vue配置vue.config.js
现在的 vue.config.js
const { defineConfig } = require('@vue/cli-service')
module.exports = defineConfig({
transpileDependencies: true
// 关闭eslint校验
// lintOnSave: false
})
一、在src目录下创建 settings.js用于存放所有规则配置
module.exports = {
title: 'Example示例',
transpileDependencies: true
// 关闭eslint校验
// lintOnSave: false
}
在vue.config.js中添加以下语句引入settings.js文件
const defaultSettings = require('./src/settings.js')
二、在vue.config.js文件中添加path模块
path 模块,提供了一些工具函数,用于处理文件与目录的路径。path.join()方法用于连接路径,该方法会正确识别当前系统的路径分隔符,如Unix系统是”/“,Windows系统是”\“。__dirname 是node的一个全局变量,即获得当前文件所在目录的完整目录名。
const path = require('path')
function resolve(dir) {
return path.join(__dirname, dir)
}
三、在vue.config.js中添加端口和网址标题设置
const name = defaultSettings.title // 网址标题
const port = 8099 // 端口配置
四、在vue.config.js中配置module.exports及代理,并在前端解决跨域问题
const path = require('path')
const defaultSettings = require('./src/settings.js')
function resolve(dir) {
return path.join(__dirname, dir)
}
const name = defaultSettings.title // 网址标题
const port = 8099 // 端口配置
module.exports = {
// 配置基地址BASE_URL等于publicpath的值
// NODE_ENV:Node.js 暴露给执行脚本的系统环境变量。通常用于确定在开发环境还是生产环境
// 部署应用时的根路径(默认'/'),也可用相对路径(存在使用限制)
publicPath: process.env.NODE_ENV === 'development' ? '/' : './',
// publicPath: process.env.NODE_ENV === "production" ? "./" : "./",
outputDir: 'dist', // 输出文件目录
assetsDir: 'static', // // 放置静态资源
lintOnSave: process.env.NODE_ENV === 'development',// true/false 设置为开发环境下每次保存代码时都启用 eslint验证
productionSourceMap: false, // 如果你不需要生产环境的 source map,可以将其设置为false以加速生产环境构建
devServer: { // 配置开发服务器
port: port,
// overlay: { // 错误、警告在页面弹出
// warnings: false,
// errors: true
// },
/* 跨域代理 */
proxy: {
// 第一种写法
'/api': {
/* 目标代理服务器地址 */
target: 'http://localhost:8090/',
/* 允许跨域 */
changeOrigin: true,
pathRewrite: { // 标识替换
'^/api': '/static/mock' // 请求数据路径别名,这里是注意将static/mock放入public文件夹
}
},
// 第二种写法
[process.env.VUE_APP_BASE_API]: { // 使用环境变量中的值
target: 'http://127.0.0.1:9000/',
changeOrigin: true,
pathRewrite: {
['^' + process.env.VUE_APP_BASE_API]: '',
'^/api': ''
}
}
}
}
}
至此前后端解决跨域的方法都有了,可只写一个,也可全写
devServer.proxy中的 pathRewrite说明:
如图,pathRewrite设置了 '^/api': '' ,作用如下:
使用代理,首先需要有一个标识,告诉程序这个连接要使用代理,不然的话,可能你的html、css、js、矢量图等静态资源都跑去代理。所以我们要通过一个唯一标识,让接口使用代理,静态资源文件使用本地。
proxy中的 '/api':{······},就是告诉node,我的接口是要以 /api 开头的才使用代理。所有的接口都要写成 /api/xx/xx ,以 /api 开头,最后代理的接口路径路径就是 http://localhost:8090/api/xx/xxi
但是例子中真实的后台数据接口里没有 /api,直接就是 http://localhost:8080/xx/xx ,所以就需要配置 pathRewrite,用'^/api': '' 将 /api 去掉,这样既有正确的标识,又能在真实请求接口的时候去掉 /api 。
五、创建上一步中的开发环境配置文件.env.development
可对应配置相应的生产环境配置文件
ENV = 'development'
VUE_APP_BASE_API = 'http://localhost:8090/api/'
六、修改request.js中的baseURL
import axios from "axios";
const service = axios.create({
// baseURL: 'http://localhost:8090/api',
baseURL: process.env.VUE_APP_BASE_API, // url = base url + request url
timeout: 3000
})
export default service;
七、启动项目测试
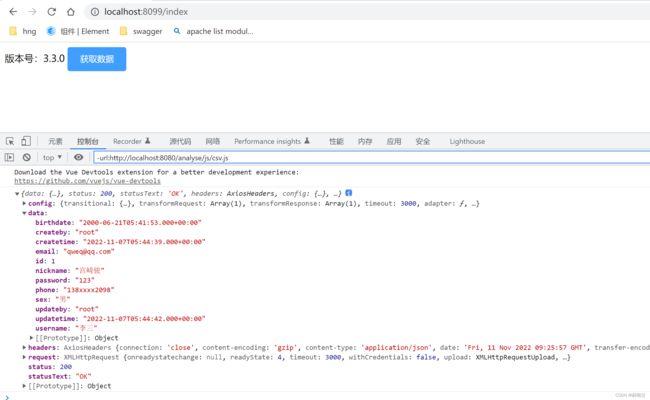
成功运行,并正常请求返回后端数据
