震惊!一菜鸟竟用pyecharts分析B站弹幕作出这么靓的图~
文章目录
- 数据预处理
- 弹幕长度分布条形图
- 弹幕颜色分布饼图
- 弹幕量与视频内时间关系折线图
- 弹幕发送次数饼图
- 单用户弹幕数量Top10直方图
- 弹幕热词分析词云图
写在前面
年前写了篇B站弹幕爬取的文章,说之后有时间分析一下弹幕中的热点,正好最近有时间,就来填坑吧。。
本文主要对B站《咒术回战》动漫第一集弹幕的数据进行分析及可视化,主要使用 python 的 pandas 对数据进行预处理, jieba 分词,pyecharts 可视化。数据集为简单整理后的,数据量 60000 条。
ok,话不多说,直接开整。

数据预处理
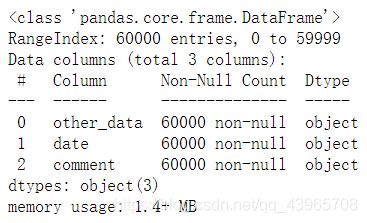
首先,查看数据集的一些信息,为了之后能够对数据集有个清晰地认识。
import pandas as pd

df = pd.read_csv('bilibili_clean.csv')
df.info()
 |
|---|
输出前五行。
df.head()
 |
|---|
通过上图可以看到, other_data 列中包含很多数据,并不是所有的数据都对后面的分析有帮助,我们将该列拆分,只保留我们需要的列。以第一行的数据为例。
‘351.52700,1,25,16777215,1601686748,0,b083a745,39082825228484615’
所需数据及含义:
351.52700 :弹幕的时间位置,基于视频长度,单位秒;
16777215 :弹幕颜色, 16777215 对应 0xFFFFFF ;
b083a745 :弹幕发送者的用户 id ;
# 将other_data列进行划分,并将需要的列添加到DataFrame中
split_df = df['other_data'].str.split(',', expand=True)

column_dict = [('video_time', 0), ('color', 3), ('user_id', 6)]
for col_name, index in column_dict:
    df[col_name] = split_df[index]
# 删除other_data列
df.drop('other_data', axis=1, inplace=True)
df.head()
 |
|---|
这样就得到了及结构比较清晰的数据集,我们在绘制图形前,还会对数据进行的一些处理来使的图形绘制的更加方便。
弹幕长度分布条形图
添加一列 comment_length 来记录 comment 的长度,统计 comment 各长度出现的次数。使用 pyecharts 库绘制直方图。
# 添加一列comment_length来记录comment的长度
df['comment_length'] = df['comment'].map(lambda x: len(x))

length_series = df['comment_length'].value_counts()
length_series.sort_index(ascending=True, inplace=True)
# 评论长度列表(升序)
length_list = length_series.index.astype(int).tolist()
# 各长度对应出现次数列表
count_list = length_series.values.astype(int).tolist()

# 绘制直方图
from pyecharts import options as opts
from pyecharts.charts import Bar

chart = Bar()
chart.add_xaxis(length_list).add_yaxis("第一集", count_list, color='#DF0101').set_global_opts(
        title_opts=opts.TitleOpts(title="弹幕长度分布"),
        datazoom_opts=[opts.DataZoomOpts(), opts.DataZoomOpts(type_="inside")],
    ).render("弹幕长度分布.html")
chart.render_notebook()
观察图中信息,可以看出,随着长度的增加,弹幕的数量逐渐减少,大部分弹幕长度在10以内,这也比较符合我们的习惯,笔者发弹幕一般也是就几个字。。
弹幕颜色分布饼图
首先将十进制的颜色代码转为十六进制。之后绘制彩色代码的时候就可以按照颜色代码给扇形区域绘制对应的颜色。
import time

# 将color列的数据类型由“str”转为“int”, 数据格式由“十进制”转为“十六进制”
df['color'] = df['color'].astype(int).map(lambda x: str(hex(x)))
统计 白色弹幕 和 彩色弹幕 的数量,绘制饼图。
# 弹幕颜色可视化
from pyecharts.charts import Pie

color_series = df['color'].value_counts()
color_list = [color for color in color_series.index]
count_list = color_series.values.astype(int).tolist()

white_other = ['白色', '彩色']
white_other_count = [count_list[0], sum(count_list[1:])]

chart = (
    Pie()
    .add(
        "",
        [list(z) for z in zip(white_other, white_other_count)],
        radius=["40%", "75%"],
    )
    .set_colors(['#0101DF', '#FE2E2E',])
    .set_global_opts(
        title_opts=opts.TitleOpts(title="普通、彩色弹幕分布饼图"),
        legend_opts=opts.LegendOpts(orient="vertical", pos_top="15%", pos_left="2%"),
    )
    .set_series_opts(label_opts=opts.LabelOpts(formatter="{b}: {c}"))
#     .render("pie_radius.html")
)
chart.render_notebook()
 |
|---|
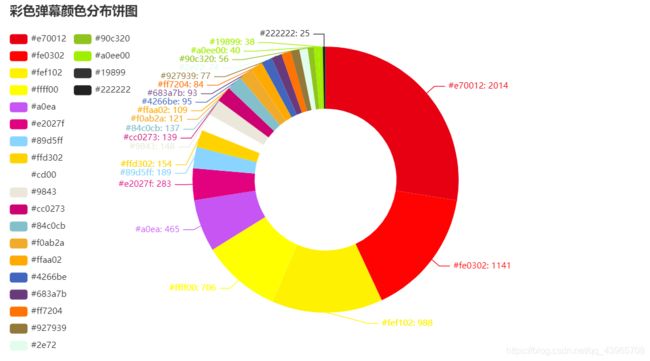
可以看到,大部分弹幕的颜色是默认白色,虽然B站三级用户就可以发送彩色弹幕,但貌似使用的人不是很多。接下来详细看一下彩色弹幕中究竟使用的都是什么颜色?
由于颜色种类较多,这里只统计出现次数大于10次的颜色。
# 忽略出现次数小于10的颜色
for count in count_list:
    if count <= 10:
        index = count_list.index(count)
        break
new_count_list = count_list[1: index]
new_color_list = color_list[1: index]
# 将0xffffff颜色格式转为#ffffff
new_color_list = ['#' + color[2:] for color in new_color_list]


chart = (
    Pie()
    .add(
        "",
        [list(z) for z in zip(new_color_list, new_count_list)],
        radius=["40%", "75%"],
    )
    .set_colors(new_color_list)
    .set_global_opts(
        title_opts=opts.TitleOpts(title="彩色弹幕颜色分布饼图"),
        legend_opts=opts.LegendOpts(orient="vertical", pos_top="8%", pos_left="0%"),
    )
    .set_series_opts(label_opts=opts.LabelOpts(formatter="{b}: {c}"))
#     .render("pie_radius.html")
)
chart.render_notebook()
 |
|---|
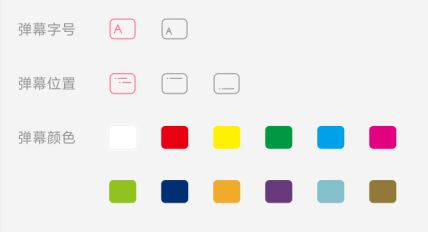
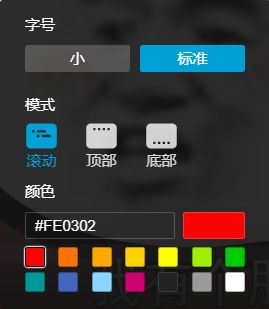
哇,一眼望去五颜六色的,但仔细一看,红黄占了一大半,但这也不能够表明有这么多人喜欢红黄,通过观察手机版和网页版官方提供的色号,网页版中的色号包含 #FFFF00 和 #FE0302,手机版的暂时无法分辨,但应该是另外两个占比较多的颜色 #FEF102 和 E70012,这些色号使用的一方面原因是用户自身的喜爱,另一方面:官方提供色号的位置可能比较靠前(狗头保命)。
|
|
弹幕量与视频内时间关系折线图
首先将 video_time 列数据类型转换为 float,然后将视频时间(共1435秒,23:55)按照10秒为间隔进行划分,0-10,10-20,20-30,30-40... ,对应标签 10,20,30,40... 。下一步,将 “秒” 类型的数据格式转为 “分:秒” ,最后统计各时间弹幕的数量。
import numpy as np

# 将video_time列的数据类型转化为float
df['video_time'] = df['video_time'].astype('float')
# 新建一个临时的DataFrame
temp_df = pd.DataFrame({})
temp_df['video_time'] = df['video_time']
# 将video_time列按照10秒一区间进行划分。
temp_df = temp_df.apply(lambda x : pd.cut(x, list(range(0, 1435, 10)) + [np.inf], labels=list(range(0, 1435, 10))))

count_series = temp_df['video_time'].value_counts()
count_series.sort_index(ascending=True, inplace=True)

# 将time数据格式由“秒”转为“分:秒”
count_series.index = count_series.index.map(lambda x: time.strftime('%M:%S', time.gmtime(x)))
time_list = count_series.index.tolist()
count_list = count_series.values.astype('int').tolist()
根据得到的时间列表( time_list ),弹幕数量列表( count_list )绘制折线图。
# 绘制折线图
from pyecharts.charts import Line

chart = (
    Line()
    .add_xaxis(time_list)
    .add_yaxis("第一集", count_list, is_smooth=True)
    .set_series_opts(
        areastyle_opts=opts.AreaStyleOpts(opacity=0.5),
        label_opts=opts.LabelOpts(is_show=False),
    )
    .set_global_opts(
        title_opts=opts.TitleOpts(title="弹幕量与视频时间关系"),
        datazoom_opts=[opts.DataZoomOpts(), opts.DataZoomOpts(type_="inside")],
        xaxis_opts=opts.AxisOpts(
            axistick_opts=opts.AxisTickOpts(is_align_with_label=True),
            is_scale=False,
            boundary_gap=False,
        ),
    )
#     .render("line_areastyle_boundary_gap.html")
)
chart.render_notebook()
根据视频内各个时间段发送的弹幕量,可以大致得出视频的高能时刻,就和“精彩时刻”差不多。图中峰值主要出现在开始,中间,结尾,也比较符合一般人发弹幕的时间点。
弹幕发送次数饼图
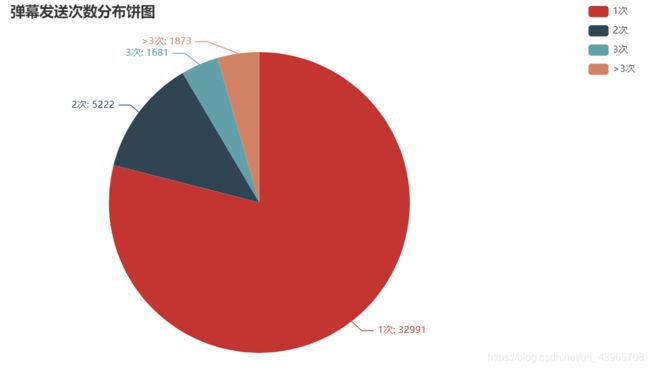
统计单用户发送弹幕次数,将弹幕发送次数分为四类,1次,2次,3次,>3次,并绘制弹幕发送次数饼图。
# 获取用户id(index)与发送弹幕次数(values)组成的series
series_user = df['user_id'].value_counts()
# 获取发送弹幕次数(index)与用户数量(values)组成的series
series_comment = series_user.value_counts()
# 对index按照升序排序
series_comment.sort_index(ascending=True, inplace=True)
# 发送弹幕次数列表
comment_count_list = series_comment.index
# 用户数量列表
user_count_list = series_comment.values.tolist()
# 将弹幕次数分为4类, 1次,2次,3次,大于3次
comment_count_list = [str(count) + '次' for count in comment_count_list[:3]] + ['>3次']
user_count_list = user_count_list[:3] + [sum(user_count_list[3:])]

chart = (
    Pie()
    .add(
        "",
        [list(z) for z in zip(comment_count_list, user_count_list)],
        center=["35%", "50%"],
    )
    .set_global_opts(
        title_opts=opts.TitleOpts(title="弹幕发送次数分布饼图"),
        legend_opts=opts.LegendOpts(pos_left="80%", orient="vertical"),
    )
    .set_series_opts(label_opts=opts.LabelOpts(formatter="{b}: {c}"))
#     .render("pie_position.html")
)
chart.render_notebook()
 |
|---|
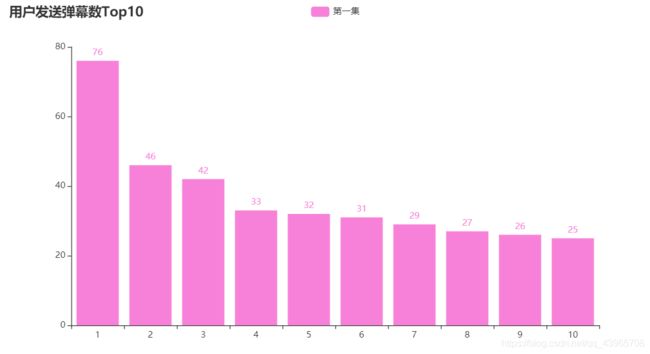
根据图中可以看到,发送一条弹幕的人占了大部分,2条的有5222个用户,3条1681个用户,大于3条的有1873个用户,接下来具体看看弹幕数量 Top10 。
单用户弹幕数量Top10直方图
top10 = series_comment[-10:].index.tolist()
top10.reverse()

chart = (
    Bar()
    .add_xaxis(list(range(1, 11)))
    .add_yaxis('第一集', top10, color='#F781D8')
    .set_global_opts(
        title_opts=opts.TitleOpts(title="用户发送弹幕数Top10"),
        datazoom_opts=opts.DataZoomOpts(type_="inside"),
    )
#     .render("bar_datazoom_inside.html")
)
chart.render_notebook()
 |
|---|
震惊!!排名第一的用户,在23分钟发了76条弹幕。。平均20秒左右一条,不得不说,真的厉害,这还能够好好看视频么。不过可能是看完一遍,之后再卡时间点发弹幕的。
弹幕热词分析词云图
首先加载本地停用词库,这里根据弹幕中的词汇手动添加了一些的停用词,为了词云图的效果更好一点。
def load_stopwords(read_path):
    '''
    读取文件每行内容并保存到列表中
    :param read_path: 待读取文件的路径
    :return: 保存文件每行信息的列表
    '''
    result = []
    with open(read_path, "r", encoding='utf-8') as f:
        for line in f.readlines():
            line = line.strip('\n')  # 去掉列表中每一个元素的换行符
            result.append(line)
    return result

# 加载中文停用词
stopwords = load_stopwords('wordcloud_stopwords.txt')
现在对弹幕中的数据进行清洗,主要去除弹幕中的空格,重复单一字符(‘111’,‘aaa’),以及时间(某某打卡)等,之后删除空字符串。
# 去除弹幕中的空格
df['comment'] = df['comment'].str.replace(r' ', '')
# 用空字符串('')替换('111','aaa','....')等
df['comment'] = df['comment'].str.replace(r'^(.)\1*$', '')
# 用空字符串('')替换('2020/11/20 20:00:00')等
df['comment'] = df['comment'].str.replace(r'\d+/\d+/\d+ \d+:\d+:\d+', '')

# 将空字符串转为'np.nan',即NAN,用于下一步删除这些弹幕
df['comment'].replace(to_replace=r'^\s*$', value=np.nan, regex=True, inplace=True)
# 删除comment中的空值,并重置索引
df = df.dropna(subset=['comment'])
df.reset_index(drop=True, inplace=True)
清洗后,就可以使用 jieba 分词对弹幕进行分词,但分词前最好先使用 load_userdict() 导入本地的自定义词典,针对特有的领域词可以进行保留,不对其进行分词,之后剔除分词后的停用词。
import jieba

# 添加自定义词典
jieba.load_userdict("自定义词典.txt")
token_list = []
# 对弹幕内容进行分词,并将分词结果保存在列表中
for comment in df['comment']:
    tokens = jieba.lcut(comment, cut_all=False)
    token_list += [token for token in tokens if token not in stopwords]
len(token_list)
| 119752 |
|---|
统计得到的词汇列表,取出现次数最多的前100个词,绘制词云图。
from pyecharts.charts import WordCloud
from collections import Counter

token_count_list = Counter(token_list).most_common(100)
new_token_list = []
for token, count in token_count_list:
    new_token_list.append((token, str(count)))

chart = (
    WordCloud()
    .add(series_name="热词", data_pair=new_token_list, word_size_range=[12, 88])
    .set_global_opts(
        title_opts=opts.TitleOpts(
            title="弹幕热点词云图", title_textstyle_opts=opts.TextStyleOpts(font_size=23)
        ),
        tooltip_opts=opts.TooltipOpts(is_show=True),
    )
#     .render("basic_wordcloud.html")
)
chart.render_notebook()
 |
|---|
刚开始绘制词云图时效果可能不太好,需要手动添加了一些词。现在看起来就还挺不错的。
![]()
这就是本文所有的内容了,如果感觉还不错的话。❤ 点个赞再走吧!!!❤
后续会继续分享数据分析、可视化、机器学习等内容,如果感兴趣的话可以点个关注不迷路哦~。
如果需要完整代码(.ipynb)练练手的话,可以在评论区留下邮箱,看见必发。