安装openGauss2.0.0(使用脚本一键部署)
写在前面
为了提高大家部署openGauss数据库的效率,大佬(非本人)将安装步骤写入shell脚本,在openEuler操作系统可以连接外网的情况下,实现一键式配置、下载、安装。
原文见此链接;详细安装视频见此链接。
openGauss2.0.0安装脚本
## openGaussinstall.sh
## Author: 贾军锋
## Date: 2021-04-15
## OS: openEuler20.03LTS [最小硬件配置:2c/4G]
## Database:openGauss 2.0.0
## Description:一键式实现操作系统环境配置、openGauss软件下载、openGauss软件安装等步骤,帮助大家提升安装openGauss数据库效率
## Tips: 请确保操作系统可以连接外网
## 0.关闭virbr0网卡 [本地虚拟机标准化安装openEuler系统会默认存在virbr0网卡,删除该网卡以避免干扰数据库的安装]
## virsh net-destroy default
## virsh net-list
## echo "Net device virbr0 is disabled."
## 1.定义主机信息[请根据实际情况修改]
export MY_HOSTNAME=node1 ## 主机名
export MY_HOSTIP=192.168.1.22 ## IP地址
export MY_SOFTWARE_DIRECTORY=/soft/openGauss ## 软件包所在目录
export MY_XML=/soft/openGauss/clusterconfig.xml ## 集群配置文件XML
export openGauss_Download_url=https://opengauss.obs.cn-south-1.myhuaweicloud.com/2.0.0/x86_openEuler/openGauss-2.0.0-openEuler-64bit-all.tar.gz ## openGauss软件包下载地址
## 1. 设置主机名并配置hosts文件
hostnamectl set-hostname $MY_HOSTNAME
sed -i '/$MY_HOSTIP/d' /etc/hosts
echo "$MY_HOSTIP $MY_HOSTNAME #Gauss OM IP Hosts Mapping" >> /etc/hosts
cat /etc/hosts
echo "1.Configure /etc/hosts completed."
echo -e "\n"
## 2. 关闭防火墙
systemctl disable firewalld.service
systemctl stop firewalld.service
echo "Firewalld " `systemctl status firewalld|grep Active`
echo "2.Disable firewalld service completed."
echo -e "\n"
## 3. 关闭SELinux
sed -i '/^SELINUX=/d' /etc/selinux/config
echo "SELINUX=disabled" >> /etc/selinux/config
cat /etc/selinux/config|grep "SELINUX=disabled"
echo "3.Disable SELINUX completed."
echo -e "\n"
## 4. 设置操作系统字符集编码
echo "LANG=en_US.UTF-8" >> /etc/profile
source /etc/profile
echo $LANG
echo "4.Configure encoding completed."
echo -e "\n"
## 5. 设置操作系统时区
rm -fr /etc/localtime
ln -s /usr/share/zoneinfo/Asia/Shanghai /etc/localtime
date -R
hwclock
echo "5.Configure Timezone completed."
echo -e "\n"
## 6. 关闭SWAP分区 [对于2G内存的设备,建议待安装完毕后再打开SWAP以间接 “扩容内存容量”]
sed -i '/swap/s/^/#/' /etc/fstab
swapoff -a
free -m
echo "6.Close swap partition completed."
echo -e "\n"
## 7. 配置SSH服务,关闭Banner,允许root远程登录
sed -i '/Banner/s/^/#/' /etc/ssh/sshd_config
sed -i '/PermitRootLogin/s/^/#/' /etc/ssh/sshd_config
echo -e "\n" >> /etc/ssh/sshd_config
echo "Banner none " >> /etc/ssh/sshd_config
echo "PermitRootLogin yes" >> /etc/ssh/sshd_config
cat /etc/ssh/sshd_config |grep -v ^#|grep -E 'PermitRoot|Banner'
echo "7.Configure SSH Service completed."
echo -e "\n"
## 8. 配置YUM源、安装依赖包、修改默认Python3版本
mkdir /etc/yum.repos.d/bak
mv /etc/yum.repos.d/*.repo /etc/yum.repos.d/bak/
wget -O /etc/yum.repos.d/openEulerOS.repo https://repo.huaweicloud.com/repository/conf/openeuler_x86_64.repo
yum clean all
yum install -y bzip2 python3
yum install -y libaio-devel libnsl flex bison ncurses-devel glibc-devel patch readline-devel net-tools tar
mv /usr/bin/python /usr/bin/python2_bak
ln -s /usr/bin/python3 /usr/bin/python
python -V
echo "8.Configure Install Packages and change default Python version completed."
echo -e "\n"
## 9. 配置 sysctl.conf 和 performance.sh
cat >> /etc/sysctl.conf << EOF
net.ipv4.tcp_retries1 = 5
net.ipv4.tcp_syn_retries = 5
net.sctp.path_max_retrans = 10
net.sctp.max_init_retransmits = 10
EOF
sysctl -p
sed -i '/vm.min_free_kbytes/s/^/#/' /etc/profile.d/performance.sh ## Only for openEuler
cat /etc/profile.d/performance.sh|grep vm.min_free_kbytes
echo "9.Configure sysctl.conf and performance.sh completed."
echo -e "\n"
## 10. 配置资源限制
echo "* soft stack 3072" >> /etc/security/limits.conf
echo "* hard stack 3072" >> /etc/security/limits.conf
echo "* soft nofile 1000000" >> /etc/security/limits.conf
echo "* hard nofile 1000000" >> /etc/security/limits.conf
echo "* soft nproc unlimited" >> /etc/security/limits.d/90-nproc.conf
tail -n 4 /etc/security/limits.conf
tail -n 1 /etc/security/limits.d/90-nproc.conf
echo "10.Configure resource limits completed."
echo -e "\n"
## 11. 关闭透明大页[Only for CentOS]
cat >>/etc/rc.d/rc.local<<EOF
if test -f /sys/kernel/mm/transparent_hugepage/enabled; then
echo never > /sys/kernel/mm/transparent_hugepage/enabled
fi
if test -f /sys/kernel/mm/transparent_hugepage/defrag; then
echo never > /sys/kernel/mm/transparent_hugepage/defrag
fi
EOF
chmod +x /etc/rc.d/rc.local
/usr/bin/sh /etc/rc.d/rc.local
cat /sys/kernel/mm/transparent_hugepage/enabled
cat /sys/kernel/mm/transparent_hugepage/defrag
echo "11.Close transparent_hugepage completed."
echo -e "\n"
## 12. 禁用RemoveIPC[Only for openEuler]
sed -i '/^RemoveIPC/d' /etc/systemd/logind.conf
sed -i '/^RemoveIPC/d' /usr/lib/systemd/system/systemd-logind.service
echo "RemoveIPC=no" >> /etc/systemd/logind.conf
echo "RemoveIPC=no" >> /usr/lib/systemd/system/systemd-logind.service
systemctl daemon-reload
systemctl restart systemd-logind
loginctl show-session | grep RemoveIPC
systemctl show systemd-logind | grep RemoveIPC
echo "12.Disable RemoveIPC completed."
echo -e "\n"
## 13. 下载openGauss软件包
mkdir -p $MY_SOFTWARE_DIRECTORY
cd $MY_SOFTWARE_DIRECTORY
wget $openGauss_Download_url
echo "13.openGauss software download completed."
echo -e "\n"
## 14. 配置XML文件
rm -fr $MY_XML
cat >> $MY_XML <<EOF
$MY_HOSTNAME " />
$MY_HOSTIP"/>
$MY_HOSTNAME"/>
$MY_HOSTIP"/>
$MY_HOSTIP"/>
EOF
cat $MY_XML
echo "14.Configure XML file completed."
echo -e "\n"
## 15. 解压安装包并修改目录权限
echo "Begin to Uncompress openGauss Package and Modify directory permissions:"
cd $MY_SOFTWARE_DIRECTORY
tar -zxvf *all.tar.gz
tar -zxvf *om.tar.gz
ls -l
chmod -R 777 $MY_SOFTWARE_DIRECTORY/../
echo "15.Uncompress openGauss Package completed."
echo -e "\n"
## 16. 执行 gs_preinstall
echo "Begin to execute openGauss preinstall:"
python $MY_SOFTWARE_DIRECTORY/script/gs_preinstall -U omm -G dbgrp -X $MY_XML
echo "16.openGauss preinstall completed."
echo -e "\n"
## 17. 检查预安装环境
echo "Begin to Check OS environment:"
$MY_SOFTWARE_DIRECTORY/script/gs_checkos -i A -h $MY_HOSTNAME --detail
## 18. 执行 gs_install
echo "Begin to execute openGauss install:"
touch /home/omm/install_db
cat >> /home/omm/install_db <<EOF
source ~/.bashrc
gs_install -X $MY_XML --gsinit-parameter="--encoding=UTF8" --dn-guc="max_process_memory=2GB" --dn-guc="shared_buffers=128MB" --dn-guc="cstore_buffers=16MB"
EOF
chown -R omm:dbgrp /home/omm/install_db
su - omm -c "sh /home/omm/install_db"
echo "17.openGauss install completed."
echo -e "\n"
## 安装完毕!
echo "openGauss Install completed.congratulations"
echo "Congratulations!!!"
在华为云上一键安装步骤
- 申请华为云服务器
操作系统为openEuler20.03LTS,最小硬件配置:2c/4G。
若仅作为学习测试用,2c/4G就可以了。
注意:云服务器需要修改安全组规则 - 修改openGauss2.0.0安装脚本
一般来说,仅需要修改一处。修改上述脚本中的主机IP地址(私有IP)。
我申请的云服务器私有IP为192.168.1.88,则脚本第18行应修改为:
export MY_HOSTIP=192.168.1.88 ## IP地址
- 使用脚本一键安装
将脚本上传到云服务器后,使用脚本一键安装
sh openGaussinstall.sh
- 验证是否安装成功
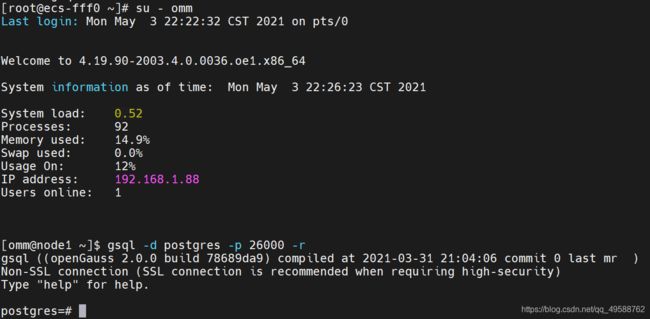
登录数据库
su - omm
gsql -d postgres -p 26000 -r

