Spring Boot 基本配置
大家好!我是今越。简单记录一下在 Spring Boot 中的一些基本配置。
Banner 配置
配置文件 application.properties
# 设置路径和名称,默认路径名称 resources/banner.txt
spring.banner.location=classpath:banner1.txt
# 启动项目时,关闭 banner 打印输出,或者在 IntelliJ IDEA 启动配置项中选择 Hide banner
spring.main.banner-mode=off
自定义 banner.txt 文件中的内容
${AnsiColor.RED}
       .__                              __
  _____|  |__   ____   ____   ______   |__|__ __
 /  ___/  |  \_/ __ \ /    \ /  ___/   |  |  |  \
 \___ \|   Y  \  ___/|   |  \\___ \    |  |  |  /
/____  >___|  /\___  >___|  /____  >\__|  |____/
     \/     \/     \/     \/     \/\______|

MANIFEST.MF 中的版本号:

${application.version}
${application.formatted-version}

Spring Boot 的版本号:

${spring-boot.version}
${spring-boot.formatted-version}
Banner 内容生成网站地址
http://patorjk.com/software/taag
http://www.network-science.de/ascii/
https://www.degraeve.com/img2txt.php
在启动类中,通过代码关闭 banner 打印输出
package indi.shensju.banner2;

import org.springframework.boot.Banner;
import org.springframework.boot.SpringApplication;
import org.springframework.boot.autoconfigure.SpringBootApplication;

@SpringBootApplication
public class Banner2Application {

//    public static void main(String[] args) {
//        SpringApplication.run(Banner2Application.class, args);
//    }

    public static void main(String[] args) {
        // 关闭 Banner
        SpringApplication app = new SpringApplication(Banner2Application.class);
        app.setBannerMode(Banner.Mode.OFF);
        app.run(args);
    }
}
Web 容器
常见的 Web 容器有 Tomcat, Jetty, Undertow,在 Spring Boot 框架中默认使用 Tomcat 作为 Web 容器。
配置文件 application.properties
# 不启动web容器
#spring.main.web-application-type=none

# 端口
# 特殊值-1 表示关闭所有的http端口
# 特殊值0  表示随机的http端口
#server.port=0

# 开启请求响应压缩
server.compression.enabled=true
当 server.port=0 时,通过程序获取容器端口
/**
 * 自定义类,实现应用程序监听器接口,来获取web容器启动端口
 */
@Component
public class MyApplicationListener implements ApplicationListener<WebServerInitializedEvent> {
    @Override
    public void onApplicationEvent(WebServerInitializedEvent webServerInitializedEvent) {
        System.out.println("webServerInitializedEvent.getWebServer().getPort() = " + webServerInitializedEvent.getWebServer().getPort());
    }
}
请求响应压缩解释
/**
 * 测试接口,返回集合
 */
@RestController
public class HelloController {
    @GetMapping("hello")
    public List<String> hello() {
        List<String> list = new ArrayList<>();
        for (int i = 0; i < 1000; i++) {
            list.add("shensju" + i);
        }
        return list;
    }
}
当未开启请求响应压缩时,F12 打开开发者工具,查看请求响应头信息
HTTP/1.1 200
Content-Type: application/json
Transfer-Encoding: chunked
Date: Sun, 05 Mar 2023 04:36:20 GMT
Keep-Alive: timeout=60
Connection: keep-alive
当开启请求响应压缩时,请求响应头信息
HTTP/1.1 200
vary: accept-encoding
Content-Encoding: gzip
Content-Type: application/json
Transfer-Encoding: chunked
Date: Sun, 05 Mar 2023 04:35:48 GMT
Keep-Alive: timeout=60
Connection: keep-alive
相比之下,增加了两项内容
vary: accept-encoding
Content-Encoding: gzip
Tomcat 配置
日志配置
Tomcat 日志分为两种类型:
1)访问日志 accesslog 用于记录外部请求,默认不开启
2)服务器内部日志
访问日志
配置文件 application.properties
# 生成的访问日志将在该目录下
server.tomcat.basedir=my-tomcat
# 开启访问日志,默认的日志位置在项目运行的临时目录中,默认生成的日志文件名称格式 access_log.2023-03-03.log
server.tomcat.accesslog.enabled=true
# 生成日志文件名称的前缀,默认是access_log
server.tomcat.accesslog.prefix=shensju2
# 生成日志文件名称的后缀
server.tomcat.accesslog.suffix=.log
# 生成的日志文件名称中的日期格式
server.tomcat.accesslog.file-date-format=.yyyyMMdd

# 生成的日志文件内容格式也是可以调整的
# %h 请求的客户端IP
# %l 用户的身份
# %u 用户名
# %t 请求时间
# %r 请求地址
# %s 响应的状态码
# %b 响应的大小
server.tomcat.accesslog.pattern=%h %l %u %t \"%r\" %s %b
access_log.2023-03-03.log
0:0:0:0:0:0:0:1 - - [03/Mar/2023:20:54:03 +0800] "GET /hello HTTP/1.1" 200 10
127.0.0.1 - - [03/Mar/2023:20:54:40 +0800] "GET /hello HTTP/1.1" 200 10
127.0.0.1 - - [03/Mar/2023:20:54:41 +0800] "GET /favicon.ico HTTP/1.1" 404 124
127.0.0.1 - - [03/Mar/2023:20:54:49 +0800] "GET /hello HTTP/1.1" 200 10
127.0.0.1 - - [03/Mar/2023:20:55:00 +0800] "GET /hello HTTP/1.1" 200 10
服务器内部日志
配置文件 application.properties
# 服务器内部日志开启
logging.level.org.apache.tomcat=debug
logging.level.org.apache.catalina=debug
HTTPS 证书配置
通常,https 证书是在 nginx 上进行配置的。Spring Boot 内嵌的 tomcat https 证书配置步骤如下:
第一步:生成 https 证书
keytool -genkey -alias myhttps -keyalg RSA -keysize 2048 -keystore shensju_key.p12 -validity 365
回车输入密码,例如123456
第二步:将生成的证书文件,拷贝至项目的 resources 目录下
第三步:在 application.properties 配置文件中进行配置
sever.ssl.key-alias=myhttps
server.ssl.key-store=classpath:shensju_key.p12
server.ssl.key-store-password=123456
第四步:创建接口,启动项目
/**
 * 测试接口
 */
@RestController
public class HelloController {
    @GetMapping("/hello")
    public String hello() {
        return "hello https";
    }
}
在浏览器中访问地址:http://127.0.0.1:8080/hello

补充:使用 http 访问时,自动跳转到 https 进行访问
程式化写法如下
package indi.shensju.https.config;

import org.apache.catalina.Context;
import org.apache.catalina.connector.Connector;
import org.apache.tomcat.util.descriptor.web.SecurityCollection;
import org.apache.tomcat.util.descriptor.web.SecurityConstraint;
import org.springframework.boot.web.embedded.tomcat.TomcatServletWebServerFactory;
import org.springframework.context.annotation.Bean;
import org.springframework.context.annotation.Configuration;

/**
 * @author shensju
 * @date 2023/3/3 21:42
 * https端口 8080
 * http端口 8081
 * 访问 http://127.0.0.1:8081/hello 转换为 https://127.0.0.1:8080/hello
 */
@Configuration
public class TomcatConfig {
    @Bean
    TomcatServletWebServerFactory tomcatServletWebServerFactory() {
        TomcatServletWebServerFactory factory = new TomcatServletWebServerFactory() {
            @Override
            protected void postProcessContext(Context context) {
                SecurityConstraint securityConstraint = new SecurityConstraint();
                securityConstraint.setUserConstraint("CONFIDENTIAL");
                SecurityCollection collection = new SecurityCollection();
                collection.addPattern("/*");
                securityConstraint.addCollection(collection);
                context.addConstraint(securityConstraint);
            }
        };
        factory.addAdditionalTomcatConnectors(myConnectors());
        return factory;
    }

    private Connector myConnectors() {
        Connector connector = new Connector("org.apache.coyote.http11.Http11NioProtocol");
        connector.setScheme("http");
        connector.setPort(8081);
        connector.setSecure(false);
        connector.setRedirectPort(8080);
        return connector;
    }
}
配置文件
名称和路径
application.properties
application.yaml
application.yml
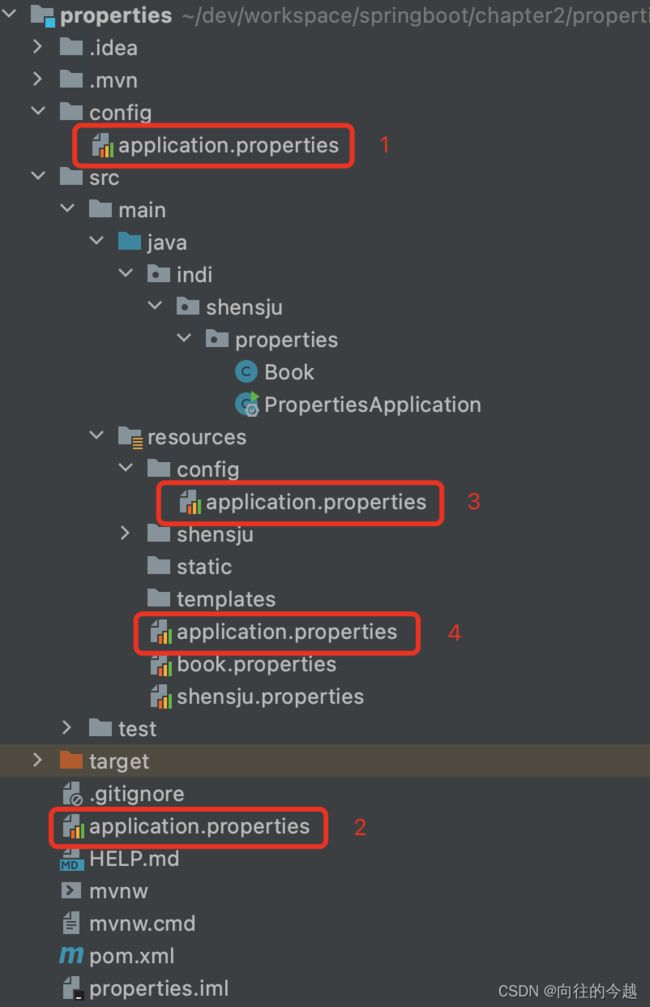
- config/application.properties
- application.properties
- src/main/resources/config/application.properties
- src/main/resources/application.properties
优先级依次降低,1 > 2 > 3 > 4
自定义配置文件路径/名称
- IDEA工具设置环境变量
- 打包后,通过命令行启动配置
# 切换到项目jar所在文件目录后,执行以下命令
java -jar properties-0.0.1-SNAPSHOT.jar --spring.config.location=classpath:/shensju/
命令行参数说明
# 指定配置文件的路径
--spring.config.location=classpath:/shensju/
# 指定配置文件的名称
--spring.config.name=shensju
引用 maven 配置
举例,application.properties
# 配置文件中引用maven配置,使用@@,不是${}
#[email protected]@
#[email protected]@

# 在pom.xml文件中自定义定界符,这里使用%
app.encoding=%project.build.sourceEncoding%
app.java.version=%java.version%
pom.xml
<?xml version="1.0" encoding="UTF-8"?>
<project xmlns="http://maven.apache.org/POM/4.0.0" xmlns:xsi="http://www.w3.org/2001/XMLSchema-instance"
         xsi:schemaLocation="http://maven.apache.org/POM/4.0.0 https://maven.apache.org/xsd/maven-4.0.0.xsd">
    <modelVersion>4.0.0</modelVersion>
    <parent>
        <groupId>org.springframework.boot</groupId>
        <artifactId>spring-boot-starter-parent</artifactId>
        <version>2.4.0</version>
        <relativePath/> <!-- lookup parent from repository -->
    </parent>
    <groupId>indi.shensju</groupId>
    <artifactId>properties</artifactId>
    <version>0.0.1-SNAPSHOT</version>
    <name>properties</name>
    <description>Demo project for Spring Boot</description>
    <properties>
        <java.version>1.8</java.version>
        <!--自定义定界符-->
        <resource.delimiter>%</resource.delimiter>
    </properties>
    // ...
</project>
短命令行参数
举例,application.properties
# 配置短命令行参数,设置默认端口
server.port=${port:8088}
打包后,通过命令行启动配置
# 切换到项目jar所在文件目录后,执行以下命令
# 从 --server.port 改变为 --port
java -jar properties-0.0.1-SNAPSHOT.jar --port=9099
属性注入
Spring 属性注入
book.properties 配置文件,单独创建配置文件,和在 application.properties 中配置系统属性区分开
book.name=人生
book.author=路遥
book.tags=小说,历史,生活
Spring 的配置
package indi.shensju.properties;

import org.springframework.beans.factory.annotation.Value;
import org.springframework.context.annotation.PropertySource;
import org.springframework.stereotype.Component;

import java.util.Arrays;

/**
 * @author shensju
 * @date 2023/3/4 11:01
 */
@Component
@PropertySource("classpath:book.properties")
public class Book {
    @Value("${book.name}")
    private String name;
    @Value("${book.author}")
    private String author;
    @Value("${book.tags}")
    private String[] tags;
    // setter, getter, toString
}
类型安全的属性注入
Spring 配置的基础上,配合使用 Spring Boot 提供的注解
package indi.shensju.properties;

import org.springframework.boot.context.properties.ConfigurationProperties;
import org.springframework.context.annotation.PropertySource;
import org.springframework.stereotype.Component;

import java.util.Arrays;

/**
 * @author shensju
 * @date 2023/3/4 11:01
 */
@Component
@PropertySource("classpath:book.properties")
@ConfigurationProperties(prefix = "book")
public class Book {
    private String name;
    private String author;
    private String[] tags;
    // setter, getter, toString
}
YAML 配置
和 properties 配置基本上差不多,在 resources 目录下创建 application.yaml 配置文件
# web容器配置
server:
  port: 8088
  tomcat:
    accesslog:
      enabled: true
# 属性注入
book:
  namea: 水浒传
  tags:
    - 历史
    - 小说
    - 明代
  authors:
    - name: 罗贯中
      age: 88
    - name: 施耐庵
      age: 99
实体类创建如下
package indi.shensju.yaml;

import org.springframework.boot.context.properties.ConfigurationProperties;
import org.springframework.stereotype.Component;

import java.util.List;

/**
 * @author shensju
 * @date 2023/3/4 12:14
 * javase 反射 内省
 * 和属性名称无关,通过属性的getter,setter方法名称来处理属性值注入
 */
@Component
@ConfigurationProperties(prefix = "book")
public class Book {
    private String aaa;
    // 注意:数组、集合属性在yaml配置文件中的赋值写法
    private List<String> tags;
    private List<Author> authors;

    @Override
    public String toString() {
        return "Book{" +
                "name='" + aaa + '\'' +
                ", tags=" + tags +
                ", authors=" + authors +
                '}';
    }

    public String getNamea() {
        return aaa;
    }

    public void setNamea(String name) {
        this.aaa  = name;
    }

    public List<String> getTags() {
        return tags;
    }

    public void setTags(List<String> tags) {
        this.tags = tags;
    }

    public List<Author> getAuthors() {
        return authors;
    }

    public void setAuthors(List<Author> authors) {
        this.authors = authors;
    }
}

/**
 * Author类
 */
public class Author {
    private String name;
    private Integer age;
    // setter, getter, toString
}
Profile 多环境配置
多配置文件,用于不同的环境,如开发、测试、生产。名称需要自定义,然后在默认配置文件中决定使用哪个配置。
application.properties 公共配置
# 指定使用application-prod文件中的配置
spring.profiles.active=prod
application-dev.properties 开发环境配置
application-test.properties 测试环境配置
application-prod.properties 生产环境配置
唯有热爱可抵岁月漫长。我是今越,欢迎大家点赞、收藏和评论,感谢支持!

