WinDbg安装入坑3(C#)
由于作者水平有限,如有写得不对的地方,请指正。
使用WinDbg的过程中,坑特别的多,对版本要求比较严格,如:
1 32位应用程序导出的Dump文件要用32位的WinDbg打开,想要没有那么多的问题,还得要求用32位的任务管理器导出Dump文件,32位的任务管理器的路径如下:C:\Windows\SysWOW64\taskmgr.exe
2 64位应用程序导出的Dump文件要用64位的WinDbg打开
3 没指定位数的程序(如AnyCPU)导出的文件要用64位的WinDbg打开
本文目的:
使用C#编写一段程序,并用64位的任务管理器导出为32位的Dump文件,试一下WinDbg Preview和老版的WinDbg在使用过程中的坑
本文测试环境:
.net framework 3.5
vistual studio 2017
win10 64位操作系统
步骤如下:
1 新增C# .net framework 控制台程序,选择.net framework 3.5 ,项目名称为:WindbgDemo,并编写代码如下:
using System;
using System.Collections.Generic;
using System.Linq;
using System.Text;
using System.Threading;

namespace WindbgDemo
{
    class Program
    {
        private static string _csdnUrl = "https://www.csdn.net/";
        public static string BaiDuUrl = "https://www.baidu.com/";
        static void Main(string[] args)
        {

            ThreadPool.QueueUserWorkItem((a) => {
                new DownLoadBp().DownLoadOperation(BaiDuUrl);
            });
            //堵塞主线程
            string readRet=Console.ReadLine();
            Console.WriteLine("主线程读取到的结果:" + readRet);
            Console.ReadKey(true);
        }
    }
    public class DownLoadBp
    {
        public void DownLoadOperation(string url)
        {
            Console.WriteLine("子线程:url地址:"+url);
            string readRet = Console.ReadLine();
            //堵塞子线程
            Console.ReadKey(true);
            Console.WriteLine("子线程读取到的结果:" + readRet);
        }

    }
}
2 生成程序,先打开任务管理器(由于是win10的64位操作系统,所以默认打开的是64位的任务管理器),再打开应用程序,Dump出转储文件,如下图:
2.1 使用WinDbg Preview打开Dump文件
既然是32位应用程序导出的dump文件,那么我们这次目标框架为x86
输入:
.load sos
!threads
后会报No export threads found的错误,那么我们试试手工导入sos版本
输入
.load C:\Windows\Microsoft.NET\Framework\v4.0.30319\SOS.dll
!threads
后会报如下的错误
SOS does not support the current target architecture.
如下图:
那么最后试试2.0版本的sos.dll
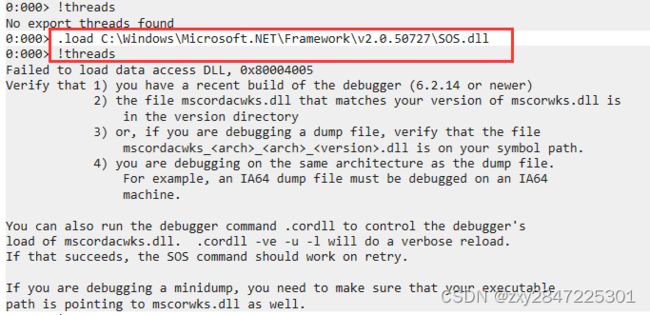
.load C:\Windows\Microsoft.NET\Framework\v2.0.50727\SOS.dll
!threads
见鬼,一样报SOS does not support the current target architecture.这样的错误
关掉WinDbg Preview后再以x86的方式打开Dump文件,这次先输入:
.load C:\Windows\Microsoft.NET\Framework\v2.0.50727\SOS.dll
再次输入!threads,就报如下的错误:
Failed to load data access DLL, 0x80004005
Verify that 1) you have a recent build of the debugger (6.2.14 or newer)
2) the file mscordacwks.dll that matches your version of mscorwks.dll is
in the version directory
3) or, if you are debugging a dump file, verify that the file
mscordacwks_
4) you are debugging on the same architecture as the dump file.
For example, an IA64 dump file must be debugged on an IA64
machine.
You can also run the debugger command .cordll to control the debugger's
load of mscordacwks.dll. .cordll -ve -u -l will do a verbose reload.
If that succeeds, the SOS command should work on retry.
If you are debugging a minidump, you need to make sure that your executable
path is pointing to mscorwks.dll as well.
又是提示版本不一致了,看着有戏,看看是不是64位的任务管理器导出的原因
输入命令:!wow64exts.sw 可以看到切换成功了,如下图:
Switched to Guest (WoW) mode
*** WARNING: Unable to verify checksum for mscorlib.ni.dll
接着输入!threads,可以看到输出线程信息了,如下图:
接着试试堆栈信息命令好不好使,可以看到命令好使了
2.2 使用老版32位的WinDbg测试
输入:.load C:\Windows\Microsoft.NET\Framework\v2.0.50727\SOS.dll
后再次输入:!threads,输出报错如下:
Failed to load data access DLL, 0x80004005
Verify that 1) you have a recent build of the debugger (6.2.14 or newer)
2) the file mscordacwks.dll that matches your version of mscorwks.dll is
in the version directory
3) or, if you are debugging a dump file, verify that the file
mscordacwks_
4) you are debugging on the same architecture as the dump file.
For example, an IA64 dump file must be debugged on an IA64
machine.
You can also run the debugger command .cordll to control the debugger's
load of mscordacwks.dll. .cordll -ve -u -l will do a verbose reload.
If that succeeds, the SOS command should work on retry.
If you are debugging a minidump, you need to make sure that your executable
path is pointing to mscorwks.dll as well.
又是版本不对,试试切换到32位模式
输入:!wow64exts.sw 后可以看到切换成功了(如果这一步报错:可以把soswow64.dll这个dll放到WinDbg运行的根目录下,后面步骤有下载地址),再次输入!threads,可以看到线程信息了,如下图:
试试切换线程及线程堆栈信息
~~[4d24]s
!clrstack
很不幸,当要查看堆栈时,发现报如下的错误:
OS Thread Id: 0x4d24 (5)
Failed to start stack walk: 80070057
网上有博主说可以用命令
!dumpstack -ee进行替换,试了一下,确实可以
但不是我想要的,由于是使用64位的任务管理器导出的32位的dump文件,这时需要下载soswow64.dll这个dll放到WinDbg运行的根目录下,如下图:
这个soswow64.dll可以从WinDbg相关.rar · 张祥裕/分享的资源名称 - Gitee.com这里下载,找到里面的压缩包soswow64.zip
接着输入
.load soswow64命令
可以看到导入成功,接着再来看堆栈信息,可以看到成功了
好了,本文到此结束。


