opencv人与摄像头距离检测
参考:
https://chtseng.wordpress.com/2018/09/18/%E5%A6%82%E4%BD%95%E4%BC%B0%E7%AE%97%E5%89%8D%E6%96%B9%E4%BA%BA%E7%89%A9%E7%9A%84%E8%B7%9D%E9%9B%A2/
WeChat_20230611160620
1、cv2加载摄像头慢解决方法,单独重新cv2.VideoCapture()
https://blog.csdn.net/captain5339/article/details/128857313
class VideoCapture:
    """Customized VideoCapture, always read latest frame"""

    def __init__(self, name):
        self.cap = cv2.VideoCapture(name)
        self.q = queue.Queue(maxsize=3)
        self.stop_threads = False    # to gracefully close sub-thread
        th = threading.Thread(target=self._reader)
        th.daemon = True             # 设置工作线程为后台运行
        th.start()

    # 实时读帧,只保存最后一帧
    def _reader(self):
        while not self.stop_threads:
            ret, frame = self.cap.read()
            if not ret:
                break
            if not self.q.empty():
                try:
                    self.q.get_nowait()
                except queue.Empty:
                    pass
            self.q.put(frame)

    def read(self):
        return self.q.get()

    def terminate(self):
        self.stop_threads = True
        self.cap.release()
cv2.putText()
2、cv2图像翻转镜像
https://blog.csdn.net/m0_38082783/article/details/128897737
img = cv2.rotate(img,cv2.ROTATE_90_COUNTERCLOCKWISE) ##逆时针90
img = cv2.flip(img, 1) ##水平镜像
3、cv2.putText(),cv2.rectangle()
https://blog.csdn.net/m0_51004308/article/details/114992313
cv2.rectangle(img, (result["bbox"][0], result["bbox"][1]), (result["bbox"][2], result["bbox"][3]), (0, 0, 255), thickness=2)


cv2.putText(img,"距离:"+str(round(distance,2))+"cm",(12,50),cv2.FONT_HERSHEY_SIMPLEX,1,(255,255,255),2,cv2.LINE_AA)
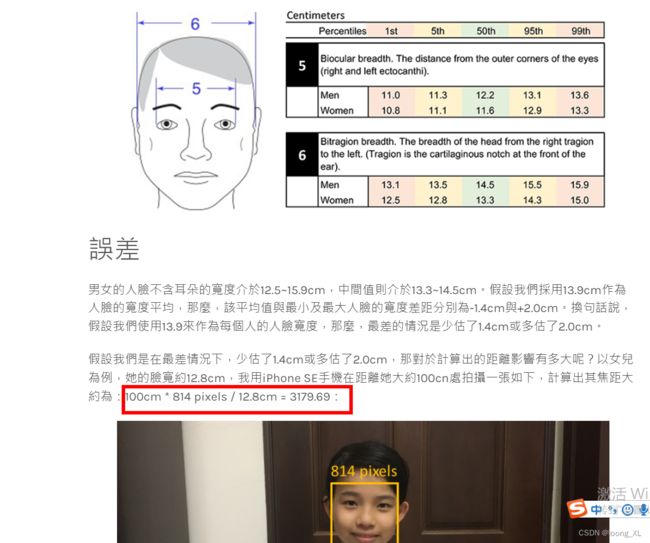
4、相机焦距计算
5、直角三角形角度计算
https://blog.csdn.net/qq_35251502/article/details/112653632
import math

math.acos(30/ distance) *180/3.14159
在这里插入代码片
整体代码
# coding=utf-8
import cv2
import insightface
import numpy as np

import queue
import threading
import time
# 自定义无缓存读视频类
class VideoCapture:
    """Customized VideoCapture, always read latest frame"""

    def __init__(self, name):
        self.cap = cv2.VideoCapture(name)
        self.q = queue.Queue(maxsize=3)
        self.stop_threads = False    # to gracefully close sub-thread
        th = threading.Thread(target=self._reader)
        th.daemon = True             # 设置工作线程为后台运行
        th.start()

    # 实时读帧,只保存最后一帧
    def _reader(self):
        while not self.stop_threads:
            ret, frame = self.cap.read()
            if not ret:
                break
            if not self.q.empty():
                try:
                    self.q.get_nowait()
                except queue.Empty:
                    pass
            self.q.put(frame)

    def read(self):
        return self.q.get()

    def terminate(self):
        self.stop_threads = True
        self.cap.release()


class FaceRecognition:
    def __init__(self, gpu_id=0, face_db='face_db', threshold=1.24, det_thresh=0.50, det_size=(640, 640)):
        """
        人脸识别工具类
        :param gpu_id: 正数为GPU的ID,负数为使用CPU
        :param face_db: 人脸库文件夹
        :param threshold: 人脸识别阈值
        :param det_thresh: 检测阈值
        :param det_size: 检测模型图片大小
        """
        self.gpu_id = gpu_id
        self.face_db = face_db
        self.threshold = threshold
        self.det_thresh = det_thresh
        self.det_size = det_size

        # 加载人脸识别模型,当allowed_modules=['detection', 'recognition']时,只单纯检测和识别
        self.model = insightface.app.FaceAnalysis(root='./',
                                                #   allowed_modules=None,
                                                  allowed_modules=['detection', 'recognition'],
                                                  providers=['CUDAExecutionProvider'])
        self.model.prepare(ctx_id=self.gpu_id, det_thresh=self.det_thresh, det_size=self.det_size)

        # 检测人脸
    def detect(self, image):
        faces = self.model.get(image)
        results = list()
        for face in faces:
            result = dict()
            # 获取人脸属性
            result["bbox"] = np.array(face.bbox).astype(np.int32).tolist()
            # result["kps"] = np.array(face.kps).astype(np.int32).tolist()
            # print(np.array(face.landmark_3d_68))
            # result["landmark_3d_68"] = np.array(face.landmark_3d_68).astype(np.int32).tolist()
            # result["landmark_2d_106"] = np.array(face.landmark_2d_106).astype(np.int32).tolist()
            # result["pose"] = np.array(face.pose).astype(np.int32).tolist()
            # result["age"] = face.age
            # gender = '男'
            # if face.gender == 0:
            #     gender = '女'
            # result["gender"] = gender
            # 开始人脸识别
            # embedding = np.array(face.embedding).reshape((1, -1))
            # embedding = preprocessing.normalize(embedding)
            # result["embedding"] = embedding
            results.append(result)
        return results


if __name__ == '__main__':

    face_recognitio = FaceRecognition()

    # 开启ip摄像头
    cv2.namedWindow("camera")
    # 这个地址就是下面记下来的局域网IP
    video = "http://admin:[email protected]:8081"  # 此处@后的ipv4 地址需要修改为自己的地址
    # video = "rtsp://admin:[email protected]:8554/live"
    # capture = cv2.VideoCapture(0)
    # success, img = capture.read()
    capture = VideoCapture(0)
    img = capture.read()
    index = 0
    imgname = -1
    while True:

        cv2.imshow("camera", img)
        # success, img = capture.read()
        img = capture.read()

        # img = cv2.rotate(img,cv2.ROTATE_90_COUNTERCLOCKWISE) ##逆时针90
        img = cv2.flip(img, 1) ##水平镜像

        print("图像大小:",img.shape)
        index+=1
        # 不进行旋转


        # 人脸检测
        # img = cv2.imdecode(np.fromfile(img, dtype=np.uint8), -1)

        if index//10==0:
            # 人脸识别
            results = face_recognitio.detect(img)
            for result in results:
                cv2.rectangle(img, (result["bbox"][0], result["bbox"][1]), (result["bbox"][2], result["bbox"][3]), (0, 0, 255), thickness=2)
                print('人脸框坐标:{}'.format(result["bbox"]))
                print("人脸宽像素:",result["bbox"][2]-result["bbox"][0])
                # print("人脸摄像头距离:",481.5*13.5/(result["bbox"][2]-result["bbox"][0]))
                # cv2.putText(img,str(round(481.5*13.5/(result["bbox"][2]-result["bbox"][0]),2))+"cm",(10,500),cv2.FONT_HERSHEY_SIMPLEX,1,(255,255,255),2,cv2.LINE_AA)
                distance = 607*13.5/(result["bbox"][2]-result["bbox"][0])
                print("人脸摄像头距离:",distance)
                import math
                print("人脸摄像头角度:",math.acos(30/ distance) *180/3.14159)
                cv2.putText(img,"距离:"+str(round(distance,2))+"cm",(12,50),cv2.FONT_HERSHEY_SIMPLEX,1,(255,255,255),2,cv2.LINE_AA)


            index=0


        # if key == 27:
        #     # 按esc键退出
        #     print("esc break...")
        #     break
        # 4 若键盘按下q则退出播放
        if cv2.waitKey(20) & 0xff == ord('q'):
            break


    capture.release()
    cv2.destroyWindow("camera")
