Windows_10_System_Programming_3,Processes
Windows_10_System_Programming_3,Processes
-
- Processes
-
- Process Basics
-
- Processes in Process Explorer
- Process Creation
-
- The main Functions
- Process Environment Variables
- Creating Processes
-
-
- Handle Inheritance
- Process Drive Directories
- Process (and Thread) Attributes
- Protected and PPL Processes
- UWP Processes
- Minimal and Pico Processes
-
- Process Termination
- Enumerating Processes
-
- Using EnumProcesses
- Using the Toolhelp Functions
- Using the WTS Functions
- Using the Native API
- Exercises
Processes
Processes are the fundamental management and containment objects in Windows. Everything that executes must be under some process context, there is no such thing as running outside of a process. This chapter examines processes from multiple points of view - from creating, to managing, to destroying and almost everything in between.
进程是Windows中的基本管理和控制对象。所有执行的东西都必须在某个进程上下文下进行,不存在运行在进程之外的东西。本章从多个角度研究了进程–从创建、管理到销毁以及中间的几乎所有内容。
In this chapter:
- Process Basics
- Process Creation
- Creating Processes
- Process Termination
- Enumerating Processes
Process Basics
Although the basic structure and attributes of processes did not change since the first release of Windows NT, new process types have been introduced into the system with special behaviors or structure. The following is a quick overview of all process types currently supported, while later sections in this chapter discuss each process type in greater detail.
虽然进程的基本结构和属性自 Windows NT 的第一个版本以来没有改变,但是新的进程类型已经被引入到系统中,具有特殊的行为或结构。以下是当前支持的所有进程类型的快速概述,而本章后面的部分将更详细地讨论每种进程类型。
• Protected Processes - These processes were introduced in Windows Vista. They were created to support Digital Rights Management (DRM) protection by preventing intrusive access to processes rendering DRM-protected content. For example, no other process (even running with administrator rights) can read the memory withing a protected process address space, so the DRM-protected data cannot be directly stolen.
• 受保护的进程 - 这些进程是在 Windows Vista 中引入的。它们的创建是为了通过防止对呈现受 DRM 保护的内容的进程的侵入式访问来支持数字版权管理 (DRM) 保护。例如,没有其他进程(即使以管理员权限运行)可以读取受保护进程地址空间的内存,因此无法直接窃取受 DRM 保护的数据。
• UWP Processes - These processes, available starting with Windows 8, host the Windows Runtime, and typically are published to the Microsoft Store. A UWP process executes inside an AppContainer - a sandbox of sorts that limits the operations this process can carry out.
• UWP 进程 - 这些进程从 Windows 8 开始可用,托管 Windows 运行时,并且通常发布到 Microsoft Store。 UWP 进程在 AppContainer 内执行 - 一种限制此进程可以执行的操作的沙箱。
• Protected Processes Light (PPL) - These processes (available from Windows 8.1) extended the protection mechanism from Vista by adding several levels of protection and even allowing third-party services to run as PPL, protecting them from intrusive access, and from termination, even by admin-level processes.
• Protected Processes Light (PPL) - 这些进程(可从 Windows 8.1 获得)通过添加多个级别的保护扩展了 Vista 的保护机制,甚至允许第三方服务作为 PPL 运行,保护它们免受侵入访问和终止,即使是管理员级别的流程。
• Minimal Processes - These processes available from Windows 10 version 1607, is a truly new form of process. The address space of a minimal process does not contain the usual images and data structures that a normal process does. For example, there is no executable file mapped into the process address space, and no DLLs. The process address space is truly empty.
• 最小进程——Windows 10 版本 1607 中提供的这些进程是一种真正全新的进程形式。最小进程的地址空间不包含普通进程所包含的常用图像和数据结构。例如,没有映射到进程地址空间的可执行文件,也没有 DLL。进程地址空间确实是空的。
• Pico Processes - These processes are minimal processes with one addition: a Pico provider, which is a kernel driver that intercepts Linux system calls and translates them to equivalent Windows system calls. These processes are used with the Windows Subsystem for Linux (WSL), available from Windows 10 version 1607.
• Pico 进程——这些进程是最小的进程,增加了一个:Pico 提供程序,它是一个内核驱动程序,可以拦截 Linux 系统调用并将它们转换为等效的 Windows 系统调用。这些进程与适用于 Linux 的 Windows 子系统 (WSL) 一起使用,可从 Windows 10 版本 1607 获得。
A Process’ basic information is easily visible in tools such as Task Manager and Process Explorer. Figure 3-1 shows Task Manager Details tab with some columns added beyond the defaults.
进程的基本信息在任务管理器和进程资源管理器等工具中很容易看到。图 3-1 显示了任务管理器详细信息选项卡,其中添加了一些超出默认值的列。
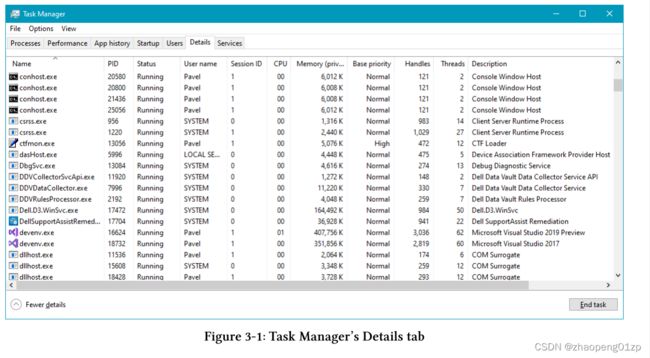
Let’s briefly examine the columns appearing in figure 3-1:
让我们简要检查一下图 3-1 中出现的列:
Name
This is normally the executable name upon which the process is based on. Remember that this name is not the unique identifier of the process. Some processes don’t seem to have an executable name at all. Examples include System, Secure System, Registry, Memory Compression, System Idle Process and System Interrupts.
名称 这通常是进程所基于的可执行文件名称(映像名称)。请记住,此名称不是进程的唯一标识符。有些进程似乎根本没有可执行名称。例子包括系统、安全系统、注册表、内存压缩、系统空闲进程和系统中断。
System Interrupts is not really a process, it’s just used as a way to measure the time spent in the kernel servicing hardware interrupts and Deferred Procedure Calls. Both are beyond the scope of this book. You can find more information in the Windows Internals and Windows Kernel Programming books.
系统中断实际上并不是一个进程,它只是用来衡量内核服务硬件中断和延迟过程调用所花费时间的一种方式。两者都超出了本书的范围。您可以在 Windows Internals 和 Windows Kernel Programming 书籍中找到更多信息。
System Idle Process is also not a real process. It always has a Process ID (PID) of zero.
It accounts for Windows idle time. This is where the CPUs go when there is nothing to do.
System Idle Process 也不是真正的进程。它的进程 ID (PID) 始终为零。
它占 Windows 空闲时间。这是 CPU 在无事可做时的去处。
The System process is a true process, technically being a minimal process as well. It always has a PID of 4. It represents everything going on in kernel space - the memory used by the kernel and kernel drivers, the open handles, threads and so on.
系统进程是一个真正的进程,从技术上讲也是一个最小进程。它的 PID 始终为 4。它代表内核空间中发生的所有事情——内核和内核驱动程序使用的内存、打开的句柄、线程等等。
The Secure System process is only available on Windows 10 and Server 2016 (and later) systems that boot with Virtualization Based Security enabled. It represents everything going on in the secure kernel. Refer to the Windows Internals book for more information.
安全系统进程仅适用于启用了基于虚拟化的安全启动的Windows 10 和Server 2016(及更高版本)系统。它代表安全内核中发生的一切。有关更多信息,请参阅 Windows Internals 一书。
The Registry process is a minimal process available from Windows 10 version 1803 (RS4) that is used as “working area” for managing the registry, rather than using the Paged Pool as was done in previous versions. For the purposes of this book, it’s an implementation detail that does not affect the way the registry is accessed programmatically.
注册表进程是Windows 10 版本1803 (RS4) 中可用的最小进程,用作管理注册表的“工作区”,而不是像以前版本那样使用页面缓冲池。就本书而言,它是一个实现细节,不会影响以编程方式访问注册表的方式。
The Memory Compression process is a minimal process available on Windows 10 version 1607 (but not on servers) and holds compressed memory in its address space.
Memory compression is a feature added in Windows 10 to conserve physical memory (RAM), especially useful for devices with limited resources such as phones and IoT (Internet of Things) devices. Confusingly, Task Manager does not show this process, but it is shown properly by Process Explorer.
内存压缩进程是Windows 10 版本1607(但不适用于服务器)上可用的最小进程,并在其地址空间中保存压缩内存。
内存压缩是 Windows 10 中添加的一项功能,用于节省物理内存 (RAM),特别适用于资源有限的设备,例如电话和 IoT(物联网)设备。令人困惑的是,任务管理器不显示此进程,但进程资源管理器可以正确显示。
The reason Memory Compression is not shown in Task Manager is somewhat funny. In Windows 10 before version 1607 memory compression was supported, but the compressed memory was stored in the user-mode address space of the System process and this made the System process look as though it was consuming (possibly) a lot of memory. That was compressed memory, so it was really saving memory, but appearances are sometimes more important, and so the compressed memory was moved into its own (minimal) process and the process itself was hidden purposefully from the list in Task Manager.
任务管理器中未显示内存压缩的原因有点滑稽。在1607版本之前的Windows 10中支持内存压缩,但是压缩后的内存存储在系统进程的用户态地址空间中,这使得系统进程看起来好像在消耗(可能)大量内存。那是压缩内存,所以它确实节省了内存,但外观有时更重要,因此压缩内存被移动到它自己的(最小)进程中,并且该进程本身有目的地从任务管理器的列表中隐藏。
In the rest of this chapter, up to the section “Minimal and Pico Processes”, deals with “normal” processes that are based on executable files. In any case, minimal and Pico processes can only be created by the kernel.
在本章的其余部分,直到“最小和 Pico 进程”部分,处理基于可执行文件的“正常”进程。无论如何,minimal 和 Pico 进程只能由内核创建。
PID
The unique ID of the process. PIDs are multiple of 4, where the lowest valid PID value is 4 (belonging to the System processes). Process IDs are reused once a process terminates, so it’s possible to see a new process with a PID that was once used for a (now gone) process. If a unique identifier is required for a process, then a combination of the PID and the process start time is truly unique on a certain system.
进程的唯一ID。PID是4的倍数,其中最低的有效PID值是4(属于系统进程)。一旦一个进程终止,进程ID就会被重复使用,所以有可能看到一个新的进程的PID曾经用于一个(现在已经消失的)进程。如果一个进程需要一个唯一的标识符,那么PID和进程开始时间的组合在某个系统上是真正唯一的。
You may recall from chapter 2, that handles also start with 4 and are multiples of 4, just like PIDs. This is not a coincidence. In fact, PIDs (and thread IDs) are handle values in a special handle table used just for this purpose.
您可能还记得第 2 章,句柄也以 4 开头并且是 4 的倍数,就像 PID。这不是巧合。事实上,PID(和线程 ID)是专门用于此目的的特殊句柄表(全局句柄表)中的句柄值。
Status
The Status column is a curious one. It can have one of three values: Running, Suspended and Not Responding. Let’s look at each one. Table 3-1 summarizes the meaning of these states based on process type.
Status 列是一个奇怪的列。它可以具有以下三个值之一:Running、Suspended 和 Not Responding。让我们看看每一个。表 3-1 根据进程类型总结了这些状态的含义。


A process with a GUI must have at least one thread that handles its user interface. This thread has a message queue, created for it as soon as it called any UI or GDI function. This thread must therefore pump messages - that is, listen to its message queue and process messages that arrive. The typical listening functions are GetMessage or PeekMessage. If none is called for at least 5 seconds, Task Manager changes the status to Not Responding, the windows owned by that thread become faded and “(Not Responding)” is added to the window’s caption. The problematic thread did not examine its message queue for one of three possible reasons:
具有 GUI 的进程必须至少有一个线程来处理其用户界面。这个线程有一个消息队列,一旦它调用任何 UI 或 GDI 函数就为它创建。因此,该线程必须抽取消息——即监听其消息队列并处理到达的消息。典型的监听函数是 GetMessage 或 PeekMessage。如果至少 5 秒内没有调用,任务管理器会将状态更改为“无响应”,该线程拥有的窗口将变淡,并且“(无响应)”将添加到窗口的标题中。由于以下三个可能原因之一,有问题的线程没有检查其消息队列:
• It was suspended for whatever reason.
• It’s waiting for some I/O operation to complete, and it takes longer than 5 seconds.
• It’s doing some CPU intensive work that takes longer than 5 seconds.
• 无论出于何种原因,它都被暂停了。
• 它正在等待一些 I/O 操作完成,并且需要超过 5 秒的时间。
• 它正在执行一些耗时超过 5 秒的 CPU 密集型工作。
We’ll look at these issues in chapter 5 (“Thread Basics”).
UWP processes are special in the sense that they are suspended unwillingly when they move into the background such as when the application’s window is minimized. A simple experiment can verify this case: Open the modern Calculator on Windows 10, and locate it in Task Manager. You should see its status as Running, meaning it can respond to user input and generally do its thing. Now minimize Calculator, and you’ll see the status changing after a few brief seconds to Suspended. This kind of behavior exists for UWP processes only.
Non-UWP processes that have no GUI are always shown with a Running status, as Windows has no idea what these processes are actually doing (or not). The only exception is if all threads in such a process are suspended, and then its status changes to Suspended.
我们将在第 5 章(“线程基础”)中探讨这些问题。
UWP 进程的特殊之处在于,当它们进入后台时(例如应用程序的窗口最小化时),它们会不情愿地挂起。一个简单的实验可以验证这种情况:在 Windows 10 上打开现代计算器,然后在任务管理器中找到它。您应该看到它的状态为正在运行,这意味着它可以响应用户输入并通常执行它的操作。现在最小化计算器,您会看到状态在几秒钟后变为已暂停。这种行为仅适用于 UWP 进程。
没有 GUI 的非 UWP 进程始终显示为运行状态,因为 Windows 不知道这些进程实际在做什么(或不做什么)。唯一的例外是如果这样一个进程中的所有线程都被挂起,那么它的状态就会变为 Suspended。
The Windows API does not have a function to suspend a process, only to suspend a thread.
Technically it’s possible to loop over all the threads in a certain process and suspend each one (assuming a powerful enough handle can be obtained). The native API (implemented in NtDll.Dll) does have a function for that purpose, NtSuspendProcess. This is the function called by Process Explorer if you right-click a process and choose Suspend. Of course the opposite function exists as well - NtResumeProcess.
Windows API没有挂起进程的功能,只有挂起线程。
从技术上讲,可以遍历某个进程中的所有线程并挂起每个线程(假设可以获得足够强大的句柄)。本机 API(在 NtDll.Dll 中实现)确实有一个用于该目的的函数,NtSuspendProcess。如果您右键单击一个进程并选择“挂起”,则这是 Process Explorer 调用的函数。当然,相反的函数也存在——NtResumeProcess。
User Name
The user name indicates under what user the process is running. A token object is attached to the process (called Primary Token) that holds the security context for the process based on the user. That security context contains information such as the groups the user belongs to, the privileges it has and more. We’ll take a deeper look at tokens in chapter 16. A process can run under special built-in users, such as Local System (shown as System in Task Manager), Network Service and Local Service. These user accounts are typically used to run services, which we’ll look at in chapter 16.
- 用户名表示进程是在哪个用户下运行的。一个令牌对象被附加到进程(称为主令牌),该进程保存基于用户的进程的安全上下文。该安全上下文包含用户所属的组、其拥有的权限等信息。我们将在第 16 章更深入地了解令牌。进程可以在特殊的内置用户下运行,例如本地系统(在任务管理器中显示为系统)、网络服务和本地服务。这些用户帐户通常用于运行服务,我们将在第 16 章中介绍。
Session ID
The session number under which session the process executes. Session 0 is used for system process and services and session 1 and higher are used for interactive logins. We’ll look at sessions in more detail in chapter 16.
- 进程在哪个会话下执行的会话号。会话 0 用于系统进程和服务,会话 1 及更高版本用于交互式登录。我们将在第 16 章中更详细地讨论会话。
CPU
This column shows the CPU percentage consumption for that process. Note it shows whole numbers only. To get better accuracy, use Process Explorer.
此列显示该进程的 CPU 消耗百分比。请注意,它仅显示整数。要获得更高的准确性,请使用 Process Explorer。
Memory
The memory-related columns are somewhat tricky. The default column shown by Task Manager is Memory (active private working set) (Windows 10 version 1903) or Memory (private working set) (earlier versions). The term Working Set means RAM (physical memory). Private working set is the RAM used by the process and not shared with other processes. The most common example of shared memory is for DLL code. Active private working Set is the same as Private working set, but is set to zero for UWP processes that are currently suspended.
与内存相关的列有些棘手。任务管理器显示的默认列是内存(活动私有工作集)(Windows 10 版本 1903)或内存(私有工作集)(早期版本)。术语工作集是指 RAM(物理内存)。私有工作集是进程使用的 RAM,不与其他进程共享。共享内存最常见的例子是 DLL 代码。活动私有工作集与私有工作集相同,但对于当前挂起的 UWP 进程设置为零。
Are the above two counters a good indication of the amount of memory used by a process? Unfortunately, no. These indicate the private RAM used, but what about memory that is currently paged out? There is another column for that - Commit Size. This is the best column to use to get a sense of the memory usage for a process. The “unfortunate” part is that Task Manager does not show this column by default.
以上两个计数器是否可以很好地指示进程使用的内存量?很不幸的是,不行。这些指示使用的私有 RAM,但是当前页面换出的内存呢?还有另一列 - 提交大小。这是了解进程内存使用情况的最佳列。 “不幸”的部分是任务管理器默认情况下不显示此列。
Process Explorer has an equivalent column for Commit Size, but it’s called Private Bytes, which is consistent with a Performance Counter by that name.
Process Explorer 有一个等效的 Commit Size 列,但它称为 Private Bytes,与同名的性能计数器一致。
Base Priority
The Base Priority column, officially called Priority Class, shows one of six values, that provide the base scheduling priority for threads executing in that process. The possible values with the priority level associated with them are the following:
Base Priority 列,正式称为 Priority Class,显示六个值之一,为在该进程中执行的线程提供基本调度优先级。与它们关联的优先级的可能值如下:

The most common (and default) priority class is Normal (8). We’ll discuss priorities and scheduling in chapter 6.
最常见(也是默认)的优先级类别是 Normal (8)。我们将在第 6 章讨论优先级和调度。
Handles
The handles columns shows the number of handles to kernel objects that are open in a particular process. This was discussed at length in chapter 2.
handles 列显示在特定进程中打开的内核对象的句柄数。这在第 2 章中进行了详细讨论。
Threads
The Threads column shows the number of threads in each process. Normally, this should be at least one, as a process with no threads is useless. However, some processes are shown with no threads (using a dash). Specifically, Secure System is shown with no threads because the secure kernel actually uses the normal kernel for scheduling. The system Interrupts pseudoprocess is not a process at all, so cannot have any threads. Lastly, the System Idle Process does not own threads either. The number of threads shown for this process is the number of logical processors on the system.
Threads 列显示每个进程中的线程数。通常,这应该至少是一个,因为没有线程的进程是无用的。但是,某些进程显示时没有线程(使用破折号)。具体来说,安全系统显示时没有线程,因为安全内核实际上使用普通内核进行调度。系统中断伪进程根本不是进程,因此不能有任何线程。最后,系统空闲进程也不拥有线程。为该进程显示的线程数是系统上的逻辑处理器数。
There are other columns of interest in Task Manager, which will be examined in due course.
任务管理器中还有其他感兴趣的列,将在适当的时候进行检查。
Processes in Process Explorer
Process Explorer can be thought of as a “Task Manager on steroids”. It has most of the functionality of Task Manager and much more. We’ve already seen its ability to show open handles in processes. In this section we’ll examine some of its process-related capabilities.
Process Explorer 可以被认为是“增强型任务管理器”。它具有任务管理器的大部分功能等等。我们已经看到它能够在进程中显示打开的句柄。在本节中,我们将研究它的一些与流程相关的功能。
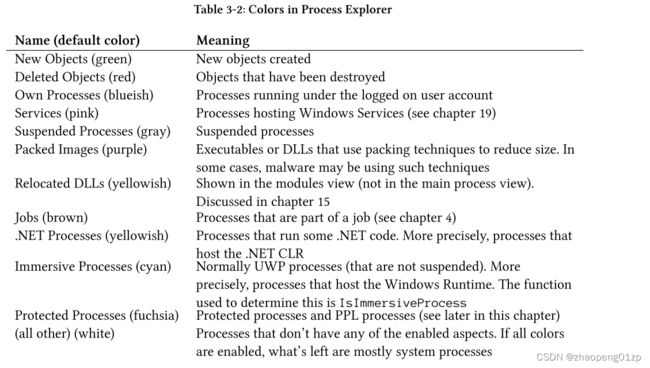
First, Process Explorer can show processes with various columns, just like Task Manager. It has more columns than are available in Task Manager, however. Immediately apparent are the colors processes are shown in. Each color indicates some interesting aspect of a process.
Of course a process can have more than one such “aspect”, worthy of a color, and in that case one color “wins” and the “losing” color is not shown. All the available colors can be changed and enabled or disabled by selecting Options, Configure Colors… from the menu, showing the dialog in figure 3-2.
首先,Process Explorer 可以像任务管理器一样用不同的列显示进程。但是,它的列比任务管理器中可用的列多。立竿见影的是显示进程的颜色。每种颜色都表示进程的一些有趣方面。
当然,一个进程可以有多个这样的“方面”,值得一种颜色,在这种情况下,一种颜色“获胜”,而“失败”的颜色不会显示出来。通过从菜单中选择 Options、Configure Colors…,可以更改和启用或禁用所有可用的颜色,显示如图 3-2 中的对话框。

Table 3-2 summarizes their background colors and meaning.
表 3-2 总结了它们的背景颜色和含义。
-
New Objects (green) 新对象(绿色)
New objects created
已创建新对象 -
Deleted Objects (red) 删除的对象(红色)
Objects that have been destroyed
已销毁的对象 -
Own Processes (blueish) 自己的进程(蓝色)
Processes running under the logged on user account
在登录用户帐户下运行的进程 -
Services (pink) 服务(粉色)
Processes hosting Windows Services (see chapter 19)
托管 Windows 服务的进程(参见第 19 章) -
Suspended Processes (gray) 暂停进程(灰色)
Suspended processes 暂停的进程 -
Packed Images (purple) 打包映像(紫色)
Executables or DLLs that use packing techniques to reduce size. In some cases, malware may be using such techniques
使用打包技术减小大小的可执行文件或 DLL。在某些情况下,恶意软件可能会使用此类技术。 -
Relocated DLLs (yellowish) 重新定位的 DLL(淡黄色)
Shown in the modules view (not in the main process view).
Discussed in chapter 15
在模块视图中显示(不在主进程视图中)。第 15 章讨论 -
Jobs (brown) 作业(棕色)
Processes that are part of a job (see chapter 4)
作为作业一部分的流程(见第4章) -
…NET Processes (yellowish) .NET进程(淡黄色)
Processes that run some .NET code. More precisely, processes that host the .NET CLR
运行某些.NET代码的进程。更确切地说,承载.NET CLR的进程 -
Immersive Processes (cyan) 沉浸式进程(青色)
Normally UWP processes (that are not suspended). More precisely, processes that host the Windows Runtime. The function used to determine this is IsImmersiveProcess
通常 UWP 进程(未挂起)。更准确地说,是托管 Windows 运行时的进程。用于确定这一点的函数是 IsImmersiveProcess -
Protected Processes (fuchsia) 受保护的进程(紫红色)
Protected processes and PPL processes (see later in this chapter)
受保护进程和 PPL 进程(参见本章后面部分) -
(all other) (white) (所有其他)(白色)
Processes that don’t have any of the enabled aspects. If all colors are enabled, what’s left are mostly system processes
没有任何启用方面的进程。如果所有颜色都启用,剩下的大部分是系统进程
I personally added the protected processes color and selected the default to be Fuchsia (unrelated to Google’s new OS).
我亲自添加了受保护进程的颜色,并选择了默认的紫红色(与谷歌的新操作系统无关)。
The new and destroyed objects colors are shown for a period of one second by default. You can make it longer by opening the menu Options, Difference Highlight Duration….
默认情况下,新对象和已销毁对象的颜色会显示一秒钟。您可以通过打开菜单选项、差异突出显示持续时间…来延长它。
Another interesting feature of Process Explorer is the ability to “sort” processes in a tree (more accurately, trees) of processes. If you click on the Process column where the image name is, you can sort normally, but a third click turns the Process column into trees of processes. Part of these trees is shown in figure 3-3.
Process Explorer 的另一个有趣的特性是能够在进程树(更准确地说,树)中对进程进行“排序”。如果单击图像名称所在的进程列,则可以正常排序,但第三次单击会将进程列变成进程树。这些树的一部分如图 3-3 所示。

Each child node in the tree is a child processes of its parent node. Some processes seem to be left-justified (see Explorer.exe in figure 3-3). These processes don’t have a parent process, or more accurately - had a parent process that has since exited. Double-clicking such a process and switching to the Image tab shows basic information about the process including its parent. Figure 3-4 shows this information for that instance of Explorer.exe.
树中的每个子节点都是其父节点的子进程。有些进程似乎是左对齐的(见图 3-3 中的 Explorer.exe)。这些进程没有父进程,或者更准确地说 - 有一个已经退出的父进程。双击此类进程并切换到“映像”选项卡会显示有关该进程的基本信息,包括其父进程。图 3-4 显示了该 Explorer.exe 实例的信息。
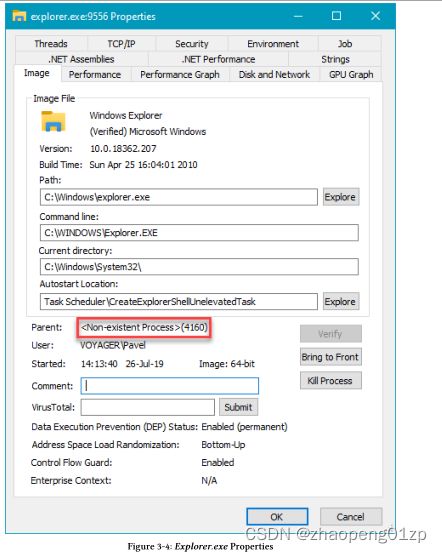
Notice the parent process is unknown but its PID is known (4160 in figure 3-4). This means that the parent PID is stored with the child process, but if the parent no longer exists no other information about it remains.
请注意,父进程未知,但其 PID 已知(图 3-4 中的 4160)。这意味着父 PID 与子进程一起存储,但如果父进程不再存在,则不会保留有关它的其他信息。
You may be wondering what would happen if a new process is created with PID 4160 in figure 3-4, since PIDs get reused. Fortunately, Process Explorer is not confused, as it checks the start time of the parent process. If it’s later than the child then clearly that process cannot be the parent.
你可能想知道如果在图 3-4 中创建一个 PID 为 4160 的新进程会发生什么,因为 PID 被重用了。幸运的是,Process Explorer 不会混淆,因为它会检查父进程的启动时间。如果它晚于子进程,那么显然该进程不能是父进程。
Why is Explorer.exe parentless? This is actually the normal case, as Explorer is created by an earlier process running UserInit.exe, whose job (among other things) is to launch the default shell (configured in the registry by default to be Explorer.exe). Once its work is done, the UserInit process simply exits.
为什么 Explorer.exe 没有父项?这实际上是正常情况,因为 Explorer 是由运行 UserInit.exe 的早期进程创建的,其工作(除其他外)是启动默认 shell(在注册表中默认配置为 Explorer.exe)。一旦它的工作完成,UserInit 进程就会退出。
The important point to remember about this parent-child process relationship is this: if process A creates process B and process A dies, process B is unaffected. In other words, processes in Windows are more like siblings - they don’t affect each other after creation.
关于这种父子进程关系,需要记住的重要一点是:如果进程 A 创建进程 B 并且进程 A 死亡,则进程 B 不受影响。换句话说,Windows 中的进程更像是兄弟姐妹——它们在创建后不会相互影响。
Process Creation
The major parts involved in process creation is depicted in figure 3-5.
进程创建涉及的主要部分如图 3-5 所示。

First, the kernel opens the image (executable) file and verifies that it’s in the proper format known as Portable Executable (PE). The file extension does not matter, by the way - only the actual content does. Assuming the various headers are valid, the kernel then creates a new process kernel object and a thread kernel object, because a normal process is created with one thread that eventually should execute the main entry point.
首先,内核打开映像(可执行)文件并验证其格式是否正确,即可移植可执行文件 (PE)。顺便说一句,文件扩展名无关紧要 - 只有实际内容才重要。假设各种PE头是有效的,内核然后创建一个新的进程内核对象和一个线程内核对象,因为一个正常的进程是用一个线程创建的,该线程最终应该执行主入口点。
At this point, the kernel maps the image to the address space of the new process, as well as NtDll.Dll. NtDll is mapped to every process (except Minimal and Pico processes), since it has very important duties in the final stage of process creation (outlined below) as well being the trampoline from which system calls are invoked. The final major step which is still carried out by the creator process is notifying the Windows subsystem process (Csrss.exe) of the fact that a new process and thread have been created. (Csrss can be thought of as a helper to the kernel for managing some aspects of Windows subsystem processes).
此时,内核将映像映射到新进程的地址空间,以及 NtDll.Dll。 NtDll 被映射到每个进程(Minimal 和 Pico 进程除外),因为它在进程创建的最后阶段(下面概述)以及作为调用系统调用的蹦床具有非常重要的职责。仍然由创建者进程执行的最后一个主要步骤是通知 Windows 子系统进程 (Csrss.exe) 已创建新进程和线程的事实。 (Csrss 可以被认为是内核的助手,用于管理 Windows 子系统进程的某些方面)。
At this point, from the kernel’s point of view, the process has been created successfully, so the process creation function invoked by the caller (typically CreateProcess, discussed in the next section) returns success. However, the new process is not yet ready to execute its initial code. The second part of process initialization must be carried out in the context of the new process, by the newly created thread.
此时,从内核的角度来看,进程已经创建成功,所以调用者调用的进程创建函数(典型的是CreateProcess,下一节会讲到)返回成功。但是,新进程尚未准备好执行其初始代码。进程初始化的第二部分必须在新进程的上下文中由新创建的线程执行。
Some developers believe that the first thing that runs in a new process is the executable’s main function. This is far from the truth, however. There is a lot going on before the actual main function starts running. The star of this part is NtDll, as there is no other OS level code in the process at this time. NtDll has several duties at this point.
一些开发人员认为,在新进程中运行的第一件事是可执行文件的主要功能。然而,这与事实相去甚远。在实际的 main 函数开始运行之前有很多事情要做。这部分的主角是 NtDll,因为此时进程中没有其他操作系统级别的代码。此时 NtDll 有几个职责。
First, it creates the user-mode management object for the process, known as the Process Environment Block (PEB) and the user mode management object for the first thread called Thread Environment Block (TEB). These structures are partially-documented (in ), and officially should not be used directly by developers. That said, there are cases where these structures are useful, especially when trying to achieve things that are difficult to do otherwise.
首先,它为进程创建用户模式管理对象,称为进程环境块 (PEB),并为第一个线程创建用户模式管理对象,称为线程环境块 (TEB)。这些结构已部分文档化(在
The current thread’s TEB is accessible via NtCurrentTeb(), while the PEB of the current process is available via NtCurrentTeb()->ProcessEnvironmentBlock.
当前线程的 TEB 可以通过 NtCurrentTeb() 访问,而当前进程的 PEB 可以通过 NtCurrentTeb()->ProcessEnvironmentBlock 访问。
Then some other initializations are carried out, including the creation of the default process heap (see chapter 13), creation and initialization of the default process thread pool (chapter 9) and more. For full details, consult the Windows Internals book.
然后进行一些其他的初始化,包括默认进程堆的创建(见第13章),默认进程线程池的创建和初始化(第9章)等等。有关完整详细信息,请参阅 Windows Internals 一书。
The last major part before the entry point can start execution is to load required DLLs.
This part of NtDll is often referred to as the Loader. The loader looks at the import section of the executable, which includes all the libraries the executable depends upon. These typically include the Windows subsystem DLLs such as kernel32.dll, user32.dll, gdi32.dll and advapi32.dll.
入口点开始执行之前的最后一个主要部分是加载所需的 DLL。
NtDll 的这一部分通常被称为 Loader。加载程序查看可执行文件的导入部分,其中包括可执行文件所依赖的所有库。这些通常包括 Windows 子系统 DLL,例如 kernel32.dll、user32.dll、gdi32.dll 和 advapi32.dll。
To get a sense for these import libraries, we can use the DumpBin.exe tool available as part of the Windows SDK and Visual Studio installation. Open the Developer Command Prompt to gain easy access to the various tools and type the following to look at the imports for Notepad.exe:
要了解这些导入库,我们可以使用作为 Windows SDK 和 Visual Studio 安装的一部分提供的 DumpBin.exe 工具。打开开发人员命令提示符以轻松访问各种工具并键入以下内容以查看 Notepad.exe 的导入:
c:>dumpbin /imports c:\Windows\System32\notepad.exe
The result is a dump of all import libraries and what symbols are imported (used) from those libraries. Here is an abbreviated output (Windows 10 version 1903):
结果是所有导入库的转储以及从这些库导入(使用)的符号。这是一个简短的输出(Windows 10 版本 1903):


For each required DLL, dumpbin shows the imported functions from that DLL, i.e. the functions actually used by the executable. Some of the DLL names may look weird, and in fact you won’t find them as actual files. The example in the above output is api-ms-wincore-libraryloader-l1-2-0.dll. This is known as an API Set, which is an indirect mapping from a contract (the API Set) to an actual implementation DLL (sometimes referred to as a Host).
对于每个所需的 DLL,dumpbin 显示从该 DLL 导入的函数,即可执行文件实际使用的函数。有些 DLL 名称可能看起来很奇怪,实际上您找不到它们作为实际文件。以上输出中的示例是 api-ms-wincore-libraryloader-l1-2-0.dll。这称为 API 集,它是从合同(API 集)到实际实现 DLL(有时称为主机)的间接映射。
API Sets exist starting from Windows 7.
API 集从 Windows 7 开始存在。
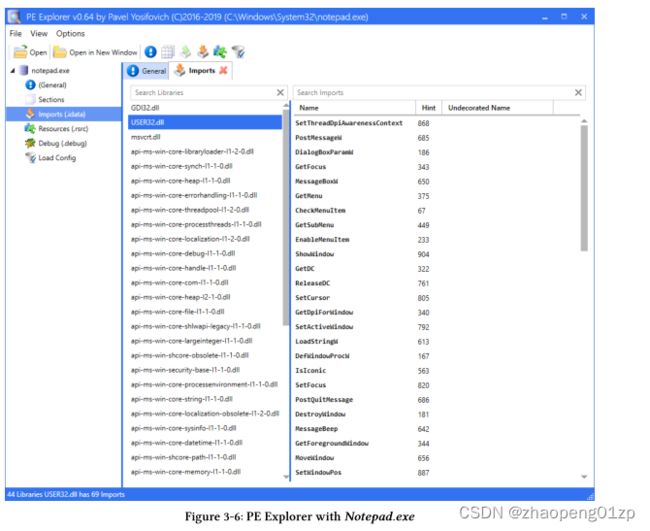
Another way to view these dependencies is with a graphical. Figure 3-6 shows one such tool, PE Explorer, downloadable from http://github.com/zodiacon/AllTools, with Notepad.exe’s dependencies. For each API Set or DLL, it shows the imported functions.
查看这些依赖关系的另一种方法是使用图形。图 3-6 显示了一个这样的工具,PE Explorer,可从 http://github.com/zodiacon/AllTools 下载,具有 Notepad.exe 的依赖项。对于每个 API 集或 DLL,它显示导入的函数。
API Sets allows Microsoft to separate function “declarations” from the actual implementation. This means the implementing DLL can change at a later Windows release, and can even be different on different form factors (IoT devices, HoloLens, Xbox, etc.). The actual mapping between API set and implementation is stored for each process in the PEB. You can view these mappings using the ApiSetMap.exe tool, downloadable from https: //github.com/zodiacon/WindowsInternals/releases. Here is the first few lines of output:
API集允许微软将功能 "声明 "与实际实现分开。这意味着实现的DLL可以在以后的Windows版本中改变,甚至可以在不同的形式因素(物联网设备、HoloLens、Xbox等)上有所不同。API集和实现之间的实际映射被存储在PEB的每个进程中。你可以使用ApiSetMap.exe工具查看这些映射,可从https: //github.com/zodiacon/WindowsInternals/releases下载。下面是输出的前几行:

The DLLs or API Set names don’t have a full path associated with them. The Loader searches in the following directories in order until the DLL is located:
DLL 或 API 集名称没有与之关联的完整路径。 Loader 按顺序搜索以下目录,直到找到 DLL:
-
If the DLL name is one of the KnownDLLs (specified in the registry), the system directory is searched first (see item 4) (Known DLLs are described in chapter 15 in part 2). This is where the Windows subsystem DLLs reside (kernel32.dll, user32.dll, advapi32.dll, etc.)
-
如果 DLL 名称是 KnownDLLs 之一(在注册表中指定),则首先搜索系统目录(参见第 4 项)(Known DLLs 在第 2 部分的第 15 章中描述)。这是 Windows 子系统 DLL(kernel32.dll、user32.dll、advapi32.dll 等)所在的位置
-
The directory of the executable
2.可执行文件的目录
- The current directory of the process (determined by the parent process). (This is discussed in the next section)
3.进程的当前目录(由父进程决定)。 (这将在下一节中讨论)
-
The System directory returned by GetSystemDirectory (e.g. c:\windows\system32)
-
GetSystemDirectory返回的系统目录(如c:\windows\system32)
-
The Windows directory returned by GetWindowsDirectory (e.g. c:\Windows)
-
GetWindowsDirectory 返回的 Windows 目录(例如 c:\Windows)
-
The directories listed in the PATH environment variable
-
PATH环境变量中列出的目录
The DLLs listed in the Known DLLs registry key (HKEY_LOCAL_MACHINE\SYSTEM\CurrentControlSet\Control\Session Manager\KnownDLLs) are always loaded from the system directory, to prevent DLL hijacking, where an alternate DLL with the same name is placed in the executable’s directory.
Known DLLs 注册表项(HKEY_LOCAL_MACHINE\SYSTEM\CurrentControlSet\Control\Session Manager\KnownDLLs) 中列出的 DLL 始终从系统目录加载,以防止 DLL 劫持,其中具有相同名称的备用 DLL 放置在可执行文件的目录中.
Once the DLL is found, it’s loaded and its DllMain function (if exists) is called with the reason DLL_PROCESS_ATTACH indicating the DLL has now been loaded into a process. (Full discussion of DLL loading is saved for chapter 15).
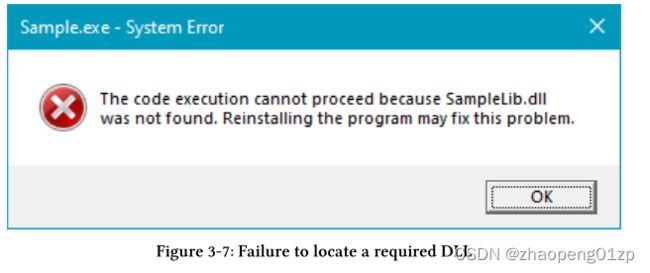
This process continues recursively, because one DLL may depend on another DLL and so on. If any of the DLLs is not found, the Loader displays a message box similar to figure 3-7.
Then the Loader terminates the process.
找到 DLL 后,将加载它并调用其 DllMain 函数(如果存在),原因 DLL_PROCESS_ATTACH 指示 DLL 现在已加载到进程中。 (关于 DLL 加载的完整讨论留到第 15 章)。
这个过程递归地继续,因为一个 DLL 可能依赖于另一个 DLL 等等。如果未找到任何 DLL,加载程序将显示类似于图 3-7 的消息框。
然后 Loader 终止进程。
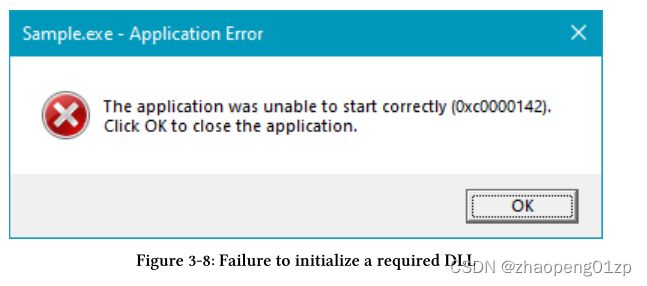
If any of the DLL’s DllMain function returns FALSE, this indicates the DLL was not able to initialize successfully. Then the Loader halts further progress and shows the message box in figure 3-8, after which the process shuts down.
如果任何 DLL 的 DllMain 函数返回 FALSE,这表明 DLL 未能成功初始化。然后 Loader 停止了进一步的进展,并显示图 3-8 中的消息框,之后进程关闭。
Once all required DLLs have been loaded and initialized successfully, control transfers to the main entry point of the executable. The entry point in question is not the actual main function provided by the developer. Instead, it’s a function provided by the C/C++ runtime, set appropriately by the linker. Why is that needed? Calling functions from the C/C++ runtime such as malloc, operator new, fopen and others require some setup. Also, global C++ objects must have their constructors called, even before your main function executes.
All this is done by the C/C++ runtime startup function.
一旦所有需要的DLLs被加载并成功初始化,控制权就转移到可执行文件的主入口点。这里所说的入口点不是开发者提供的实际主函数。相反,它是由C/C++运行时提供的一个函数,由链接器适当地设置。为什么需要这样做?从C/C++运行时调用函数,如malloc、operator new、fopen等,需要一些设置。另外,全局C++对象必须调用它们的构造函数,甚至在你的主函数执行之前。 所有这些都是由C/C++运行时的启动函数完成的。
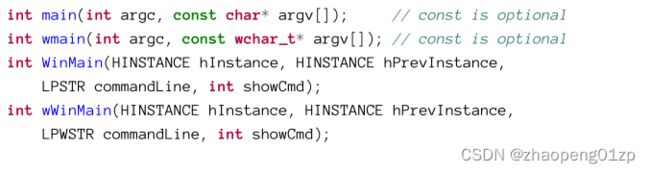
There are actually four main functions developers can write, and for each there is a corresponding C/C++ runtime function. Table 3-4 summarizes these names and when they are used.
实际上,开发人员可以编写四个主要函数,每个函数都有一个相应的C/C++运行时函数。表3-4总结了这些名称及其使用的场景。

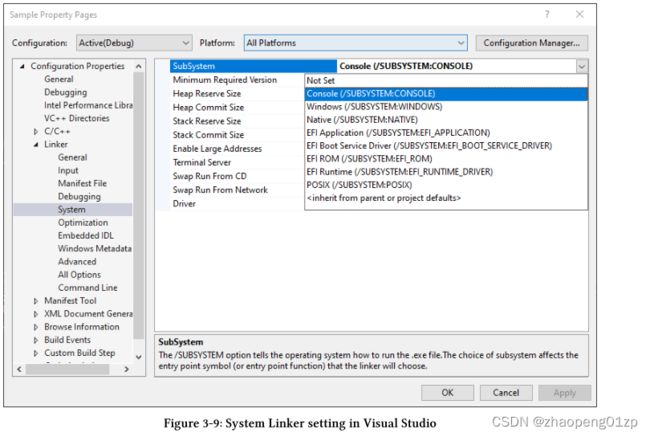
The correct function is set by the linker’s /SUBSYSTEM switch, also exposed through Visual Studio, in the Project Properties dialog shown in figure 3-9.
正确的函数由链接器的/SUBSYSTEM开关设置,该开关也通过Visual Studio在图3-9所示的“项目属性”对话框中公开。
Is a console-based process that different from a GUI-based process? Not really. Both these types are members of the Windows subsystem. A console application can show GUI and a GUI application can use a console. The difference lies in various defaults such as the main function prototype and whether a console window should be created by default.
基于控制台的进程与基于GUI的进程不同吗?并非如此。这两种类型都是Windows子系统的成员。控制台应用程序可以显示GUI,GUI应用程序可以使用控制台。不同之处在于各种默认设置,例如主功能原型以及是否应默认创建控制台窗口。
A GUI application can create a console with AllocConsole.
GUI应用程序可以使用AllocConsole创建控制台。
The main Functions
Based on the rows in table 3-4, there are four variants of a main function written by developers:
根据表3-4中的行,开发人员编写的主函数有四种变体:
Sometimes you’ll see main functions written as _tmain or _tWinMain. As you probably guess, this allows compiling as Unicode or ASCII based on the compilation constants _UNICODE and UNICODE, respectively.
有时您会看到主要函数被写成_tmain或_tWinMain。正如您可能猜测的那样,这允许分别基于编译常量_Unicode和Unicode编译为Unicode或ASCII。
With the classic main/wmain functions, the command line arguments are broken down by the C/C++ runtime prior to calling (w)main. argc indicates the number of command-line arguments and is at least one, as the first “argument” is the full path of the executable. argv is an array of pointers to the parsed (split based on whitespace) arguments. This means argv[0] points to the full executable path.
With the w(WinMain) functions, the parameters are as follows:
对于经典的main/wmain函数,在调用(w)main之前,命令行参数由C/C++运行时分解。argc表示命令行参数的数量,并且至少为一个,因为第一个“参数”是可执行文件的完整路径。argv是指向已解析(基于空格拆分)参数的指针数组。这意味着argv[0]指向完整的可执行路径。
commandLine is the command line string excluding the executable path - it’s the rest of the command line (if any). It’s not “parsed” into separate tokens - it’s just a single string. If parsing is beneficial, the following function can be used:
wWinMain主函数中的commandLine是不包括可执行路径的命令行字符串,它是命令行的其余部分(如果有的话)。它没有被“解析”成单独的令牌——它只是一个字符串。如果解析是有益的,可以使用以下函数:

The function takes the command line and splits it into tokens, returning a pointer to an array of string pointers. The count of strings is returned via *pNumArgs. The function allocates a block of memory to hold the parsed command-line arguments, and it must be eventually freed by calling LocalFree. The following code snippet shows how to parse the command line properly in a wWinMain function:
该函数获取命令行并将其拆分为标记,返回一个指向字符串指针数组的指针。字符串的计数通过*pNumArgs返回。该函数分配一块内存来保存解析后的命令行参数,并且必须通过调用LocalFree最终释放该内存。以下代码片段显示了如何在wWinMain函数中正确解析命令行:
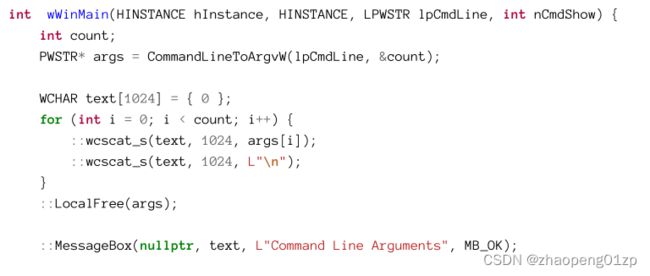
If the string passed to CommandLineToArgvW is the empty string, then its return value is a single string which is the full executable path. On the other hand, if the passed-in string contains non-empty arguments, it returns an array of string pointers containing only the parsed arguments without having the full executable path as the first parsed string.
A process can get its command line at any time by calling GetCommandLine, and it’s a proper argument to CommandLineToArgvW. This could be useful if parsing is required outside of wWinMain.
如果传递给CommandLineToArgvW的字符串为空字符串,则其返回值为单个字符串,即可执行文件的完整路径。另一方面,如果传入的字符串包含非空参数,则返回一个只包含被解析的参数的字符串指针数组,而没有将完整的可执行路径作为第一个被解析的字符串。
进程可以通过调用GetCommandLine随时获取其命令行,它是CommandLineToArgvW的适当参数。如果在wWinMain之外需要解析,这可能很有用。
Process Environment Variables
Environment variables is a set of name/value pairs that can be set on a system or user wide basis using the dialog shown in figure 3-10 (accessible from the System Properties dialog or simply by searching). The names and values are stored in the Registry (like most system data in Windows).
环境变量是一组名称/值对,可以使用图3-10所示的对话框在系统或用户范围内进行设置(可从“系统属性”对话框访问或仅通过搜索进行访问)。名称和值存储在注册表中(与Windows中的大多数系统数据一样)。

User environment variables are stored in HKEY_CURRENT_USER\Environment.
System environment variables (applicable to all users) are stored at HKEY_LOCAL_MACHINE\System\Current Control Set\Control\Session Manager\Environment
用户环境变量存储在HKEY_CURRENT_User\environment中。
系统环境变量(适用于所有用户)存储在HKEY_LOCAL_MACHINE\System\Current Control Set\Control\Session Manager\environment
A process receives environment variables from its parent process, which are a combination of system variables (applicable to all users) and user-specific variables. In most cases the environment variables a process receives are a copy of its parent’s (see next section).
A console application can get the process environment variables with a third argument to main or wmain:
进程从其父进程接收环境变量,这些变量是系统变量(适用于所有用户)和用户特定变量的组合。在大多数情况下,进程接收的环境变量是其父进程的副本(请参阅下一节)。
控制台应用程序可以使用main或wmain的第三个参数获取进程环境变量:

env is an array of string pointers, where the last pointer is NULL, signaling the end of the array. Each string is built in the following format:
env是一个字符串指针数组,其中最后一个指针为NULL,表示数组结束。每个字符串都以以下格式构建:
name=value
The equals character separates the name from the value. The following example main function prints out the names and values of each environment variable:
等号将名称与值分隔开。以下示例主函数打印出每个环境变量的名称和值:
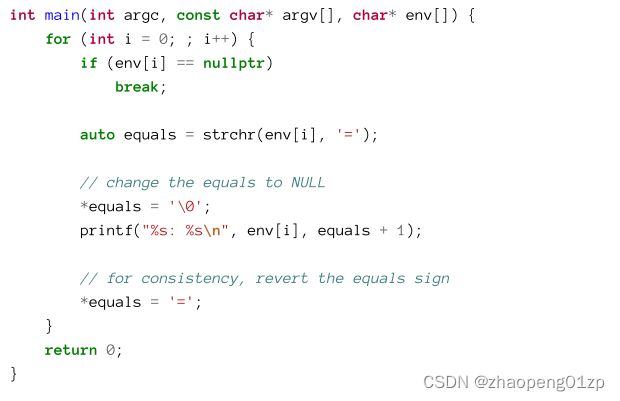
GUI applications can call GetEnvironmentStrings to get a pointer to an environment variables memory block, formatted like so:
GUI应用程序可以调用GetEnvironmentStrings来获取指向环境变量内存块的指针,其格式如下:

The following code snippet uses GetEnvironmentStrings to show all environment variables in one giant message box:
以下代码片段使用GetEnvironmentStrings在一个巨大的消息框中显示所有环境变量:
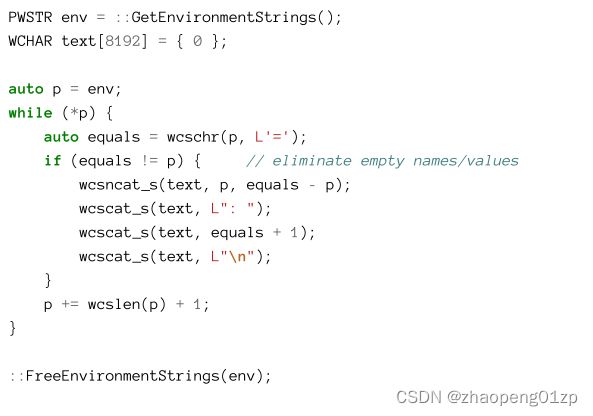
The environment block can be replaced in one swoop with SetEnvironmentStrings using the same format returned by GetEnvironmentStrings.
可以使用SetEnvironmentString一次性替换环境块,替换的格式与GetEnvironmentStrings返回的格式相同。
The environment block must be freed with FreeEnvironmentStrings. Normally, applications don’t need to enumerate environment variables, but rather change or read a specific value. The following functions are used for this purpose:
必须使用FreeEnvironmentStrings释放环境块。通常,应用程序不需要枚举环境变量,而是需要更改或读取特定的值。以下功能用于此目的:
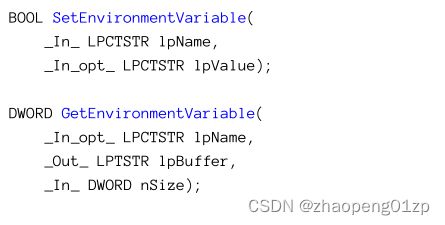
GetEnvironmentVariable returns the number of characters copied to the buffer if it’s large enough, or the length of the environment variable otherwise. It returns zero on failure (if the named variable does not exist). The usual practice is to call the function twice: first, with no buffer to get the length and then a second time after allocating a properly-sized buffer to receive the result. The following function can be used to get a variable’s value by returning a C++ std::wstring as a result:
如果缓冲区足够大,则GetEnvironmentVariable返回复制到缓冲区的字符数,否则返回环境变量的长度。失败时返回零(如果命名变量不存在)。通常的做法是调用该函数两次:第一次,在没有缓冲区的情况下获取长度,第二次是在分配了适当大小的缓冲区后接收结果。以下函数可用于通过返回C++std::wstring作为结果来获取变量的值:

The const_cast operator above removes the “constness” of value.data() as it returns const wchar_t*. A brutal C-style cast would work just as well: (PWSTR)value.data().
上面的const_cast运算符在返回const wchar_t*时删除了value.data()的“constness”。残酷的C风格转换也同样有效:(PWSTR)value.data()。
Environment variables are used in many situations to specify information that is based on their current values. For example, a file path may be specified as “%windir%\explorer.exe”.
The name between the percent characters is an environment variable that should be expended into its real value. Normal API functions don’t have any special understanding of these intentions. Instead, the application must call ExpandEnvironmentStrings to convert any environment variable enclosed between percent signs to its value:
环境变量在许多情况下用于指定基于其当前值的信息。例如,文件路径可以指定为“%windir%\explorer.exe”。
百分比字符之间的名称是一个环境变量,应该将其扩展为实际值。正常的API函数对这些意图没有任何特殊的理解。相反,应用程序必须调用ExpandEnvironmentStrings,才能将包含在百分号之间的任何环境变量转换为其值:
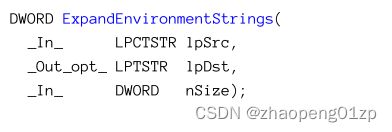
Just like GetEnviromentVariable, ExpandEnvironmentStrings returns the number of characters copied to the target buffer or the number of characters that is needed if the buffer is too small (plus the NULL terminator). Here is an example usage:
就像GetEnviromentVariable一样,ExpandEnvironmentStrings返回复制到目标缓冲区的字符数,或者如果缓冲区太小(加上NULL终止符),则返回所需的字符数。下面是一个用法示例:

Creating Processes
Processes are created under the same user account with CreateProcess. Extended functions exist, such as CreateProcessAsUser, which will be discussed in chapter 16. CreateProcess requires an actual executable file. It cannot create a process based on a path to a document file. For example, passing something like c:\MyData\data.txt, assuming data.txt is some text file - will fail process creation. CreateProcess does not search for an associated executable to launch for TXT files. When a file is double-clicked in Explorer, for instance, a higher-level function from the Shell API is invoked - ShellExecuteEx. This function accepts any file, and if does not end with “EXE”, will search the registry based on the file extension to locate the associated program to execute. Then (if located), it will eventually call CreateProcess.
进程是在与 CreateProcess 相同的用户帐户下创建的。存在扩展函数,例如将在第 16 章中讨论的 CreateProcessAsUser。CreateProcess 需要一个实际的可执行文件。它无法根据文档文件的路径创建流程。例如,传递类似 c:\MyData\data.txt 的内容,假设 data.txt 是某个文本文件 - 将无法创建进程。 CreateProcess 不会搜索关联的可执行文件以启动 TXT 文件。例如,当在资源管理器中双击文件时,会调用 Shell API 中的高级函数 - ShellExecuteEx。此函数接受任何文件,如果不以“EXE”结尾,将根据文件扩展名搜索注册表以找到相关的程序来执行。然后(如果找到),它最终会调用 CreateProcess。
Where does Explorer look for these file associations? We’ll look at that in chapter 17 (“Registry”)
资源管理器在哪里查找这些文件关联?我们将在第 17 章(“注册表”)中讨论
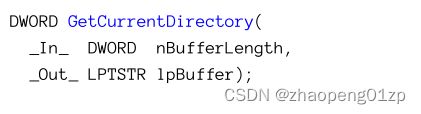
CreateProcess accepts 9 parameters as follows:
CreateProcess接受9个参数如下:

The function returns TRUE on success, which means that from the kernel’s perspective the process and the initial thread have been created successfully. It’s still possible for the initialization done in the context of the new process (described in the previous section) to fail.
If successful, the real returned information is available via the last argument of type PROCESS_INFORMATION:
该函数在成功时返回TRUE,这意味着从内核的角度来看,进程和初始线程已经被成功创建。在新进程的上下文中完成的初始化(在上一节中描述)仍然有可能失败。 如果成功,真正返回的信息可以通过PROCESS_INFORMATION类型的最后一个参数获得:
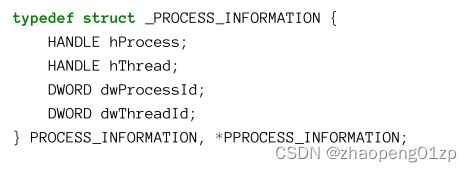
There are four pieces of information provided: the unique process and thread IDs, and two open handles (with all possible permissions unless the new process is protected) to the newly created process and thread. Using the handles, the creating (parent) process can do anything it wants with the new process and thread (again, unless the process is protected, see later in this chapter). As usual, it’s a good idea to close these handles once they are no longer needed.
提供了四条信息:唯一的进程和线程ID,以及新建进程和线程的两个打开句柄(除非新进程受到保护,否则具有所有可能的权限)。使用句柄,创建(父)进程可以对新进程和线程执行任何它想要的操作(同样,除非进程受到保护,请参阅本章稍后部分)。和往常一样,一旦不再需要这些句柄,最好关闭它们。
Now let’s turn our attention to the rest of the parameters that are inputs to the function.
现在,让我们将注意力转向作为函数输入的其余参数。
- pApplicationName and pCommandLine
These parameters should provide the executable path to run as a new process and any command-line arguments that are needed. These parameters are not interchangeable, however.
这些参数应该提供作为新进程运行的可执行路径以及所需的任何命令行参数。然而,这些参数不能互换。
In most cases, you’ll use the second argument for both the executable name and any command-line arguments needed to pass to the executable and set the first argument to NULL. Here are some of the benefits of the second argument compared to the first:
在大多数情况下,您将使用第二个参数作为可执行文件名称和传递给可执行文件所需的任何命令行参数,并将第一个参数设置为NULL。以下是与第一个参数相比,第二个参数的一些好处:
• If the file name has no extension, an EXE extension is added implicitly before searching for a match.
• If just a file name is supplied (not a full path) as the executable, the system searches in the directories listed in the previous section where the Loader looks for required DLLs, repeated here for convenience:
•如果文件名没有扩展名,则在搜索匹配项之前会隐式添加EXE扩展名。
•如果只提供了一个文件名(而不是完整路径)作为可执行文件,则系统会在上一节中列出的目录中搜索Loader查找所需DLL的位置,为了方便起见,在此重复:
- The directory of the caller’s executable
1.调用方可执行文件的目录
- The current directory of the process (discussed later in this section)
2.进程的当前目录(本节稍后讨论)
- The System directory returned by GetSystemDirectory
3.GetSystemDirectory返回的系统目录
- The Windows directory returned by GetWindowsDirectory
4.GetWindowsDirectory返回的Windows目录
- The directories listed in the PATH environment variable
5.PATH环境变量中列出的目录
If pApplicationName is not NULL, then it must be set to a full path to the executable. In that case, pCommandLine is still treated as command-line arguments.
One dent in the pCommandLine argument is that it’s typed as PTSTR, meaning it’s a nonconst pointer to a string. This means CreateProcess actually writes (not just reads) to this buffer, which will cause an access violation if called with a constant string like so:
如果pApplicationName不为NULL,则必须将其设置为可执行文件的完整路径。在这种情况下,pCommandLine仍然被视为命令行参数。
pCommandLine参数的一个缺陷是它被键入为PTSTR,这意味着它是一个指向字符串的非约束指针。这意味着CreateProcess实际上向这个缓冲区写入(而不仅仅是读取),如果使用如下常量字符串调用,这将导致访问冲突:

Compile time static buffers are placed by default in a read-only section of the executable and mapped with the read only protection, causing any writes to raise an exception. The simplest solution is to place the string in read/write memory by building it dynamically or placing it on the stack (which is always read/write):
编译时静态缓冲区(这个常量字符串)默认放置在可执行文件的只读部分,并使用只读保护进行映射,导致任何写入都会引发异常。最简单的解决方案是通过动态构建字符串或将其放置在堆栈(始终为读/写)上,将字符串放置在读/写内存中:

The final content of the buffer is the same as initially provided. You might be wondering why CreateProcess writes to the buffer. Unfortunately, there is no good reason that I know of and Microsoft should fix that. But they haven’t for many years now, so I wouldn’t hold my breath.
缓冲区的最终内容与最初提供的内容相同。您可能想知道为什么CreateProcess会写入缓冲区。不幸的是,据我所知,没有什么好的理由,微软应该解决这个问题。但他们已经很多年没有了,所以我不会屏住呼吸。
This issue does not occur with CreateProcessA (the ASCII version of CreateProcess). The reason may be obvious: CreateProcessA must convert its arguments to Unicode, and for that it allocates a buffer dynamically (which is read/write), converts the string and then calls CreateProcessW with that allocated buffer. This does not mean you should use CreateProcessA!
CreateProcessA(CreateProcess的ASCII版本)不会出现此问题。原因可能很明显:CreateProcessA必须将其参数转换为Unicode,为此它动态地分配一个缓冲区(读/写),转换字符串,然后用分配的缓冲区调用CreateProcessW。但这并不意味着您应该使用CreateProcessA!
- pProcessAttributes and pThreadAttributes
These two parameters are SECURITY_ATTRIBUTES pointers (for the newly created process and thread), discussed in chapter 2. In most cases, NULL should be passed in, unless the returned handles should be inheritable and in that case an instance with bInheritHandle = TRUE may be passed in.
这两个参数是SECURITY_ATTRIBUTES指针(用于新创建的进程和线程),在第2章中讨论过了。在大多数情况下,应该传入NULL,除非返回的句柄应该是可继承的,并且在这种情况下,可以传入bInheritHandle=TRUE的实例。
bInheritHandles This parameter is a global switch that allows or disallows handle inheritance (described in the next sub-section). If FALSE, no handles from the parent process are inherited by the (newly created) child process. If TRUE, all handles that are marked inheritable will be inherited by the child process.
bInheritHandles此参数是允许或不允许句柄继承的全局开关(在下一小节中介绍)。如果为FALSE,则(新创建的)子进程不会继承父进程的句柄。如果为TRUE,则所有标记为可继承的句柄都将由子进程继承。
- dwCreationFlags
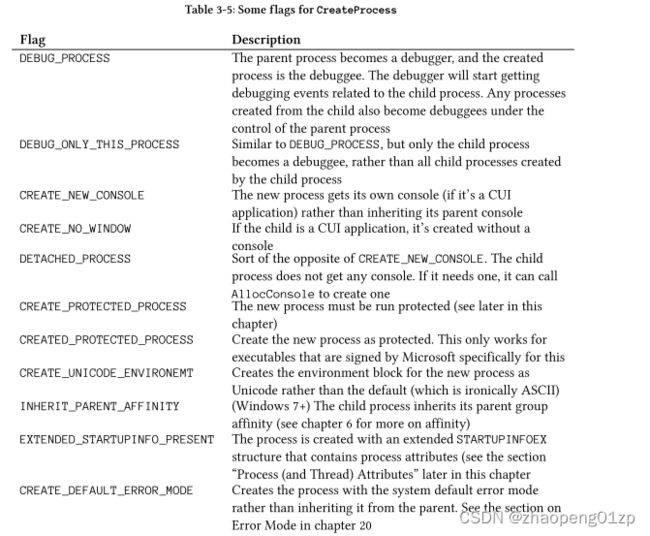
This parameter can be a combination of various flags, the more useful ones described in table 3-5. Zero is a reasonable default in many cases.
该参数可以是各种标志的组合,表 3-5 中描述了更有用的标志。在许多情况下,零是一个合理的默认值。
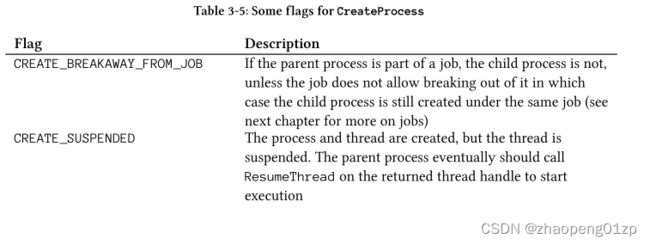
- CREATE_BREAKAWAY_FROM_JOB
If the parent process is part of a job, the child process is not, unless the job does not allow breaking out of it in which case the child process is still created under the same job (see next chapter for more on jobs)
如果父进程是作业的一部分,则子进程不是,除非作业不允许中断它,在这种情况下,子进程仍会在同一作业下创建(有关作业的更多信息,请参见下一章)
- CREATE_SUSPENDED
The process and thread are created, but the thread is suspended. The parent process eventually should call ResumeThread on the returned thread handle to start execution
进程和线程被创建,但是线程被挂起。父进程最终应该在返回的线程句柄上调用 ResumeThread 来开始执行
- DEBUG_PROCESS
The parent process becomes a debugger, and the created process is the debuggee. The debugger will start getting debugging events related to the child process. Any processes created from the child also become debuggees under the control of the parent process
父进程成为调试器,创建的进程成为被调试程序。调试器将开始获取与子进程相关的调试事件。从子进程创建的任何进程也成为父进程控制下的调试对象
- DEBUG_ONLY_THIS_PROCESS
Similar to DEBUG_PROCESS, but only the child process becomes a debuggee, rather than all child processes created by the child process
类似于DEBUG_PROCESS,但只有子进程成为被调试者,而不是子进程创建的所有子进程
- CREATE_NEW_CONSOLE
The new process gets its own console (if it’s a CUI application) rather than inheriting its parent console
新进程获得自己的控制台(如果它是 CUI 应用程序)而不是继承其父控制台
- CREATE_NO_WINDOW
If the child is a CUI application, it’s created without a console
如果子应用程序是CUI应用程序,则创建时没有控制台
- DETACHED_PROCESS
Sort of the opposite of CREATE_NEW_CONSOLE. The child process does not get any console. If it needs one, it can call AllocConsole to create one
与CREATE_NEW_CONSOLE有点相反。子进程没有得到任何控制台。如果需要,它可以调用AllocConsole来创建一个
- CREATE_PROTECTED_PROCESS
The new process must be run protected (see later in this chapter)
新进程必须在保护下运行(请参阅本章后面的内容)
- CREATED_PROTECTED_PROCESS
Create the new process as protected. This only works for executables that are signed by Microsoft specifically for this
将新进程创建为受保护进程。这只适用于由Microsoft专门为此签名的可执行文件
- CREATE_UNICODE_ENVIRONEMT
Creates the environment block for the new process as Unicode rather than the default (which is ironically ASCII)
将新进程的环境块创建为Unicode,而不是默认值(具有讽刺意味的是ASCII)
- INHERIT_PARENT_AFFINITY
(Windows 7+) The child process inherits its parent group affinity (see chapter 6 for more on affinity)
(Windows 7+)子进程继承其父进程所在组的亲和力(affinity)(有关亲和力的更多信息,请参阅第 6 章)
- EXTENDED_STARTUPINFO_PRESENT
The process is created with an extended STARTUPINFOEX structure that contains process attributes (see the section “Process (and Thread) Attributes” later in this chapter
该进程是使用包含进程属性的扩展 STARTUPINFOEX 结构创建的(请参阅本章后面的“进程(和线程)属性”部分
- CREATE_DEFAULT_ERROR_MODE
Creates the process with the system default error mode rather than inheriting it from the parent. See the section on Error Mode in chapter 20
使用系统默认错误模式创建进程,而不是从父进程继承它。请参阅第 20 章中的错误模式部分
In addition to the flags in table 3-5, the creator can set the process priority class, based on table 3-6.
除了表 3-5 中的标志外,创建者还可以根据表 3-6 设置进程优先级(Priority)。

If no priority class flag is specified, the default is Normal unless the creator’s priority class is Below Normal or Idle, in which case the new process inherits its parent’s priority class. If the Real-time priority class is specified, the child process must execute with admin privileges; otherwise, it gets a High priority class instead.
The priority class has little meaning for the process itself. Rather, it sets the default priority for threads in the new process. We’ll look at the effects of priorities in chapter 6.
如果未指定优先级标志,则默认为 Normal,除非创建者的优先级为 Below Normal 或 Idle,在这种情况下,新进程继承其父进程的优先级。如果指定了实时优先级,则子进程必须以管理员权限执行;否则,它会获得高优先级。
优先级对于进程本身意义不大。相反,它为新进程中的线程设置默认优先级。我们将在第 6 章中探讨优先级的影响。
- pEnvironment
This is an optional pointer to an environment variables block to be used by the child process.
Its format is the same as returned by GetEnvironmentStrings discussed earlier in this chapter. In most cases, NULL is passed in, which causes the parent’s environment block to be copied to the new process’ environment block.
这是一个可选的指针,指向子进程要使用的环境变量块。
它的格式与本章前面讨论的 GetEnvironmentStrings 返回的格式相同。在大多数情况下,传入 NULL,这会导致将父进程的环境块复制到新进程的环境块。
- pCurrentDirectory
This sets the current directory for the new process. The current directory is used as part of the search for files in case a file name only is used rather than a full path. For example, a call to the CreateFile function with a file named “mydata.txt”, will search for the file in the process’ current directory. The pCurrentDirectory parameter allows the parent process to set the current directory for the created process which can affect the locations in which DLL search is performed for required DLLs. In most cases, NULL is passed in, which sets the current directory of the new process to the current directory of the parent.
Normally, a process can change its current directory with SetCurrentDirectory. Note this is a process-wide rather than a thread setting:
这将为新进程设置当前目录。当前目录用作文件搜索的一部分,以防仅使用文件名而不是完整路径。例如,使用名为“mydata.txt”的文件调用 CreateFile 函数,将在进程的当前目录中搜索该文件。 pCurrentDirectory 参数允许父进程为创建的进程设置当前目录,这可能会影响为所需 DLL 执行 DLL 搜索的位置。在大多数情况下,传入 NULL,它将新进程的当前目录设置为父进程的当前目录。
通常,进程可以使用 SetCurrentDirectory 更改其当前目录。请注意,这是一个进程范围而不是线程设置:

The current directory consists of a drive letter and path or a share name in the Universal Naming Convention (UNC), such as \MyServer\MyShare.
当前目录由驱动器号和路径组成,或者由通用命名约定(UNC)中的共享名组成,例如\MyServer\MyShare。
Naturally, the current directory can be queried back with GetCurrentDirectory:
当然,可以使用 GetCurrentDirectory 查询当前目录:
The return value is zero on failure, or the number of characters copied to the buffer (including the NULL terminator). If the buffer is too small, the returned value is the required character length (including the NULL terminator).
失败时返回值为零,或者复制到缓冲区的字符数(包括 NULL 终止符)。如果缓冲区太小,则返回值为要求的字符长度(包括 NULL 终止符)。
- pStartupInfo
This parameter points to one of two structures, STARTUPINFO or STARTUPINFOEX, defined like so:
此参数指向两个结构之一,STARTUPINFO 或 STARTUPINFOEX,定义如下:


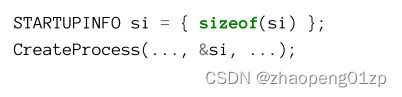
The minimum usage for this parameter is to create a STARTUPINFO structure, initialize its size (cb member) and zero out the rest. Zeroing the structure is important, otherwise it holds junk values which will likely cause CreateProcesss to fail. Here is the minimal code:
此参数的最小用法是创建一个 STARTUPINFO 结构,初始化其大小(cb 成员)并将其余部分归零。将结构归零很重要,否则它包含可能导致 CreateProcesss 失败的垃圾值。这是最少的代码:
STARTUPINFOEX is discussed in the section “Process (and Thread) Attributes” later in this chapter.
STARTUPINFOEX 将在本章后面的“进程(和线程)属性”一节中讨论。
The STARTUPINFO and STARTUPINFOEX structures provide more customization options for process creation. Some of their members are only used if certain values are set in the dwFlags member (in addition to other flags). Table 3-7 details dwFlags possible values and their meaning.
STARTUPINFO 和 STARTUPINFOEX 结构为进程创建提供了更多自定义选项。只有在 dwFlags 成员中设置了某些值(除了其他标志)时,它们的一些成员才会被使用。表 3-7 详细说明了 dwFlags 可能的值及其含义。


- STARTF_USESHOWWINDOW
The wShowWindow member is valid
wShowWindow 成员有效
- STARTF_USESIZE
The dwXSize and dwYSize members are valid
dwXSize 和 dwYSize 成员有效
- STARTF_USEPOSITION
The dwX and dwY members are valid
dwX 和 dwY 成员有效
- STARTF_USECOUNTCHARS
The dwXCountChars and dwYCountChars members are valid
dwXCountChars 和 dwYCountChars 成员有效
- STARTF_USEFILLATTRIBUTE
The dwFillAttribute member is valid
dwFillAttribute 成员有效
- STARTF_RUNFULLSCREEN
For console apps, run full screen (x86 only)
对于控制台应用程序,全屏运行(仅限 x86)
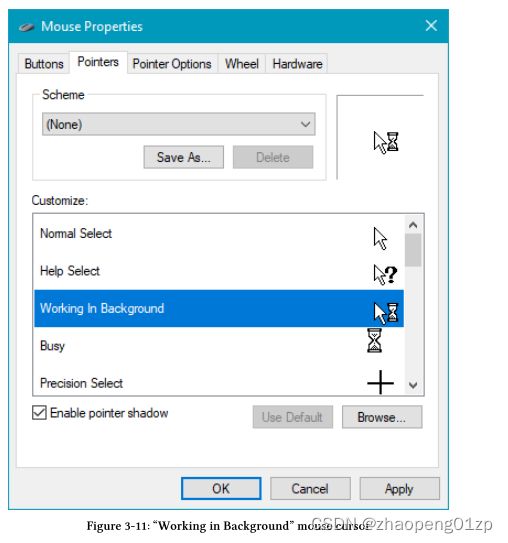
- STARTF_FORCEONFEEDBACK
Instructs Windows to show the “Working in Background” cursor, whose shape can be found in the Mouse Properties dialog shown in figure 3-11. If during the next 2 seconds, the process makes GUI calls, it gives the process an additional 5 seconds with this cursor showing. If at any point, the process calls GetMessage, indicating it’s ready to process messages, the cursor is immediately reverted to normal.
指示 Windows 显示“在后台工作”光标,其形状可以在图 3-11 所示的鼠标属性对话框中找到。如果在接下来的 2 秒内,该进程进行 GUI 调用,它会再给该进程 5 秒并显示此光标。如果进程在任何时候调用 GetMessage,表明它已准备好处理消息,则游标会立即恢复正常。
- STARTF_FORCEOFFFEEDBACK
Does not show the “Working in Background” cursor
不显示“在后台工作”光标
- STARTF_USESTDHANDLES
The hStdInput, hStdOutput and hStdError members are valid
hStdInput、hStdOutput 和 hStdError 成员有效
- STARTF_USEHOTKEY
The hStdInput member is valid and is a value sent as wParam for a WM_HOTKEY message. Refer to the documentation for more information
hStdInput 成员有效并且是作为 WM_HOTKEY 消息的 wParam 发送的值。有关详细信息,请参阅文档
- STARTF_TITLEISLINKNAME
The lpTitle member is a path to a shortcut file (.lnk) used to start the process. The Shell (Explorer) sets this appropriately
lpTitle 成员是用于启动进程的快捷方式文件 (.lnk) 的路径。 Shell(Explorer)适当地设置它
- STARTF_TITLEISAPPID
The lpTitle member is an AppUserModelId. See discussion after this table
lpTitle 成员是一个 AppUserModelId。请参阅此表后的讨论
- STARTF_PREVENTPINNING
Prevents any windows created by the process from being pinned to the task bar. Only works if STARTF_TITLEISAPPID is also specified
防止进程创建的任何窗口被固定到任务栏。仅在同时指定了 STARTF_TITLEISAPPID 时才有效
- STARTF_UNTRUSTEDSOURCE
Indicates the command line passed to the process is from an untrusted source. This is a hint to the process to check its command line carefully
指示传递给进程的命令行来自不受信任的来源。这是提示进程仔细检查其命令行
Let’s now examine the other members of STARTUPINFO.
现在让我们检查一下 STARTUPINFO 的其他成员。
There are three reserved members, lpRserved, lpReserved2 and cbReserved2 - these should be set to NULL, NULL and zero, respectively.
The lpDesktop member specifies an alternate Window Station for the new process and an alternate Desktop for the new thread. If this member is NULL (or an empty string), the parent process Window Station and Desktop are used. Alternatively, a full desktop name can be specified in the format windowstation\desktop. For example “winsta0\mydesktop” could be used. See the sidebar Window Stations and Desktops for more information.
有三个保留成员,lpRserved、lpReserved2和cbReserved2,它们应该分别设置为NULL、NULL和零。
lpDesktop成员为新进程指定备用窗口站,为新线程指定备用桌面。如果此成员为NULL(或空字符串),则使用父进程Window Station和Desktop。或者,可以按windowstation\desktop格式指定完整的桌面名称。例如,可以使用“winsta0\mydesktop”。有关详细信息,请参阅侧栏“窗口工作站和桌面”。
- Window Stations and Desktops
A Window Station is a kernel object which is part of a session. It contains user related objects: A clipboard, an atom table and desktops. A desktop contains windows, menus and hooks. A process is associated with a single Window Station. The interactive Window Station is always named “WinSta0” and is the only one within a session that can be “interactive”, meaning used with input devices.
By default, a interactive logon session has a Window Station named “winsta0”, in which two desktops exist: the “default” desktop, where the user normally works - where you see Explorer, the task bar and whatever else you normally run. Another desktop (created by the Winlogon.exe process is called “Winlogon” and is the one used when pressing the famous Ctrl+Alt+Del key combination. Windows calls the SwitchDesktop function to switch the input desktop to the “Winlogon” desktop. Desktops can be created or opened with CreateDesktop and OpenDesktop, respectively.
You can find more details in my blog post at https://scorpiosoftware.net/2019/02/17/ windows-10-desktops-vs-sysinternals-desktops/.
Window Station是一个内核对象,它是会话的一部分。它包含与用户相关的对象:剪贴板、原子表和桌面。桌面包含窗口、菜单和挂钩。进程与单个Window Station关联。交互式窗口站始终命名为“WinSta0”,并且是会话中唯一可以“交互式”的窗口站,即与输入设备一起使用。
默认情况下,交互式登录会话有一个名为“winsta0”的窗口站,其中存在两个桌面:“默认”桌面,用户正常工作的地方,您可以在那里看到资源管理器、任务栏和其他正常运行的东西。另一个桌面(由Winlogon.exe进程创建)被称为“Winlogon”,是按下著名的Ctrl+Alt+Del组合键时使用的桌面。Windows调用SwitchDesktop函数将输入桌面切换到“Winlogo”桌面。桌面可以分别用CreateDesktop和OpenDesktop创建或打开。
你可以在我的博客文章中找到更多详细信息 https://scorpiosoftware.net/2019/02/17/
windows-10-desktops-vs-sysinternals-desktops/.
The lpTitle member can hold the title for console applications. If NULL, the executable name is used as the title. If dwFlags has the flag STARTF_TITLEISAPPID (Windows 7 and later), then lpTitle is an AppUserModelId, which is a string identifier that the shell uses for task bar item grouping and jump lists. Processes can set their AppUserModelId explicitly by calling SetCurrentProcessExplicitAppUserModelID rather than letting their parent dictate it. Working with jump lists and other task bar features are beyond the scope of this book.
lpTitle成员可以持有控制台应用程序的标题。如果为NULL,则使用可执行文件名称作为标题。如果dwFlags具有STARTF_TITLEISAPID标志(Windows 7及更高版本),则lpTitle是AppUserModelId,它是shell用于任务栏项目分组和跳转列表的字符串标识符。进程可以通过调用SetCurrentProcessExplicitAppUserModelID来显式设置其AppUserModelId,而不是由其父级指定。使用跳转列表和其他任务栏功能超出了本书的范围。
dwX and dwY can be set as default location for windows created by the process. They are used only if dwFlags includes STARTF_USEPOSITION. The new process can use these values if its calls to CreateWindow or CreateWindowEx use CW_USEDEFAULT for the window’s position.
(See the CreateWindow function documentation for more details.) dwXSize and dwYSize are similar, specifying default width and height of new windows created by the child process if it uses CW_USEDEFAULT as width and height in calls to CreateWindow/CreateWindowEx.
(Of course STARTF_USESIZE must be set in dwFlags for these values to propagate).
dwX和dwY可以设置为进程创建的窗口的默认位置。只有当dwFlags包含STARTF_USEPOSITION时,才会使用它们。如果新进程对CreateWindow或CreateWindowEx的调用对窗口的位置使用CW_USEDEFAULT,则它可以使用这些值。
(有关更多详细信息,请参阅CreateWindow函数文档。)dwXSize和dwYSize类似,如果子进程在调用CreateWindow/CreateWindowEx时使用CW_USEDEFAULT作为宽度和高度,则指定子进程创建的新窗口的默认宽度和高度。
(当然,必须在dwFlags中设置STARTF_USESIZE才能传播这些值)。
dwXCountChars and dwYCountChars set the initial width and height (in characters) of a console window created by the child process (if any). As with the previous members, dwFlags must have STARTF_USECOUNTCHARS for these values to have any effect.
dwXCountChars和dwYCountChars设置子进程创建的控制台窗口(如果有的话)的初始宽度和高度(以字符为单位)。与前面的成员一样,dwFlags必须具有STARTF_USECOUNTCHARS,这些值才能产生任何效果。
dwFillAttribute specifies the initial text and background colors if a new console window is created with the process. As usual, this member has effect if dwFlags includes STARTF_USEFILLATTRIBUTE. The possible color combinations have 4 bits each, leading to 16 combinations for text and background. The possible values are shown in table 3-8.
如果使用该过程创建新的控制台窗口,dwFillAttribute 指定初始文本和背景颜色。与往常一样,如果 dwFlags 包含 STARTF_USEFILLATTRIBUTE,则此成员有效。可能的颜色组合各有 4 位,因此文本和背景有 16 种组合。表 3-8 中显示了可能的值。

wShowWindow (valid if dwFlags includes STARTF_USESHOWWINDOW) indicates the way the main window should be shown by the process (assuming it has a GUI). These are values normally passed to the ShowWindow function, with the SW_ prefix. wShowWindow is unique because it’s provided directly in the WinMain function as the last parameter. Of course the created process can just disregard the provided value and show its windows in any way it sees fit. But it’s a good practice to honor this value. If the creator does not provide this member, SW_SHOWDEFAULT is used, indicating the application can use any logic in displaying its main window. For example, it may have saved the last window position and state (maximized, minimized, etc.) and so it will restore the window to the saved position/state.
wShowWindow(如果 dwFlags 包含 STARTF_USESHOWWINDOW 则有效)指示进程应显示主窗口的方式(假设它有 GUI)。这些是通常传递给 ShowWindow 函数的值,带有 SW_ 前缀。 wShowWindow 是独一无二的,因为它直接在 WinMain 函数中作为最后一个参数提供。当然,创建的进程可以忽略提供的值并以它认为合适的任何方式显示其窗口。但尊重这个价值是一个很好的做法。如果创建者不提供此成员,则使用 SW_SHOWDEFAULT,表示应用程序可以使用任何逻辑来显示其主窗口。例如,它可能保存了最后一个窗口位置和状态(最大化、最小化等),因此它将窗口恢复到保存的位置/状态。
One scenario where this value is controllable is with shortcuts created using the shell.
Figure 3-12 shows a shortcut created for running Notepad. In the shortcut properties, the way the initial window is shown can be selected: normal, minimized or maximized.
Explorer propagates this value in the wShowWindow member when creating the process (SW_SHOWNORMAL, SW_SHOWMINNOACTIVE, SW_SHOWMAXIMIZED).
此值可控的一种情况是使用 shell 创建的快捷方式。
图 3-12 显示了为运行记事本创建的快捷方式。在快捷方式属性中,可以选择初始窗口的显示方式:正常、最小化或最大化。
资源管理器在创建进程时在 wShowWindow 成员中传播此值(SW_SHOWNORMAL、SW_SHOWMINIMIZED、SW_SHOWMAXIMIZED)。

The last three members in STARTUPINFO are handles to standard input (hStdInput), output (hStdOutput) and error (hStdError). If dwFlags contains STARTF_USEHANDLES, these handles will be used in the new process as such. Otherwise, the new process will have the defaults: input from keyboard, output and error to the console buffer.
STARTUPINFO中的最后三个成员是标准输入(hStdInput)、输出(hStdPOutput)和错误(hStdBerror)的句柄。如果dwFlags包含STARTF_USEHANDLES,那么这些句柄将在新进程中使用。否则,新进程将具有默认值:键盘输入、控制台缓冲区输出和错误。
If the process is launched from the taskbar or a jump list (Windows 7+), the hStdOutput handle is actually a handle to a monitor (HMONITOR) from which the process was launched.
如果进程是从任务栏或跳转列表(Windows 7+)启动的,则hStdOutput句柄实际上是启动进程的监视器(HMONITOR)的句柄。
Given all these various options for process creation (and there are more discussed in the section “Process (and Thread) Attributes” later in this chapter), it may seem daunting to create a process, but in most cases it’s fairly straightforward if the defaults are acceptable.
The following code snippet creates an instance of Notepad:
考虑到创建流程的所有这些不同选项(在本章后面的“流程(和线程)属性”一节中有更多讨论),创建流程可能会让人望而却步,但在大多数情况下,如果默认值可以接受,那就相当简单了。
以下代码片段创建记事本的一个实例:

What can be done with the returned handles from CreateProcess? One thing is being notified when the process terminated (for whatever reason). This is done with the WaitForSingleObject function. This function is not specific to a process, but can wait for various kernel objects until they become signaled. The meaning of signaled depends on the object type; for a process, it means terminated. A detailed discussion of the “wait” functions is saved for chapter 8. Here, we’ll look at a couple of examples. First we can wait indefinitely until the process exits:
如何处理CreateProcess返回的句柄?一件事是当进程终止时(无论出于何种原因)会收到通知。这是通过WaitForSingleObject函数完成的。这个函数不是特定于进程的,但可以等待各种内核对象,直到它们发出信号。信号的含义取决于对象类型;对于一个进程,它意味着终止。关于“等待”函数的详细讨论保存在第8章中。在这里,我们将看几个例子。首先,我们可以无限期地等待,直到进程退出:

WaitForSingleObject puts the calling thread into a wait state until the object in question changes to the signaled state or the timeout expires. In case of INFINITE (-1), it never expires.
Here is an example for a non-INFINITE timeout:
WaitForSingleObject 将调用线程置于等待状态,直到相关对象更改为信号状态或超时到期。如果是 INFINITE (-1),它永远不会过期。
以下是非无限超时的示例:
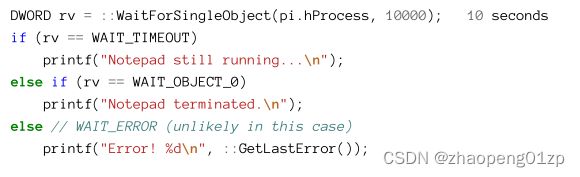
The calling thread blocks for no more then 10000 milliseconds, after which the returned value indicates the state of the process.
调用线程阻塞不超过 10000 毫秒,之后返回值指示进程的状态。
A process can always get the STARTUPINFO it was created with by calling GetStartupInfo.
进程始终可以通过调用 GetStartupInfo 获取创建它时使用的 STARTUPINFO。
Handle Inheritance
In chapter 2 we looked at ways to share kernel objects between processes. One is sharing by name the other by duplicating handles. The third option is to use handle inheritance. This option is only available if a process creates a child process. At the point of creation, the parent process can duplicate a selected set of handles to the target process. Once CreateProcess is called with the fifth argument set to TRUE, all handles in the parent process that have their inheritance bit set will be duplicated into the child process, where the handle values are the same as in the parent process.
在第 2 章中,我们研究了在进程之间共享内核对象的方法。一个是通过复制句柄按名称共享另一个。第三种选择是使用句柄继承。此选项仅在进程创建子进程时可用。在创建时,父进程可以将选定的一组句柄复制到目标进程。一旦将第五个参数设置为 TRUE 调用 CreateProcess,父进程中设置了继承位的所有句柄将被复制到子进程中,其中句柄值与父进程中的相同。
The last sentence is important. The child process cooperates with the parent process (presumably they are part of the same software system), and it knows it’s going to get some handles from its parent. What it does not know is what the values of these handles are.
One simple way of providing these values is using the command line arguments sent to the process being created.
最后一句话很重要。子进程与父进程合作(假设它们是同一个软件系统的一部分),并且它知道它将从其父进程那里获得一些句柄。它不知道这些句柄的值是什么。
提供这些值的一种简单方法是使用发送到正在创建的进程的命令行参数。
Setting a handle to be inheritable can be done in several ways:
可以通过多种方式将句柄设置为可继承:
• If the object in question is created by the parent process, then its SECURITY_ATTRIBUTES can be initialized with a handle inheritance flag and passed to the Create function like so:
如果正在讨论的对象(相关的对象)是由父进程创建的,那么它的SECURITY_ATTRIBUTES可以用句柄继承标志初始化,并传递给Create函数,如下所示:
• For an existing handle, call SetHandleInformation:
对于现有句柄,调用SetHandleInformation:
![]()
• Lastly, most Open functions allow setting the inheritance flag on a successfully returned handle. Here is an example for a named event object:
• 最后,大多数Open 函数允许在成功返回的句柄上设置继承标志。以下是命名事件对象的示例:

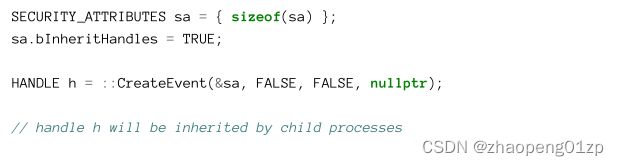
The InheritSharing application is yet another variation on the memory sharing applications from chapter 2. This time, the sharing is achieved by inheriting the memory mapping handle to child processes created from a first process. The dialog now has an extra Create button to spawn new processes with an inherited shared memory handle (figure 3-13).
InheritSharing 应用程序是第 2 章内存共享应用程序的另一个变体。这一次,共享是通过将内存映射句柄继承到从第一个进程创建的子进程来实现的。该对话框现在有一个额外的“创建”按钮来生成具有继承的共享内存句柄的新进程(图 3-13)。

A InheirtSharing process creates another instance of itself when the Create button is clicked.
The new instance must get a handle to the shared memory object, and this is done by inheritance: the existing shared memory handle (held in a wil::unique_handle object) needs to be made inheritable so that it can be duplicated to the new process. The Create button click handler starts with setting the inheritance bit:
单击“创建”按钮时,InheirtSharing 进程会创建其自身的另一个实例。
新实例必须获得共享内存对象的句柄,这是通过继承完成的:现有的共享内存句柄(保存在 wil::unique_handle 对象中)需要可继承,以便可以将其复制到新进程.创建按钮单击处理程序从设置继承位开始:

Now the new process can be created with the fifth argument set to TRUE, indicating all inheritable handles are to be duplicated for the new process. In addition, the new process needs to know the value of its duplicated handle, and this is passed in the command line:
现在可以创建新进程并将第五个参数设置为 TRUE,表示要为新进程复制所有可继承句柄。此外,新进程需要知道其复制句柄的值,这是在命令行中传递的:
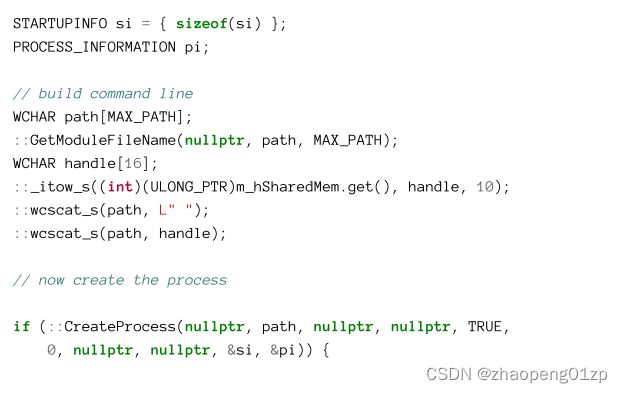
The command line is built by first calling GetModuleFileName, which generally allows getting a full path for any DLL loaded in the process. With the first argument set to NULL, the executable full path is returned. This approach is robust, such that there is no dependency on the actual location of the executable in the file system.
命令行是通过首先调用GetModuleFileName构建的,这通常允许获取进程中加载的任何DLL的完整路径。当第一个参数设置为NULL时,将返回可执行文件的完整路径。这种方法是稳健的,因此不依赖于可执行文件在文件系统中的实际位置。
Once this path is returned, the handle value is appended as a command-line argument.
Remember that an inherited handle always has the same value as in the original process. This is possible because the new process handle table is initially empty, so the entry is definitely unused.
返回此路径后,句柄值将作为命令行参数追加。
请记住,继承的句柄始终具有与原始进程中相同的值。这是可能的,因为新的进程句柄表最初是空的,所以该条目肯定是未使用的。
The last piece of the puzzle is when the process starts up. It needs to know whether it’s the first instance, or an instance that gets an existing inherited handle. In the WM_INITDIALOG message handler, the command line needs to be examined. If there is no handle value in the command line then the process needs to create the shared memory object. Otherwise, it needs to grab the handle and just use it.
难题的最后一块是这个进程何时启动。它需要知道它是第一个实例,还是获得现有继承句柄的实例。在WM_INITDIALOG消息处理程序中,需要检查命令行。如果命令行中没有句柄值,则进程需要创建共享内存对象。否则,它需要抓住句柄并直接使用它。
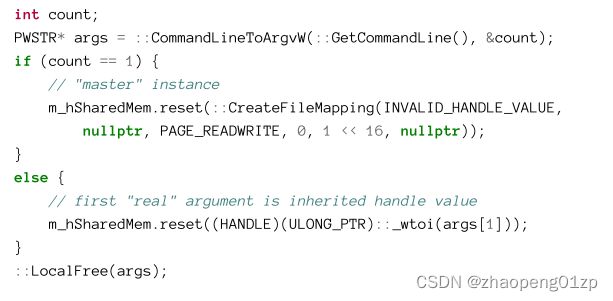
Since this is not WinMain, the command line arguments are not readily available. GetCommandLine can always be used to get the command line at any time. Then CommandLineToArgvW is used to parse the arguments (discussed earlier in this chapter). If no handle value is passed in, CreateFileMapping is used to create the shared memory. Otherwise, the value is interpreted as a handle and attached to the wil::unique_handle object for safe keeping.
由于这不是 WinMain,命令行参数不容易获得。 GetCommandLine 始终可用于随时获取命令行。然后 CommandLineToArgvW 用于解析参数(在本章前面讨论过)。如果没有传入句柄值,则使用 CreateFileMapping 创建共享内存。否则,该值被解释为句柄并附加到 wil::unique_handle 对象以进行安全保存。
(如果传递给CommandLineToArgvW的字符串为空字符串,则其返回值为单个字符串,即count==1,该单个字符串就是可执行文件的完整路径。另一方面,如果传入的字符串包含非空参数,则返回一个只包含被解析的参数的字符串指针数组,而没有将完整的可执行路径作为第一个被解析的字符串?)
You can try creating a new instance from a child process - it works in exactly the same way as using the “original” handle to propagate to the child process.
您可以尝试从子进程创建一个新实例 - 它的工作方式与使用“原始”句柄传播到子进程的方式完全相同。
- Debugging Child Processes with Visual Studio
In the InheritSharing application, it’s desirable to debug not just the main instance, but also a child process, because it’s initiated with a different command line. Visual Studio by default does not debug child processes (processes created by the debugged process).
在 InheritSharing 应用程序中,不仅要调试主实例,还要调试子进程,因为它是用不同的命令行启动的。默认情况下,Visual Studio 不会调试子进程(由被调试进程创建的进程)。
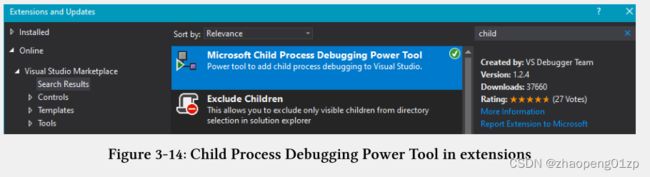
There is, however, an extension to Visual Studio that allows this. Open the extensions dialog (Tools/Extensions and Updates in VS 2017, Extensions/Manage Extensions in VS 2019), go to the Online node and search for Microsoft Child Process Debugging Power Tool and install it (figure 3-14).
但是,有一个 Visual Studio 扩展允许这样做。打开扩展对话框(VS 2017中的Tools/Extensions and Updates,VS 2019中的Extensions/Manage Extensions),进入Online节点,搜索Microsoft Child Process Debugging Power Tool并安装(图3-14)。
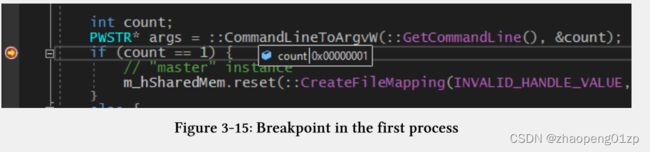
Once installed, go to Debug/Other Debug Targets/Child Process Debugger Settings…, check Enable Child Process Debugging and click Save. Now set a breakpoint at CMainDlg::OnInitDialog and start debugging normally (F5).
The first time you hit the breakpoint is when the dialog comes up for a fresh process, creating its own shared memory object. The count variable should be 1 (figure 3-15).
安装后,转到调试/其他调试目标/子进程调试器设置…,选中启用子进程调试并单击保存。现在在 CMainDlg::OnInitDialog 处设置断点并正常开始调试 (F5)。
第一次遇到断点时,对话框会出现一个新的进程,创建自己的共享内存对象。计数变量(count)应为 1(图 3-15)。
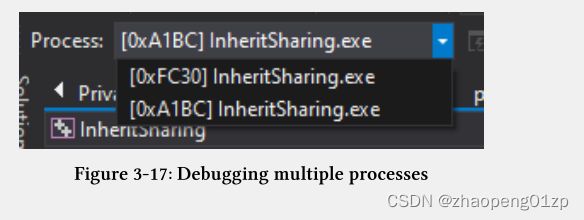
Continue debugging and click Create. A new process should come up under the control of the debugger and the same breakpoint should hit again (figure 3-16). Notice count is now 2. Also notice it’s a different process - the Processes toolbar combobox should show two processes (figure 3-17).
继续调试,点击创建。一个新的进程应该在调试器的控制下出现,同样的断点应该再次命中(图 3-16)。 注意count 现在是 2。还要注意这是一个不同的进程——Processes 工具栏组合框应该显示两个进程(图 3-17)。
Process Drive Directories
Every process has its current directory, set with SetCurrentDirectory and retrieved with GetCurrentDirectory. This directory is used when accessing a file without any path prefix such as “mydata.txt”. What about default directories when accessing a file with a drive prefix like “c:mydata.txt” (notice the lack of a backslash).
As it turns out, the system keeps track of the current directory for each drive using process environment variables. If you call GetEnvironmentStrings, you’ll discover something like the following at the beginning of the block:
每个进程都有其当前目录,使用 SetCurrentDirectory 设置并使用 GetCurrentDirectory 检索。当访问不带任何路径前缀的文件(例如“mydata.txt”)时使用此目录。当访问带有“c:mydata.txt”这样的驱动器前缀的文件时,默认目录会怎么样(注意没有反斜杠)。
事实证明,系统使用进程环境变量跟踪每个驱动器的当前目录。如果您调用 GetEnvironmentStrings,您会在块的开头发现类似以下的内容:

To get the current directory for a drive call GetFullPathName:
要获取驱动器的当前目录,请调用 GetFullPathName:

Generally speaking, this function returns the full path of a given file name. Specifically, with a drive letter it returns its current directory. Here is an example:
一般来说,此函数返回给定文件名的完整路径。具体来说,它使用驱动器号返回其当前目录。这是一个例子:

Do not append a backslash to the drive letter after the colon! If you do, you’ll just get the same string back.
不要在冒号后的驱动器盘符上附加反斜杠!如果这样做,您只会得到相同的字符串。
Calling the function with a drive letter and a file name returns the resulting full path of the drive’s current directory and the file name:
使用驱动器盘符和文件名调用该函数将返回驱动器当前目录和文件名的完整路径:

The above code might return something like “c:Win10SysProg\mydata.txt”.
上面的代码可能会返回类似于“c:Win10SysProg\mydata.txt”的内容。
GetFullPathName does not check for the existence of the file provided.
GetFullPathName 不检查提供的文件是否存在。
Process (and Thread) Attributes
The STARTUPINFO structure we met in CreateProcess has quite a few fields in it. It stands to reason that future versions of Windows may require more ways to customize process creation. One possible way would be to extend the STARTUPINFO structure and add more flags to make certain members valid. Microsoft decided to extend STARTUPINFO in a different way starting with Windows Vista.
我们在 CreateProcess 中遇到的 STARTUPINFO 结构中有相当多的字段。按理说,未来版本的 Windows 可能需要更多的方式来自定义进程创建。一种可能的方法是扩展 STARTUPINFO 结构并添加更多标志以使某些成员有效。 Microsoft 决定从 Windows Vista 开始以不同的方式扩展 STARTUPINFO。
An extended structure, STARTUPINFOEX is defined, that extends STARTUPINFO, shown here again for convenience:
定义了一个扩展结构 STARTUPINFOEX,它扩展了 STARTUPINFO,为方便起见,此处再次显示:

The memory layout of STARRTUPINFOEX starts with a STARTUPINFO with just one added member: an opaque attribute list. This attribute list is the main extension mechanism for CreateProcess (and CreateRemoteThreadEx discussed in chapter 5). Since this attribute list can point to any number of attributes, there is no need to extend STARTUPINFOEX further.
STARRTUPINFOEX 的内存布局以 STARTUPINFO 开始,只添加了一个成员:一个不透明的属性列表。该属性列表是 CreateProcess(以及第 5 章中讨论的 CreateRemoteThreadEx)的主要扩展机制。由于此属性列表可以指向任意数量的属性,因此无需进一步扩展 STARTUPINFOEX。
Creating and filling an attribute list requires the following steps:
创建和填充属性列表需要以下步骤:
-
- Allocate and initialize an attribute list with InitializeProcThreadAttributeList.
- 使用 InitializeProcThreadAttributeList 分配并初始化一个属性列表。
-
- Add attributes as required by calling UpdateProcThreadAttribute once for each attribute.
- 通过为每个属性调用一次 UpdateProcThreadAttribute 来根据需要添加属性。
-
- Set the pAttribute member of STARTUPINFOEX to point to the attribute list.
3.设置STARTUPINFOEX的pAttributeList成员指向属性列表。
-
- Call CreateProcess with the extended structure, not forgetting to add the flag EXTENDED_STARTUPINFO_PRESENT to the creation flags (sixth parameter to CreateProcess)
- 使用扩展结构调用 CreateProcess,不要忘记将标志 EXTENDED_STARTUPINFO_PRESENT 添加到创建标志(CreateProcess 的第六个参数dwCreationFlag)
-
- Delete the attribute list with DeleteProcThreadAttributeList.
- 用DeleteProcThreadAttributeList 删除属性列表。
Let’s take these steps in turn. Here is the simplified declaration of InitializeProcThreadAttributeList:
让我们依次执行这些步骤。下面是 InitializeProcThreadAttributeList 的简化声明:
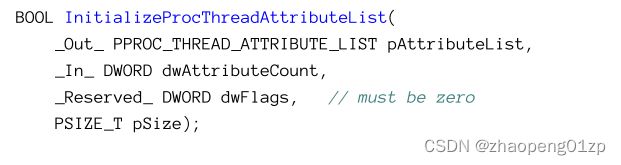
The first step is to allocate a buffer large enough to hold the required number of attributes.
This is done by calling InitializeProcThreadAttributeList twice: first to get the required size, allocate a buffer, and then make a second call to initialize the buffer to hold an attribute list.
第一步是分配一个足够大的缓冲区来容纳所需数量的属性。
这是通过两次调用 InitializeProcThreadAttributeList 来完成的:首先是获取所需的大小,分配缓冲区,然后进行第二次调用以初始化缓冲区以保存属性列表。
The following example performs these steps (error handling omitted):
以下示例执行这些步骤(省略了错误处理):
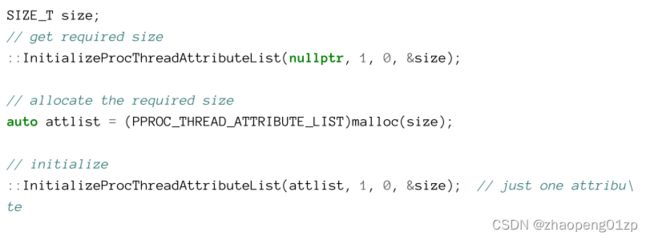
The first call to InitializeProcThreadAttributeList returns FALSE, with GetLastError returning 122 (“The data area passed to a system call is too small. ”). This is expected, since the real return value is the required size. The attribute list itself must be allocated by the caller (malloc is used in the above snippet), which also means it must be freed after the call to CreateProcess.
对InitializeProcThreadAttributeList的第一次调用返回FALSE,GetLastError返回122(“传递给系统调用的数据区域太小。”)。这是意料之中的事,因为实际返回值是所需的大小。属性列表本身必须由调用者分配(malloc在上面的代码段中使用),这也意味着必须在调用CreateProcess之后释放它。
Next, UpdateProcThreadAttribute is called a number of times according to the count of attributes. The list of possible attributes has grown with almost every Windows release, and is likely to continue growing. Table 3-9 shows the documented attributes for processes and threads (at the time of writing), with a brief description.
接下来,UpdateProcThreadAttribute会根据属性的计数被调用多次。可能的属性列表几乎随着每一个Windows版本的发布而增长,而且可能还会继续增长。表3-9显示了进程和线程的记录属性(在撰写本文时),并进行了简要描述。


- PARENT_PROCESS
Sets a different parent process from which to inherit various properties
设置一个不同的父进程,从中继承各种属性
- HANDLE_LIST
Specified a list of handles to be inherited by the child process
指定要由子进程继承的句柄列表
- GROUP_AFFINITY
Sets the default CPU affinity group for the new thread (see chapter 6)
为新线程设置默认的 CPU 亲和组(参见第 6 章)
- PREFERRED_NODE
Sets the preferred NUMA node for the new process
为新进程设置首选 NUMA 节点
- IDEAL_PROCESSOR
Sets the ideal CPU for the new thread (see chapter 6)
为新线程设置理想的 CPU(见第 6 章)
- UMS_THREAD
Sets the User Mode Scheduling (UMS) context for the new thread (see chapter 10)
为新线程设置用户模式调度 (UMS) 上下文(参见第 10 章)
- MITIGATION_POLICY 缓解策略
Sets security mitigation policies for the new process (see chapter 16)
为新进程设置安全缓解策略(参见第 16 章)
- SECURITY_CAPABILITIES
Sets the security capabilities of an AppContainer (see chapter 16)
设置 AppContainer 的安全能力(见第 16 章)
- PROTECTION_LEVEL 保护等级
Launches the new process with the same protection level as the creator
启动与创建者具有相同保护级别的新进程
- CHILD_PROCESS_POLICY
Specifies whether the new process can create child processes
指定新进程是否可以创建子进程
- DESKTOP_APP_POLICY
Applies to applications converted to UWP using Desktop Bridge. Specifies whether the new process’ child processes will be created outside the desktop app environment
适用于使用 Desktop Bridge 转换为 UWP 的应用程序。指定是否将在桌面应用程序环境之外创建新进程的子进程
Desktop Bridge is discussed in chapter 18.
桌面桥在第18章中进行了讨论。
UpdateProcThreadAttribute is defined like so:
UpdateProcThreadAttribute的定义如下:

The following example uses PROC_THREAD_ATTRIBUTE_PARENT_PROCESS attribute to set a different parent by specifying a handle to another process:
以下示例使用PROC_THREAD_ATTRIBUTE_PARENT_PROCES属性,通过指定另一个进程的句柄来设置不同的父进程:

With PROC_THREAD_ATTRIBUTE_PARENT_PROCESS, the attribute value is an open handle to the relevant process. See the documentation for details on the other attributes values.
Once the attribute list is fully updated, the call to CreateProcess can commence, being careful to use the correct structure and flags for the attributes to have any effect:
对于PROC_THREAD_ATTRIBUTE_PARENT_PROCES,属性值是相关进程的打开句柄。有关其他属性值的详细信息,请参阅文档。
一旦属性列表完全更新,就可以开始调用CreateProcess,注意使用正确的结构和标志以使属性产生生效:

There are two things that must be set to indicate an attribute list: the STARTUPINFOEX structure and the flag EXTENDED_STARTUPINFO_PRESENT. Without the latter, the attributes won’t be applied.
必须设置两件事来指示属性列表:STARTUPINFOEX 结构和标志 EXTENDED_STARTUPINFO_PRESENT。如果没有后者,属性将无法应用。
The last step is cleaning up the attribute list and the allocated memory for it:
最后一步是清理属性列表和为其分配的内存:

Given the above steps, the following function creates a given process parented with another process based on its ID:
鉴于上述步骤,下面的函数根据一个 ID 创建一个给定进程,该进程是另一个进程的父级:
鉴于上述步骤,下面的函数根据另一个进程(父进程)的ID创建一个给定的进程:
(根据上述步骤,下面的函数创建一个给定的进程,该进程的父进程是基于其ID的另一个进程)


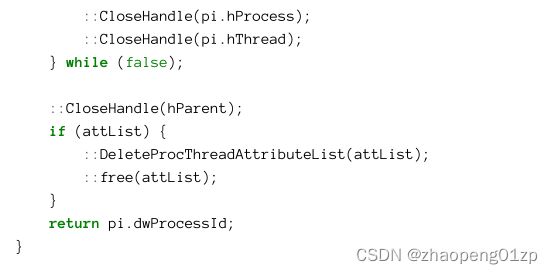
Most of the code is the same as the steps outlined for working with attributes, with error handling added and proper cleanup. Notice the process handle is opened with the PROCESS_CREATE_PROCESS access mask. This is required when using the PROC_THREAD_ATTRIBUTE_PARENT_PROCESS attribute. This means not all processes can just arbitrarily serve as parents.
大多数代码与使用属性的步骤相同,只是添加了错误处理和适当的清理。请注意,进程句柄是使用 PROCESS_CREATE_PROCESS 访问掩码打开的。这在使用 PROC_THREAD_ATTRIBUTE_PARENT_PROCESS 属性时是必需的。这意味着并非所有进程都可以任意充当父进程。
使用记事本运行此函数,传入Explorer 进程的 PID ,代码如下:
WCHAR name[] = L"notepad";
auto pid = CreateProcessWithParent(name, parentPid);
Running this function from with Notepad and a PID of an Explorer process created Notepad as expected. Opening its properties in Process Explorer shows Explorer as being the parent (figure 3-18).
使用记事本运行此函数,通过Explorer 进程的 PID 按预期创建了记事本。在 Process Explorer 中打开它的属性显示 Explorer 是父进程(图 3-18)。

As another example, consider the following function that applied a process security mitigation policy:
另一个例子是,考虑以下应用了进程安全缓解策略的功能:
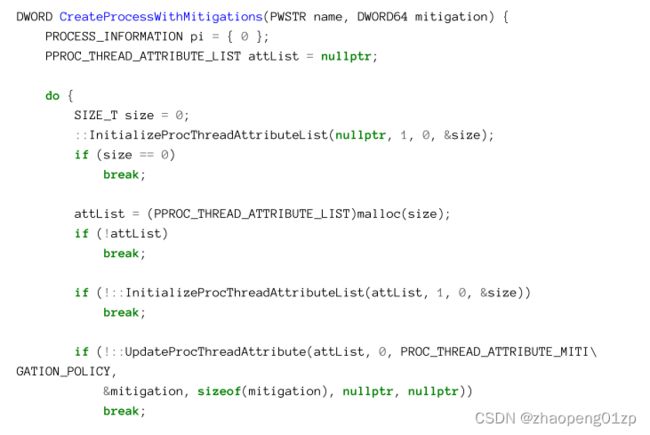

The code is nearly identical except for the different attribute. The value associated with PROC_THREAD_ATTRIBUTE_MITIGATION_POLICY is a DWORD or DWORD64 indicating the mitigation(s) to apply to the new process.
除了属性不同之外,代码几乎完全相同。与PROC_THREAD_ATTRIBUTE_MITIGATION_POLICY相关联的值是DWORD或DWORD64,指示要应用于新进程的缓解措施。
Full discussion of process mitigations is in chapter 16.
第 16 章将全面讨论进程缓解措施。
For example, calling this function with the following arguments
例如,使用以下参数调用此函数

Causes Notepad to fail initialization and terminate, not before showing the message box in figure 3-19. The reason is that the specific mitigation prevents calls to Win32k.sys (the windowing manager), which essentially means User32.dll cannot properly initialize. Without this capability Notepad is useless and cannot properly execute. This mitigation is good for processes that have no UI and want to make sure Win32k.sys security vulnerabilities cannot be used in such a process.
导致记事本初始化失败并终止,而不是在显示图3-19中的消息框之前。原因是特定的缓解措施阻止了对Win32k.sys(窗口管理器)的调用,这本质上意味着User32.dll无法正确初始化。如果没有此功能,记事本将毫无用处,无法正确执行。这种缓解措施适用于没有UI并且希望确保Win32k.sys安全漏洞不能在这样的进程中使用的进程。
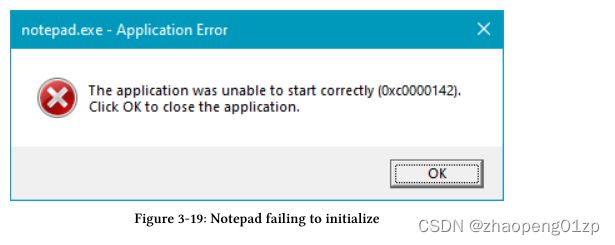
Protected and PPL Processes
Protected processes were introduced in Windows Vista as a way to fight Digital Rights Management (DRM) infringements. These processes be granted certain access rights even by admin-level users. The only access masks allowed for protected processes are: PROCESS_QUERY_LIMITED_INFORMATION, PROCESS_SET_LIMITED_INFORMATION, PROCESS_SUSPEND_RESUME and PROCESS_TERMINATE.
Windows Vista中引入了受保护的进程,作为对抗数字版权管理(DRM)侵权行为的一种方式。即使管理员级别的用户也会授予这些进程某些访问权限。受保护进程允许的唯一访问掩码是:PROCESS_QUERY_LIMITED_INFORMATION、PROCESS_SET_LIMITED_INFORMATION、PROCESS_SUSPEND_RESUME和PROCESS_TERMINATE。
Only Microsoft-signed executables with a certain Extended Key Usage (EKU) were allowed to execute protected.
只有具有特定扩展密钥用法(EKU)的Microsoft签名的可执行文件才允许受保护地执行。
Windows 8.1 introduced Protected Processes Light (PPL), which extends the protection model to include several levels of protection, where higher level protected processes have full access to lower level ones, but not vice versa. With the extended model, it is now possible to run third party anti-malware services by negotiating with Microsoft and obtaining the proper signature. Also, some of the PPL levels (such as for anti-malware) deny PROCESS_TERMINATE access, so that malicious software, even with elevated permissions, cannot stop or kill these services. Table 3-10 lists the PPL signer levels with a brief description.
Windows 8.1引入了Protected Processes Light(PPL),它将保护模型扩展到包括多个级别的保护,在这些级别中,更高级别的受保护进程可以完全访问更低级别的进程,但反之亦然。有了扩展模型,现在可以通过与微软协商并获得正确的签名来运行第三方反恶意软件服务。此外,一些PPL级别(如反恶意软件)拒绝PROCESS_TERMINATE访问,因此恶意软件即使具有提升的权限,也无法停止或终止这些服务。表3-10列出了PPL签名者级别,并进行了简要说明。
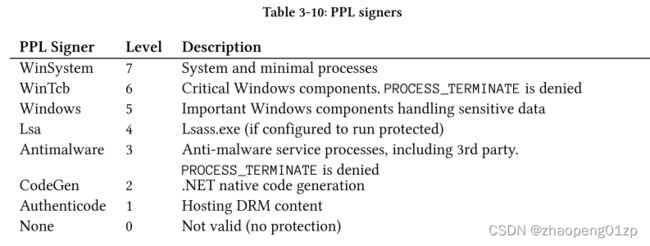
- WinSystem
System and minimal processes
系统和最低进程
- WinTcb
Critical Windows components. PROCESS_TERMINATE is denied
关键的Windows组件。PROCESS_TERMINATE被拒绝
- Windows
Important Windows components handling sensitive data
处理敏感数据的重要Windows组件
- Lsa
Lsass.exe (if configured to run protected)
Lsass.exe(如果配置为受保护运行)
- Antimalware 反恶意软件
Anti-malware service processes, including 3rd party.
PROCESS_TERMINATE is denied
反恶意软件服务流程,包括第三方。
PROCESS_TERMINATE被拒绝
- CodeGen
.NET native code generation
.NET本机代码生成
- Authenticode 验证码
Hosting DRM content
托管DRM内容
- None
Not valid (no protection)
无效(无保护)
The level (and whether the process is “normal” protected or PPL) shown in table 3-10 is stored inside the kernel process object.
表3-10中所示的级别(以及进程是“正常”保护还是PPL)存储在内核进程对象中。
The “limited” access masks allowed for protected/PPL processes cater for setting/querying superficial information about the process, such as querying its start time, its priority class or its executable path. Getting a list of loaded modules inside a protected process cannot be obtained because this requires an access mask of PROCESS_QUERY_INFORMATION, which is not allowed. Figure 3-20 shows Csrss.exe selected in Process Explorer. Notice that the list of modules in the bottom pane is empty. Also, the Protection column is shown, with the signer values from table 3-10.
受保护/PPL 进程允许的“有限”访问掩码满足设置/查询有关进程的粗浅信息,例如查询其开始时间、优先级类或其可执行路径。无法获得受保护进程内已加载模块的列表,因为这需要 PROCESS_QUERY_INFORMATION 的访问掩码,这是不允许的。图 3-20 显示了在 Process Explorer 中选择的 Csrss.exe。请注意,底部窗格中的模块列表是空的。此外,也显示了保护列(Protection column),以及表 3-10 中的签名者值(PPL signers)(例如PsProtectedSignerWinTcb-Light、PsProtectedSignerWindows-Light和PsProtectedSignerAntimalware-Light)。
Figure 3-20 also shows Microsoft’s own anti-malware executables (MsMpEng.exe and NisSrv.exe, known as “Windows Defender”) running as anti-malware PPL, just like other 3rd party anti-malware services.
图 3-20 还显示了作为反恶意软件 PPL 运行的 Microsoft 自己的反恶意软件可执行文件(MsMpEng.exe 和 NisSrv.exe,称为“Windows Defender”),就像其他第 3 方反恶意软件服务一样。
Protected and PPL processes cannot load arbitrary DLLs, so that the protected process is not tricked into loading an untrusted DLL that would run under the protection of the process.
All DLLs loaded by protected/PPL processes must be signed properly.
受保护和 PPL 进程无法加载任意 DLL,因此受保护进程不会被诱骗加载不受信任的 DLL,该 DLL 将在进程的保护下运行。
受保护/PPL 进程加载的所有 DLL 都必须正确签名。
Creating a process as protected requires the CREATE_PROTECTED_PROCESS flag in CreateProcess. Of course, this can only work on properly signed executables. The protection mechanism is too specialized to be used by normal applications and so is not going to be discussed further in this book.
创建受保护的进程需要 CreateProcess 中的 CREATE_PROTECTED_PROCESS 标志。当然,这只适用于正确签名的可执行文件。保护机制过于特殊,无法被普通应用程序使用,因此本书不打算进一步讨论。
You can find more information on protected/PPL processes in the “Windows Internals 7th edition Part 1” book in chapter 3.
您可以在“Windows Internals 第 7 版第 1 部分”一书的第 3 章中找到有关受保护/PPL 进程的更多信息。
UWP Processes
A Universal Windows Platform (UWP) process is similar to any other standard process. It uses the Windows Runtime platform/API to do most of its work - be that UI, graphics, networking, background processing and so on. Some of its unique properties include:
通用 Windows 平台 (UWP) 进程类似于任何其他标准进程。它使用 Windows 运行时平台/API 来完成大部分工作——UI、图形、网络、后台处理等。它的一些独特属性包括:
• A UWP process always runs under an application sandbox known as AppContainer that limits what it can do and what it can access (discussed in more detail in chapter 16, “Security”).
• UWP 进程始终在称为 AppContainer 的应用程序沙箱下运行,该沙箱限制了它可以执行的操作和可以访问的内容(在第 16 章“安全性”中进行了更详细的讨论)。
• A UWP process’ state is managed by the Process Lifetime Manager (PLM), running under the Explorer.exe process, that can initiate process suspension, resumption, and termination based on its foreground/background activity and memory usage (discussed more in chapter 18).
•UWP进程的状态由在Explorer.exe进程下运行的进程生存期管理器(PLM)管理,该管理器可以根据其前台/后台活动和内存使用情况启动进程暂停、恢复和终止(在第18章中详细讨论)。
• A UWP package includes a set of capabilities - declarations - of what the application wants to access (such as camera, location, Pictures folder) and those capabilities are listed in the Microsoft Store so that users can decide whether that would like to download such an application.
•UWP包包括一组功能-声明-说明应用程序想要访问的内容(如相机、位置、图片文件夹),这些功能在Microsoft Store中列出,以便用户可以决定是否下载此类应用程序。
• UWP processes are single instance by default (multiple instances supported starting with Windows 10 version 1803).
•默认情况下,UWP进程是单个实例(从Windows 10版本1803开始支持多个实例)。
From a process creation perspective, a standard CreateProcess call cannot create a UWP process. This is because a UWP application has identity, something that is missing from standard executables. Such an application is built into a package with the executable, libraries, resource files and anything else that is needed for the application to execute properly. This package has a universally unique name, and this name is the one required for UWP process creation.
从进程创建的角度来看,标准的CreateProcess调用无法创建UWP流程。这是因为UWP应用程序具有标识(identity),这是标准可执行文件中缺少的。这样的应用程序内置在一个包中,包中包含可执行文件、库、资源文件以及应用程序正常执行所需的任何其他内容。这个包有一个通用的唯一名称,这个名称是创建UWP进程所需的名称。
You can view this name in Task Manager or Process Explorer by adding the Package Name column.
通过添加“包名称”列,可以在任务管理器或Process Explorer中查看此名称。
As a simple example to this requirement, run Calculator on Windows 10, and look at its properties with Process Explorer (figure 3-21). Notice the command line; disregard its length and ugliness and just copy it, and use Start/Run to launch another calculator with the pasted in the command-line. You’ll get an error message box similar to the one in figure 3-22.
作为此要求的一个简单示例,请在Windows 10上运行Calculator,并使用Process Explorer查看其属性(图3-21)。注意命令行;忽略它的长度和丑陋,只复制它,然后使用Start/Run启动另一个计算器,并在命令行中粘贴。您将得到一个类似于图3-22中的错误消息框。

The error message in figure 3-22 seems unrelated to anything. The missing piece of information is the package full name, which needs to be specified as a process attribute.
Unfortunately, this particular attribute is undocumented, so cannot be specified with the help of the Windows headers. There is a way to specify this parameter using another creation mechanism devised just for this purpose and exposed through a COM interface (and class).
图3-22中的错误消息似乎与任何事情都无关。缺少的信息是包全名,需要将其指定为进程属性。
不幸的是,这个特定的属性是未文档化的(undocumented),因此无法在Windows标头的帮助下指定。有一种方法可以使用另一种创建机制来指定此参数,该机制仅为此目的设计,并通过COM接口(和类)公开。
The MetroManager application, shown in figure 3-23 lists the available UWP packages on the machine, and allows the user to launch any selected package. The application demonstrates a few interesting abilities:
MetroManager应用程序,如图3-23所示,列出了机器上可用的UWP包,并允许用户启动任何选定的包。该应用程序展示了一些有趣的功能:
-
Consuming Windows Runtime APIs from a non-UWP application.
-
使用非UWP应用程序的Windows运行时API。
-
Enumerating packages
-
枚举包
-
Launching UWP processes in the documented way.
-
以文件化的方式启动UWP流程。
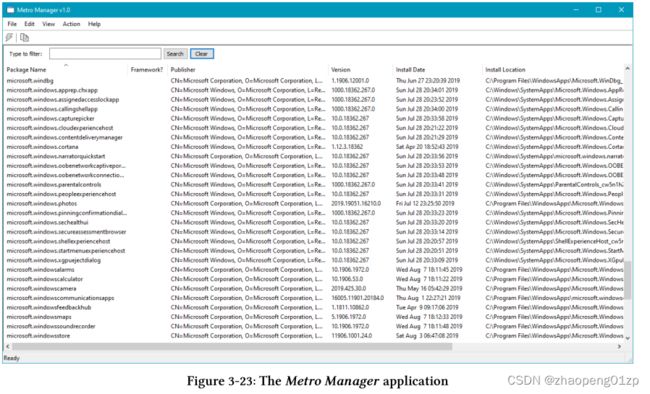
The Windows Runtime (WinRT) is built on top of COM, which means it utilizes interfaces, classes, class factories, GUIDs and other concepts from the COM world (albeit giving to some new names). The Windows Runtime supports entities typically found in high level languages, including static methods and generics. We’ll look at how this works in chapter 18. Here, I want to concentrate mostly on the mechanics of using the Windows Runtime.
Windows运行时(WinRT)构建在COM之上,这意味着它利用了COM世界中的接口、类、类工厂、GUID和其他概念(尽管赋予了一些新名称)。Windows运行时支持通常在高级语言中找到的实体,包括静态方法和泛型。我们将在第18章中研究它是如何工作的。在这里,我想主要关注使用Windows运行时的机制。
The Windows Runtime API can be consumed by a C++ client in several ways:
C++客户端可以通过以下几种方式使用Windows运行时API:
-
- Directly, by instantiating the proper classes and working with the low level object factories until an instance is created and then use normal COM calls.
-
1.直接地,通过实例化适当的类并使用低级对象工厂,直到创建了实例,然后使用正常的COM调用。
-
- Use the Windows Runtime Library (WRL) C++ wrappers and helpers.
-
2.使用Windows运行时库(WRL)C++包装器和帮助程序。
-
- Use the C++/CX language extensions, that provide an easy access to WinRT by extending C++ in a non-standard way.
-
3.使用C++/CX语言扩展,通过以非标准的方式扩展C++,可以轻松访问WinRT。
-
- Use the CppWinRT library, that provides relatively easy access to the WinRT APIs with standard C++ only.
-
4.使用CppWinRT库,该库仅通过标准C++提供对WinRT API的相对容易的访问。
All the above four ways are officially supported. The first option is the most tedious and is only recommended for learning purposes, as it hides very little from the developer and so is very verbose. Option 2 is easier to use, but is not favored today, not even by Microsoft.
Option 3 is the easiest and was the most common in the early days of WinRT, but is frowned upon today because it forces the developer to use non-standard C++ extensions. This leaves option 4, which is the recommended way to work with WinRT in C++, as it’s easy enough to work with but still uses standard C++ constructs.
以上四种方式均得到官方支持。第一个选项是最乏味的,只推荐用于学习目的,因为它对开发人员隐藏得很少,因此非常冗长。选项2更容易使用,但在今天并不受欢迎,甚至微软也不喜欢。
选项3是最简单的,也是WinRT早期最常见的,但今天却不受欢迎,因为它迫使开发人员使用非标准的C++扩展。这就留下了选项4,这是在C++中使用WinRT的推荐方法,因为它很容易使用,但仍然使用标准C++构造。
CppWinRT is beyond the scope of this book, but we’ll cover the basics which can get you quite far. First, we need to add the Nuget package for the library (figure 3-24). Next, we need to add includes for the namespaces that we wish to use from WinRT. The following was added to the pre-compiled header (pch.h in the project source code):
CppWinRT超出了本书的范围,但我们将介绍可以帮助您走得更远的基础知识。首先,我们需要为库添加Nuget包(图3-24)。接下来,我们需要为我们希望从WinRT中使用的命名空间添加includes。以下内容已添加到预编译的标头中(项目源代码中的pch.h):

More CppWinRT information is available in the online Microsoft documentation.
在线 Microsoft 文档中提供了更多 CppWinRT 信息。

This is the general format of the CppWinRT headers: winrt prefix and then the namespace (found in the WinRT documentation).
这是CppWinRT标头的通用格式:winrt前缀,然后是命名空间(在winrt文档中找到)。
没有winrt前缀的头文件是 "真正的 "WinRT头文件,它被包含在内部。在使用CppWinRT时,你一般不需要这些头文件。
Since all WinRT APIs are in namespaces and nested namespaces, the type names become long. It’s much easier to add using namespace statements to a source file, or in some cases - a function to ease accessing the various types:
由于所有的WinRT API都在命名空间和嵌套命名空间中,因此类型名称变得很长。在源文件中添加使用命名空间的语句要容易得多,或者在某些情况下,添加一个函数来简化对各种类型的访问:

The winrt namespace itself has some general CppWinRT helpers, so it’s mandatory. The others depend on the types we use.
Enumerating the UWP packages is done with the PackageManager class in the winrt::Windows::Management::Deployment namespace:
winrt命名空间本身有一些通用的CppWinRT帮助器,所以它是强制性的。其他取决于我们使用的类型。
枚举UWP包是通过winrt::Windows::Management::Deployment命名空间中的PackageManager类完成的:

An empty string for the user looks at the current user (other users on the system may have installed different packages).
The auto keyword is real helper here as the actual returned type is IIterable (and I’ve shortened both types assuming we have using namespace for them). The important point is this method returns a collection (IIterable<>) in WinRT parlance.
Because of the added conveniences in CppWinRT, any such collection can be iterated upon with the C++ enhanced range-based for statement:
用户的空字符串显示当前用户(系统上的其他用户可能安装了不同的软件包)。
auto关键字在这里是真正的帮手,因为实际返回的类型是IIterable<Package>(我已经缩短了这两种类型,假设我们为它们使用了命名空间)。重要的一点是,用WinRT的说法,此方法返回一个集合(IIterable<>)。
由于CppWinRT增加了便利性,任何这样的集合都可以用C++增强的基于范围的for语句进行迭代:

AppItem is a normal C++ class the application defines to store the information in plain C++ types rather than WinRT types where it makes sense, especially for strings:
AppItem是一个普通的C++类,应用程序定义它来将信息存储在普通的C++类型中,而不是有意义的WinRT类型中,尤其是对于字符串:
The standard Windows Runtime string is typed as HSTRING, which is an immutable array of UTF-16 characters stored with its length.
标准的Windows运行时字符串类型为HSTRING,这是一个不可变的UTF-16字符数组,以其长度存储。
This AppItem-stored data is used to show the information in the application’s list view.
Running a UWP package is accomplished with the following COM (not WinRT) interface, shown in C++:
此AppItem存储的数据用于在应用程序的列表视图中显示信息。
运行UWP包是通过以下COM(而非WinRT)接口完成的,如C++所示:

There are several ways to “activate” a UWP application, using something called contracts, where one of the contracts is called Launch, which naturally launches the application.
ActivateApplication is using the Launch contract, while the others work with different contracts. We’ll use the Launch contract only in this application.
有几种方法可以 "激活 "一个UWP应用程序,使用一种叫做合约的东西,其中一个合约叫做Launch,它自然会启动应用程序。 ActivateApplication使用的是Launch合约,而其他的合约则使用不同的合约。我们将只在这个应用程序中使用Launch合约。
The complete code for launching an app is in the CView::RunApp member function. First, we need to locate some information about a package using its unique package full name (stored in the AppItem structure shown earlier). Here is the first call:
启动一个应用程序的完整代码在CView::RunApp成员函数中。首先,我们需要使用独特的包的全名(存储在前面显示的AppItem结构中)来定位包的一些信息。下面是第一个调用:
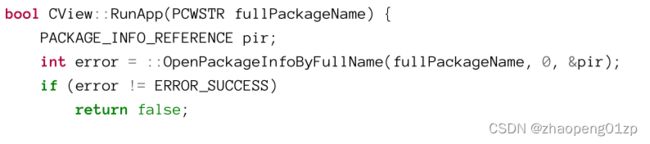
OpenPackageInfoByFullName returns an opaque pointer to an internal data structure that holds information about the requested package. Unfortunately, the full package name is not enough, because theoretically a package can contain multiple applications (which is not yet supported) and so another application ID needs to be extracted from the package:
OpenPackageInfoByFullName返回一个指向内部数据结构的不透明指针,该数据结构保存有关请求包的信息。不幸的是,完整的包名称是不够的,因为理论上一个包可以包含多个应用程序(目前还不支持),因此需要从包中提取另一个应用程序ID:

This is accomplished in two steps: first calling GetPackageApplicationIds with a NULL pointer for the application ID and a length of zero. This causes the function to fill in the required length. Then, a buffer is constructed with make_unique (ensuring it’s automatically destroyed when the variable goes out of scope), and a second call is made.
The application IDs returned are stored with a 4-byte length and then the data itself. Since only one application is expected, we can just skip the first 4 bytes and use the rest as the application ID. The last step is to create the instance that implements IApplicationActivationManager and call ActivateApplication with the application ID:
这分两步完成:首先调用GetPackageApplicationIds,其中应用程序ID的指针为NULL,长度为零。这会导致函数填充所需的长度。然后,使用make_unique构建一个缓冲区(确保在变量超出范围时自动销毁),并进行第二次调用。
返回的应用程序ID以4字节的长度存储,然后存储数据本身。由于只需要一个应用程序,我们可以跳过前4个字节,将其余字节用作应用程序ID。最后一步是创建实现IApplicationActivationManager的实例,并使用应用程序ID调用ActivateApplication:
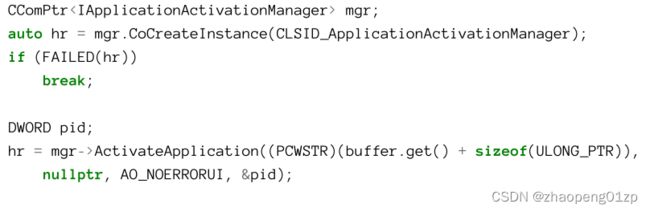
ActivateApplication is even kind enough to return the process ID of the created process.
Finally, the package information data needs to be freed:
ActivateApplication甚至可以返回创建的进程的进程ID。
最后,需要释放包信息数据:

If you look at the parent of any UWP process, you’ll discover it’s an Svchost.exe process, rather than the direct creator (see figure 3-22). This is because UWP processes are actually launched by the DCOM Launch service, hosted in a service host (figure 3-25).
如果您查看任何UWP进程的父进程,您会发现它是Svchost.exe进程,而不是直接创建者(见图3-22)。这是因为UWP进程实际上是由托管在服务主机中的DCOM Launch服务启动的(图3-25)。
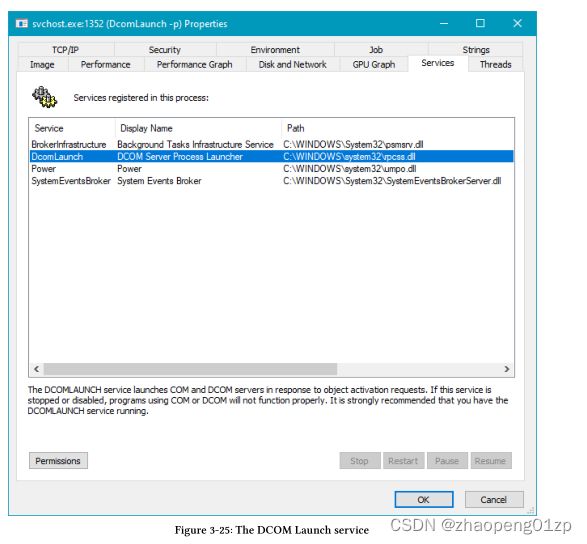

DCOMLAUNCH服务在响应对象激活请求时启动COM和DCOM服务器。如果这个服务被停止或禁用,使用COM或DCOM的程序将不能正常运行。强烈建议你让DCOMLAUNCH服务运行。
Minimal and Pico Processes
Minimal processes contain just a user mode address space. Memory Compression and Registry are canonical examples of minimal processes. Minimal processes can only be created by the kernel, and so will not be discussed further in this book.
最小进程只包含一个用户模式地址空间。内存压缩和注册表是最小进程的典型示例。最小进程只能由内核创建,因此在本书中不会进一步讨论。
Pico processes are minimal processes with an added twist: a pico provider, which is a kernel driver that is responsible for translating Linux system calls to equivalent Windows system calls. This is the basis of the Windows Subsystem for Linux (WSL), available in Windows 10 version 1607 (and later) and Windows 2016 (and later). Pico processes are beyond the scope of this book, although I may publish a special chapter on WSL in the future.
Pico进程是最小的进程,有一个额外的变化:Pico提供程序,这是一个内核驱动程序,负责将Linux系统调用转换为等效的Windows系统调用。这是Windows Subsystem for Linux(WSL)的基础,在Windows 10版本1607(及以后)和Windows 2016(及以后)中可用。Pico进程超出了本书的范围,尽管我可能会在未来出版一个关于WSL的专门章节。
Process Termination
Most processes will terminate at some point before the system is shutdown. There are several ways a process might exit or terminate. One thing to keep in mind is no matter how a process terminates, the kernel ensures nothing private to the process remains: all private (non-shared) memory is freed and all handles in the process handle table are closed.
大多数进程会在系统关闭前的某个时刻终止。一个进程可能有几种退出或终止的方式。需要记住的一点是,无论进程如何终止,内核都要确保进程的任何私有部分都不存在(不会保留):所有的私有(非共享)内存都会被释放,进程句柄表中的所有句柄都会被关闭。
A process terminates if any one of the following conditions is met:
如果满足以下任何一个条件,则进程终止:
-
All the threads in the process exit or terminate.
-
Any thread in the process calls ExitProcess.
-
The process is terminated (usually externally but could be because of an unhandled exception) with TerminateProcess.
-
进程中的所有线程退出或终止。
-
进程中的任何线程调用ExitProcess。
-
进程被TerminateProcess终止(通常是外部的,但可能是由于未处理的异常)。
Anyone writing a Windows application usually finds out at some point that the thread executing the main function is “special”, typically referred to as the main thread. It can be observed that whenever the main function returns, the process exits. This seems to be a scenario not listed in the above reasons for process exit. However, it does, and it’s scenario number 2. The C/C++ runtime library invokes main/WinMain (discussed in the section “Process Creation” earlier in this chapter), and then does required cleanup such as calling global C++ destructors, C runtime cleanup, etc., and then as its final act eventually calls ExitProcess, causing the process to exit.
任何编写Windows应用程序的人通常会在某个时候发现,执行主函数的线程是“特殊的”,通常被称为主线程。可以观察到,每当主函数返回时,进程就会退出。这似乎是上述进程退出原因中未列出的场景。然而,它确实存在,这是第二种情况。C/C++运行时库调用main/WinMain(在本章前面的“进程创建”一节中讨论),然后执行所需的清理,如调用全局C++析构函数、C运行时清理等,然后作为其最后一步,最终调用ExitProcess,导致进程退出。
From the kernel’s perspective, all threads in a process are equal, and there is no main thread.
The kernel destroys a process when all threads within it exit/terminate, as a process without threads is mostly useless. In practice, this scenario can only be achieved in native processes (executables that only depend on NtDll.dll and have no C/C++ runtime). In other words, this is unlikely to happen in normal Windows programming.
从内核的角度来看,一个进程中的所有线程都是平等的,不存在主线程。 当一个进程中的所有线程退出/结束时,内核就会销毁该进程,因为没有线程的进程大多是无用的。在实践中,这种情况只能在本地进程中实现(只依赖NtDll.dll而没有C/C++运行时的可执行程序)。换句话说,在正常的Windows编程中,这种情况不太可能发生。
The ExitProcess function is defined like so:
ExitProcess函数的定义如下:

The calling process is the only one capable of calling ExitProcess, and naturally, this function never returns. External processes can attempt to terminate a process with TerminateProcess (discussed later). The exit code becomes the process exit code, that can be read by anyone holding a handle to the process with GetExitCodeProcess defined like so:
调用进程是唯一能够调用ExitProcess的进程,当然,此函数永远不会返回。外部进程可以尝试使用TerminateProcess终止进程(稍后讨论)。退出代码变为进程退出代码,任何持有GetExitCodeProcess的进程句柄的人都可以读取该代码,GetExitCodeProcess定义如下:

It might seem weird that the exit code is available after the process exits, but since a handle to the process is still open, the kernel process structure is still alive and that is where the exit code is stored. What would happen if GetExitCodeProcess is called for a live process. You might expect the function to fail, but confusingly it succeeds and returns an exit code called STILL_ACTIVE (0x103).
退出代码在进程退出后可用,这可能看起来很奇怪,但由于进程的句柄仍然打开,内核进程结构仍然有效,这就是存储退出代码的地方。如果为活动进程调用GetExitCodeProcess会发生什么。您可能期望该函数失败,但令人困惑的是,它成功了,并返回了一个名为STILL_ACTIVE(0x103)的退出代码。
In the kernel, STILL_ACTIVE is called STATUS_PENDING, indicating in this case that the process is still alive.
在内核中,STILL_ACTIVE被称为STATUS_PENDING,在这种情况下表示进程仍然处于活动状态。
The last sentence means looking at the exit code is not a 100% sure way to check if a process is still alive. The proper way to do this is call WaitForSingleObject(hProcess, 0) and check the return value against WAIT_OBJECT_0; if equal, the process is dead; Only the kernel management object still remains because there is at least one open handle to the process.
最后一句话的意思是,查看退出代码并不是检查进程是否仍然有效的100%确定的方法。正确的方法是调用WaitForSingleObject(hProcess,0)并根据WAIT_OBJECT_0检查返回值;如果相等,则进程是死的;只有内核管理对象仍然保留,因为该进程至少有一个打开的句柄。
ExitProcess shuts down the process in an orderly fashion, performing the following important actions:
ExitProcess以有序的方式关闭进程,执行以下重要操作:
-
All other threads in the process terminate.
-
All DLLs in the process get their DllMain function called with a reason value of PROCESS_DLL_DETACH, indicating the DLL is about to be unloaded and should do its cleanup.
-
Terminates the process and the calling thread (ExitProcess never returns).
-
进程中的所有其他线程终止。
-
进程中的所有DLL都会调用其DllMain函数,其原因reason值为PROCESS_DLL_DETACH,表明DLL即将被卸载,应该进行清理。
-
终止进程和调用线程(主线程)(ExitProcess永不返回)。
The third way a process might terminate is because of a call to TerminateProcess, defined like so:
进程终止的第三种方式是调用TerminateProcess,定义如下:

TerminateProcess can be called from outside the process, assuming a handle with the access mask PROCESS_TERMINATE can be obtained. The function terminates the process then and there and specifies what its exit value would be. The process in question has no say in this.
TerminateProcess differs from ExitProcess in one important aspect: DllMain functions for all DLLs in the target process don’t get called, so cannot perform any cleanup action. This may result in loss of functionality or data. For example, if a DLL writes some information to a log file when it’s unloaded, it will not get the chance to do so. Clearly, TerminateProcess should be used as a last resort.
TerminateProcess可以从进程外部调用,前提是可以获得一个带有访问掩码PROCESS_TERMINATE的句柄。该函数当时就会终止进程,并指定其退出值是多少。相关进程(被终止进程)对此没有发言权。
TerminateProcess与ExitProcess在一个重要方面不同:目标进程中所有DLL的DllMain函数不会被调用,所以不能执行任何清理动作。这可能导致功能或数据的损失。例如,如果一个DLL在卸载时将一些信息写入日志文件,它将没有机会这样做。显然,TerminateProcess应该作为最后的手段来使用。
Task Manager’s End Task button in the Details tab calls TerminateProcess if it’s able to open a process handle with PROCESS_TERMINATE access mask. The End Task button in the Processes tab is trickier, as for GUI processes it first attempts to ask the process to exit nicely by sending a close message to its main window (SendMessage or PostMessage function with WM_CLOSE as the message type).
如果任务管理器能够使用process_TERMINATE访问掩码打开进程句柄,则“详细信息”选项卡中的“结束任务”按钮将调用TerminateProcess。“进程”选项卡中的“结束任务”按钮比较棘手,因为对于GUI进程,它首先尝试通过向其主窗口发送关闭消息(以WM_CLOSE为消息类型的SendMessage或PostMessage函数)来要求进程顺利退出。
Enumerating Processes
In some cases it’s beneficial to enumerate existing processes. One possible reason would be to look for a particular process of interest. Another reason may be to create some sort of tool that provides information on existing processes. Well-known tools such as Task Manager and Process Explorer use process enumeration.
在某些情况下,枚举现有进程是有益的。一个可能的原因是寻找一个感兴趣的特定进程。另一个原因可能是创建某种提供现有进程信息的工具。众所周知的工具(如任务管理器和Process Explorer)使用进程枚举。
The Windows API provides three documented ways to enumerate processes. We’ll examine all of them and then briefly discuss a fourth, semi-documented, option.
Windows API提供了三种文档化(documented )的枚举进程的方法。我们将检查所有这些选项,然后简要讨论第四个半文档化(semi-documented)选项。
Using EnumProcesses
The simplest function to use is EnumProcesses part of the so-called Process Status API (PSAPI), included in :
最简单的函数是EnumProcesses,它是所谓的Process Status API(PSAPI)的一部分,包含在
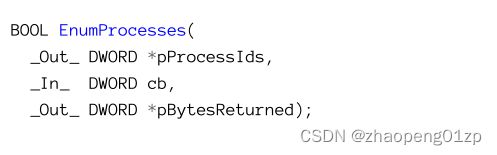
This function provides the bear minimum - all process IDs. The caller must allocate a large enough buffer to store all PIDs. On return, the function indicates the number of bytes actually stored in the provided buffer. If it’s lower than the buffer size, it means the buffer was large enough to contain all PIDs. If it’s equal to the buffer size, then the buffer was probably too small, and the caller should make a second call with a larger buffer size until the first condition is met.
此函数提供了bear最小值-所有进程ID。调用方必须分配一个足够大的缓冲区来存储所有PID。返回时,函数指示实际存储在所提供的缓冲区中的字节数。如果它低于缓冲区大小,则表示缓冲区足够大,可以包含所有PID。如果它等于缓冲区大小,那么缓冲区可能太小,调用方应该使用更大的缓冲区大小进行第二次调用,直到满足第一个条件。
The simplest way is to call the function with a (hopefully) large enough buffer:
最简单的方法是用(希望)足够大的缓冲区调用函数:

A more conservative approach needs to allocate the PIDs array dynamically so it can be resized when needed. A relatively simple way to do this is by leveraging the C++ std::unique_ptr<> template class. Here is a revised example:
一种更保守的方法需要动态分配PID数组,以便在需要时调整其大小。实现这一点的一个相对简单的方法是利用C++std::unique_ptr<>模板类。以下是一个修改后的示例:

(上述代码中的for循环退出条件是count < maxCount,说明缓冲区足够大,如果count == maxCount说明缓冲区不够大,需要重新分配更大的缓冲区maxCount *= 2)
Remember to add #include for the above to compile.
请记住添加#include
You’ll need to #include so that unique_ptr<> is available.
您需要#include,以便unique_ptr<>可用。
If you would rather use classic C++ or even C, you can of course do that by leveraging the new and delete operators or the malloc and free functions. I recommend using the modern C++ approach which is less error prone because the allocated memory is freed automatically when the relevant object is destroyed.
如果您更愿意使用经典C++甚至C,那么您当然可以通过利用new和delete运算符或malloc和free函数来做到这一点。我建议使用现代C++方法,这种方法不太容易出错,因为当相关对象被破坏时,分配的内存会自动释放。
The downside of EnumProcesses is its minimal information - just the PID for each process.
If anything else about the process is needed (the usual case), another call to OpenProcess is required to get a handle to each process of interest and then making the appropriate calls to retrieve information or perform the required operations on the process. Of course, OpenProcess can fail, because not every access mask is necessarily possible to obtain for a process.
EnumProcesses的缺点是它的信息最少——只有每个进程的PID。
如果需要关于该进程的任何其他信息(通常情况下),则需要对OpenProcess进行另一次调用,以获得每个感兴趣的进程的句柄,然后进行适当的调用来检索信息或对该进程执行所需的操作。当然,OpenProcess可能会失败,因为并不是每个访问掩码都可以为一个进程获得。
The following code snippet shows how to get the process image name and its start time after a successful call to EnumProcesses:
以下代码片段显示了如何在成功调用EnumProcesses后获取进程映像名称及其开始时间:
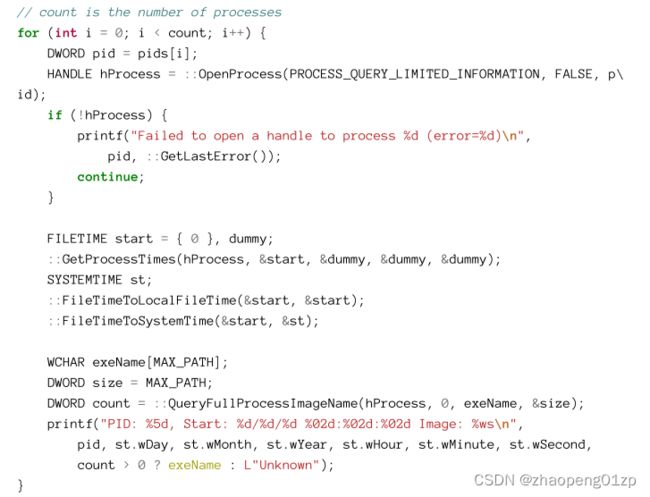
OpenProcess is used to get a handle to the process with PROCESS_QUERY_LIMITED_INFORMATION access mask, which is the lowest one you can ask for. This is enough to get shallow information on a process, such as its start time (GetProcessTimes) or image file name (QueryFullProcessImageName).
OpenProcess用于获取带有PROCESS_QUERY_LIMITED_INFORMATION访问掩码的进程的句柄,这是您可以要求的最低掩码。这足以获取进程的浅层信息,例如进程的开始时间(GetProcessTimes)或映像文件名(QueryFullProcessImageName)。
Here is the prototype for GetProcessTimes:
以下是GetProcessTimes的原型:

FILETIME is a 64-bit value that is split into two 32-bit values. The creation and exit time are given in 100 nano-seconds units measured from January 1, 1601, UTC, at midnight. The creation time is converted into a more manageable form using FileTimeToSystemTime, which splits the 64-bit value into human-readable pieces (day, month, year, etc.).
FILETIME是一个64位值,分为两个32位值。创建和退出时间以100纳秒为单位,从1601年1月1日UTC午夜开始测量。使用FileTimeToSystemTime将创建时间转换为更易于管理的形式,它将64位值拆分为可读的部分(日、月、年等)。
The kernel and user times are relative, given in the same 100 nsec units. They are not used in the above code, putting their result in a dummy variable. Note that providing NULL for any of the parameters will cause the function to throw an access violation exception.
内核和用户时间是相对的,以相同的100纳秒为单位。上面的代码中没有使用它们,而是将它们的结果放在一个伪变量中(dummy)。请注意,为任何参数提供NULL都会导致函数抛出访问冲突异常(所以得提供一个不使用的dummy变量)。
QueryFullProcessImageName allows getting the full executable path of a given process:
QueryFullProcessImageName允许获取给定进程的完整可执行路径:
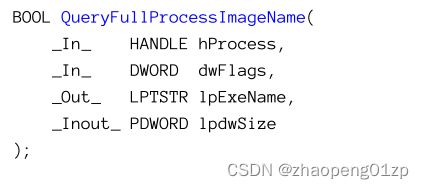
he dwFlags parameter is usually zero, but can be PROCESS_NAME_NATIVE (1), which returns the path in device form, which is the native Windows way of representing paths (something like \Device\HarddiskVolume3\MyDir\MyApp.exe). We’ll look at this form more closely in chapter 11. The lpExeName parameter is the buffer allocated by the caller, and the last parameter is a pointer to the size of the buffer, in characters. This is an input/output parameter, so it must be initialized to the allocated buffer size, and the function changes it to the actual number of characters written to the buffer.
dwFlags参数通常为零,但可以是PROCESS_NAME_NATIVE(1),它以设备形式返回路径,这是表示路径的本机Windows方式(如\device\HarddiskVolume3\MyDir\MyApp.exe)。我们将在第11章中更详细地了解此形式。lpExeName参数是调用方分配的缓冲区,最后一个参数是指向缓冲区大小的指针,以字符为单位。这是一个输入/输出参数,因此必须将其初始化为分配的缓冲区大小,并且函数会将其更改为写入缓冲区的实际字符数。
Running this code with standard user rights produces output like the following:
使用标准用户权限运行此代码会产生如下输出:
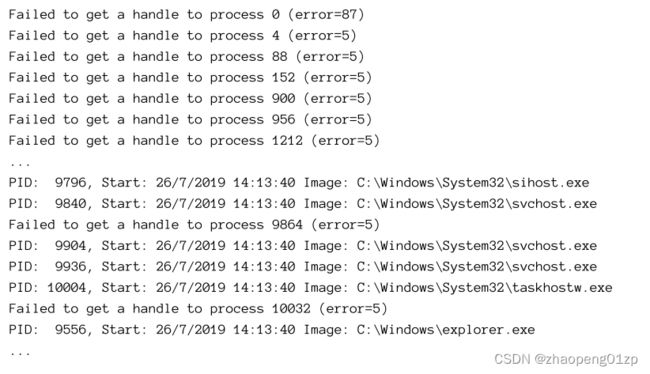
Getting a handle to PID 0 (System Idle Process in Task Manager) fails, as PID 0 is not valid.
This is why the error is number 87 (ERROR_INVALID_PARAMETER). Other processes in the low-PID range fail to open as well, with error 5 (ERROR_ACCESS_DENIED).
获取PID 0(任务管理器中的系统空闲进程)的句柄失败,因为PID 0无效。
这就是错误编号为87(ERROR_INVALID_PARAMETER)的原因。低PID范围内的其他进程也无法打开,出现错误5(ERROR_ACCESS_DENIED)。
Running the same code with admin rights by opening an elevated command window, navigating to the output directory and running the executable produces the following output:
通过打开提升的命令行窗口,导航到输出目录并运行可执行文件,以管理员权限运行相同的代码,会产生以下输出:
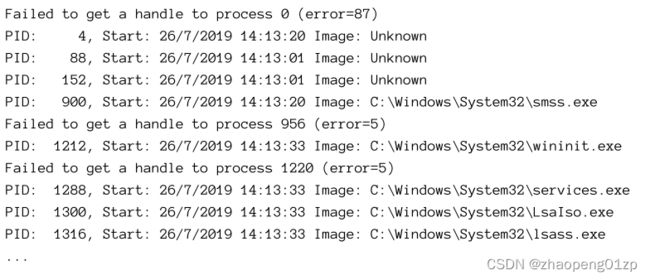
There are two things to notice here. First, we do get more processes open successfully than with standard user rights. Second, with some processes we fail to retrieve the image name.
This is because they don’t have normal executable names. These are some of the “special” ones: 4 (System), 88 (Secure System), 152 (Registry) and further down (not shown) Memory Compression. Clearly, QueryFullProcessImageName cannot provide the names for these processes.
这里有两件事需要注意。首先,与标准用户权限相比,我们确实得到了更多成功打开的进程。第二,对于一些进程,我们无法检索到映像名称。
这是因为它们没有正常的可执行名称。这些是一些 "特殊 "的进程:4(系统)、88(安全系统)、152(注册表)和更远的(更深入)(未显示)的内存压缩。显然,QueryFullProcessImageName不能提供这些进程的名称。
Even with administrator privileges, we can’t seem to open every possible process. This situation can be improved by enabling the Debug privilege (which exists by default in the admin token, but is not enabled). Curiously enough, if you run the code directly from Visual Studio (running elevated), you’ll get the same effect as if the Debug privilege was enabled, because Visual Studio already enabled its Debug privilege and because it’s the one launching the process, its access token is duplicated for the new process, so that the Debug privilege is already enabled.
即使有管理员权限,我们似乎也无法打开所有可能的进程。这种情况可以通过启用调试权限(默认情况下存在于管理令牌中,但未启用)来改善。奇怪的是,如果您直接从Visual Studio运行代码(以提升的方式运行),您将获得与启用“调试”权限相同的效果,因为Visual Studio已经启用了其“调试”特权,并且因为它是启动进程的人,所以它的访问令牌对于新进程是重复的,因此“调试”权利已经启用。
To make sure the Debug privilege is enabled regardless of where the executable is launched from, we can use the following function:
为了确保无论可执行文件从何处启动,都启用调试权限,我们可以使用以下功能:

The complete project is named ProcEnum in the samples repository.
完整的项目在示例存储库中命名为ProcEnum。
A thorough explanation of this function is saved for chapter 16 (“Security”). For now, we can simply use it and get better results:
有关此功能的详细说明,请参阅第16章(“安全”)。目前,我们可以简单地使用它并获得更好的结果:

Now we can open a handle to each and every process (except PID 0 which of course is not a real process).
We still are unable to get the names of the special processes. The next technique for process enumeration solves this issue.
现在我们可以打开每个进程的句柄(除了PID 0,它当然不是一个真正的进程)。
我们仍然无法获得特殊进程的名称。进程枚举的下一个技术解决了这个问题。
Using the Toolhelp Functions
The so-called “Toolhelp” functions provide a more convenient way to get basic information on processes, including process “names” for the special processes not based on an executable image. All this is available from a standard user rights process - no need for elevated permissions.
To gain access to these functions, include . The initial function to call is CreateToolhelp32Snapshot, which creates a snapshot consisting of an optional combination of processes and threads, and for a specific process - heaps and modules as well. Here is the call to create the snapshot to get information for processes only:
所谓的“Toolhelp”函数提供了一种更方便的方式来获取进程的基本信息,包括不基于可执行映像的特殊进程的进程“名称”。所有这些都可以通过一个标准的用户权限进程获得,无需提升权限。
要访问这些函数,请包括

The second parameter to CreateToolhelp32Snapshot indicates which process is the target of the snapshot in case modules or heaps are requested. For processes and threads this must be zero and all processes/threads are included in the snapshot.
Now process enumeration starts with Process32First, and subsequent processes are available by calling Process32Next until the latter returns FALSE meaning there are no more processes. Both functions accept a PROCESSENTRY32 structure pointer where the information is returned for each process:
CreateToolhelp32Snapshot的第二个参数指示在请求模块或堆的情况下哪个进程是快照的目标。对于进程和线程,此值必须为零,并且所有进程/线程都包含在快照中。
现在进程枚举从Process32First开始,通过调用Process32Next可以使用后续进程,直到后者返回FALSE,这意味着不再有进程。两个函数都接受PROCESSENTRY32结构指针,其中为每个进程返回信息:
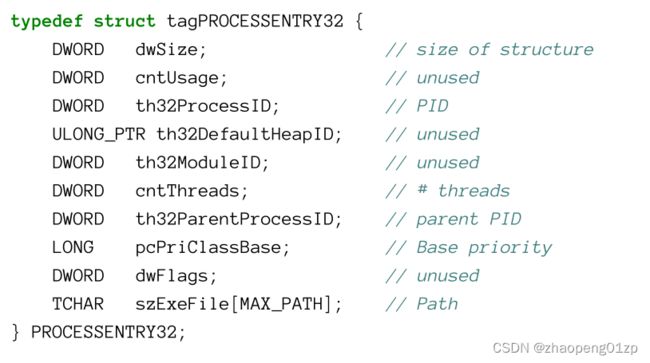
The first member (dwSize) must be set to the size of the structure. As can be seen from the comments, only some of the members are actually used. The following code demonstrates getting all possible information provided by process snapshotting:
第一个成员(dwSize)必须设置为结构的大小。从评论中可以看出,实际上只使用了部分成员。以下代码演示如何获取进程快照提供的所有可能信息:
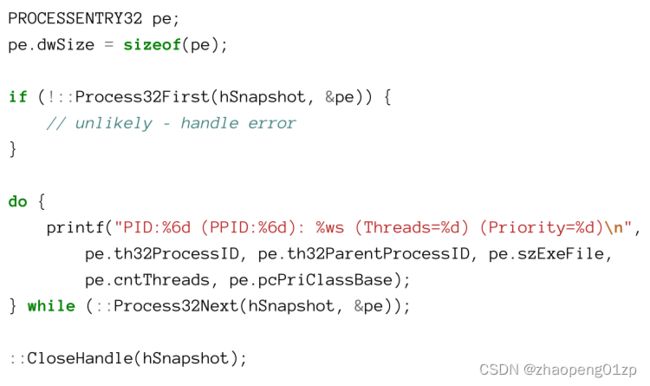
The project ProcList from this chapter’s samples has the complete code. Here is the first few lines of output:
本章示例中的项目ProcList具有完整的代码。以下是输出的前几行:

Using the WTS Functions
The Windows Terminal Services (WTS) functions are used to work in a terminal services (also called Remote Desktop Services) environment, where a server may host several remote (and local) sessions simultaneously. That said, the WTS API can be used on a single session machine just the same as for a multi-session machine. There are several interesting functions in this API, but for this section’s purposes we’ll use its process enumeration functions: WTSEnumerateProcesses and WTSEnumerateProcessesEx. The WTS API is defined in its own header (not included by default with ) - . It also requires adding an import library - wtsapi32.lib - to link successfully.
Windows终端服务(WTS)功能用于在终端服务(也称为远程桌面服务)环境中工作,在该环境中,服务器可以同时主持多个远程(和本地)会话。也就是说,WTS API可以在单会话机器上使用,就像在多会话机器上一样。这个API中有几个有趣的函数,但出于本节的目的,我们将使用它的进程枚举函数:WTSEnumerateProcesses和WTSEnumerateProcessesEx。WTS API在其自己的头中定义(默认情况下不包括在
WTSEnumerateProcesses is defined like so:
WTSEnumerateProcesses的定义如下:

The function can enumerate processes on other machines with the first handle that can be obtained by calling WTSOpenServer. To use the local machine, the constant WTS_CURRENT_SERVER_HANDLE can be used instead. The Version parameter must be set to 1, and the real result is allocated and filled by the function itself, returning a pointer to an array of structures of type WTS_PROCESS_INFO for each discovered process. The last parameter returns the number of processes in the returned array. Since the function allocates the memory, the client application must free it eventually with WTSFreeMemory.
该函数可以枚举其他机器上的进程,第一个句柄可以通过调用 WTSOpenServer 获得。要使用本地机器,可以改用常量 WTS_CURRENT_SERVER_HANDLE。 Version 参数必须设置为 1,真正的结果由函数本身分配和填充,为每个发现的进程返回一个指向 WTS_PROCESS_INFO 类型结构数组的指针。最后一个参数返回进程数到返回数组中。由于该函数分配内存,因此客户端应用程序最终必须使用 WTSFreeMemory 释放它。
The following function, part of the ProcList2 project, uses WTLEnumerateProcesses to show information on all processes in the system:
以下函数是 ProcList2 项目的一部分,使用 WTLEnumerateProcesses 显示系统中所有进程的信息:


The returned information per-process is fairly minimal - process ID, session ID, process name (executable name or a special process name such as System) and a Security Identifier (SID) of the user running the process. The above function displays all information available, and uses a helper function to turn a SID (which is a binary blob, discussed in chapter 16) into a human-readable name:
每个进程返回的信息非常少——进程 ID、会话 ID、进程名称(可执行文件名称或特殊进程名称,例如 System)和运行该进程的用户的安全标识符 (SID)。上面的函数显示了所有可用的信息,并使用辅助函数将 SID(这是一个二进制 blob,在第 16 章中讨论)转换为人类可读的名称:

To link properly, wtsapi32.lib must be added to the linker additional dependencies in Project/Properties, or alternatively added in source with the appropriate #pragma:
要正确链接,必须将 wtsapi32.lib 添加到项目/属性中的链接器附加依赖项,或者使用适当的#pragma 添加到源中:

Running the application that calls EnumerateProcesses1 with standard user rights shows something like the following:
运行以标准用户权限调用 EnumerateProcesses1 的应用程序会显示如下内容:
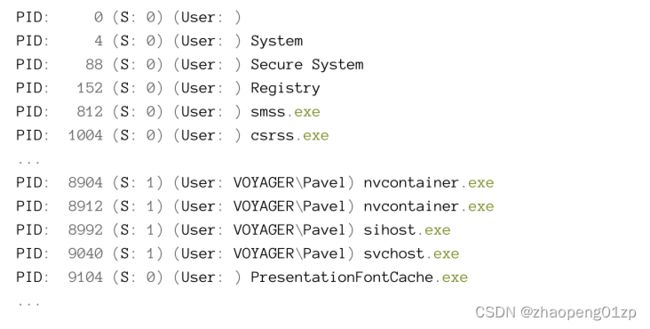
PID 0 (the idle process) has no name as far as the WTS APIs are concerned. As explained earlier, this is not a real process, so any name is synthetic anyway. The SID provided by the API is NULL in all non-running-user processes. To get the most out of this function, including the SIDs, we can run it in an elevated command window (or launch Visual Studio elevated and execute from the IDE). The results are better:
就 WTS API 而言,PID 0(空闲进程)没有名称。如前所述,这不是一个真正的进程,所以任何名称都是合成的。 API 提供的 SID 在所有非运行用户进程中都是 NULL。要充分利用此功能(包括 SID),我们可以在提升的命令窗口中运行它(或启动提升的 Visual Studio 并从 IDE 执行)。结果更好:
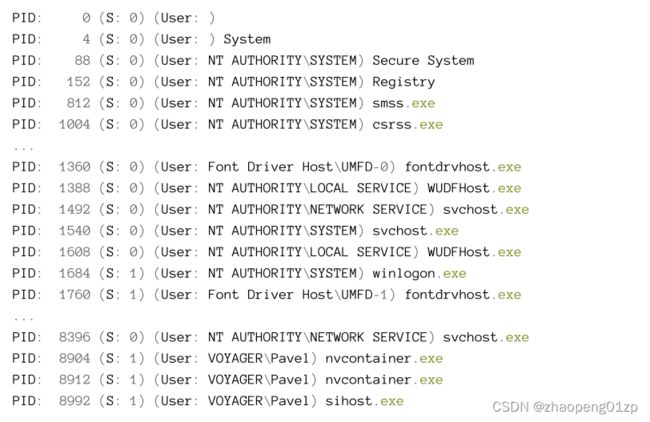

The WTSEnumerateProcessesEx API (available from Windows 7) is an extended version of WTSEnumerateProcesses that provides more information per process:
WTSEnumerateProcessesEx API(可从 Windows 7 获得)是 WTSEnumerateProcesses 的扩展版本,可为每个进程提供更多信息:
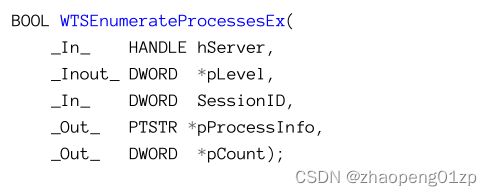
The pLevel parameter can be set to 0 or 1. With 1, an array of extended structures is returned with more information for each process:
pLevel 参数可以设置为 0 或 1。设置为 1 时,将返回一个扩展结构数组,其中包含每个进程的更多信息:

The SessionID parameter allows enumerating processes in a specific session of interest, but WTS_ANY_SESSION can be supplied to indicate all sessions are of interest.
The ppProcessInfo is typed as a pointer to a pointer to a string, which makes no sense.
It must be a pointer to PWTS_PROCESS_INFO or PWTS_PROCESS_INFO_EX based on the level value. The following is a revised enumeration function that uses the extended structure:
SessionID 参数允许枚举感兴趣的特定会话中的进程,但可以提供 WTS_ANY_SESSION 以指示感兴趣的所有会话。
ppProcessInfo 被键入为指向字符串指针的指针这种类型,这是没有意义的。
根据级别值,它必须是指向 PWTS_PROCESS_INFO 或 PWTS_PROCESS_INFO_EX 的指针(指针的指针;该函数分配内存,结果由函数本身分配和填充,为每个发现的进程返回一个指向 WTS_PROCESS_INFO_EX 类型结构数组的指针)。以下是使用扩展结构的修改后的枚举函数:
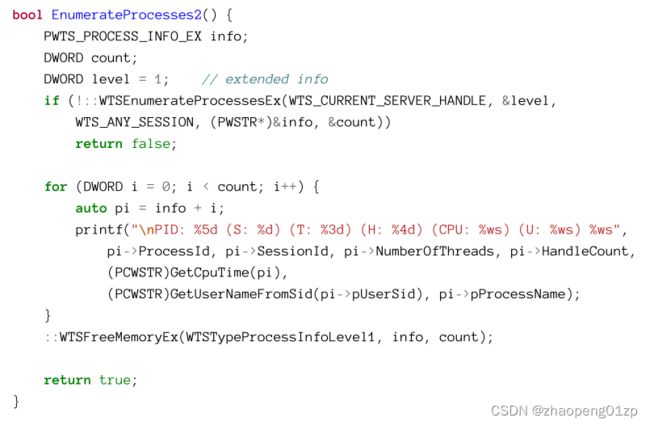
The fields related to memory in WTS_PROCESS_INFO_EX (PagefileUsage, PeakPagefileUsage, WorkingSetSize and PeakWorkingSetSize) are actually buggy because they are 32 bit in size even in 64-bit processes (the structure should have been modified so that DWORD is changed to DWORD_PTR at the very least), so if one of these counters is above 4 GB, they will show wrong numbers.
WTS_PROCESS_INFO_EX 中与内存相关的字段(PagefileUsage、PeakPagefileUsage、WorkingSetSize 和 PeakWorkingSetSize)实际上是错误的,因为即使在 64 位进程中它们的大小也是 32 位的(应该修改结构,以便至少将 DWORD 更改为 DWORD_PTR ),因此如果这些计数器之一超过 4 GB,它们将显示错误的数字。
Freeing the allocated memory block must be done with a dedicated function (WTSFreeMemoryEx), with the appropriate level related enumeration. The code displays some additional data compared to EnumerateProcesses1 - number of threads in the process, number of handles and the total CPU time used. The GetCpuTime helper function returns a string representation of the CPU time:
释放分配的内存块必须用一个专门的函数(WTSFreeMemoryEx)来完成,并且要有相应级别的相关枚举。与EnumerateProcesses1相比,该代码显示了一些额外的数据–进程中的线程数、句柄数和使用的总CPU时间。GetCpuTime辅助函数返回CPU时间的一个字符串表示:

The KernelTime and UserTime members of WTS_PROCESS_INFO_EX are the time the process’ threads spent in kernel mode and user mode, respectively. This time is provided in 100-nanosecond units (100 times 10 to the -9th power), which is very common within the Windows API. This means converting to seconds requires dividing by 10 million. The above code uses the CTimeSpan ATL helper class that accepts a number of seconds and can provide simple string formatting for the value.
WTS_PROCESS_INFO_EX 的 KernelTime 和 UserTime 成员分别是进程的线程在内核模式和用户模式下花费的时间。此时间以 100 纳秒为单位(100 乘以 10 的 -9 次方)提供,这在 Windows API 中很常见。这意味着转换为秒需要除以 1000 万。上面的代码使用 CTimeSpan ATL 助手类,它接受秒数并可以为该值提供简单的字符串格式。
Here is some sample output from running EnumerateProcesses2 with admin rights:
以下是使用管理员权限运行 EnumerateProcesses2 的一些示例输出:

Using the Native API
The last option available for process (and thread) enumeration is using the native API exposed by NtDll.dll. This API is mostly undocumented, and in some cases partially documented. Some of the documentation is part of the Windows Driver Kit (WDK), as some kernel APIs are the targets of native functions and so share a prototype. In user mode, Microsoft provides very partial definitions for the native API in the file .
One of the functions is NtQuerySystemInformation. This mega-function can return various pieces of information depending on a SYSTEM_INFORMATION_CLASS that specifies the type of information requested. Here is the definition from :
可用于进程(和线程)枚举的最后一个选择是使用 NtDll.dll 公开的本机 API。此API大多没有文档记录,在某些情况下有部分文档记录。一些文档是 Windows Driver Kit (WDK) 的一部分,因为一些内核 API 是本机函数的目标,因此共享一个原型。在用户模式下,Microsoft 在文件
其中一个函数是 NtQuerySystemInformation。该宏功能可以根据指定所请求的信息类型 SYSTEM_INFORMATION_CLASS 返回各种信息。这是
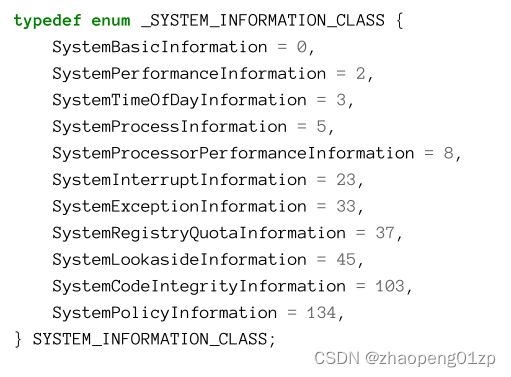
As can be seen from the enumeration, there are many gaps of undocumented information classes. SystemProcessInformation is one value that retrieves data for all processes in the system, with more fields than are available with WTS_PROCESS_INFO_EX. It even includes all threads for each process. In fact, Task Manager and Process Explorer use this to get process information.
Using the above enumeration returns objects of type SYSTEM_PROCESS_INFORMATION, which is declared in like so:
从枚举中可以看出,未记载的信息类存在很多空白。 SystemProcessInformation 是一个值,用于检索系统中所有进程的数据,其字段比 WTS_PROCESS_INFO_EX 可用的字段更多。它甚至包括每个进程的所有线程。事实上,任务管理器和进程资源管理器使用它来获取进程信息。
使用上面的枚举返回 SYSTEM_PROCESS_INFORMATION 类型的对象,它在
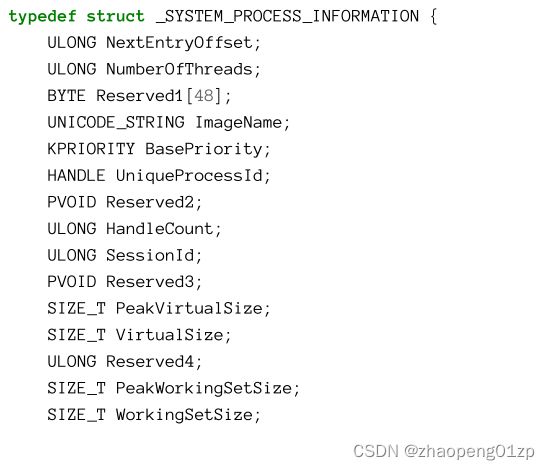
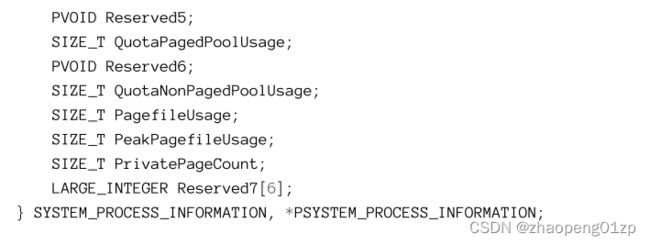
Although it provides quite a bit of information, there are many members named “reserved”something, which are actually undocumented fields, rather than true reserved fields. Can we get the details for these “reserved” fields?
Although these structures and enumerations are undocumented, some have been located in some leaked Windows sources, reverse engineered or are available in the public symbols provided by Microsoft. One application that uses many of these officially undocumented functions and types is Process Hacker, a open-source Process Explorer clone available on Github. One of its sibling projects is phnt, which contains the largest definitions of native APIs, structures, enumerations and definitions (https://github.com/processhacker/phnt) that I know of.
虽然它提供了相当多的信息,但其中有很多名为“reserved”的成员,实际上是未文档化的字段,而不是真正的保留字段。我们可以获取这些“保留”字段的详细信息吗?
尽管这些结构和枚举未记录在案,但其中一些已位于某些泄露的 Windows 源代码中,经过逆向工程或在 Microsoft 提供的公共符号中可用。 Process Hacker 是一个使用许多这些官方未文档化的函数和类型的应用程序,它是 Github 上可用的开源 Process Explorer 克隆。它的兄弟项目之一是 phnt,它包含我所知道的最大的原生 API、结构、枚举和定义 (https://github.com/processhacker/phnt) 定义。
As a quick example, the complete SYSTEM_PROCESS_INFORMATION looks something like the following:
举个简单的例子,完整的 SYSTEM_PROCESS_INFORMATION 看起来像下面这样:
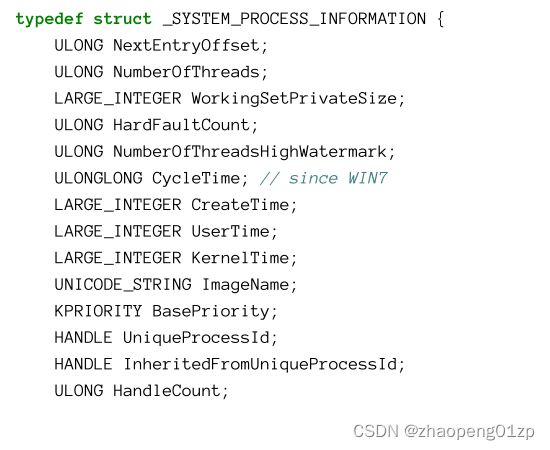

Most of the fields that don’t exist in the documented structures can still be obtained by other API functions. For example, process creation time can be retrieved with GetProcessTimes, but this does require opening a handle to the process (with access mask PROCESS_QUERY_LIMITED_INFORMATION in this case). Clearly, getting much of the information in one stroke is a win, which is why process information tools typically use the native API.
文档结构中不存在的大多数字段仍然可以通过其他 API 函数获取。例如,可以使用 GetProcessTimes 检索进程创建时间,但这确实需要打开进程的句柄(在本例中使用访问掩码 PROCESS_QUERY_LIMITED_INFORMATION)。显然,一次获得大量信息是一种胜利,这就是进程信息工具通常使用本机 API 的原因。
In this book, we won’t use the native API unless there is a very good reason to do so. You can explore the code of Process Hacker to get a sense of how to use these APIs. In any case, if an official API exists, it’s always safer to go with that, rather than to rely on a native undocumented API.
在本书中,除非有充分的理由,否则我们不会使用原生 API。您可以浏览 Process Hacker 的代码以了解如何使用这些 API。在任何情况下,如果存在官方 API,使用它总是比依赖本地未文档化的 API 更安全。
Exercises
-
Write a GUI or console application called MiniProcExp - a mini Process Explorer, that uses either the Toolhelp APIs, WTS APIs or the native API to show information about processes. Anything that is not readily available get by opening a proper handle to the process and using the correct function to get the information. (A basic app is provided in the MinProcExp project).
-
编写一个名为 MiniProcExp 的 GUI 或控制台应用程序 - 一个迷你 Process Explorer,它使用 Toolhelp API、WTS API 或本机 API 来显示有关进程的信息。任何不容易获得的信息都可以通过打开适当的进程句柄并使用正确的函数来获取信息来获得。 (MinProcExp 项目中提供了一个基本应用程序)。
-
Extend the previous application by adding operations on processes, such as terminating and changing priority class.
-
通过添加对进程的操作来扩展以前的应用程序,例如终止和更改优先级。
-
Continue extending the application in any way you see fit!
-
以您认为合适的任何方式继续扩展应用程序!