Android 自定义消息弹窗(带效果图)
前言
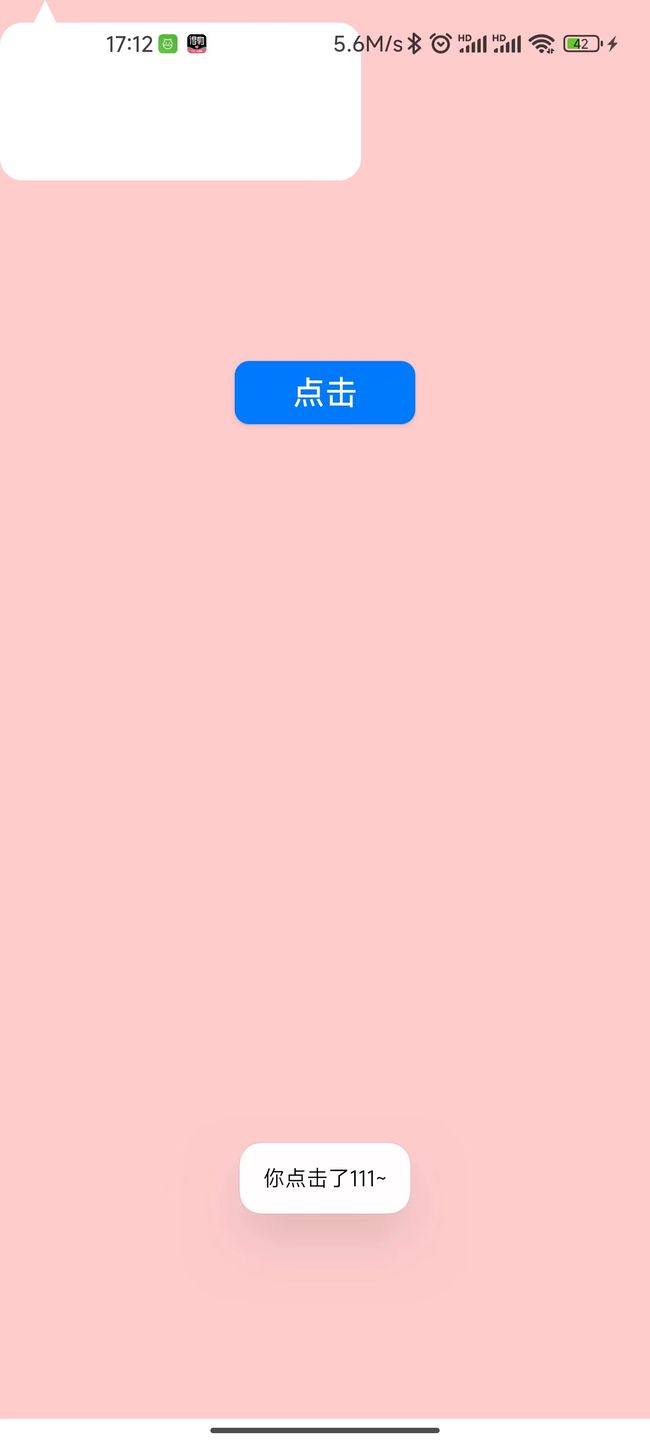
自定义消息弹窗,dialog那种弹窗,先发效果图,
弹窗就是使用的popuwindow,使用自由度较高,也可以按照界面位置来展示
一、popuwindow是什么?
PopupWindow是一个弹出式窗口,它可以展示任意View,里面可以自己定义任何看见,而且窗口对象也可以全局使用,它是浮在当前窗口的上方展示。
二、使用步骤
首页布局代码 如下:
<?xml version="1.0" encoding="utf-8"?>
<RelativeLayout xmlns:android="http://schemas.android.com/apk/res/android"
    xmlns:app="http://schemas.android.com/apk/res-auto"
    xmlns:tools="http://schemas.android.com/tools"
    android:layout_width="match_parent"
    android:layout_height="match_parent"
    android:orientation="vertical"
    android:background="#fcc"
    tools:context=".func.Pop_Activity">


    <Button
        android:layout_centerHorizontal="true"
        android:layout_marginTop="@dimen/public_200_dp"
        android:id="@+id/btn"
        android:background="@drawable/shape_login7"
        android:layout_width="100dp"
        android:layout_height="35dp"
        android:padding="5dp"
        android:text="点击"
        android:textColor="#fff"
        android:textSize="18sp" />

    <com.ami.myzonghe_demo.utils.Message_Back_Style
        android:layout_width="wrap_content"
        android:layout_height="wrap_content"/>

</RelativeLayout>
自定义布局代码先别着急后面会贴,可以先注释一下
2.首页所有代码,在点击事件中执行popuwindow代码,BaseActivity22 是我继承的代码,你们可以只复制点击事件中的代码
public class Pop_Activity extends BaseActivity22 {
    @BindView(R.id.btn)
    Button btn;
    private PopupWindow popupWindow;

    @Override
    protected int Layout() {
        return R.layout.activity_pop;
    }

    @Override
    protected void initView(Bundle savedInstanceState) {
        btn.setOnClickListener(v -> {
            initPopWindow(v);
        });
    }

    private void initPopWindow(View v) {
        ScreenUtils.backgroundAlpha(0.5f, (Activity) this);
        View vPopupWindow = LayoutInflater.from(this).inflate(R.layout.item_pop_test, null, false);
        popupWindow = new PopupWindow(vPopupWindow, ViewGroup.LayoutParams.WRAP_CONTENT, ViewGroup.LayoutParams.WRAP_CONTENT, true);

        Button btn_xixi = (Button) vPopupWindow.findViewById(R.id.btn_xixi);
        Button btn_hehe = (Button) vPopupWindow.findViewById(R.id.btn_hehe);

       btn_xixi.setOnClickListener(v1 -> {
            Toast.makeText(Pop_Activity.this, "你点击了111~", Toast.LENGTH_SHORT).show();
            popupWindow.dismiss();
        });

        btn_hehe.setOnClickListener(v12 -> {
            Toast.makeText(Pop_Activity.this, "你点击了222~", Toast.LENGTH_SHORT).show();
            popupWindow.dismiss();

        });

        //引入依附的布局
        popupWindow.setTouchable(true);
        popupWindow.showAsDropDown(v, 0, 33);
    }

    @Override
    protected void startCoding() {
    }

    @Override
    public void onSuccess(Object o) {
    }

    @Override
    public void onError(String error) {
    }
}
子布局item_pop_test代码 如下:
<?xml version="1.0" encoding="utf-8"?>
<LinearLayout xmlns:android="http://schemas.android.com/apk/res/android"
    xmlns:app="http://schemas.android.com/apk/res-auto"
    android:orientation="horizontal"
    android:layout_width="wrap_content"
    android:layout_height="wrap_content">

    <RelativeLayout
        android:orientation="horizontal"
        android:layout_width="wrap_content"
        android:layout_height="wrap_content">

        <com.ami.myzonghe_demo.utils.Message_Back_Style
            android:layout_width="200dp"
            android:layout_height="100dp"/>

        <LinearLayout
            android:layout_marginTop="20dp"
            android:layout_centerHorizontal="true"
            android:layout_width="wrap_content"
            android:layout_height="wrap_content">
            <Button
                android:background="@drawable/btnback"
                android:id="@+id/btn_xixi"
                android:layout_width="70dp"
                android:layout_height="35dp"
                android:text="111"
                android:textColor="#fff"
                android:textSize="18sp" />

            <Button
                android:background="@drawable/btnback"
                android:id="@+id/btn_hehe"
                android:layout_marginLeft="20dp"
                android:layout_width="70dp"
                android:layout_height="35dp"
                android:text="222"
                android:textColor="#fff"
                android:textSize="18sp" />

        </LinearLayout>

    </RelativeLayout>

</LinearLayout>
自定义canvas,绘制的消息框
package com.ami.myzonghe_demo.utils;

import android.content.Context;
import android.graphics.Canvas;
import android.graphics.Color;
import android.graphics.Paint;
import android.graphics.Path;
import android.graphics.Rect;
import android.graphics.RectF;
import android.util.AttributeSet;
import android.view.View;
import android.widget.LinearLayout;

import androidx.annotation.Nullable;

public class Message_Back_Style extends View {
    private Paint mPaint;
    private RectF rect;
    private Path path3;

    public Message_Back_Style(Context context) {
        super(context);
    }

    public Message_Back_Style(Context context, @Nullable AttributeSet attrs) {
        super(context, attrs);

        //new一个画笔对象
        mPaint = new Paint();
        //设置颜色
        mPaint.setColor(Color.WHITE);


        //new 路径对象,用来绘制三角形的
        path3 = new Path();
        //路径绘制是设置具体的几个点的位置,然后连在一起,三个点就是三角形,四个点就是四边形或者其他形状
        //因为我们的圆角矩形是从50的高度开始绘制的,所以我这边的三角形也设置的是50的等腰三角形
        path3.moveTo(100, 0);
        path3.lineTo(75, 50);
        path3.lineTo(125, 50);

        //在此执行绘制圆角矩形的操作,
        //1,2个参数是左上角的位置
        //3,4个参数是右下角的位置
        rect = new RectF(0, 50, new Dp_Px_Util().Dp2Px(context,200),  new Dp_Px_Util().Dp2Px(context,100));
    }

    @Override
    protected void onDraw(Canvas canvas) {
        super.onDraw(canvas);

        //绘制圆角矩形   50,50是绘制的弧度
        canvas.drawRoundRect(rect, 50, 50, mPaint);

        //绘制三角形
        //放入设置的路径和画笔对象
        canvas.drawPath(path3,mPaint);
        path3.close();
    }

}
代码中用到的dp转px的工具类Dp_Px_Util
package com.ami.myzonghe_demo.utils;

import android.content.Context;

public class Dp_Px_Util {
    public int Dp2Px(Context context, float dp) {
        final float scale = context.getResources().getDisplayMetrics().density; //当前屏幕密度因子
        return (int) (dp * scale + 0.5f);
    }

    public int Px2Dp(Context context, float px) {
        final float scale = context.getResources().getDisplayMetrics().density;
        return (int) (px / scale + 0.5f);
    }
}

