Pytest(一):pytest的使用简介、jenkins+allure报告生成
目录
0、最新总结:
Jenkins的安装:
Jenkins在windows环境下的下载与安装_冷凝娇的博客-CSDN博客
一、pytest的安装及简介
二、pytest使用规则
三、pytest初始化
3.0.fixture(最推荐conftest+fixture)
3.1 模块级
3.2 类级别
3.3 方法级别
3.4 目录级别
四、 断言assert(与unitest的断言有差异)
五、pytest的执行
六、报告展示
0、最新总结:
pytest-html#生成html报告
pytest-xdist # 测试用例的分布式执行。多线程
pytest-ordering # 改变用例执行顺序
pytest-rerunfailures #重新执行
allure-pytest # 生成较为美观的测试报告
pytest-repeat # 指定重复用例执行次数


--pytest文件命名的基本规则:
    1.模块名必须以test_开头or_test结尾
    2.测试类必须以Test开头,而且,类不允许含有__init__方法
    3.测试方法默认以test开头
--目标:使用pytest执行基本的单元测试
^^^^^^^^^^^^^^^^^^^^^^^^^^^^^^^^^^^^^^^^^^^^^^^^^^^^^^^^^^^^^^^^^^^^^^^^^^
    0.首先了解pytest运行都有哪些常用的入参,各自是什么意思,如何使用?
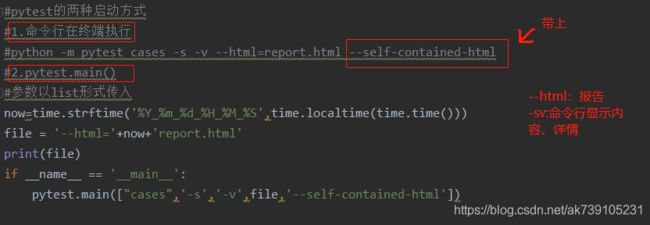
        -s:输出调试信息,其中包含在代码中print的内容
        -v:显示更为详细的信息(相对与-s而已,-vs更详细),备注:-vs这两个参数一起使用
        -n:支持多线程、更或者分布式运行测试用例
        --reruns {num}:失败用例重新执行测试设置
        -m:指定装饰器装饰的case的运行用例(注意:1.装饰器装饰case,@pytest.mark.o;
                                          2.pytest.ini中配置 markers =
                                                                o: TTT
                                                                smoke: just a smoke test
                                                                login: login api
                                          3.执行时,加上参数 -m 模块)
        -k:根据测试用例的部分字符串指定要执行测试用例,eg:pytest -vs ./testcase -n 2 -x -k 'test'
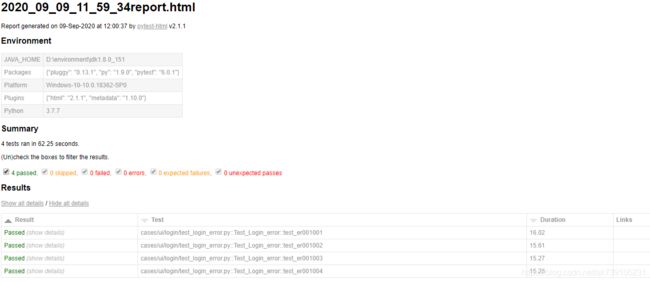
        --html path:生成html报告
        -x:只要有一个case失败,所有case停止
        --maxfail=2:出现2个用例失败就停止;即:--maxfail={num}设置用例最大失败次数
        --alluredir path:临时json报告,再生成allure报告:os.system('allure generate ./temp -o ./report --clean')
                            allure generate :allure命令
                            第一个入参:./temp,临时的json格式报告的路径
                            -o:output 后面跟具体输出到的目录
                            --clean:清空 -o后面跟的目录的原有的报告
^^^^^^^^^^^^^^^^^^^^^^^^^^^^^^^^^^^^^^^^^^^^^^^^^^^^^^^^^^^^^^^^^^^^^^^^^^
    1.pytest的程序运行的方法:
        a.主函数模式
            运行所有case: pytest.main()
            指定模块所有case: pytest.main(['-vs','test_module.py'])
            指定目录所有case:pytest.main(['-vs','./test_manage'])
            指定nodeid执行用例:nodeid由模块名、分隔符、类名、方法名、函数名组成。
                eg:pytest.main(['-vs','./api_testcase/testlogin.py::TestLogin::test_01_login'])
        b.命令行模式
            运行所有:pytest
            执行模块:pytest -vs test_login.py
            执行目录:pytest -vs ./api_testcase
            指定nodeid执行用例: pytest -vs ./api_testcase/testlogin.py::TestLogin::test_01_login
        c.通过读取pytest.ini配置文件运行(最为常用的方式)
            0.pytest.ini是pytest单元测试框架的核心配置文件(不管是主函数模式/命令行模式运行,都会读取该文件)
            1.pytest.ini一般放置在项目的根目录
            2.pytest.ini的编码必须是GBK(最近发现可以)ANSI,可以使用notepad++修改编码格式(不可有中文)
            3.作用:改变pytest的默认的行为
                    [pytest]
                    # 命令行入参全部放置在addopts,以空格间隔
                    addopts = -vs
                    # 测试用例文件夹,
                    testpaths = ../pytest_demo
                    # 文件名
                    python_files = test*.py test_* *_test test*
                    # 类名
                    python_classes = Test* test*
                    # 用例函数
                    python_functions = test_* test*
                    # 控制台实时输出日志(批量运行,耗费性能)
                    log_cli = True
                    # 如case被xfail标记(预期失败),但是实际却成功了,结果会显示xfailed,=True时,结果显示:failed
                    xfail_strict = True
                    # 标记case的模块名称(分组执行,如:冒烟测试:1.用例装饰@pytest.mark.smoke;2.ini配置;3.执行带参数 -m
                    markers =
                            smoke: just do a smoketest
                            login: login api
                            userinfo: user info api
^^^^^^^^^^^^^^^^^^^^^^^^^^^^^^^^^^^^^^^^^^^^^^^^^^^^^^^^^^^^^^^^^^^^^^^^^^
    2.pytest中用例的执行顺序:从上到下执行,可指定顺序,(unitest根据case名称的ASCII码大小来执行)
        a.前后置(预置条件、后置处理)
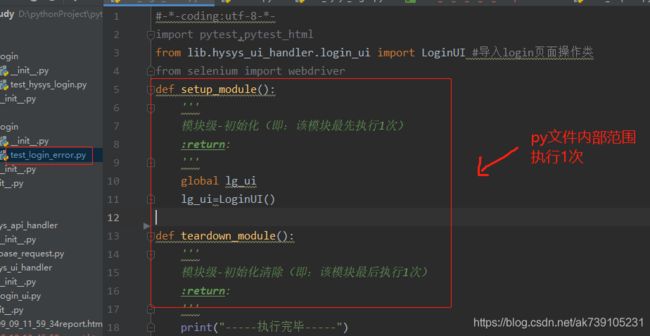
            模块级:一个py文件执行1次前后置
                setup_module()
                teardown_module()
            类级别:一个类执行1次前后置
                setup_class()
                teardown_class()
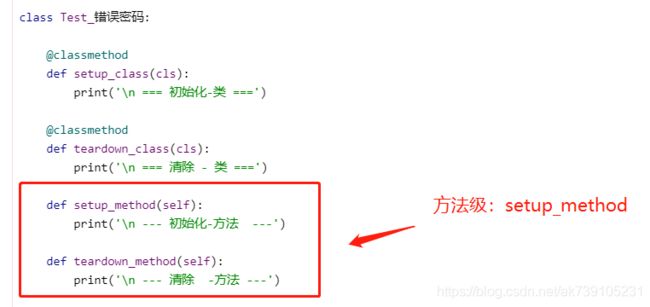
            函数级:每次case都会执行1次前后置
                setup_method()
                teardown_method()
        b.pytest特有的装饰器装饰:前后置、可实现部分case前后置、全局前后置
            @pytest.fixture(scope='',params='',autouse='',ids='',name='')所装饰的函数作为case的前后置函数执行;
                入参解释:
                    scope:表示被pytest.fixture装饰的函数作用域,包含:``"function"``(default), ``"class"``, ``"module"``, ``"package"`` or ``"session"``
                    params:参数化(可以实现参数化,但比较笨拙,下面有更好的参数化方式)支持list.tuple.dict
                    autouse:是否自动执行,默认False(即:不指定,则不执行);True(即:不需要指定,在指定作用域中,自动执行该函数)
                    ids:当使用params时,给每个值设置一个变量名,无多大意义
                    name:给表示的被@pytest.fixture装饰的函数取一个别名(备注:有了别名,在指定前后置时,需要使用别名,否则会报错)
        c.pytest的@pytest.fixture装饰器结合conftest.py 实现全局前后置(如:系统登录、模块共同使用的条件等)
            备注:conftest.py与pytest.ini类似,都是pytest特有的,名称不可变
            1.作用:将@pytest.fixture装饰器装饰的函数放在conftest.py中,可以实现不同py文件调用同一个被装饰的函数
            2.原则上:conftest.py需要和运行的用例放到同一层目录,而且,不需要import conftest;实际上:conftest.py是从case层每层去找
                -user
                    -test_userinfo.py      -->在这个文件中的用例会找到同目录层级的conftest,以及最外层的conftest,并且有需要时执行;
                    -conftest.py
                -product
                    -test_product.py
                    -conftest.py
                -conftest.py
^^^^^^^^^^^^^^^^^^^^^^^^^^^^^^^^^^^^^^^^^^^^^^^^^^^^^^^^^^^^^^^^^^^^^^^^^^
            3.一个用例,前后置函数如果是多个,则执行顺序是:先执行autouse=True,再按照参数从左向右执行;
        d.跳过,不执行
            1.无条件,直接跳过
            @pytest.mark.skip(reason='满足条件不执行')
            2.有条件,满足则跳过
            @pytest.mark.skipif(num>=5,reason='满足条件不执行')
        e.指定用例的执行顺序
            @pytest.mark.run(order=3)
        f.指定用例的重复执行次数:
            1.命令行/主函数:--count=5 --repeat-scope=session,pytest.main(['--count','5','--repeat-scope','function'])
            1.1 配置在pytest.ini中
            2.指定装饰case:@pytest.mark,repeat(5)
^^^^^^^^^^^^^^^^^^^^^^^^^^^^^^^^^^^^^^^^^^^^^^^^^^^^^^^^^^^^^^^^^^^^^^^^^^
    4.参数化(最用的多的)
        @pytest.mark.parametrize
             eg:
                    @pytest.mark.parametrize('args',['123','456','789'])
                    @pytest.mark.o
                    def test_todo_02(self,args):
                        print('todo----2%s'%args, end='\r\n')

                    @pytest.mark.parametrize('name,age',[['代华','12'],['不代华','9']])
                    @pytest.mark.o
                    def test_todo_03(self,name,age):
                        print('todo----2%s,%s' % (name,age), end='\r\n')
^^^^^^^^^^^^^^^^^^^^^^^^^^^^^^^^^^^^^^^^^^^^^^^^^^^^^^^^^^^^^^^^^^^^^^^^^^
    5.断言
        assert
^^^^^^^^^^^^^^^^^^^^^^^^^^^^^^^^^^^^^^^^^^^^^^^^^^^^^^^^^^^^^^^^^^^^^^^^^^
    6.美腻的allure报告
        下载:https://github.com/allure-framework/allure2/releases/download/2.14.0/allure-2.14.0.zip
        解压
        配置bin目录在本地path
        执行时,加入参数:--alluredir ./temp
            备注:./temp时临时存储json格式结果报告的目录
        最后,根据临时json格式的报告,生成allure报告
        执行:os.system('allure generate ./temp -o ./report --clean')
allure 生成报告后,index不能直接打开,allure open report
参考:https://cdn.modb.pro/db/333719
1、pytest如何解决“不每一条用例重新启动浏览器并登录”?
即:仅登录一次,执行所有用例
#conftest.py

driver = None

@pytest.fixture(scope='session', autouse=True)
def browser():
    global driver

    if driver is None:
        driver = webdriver.Chrome()#GUI界面运行
        driver.maximize_window()

    return driver #返回驱动

-------------------------------------------------------
后面在testcase里面加上browser参数,直接引用
Jenkins的安装:
Jenkins在windows环境下的下载与安装_冷凝娇的博客-CSDN博客
之后,在manage jenkins---》manage plugins 中安装allure 插件(截图免了);
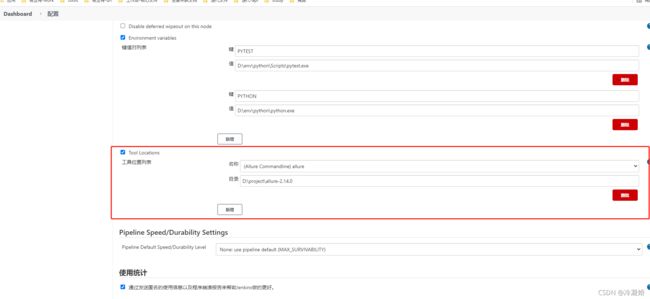
在manage jenkins---》global tool configuration 中 配置allure(前提allure本地已安装ok,具体百度)
在manage jenkins---》configure system中 配置allure(前提allure本地已安装ok,具体百度)
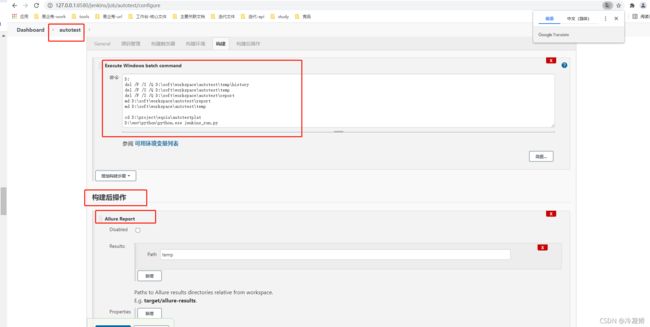
在项目中,配置: 构建后操作---allure report
一、pytest的安装及简介
pip install pytest
pip install pytest-html#生成报告
pytest可以用来实现自动化接口测试、自动化UI测试;
二、pytest使用规则
-
如果未指定命令行参数,则从 testpath(如果已配置)或当前目录开始收集。
如果命令行参数, 指定了 目录、文件名 或 node id 的任何组合,则按参数来找
-
寻找过程会递归到目录中,除非它们匹配上 norecursedirs。
-
在这些目录中,搜索由其测试包名称导入的
test_*.py或*_test.py文件。 -
从这些文件中,收集如下测试项:
- test为前缀 的
函数 - Test为前缀的
类里面的 test为前缀的方法
- test为前缀 的
三、pytest初始化
3.0.fixture(最推荐conftest+fixture)
3.1 模块级
3.2 类级别
3.3 方法级别
3.4 目录级别
目录级别
四、 断言assert(与unitest的断言有差异)
assert xx 判断xx为真
assert not xx 判断xx不为真
assert a in b 判断b包含a
assert a == b 判断a等于b
assert a != b 判断a不等于b
