spring-data-elasticsearch.4.2.0 jar包冲突导致:StackOverflow
最近要求es做升级改造:
目前版本:
1. springframework 4.3.3-RELEASE
2. spring-data-elasticsearch: 2.0.3
3. elasticsearch: 2.4.0
4. 工具类: ElasticsearchTemplate
升级后ES版本7.10.0
1. springframework 升级到 5.3.10
2. spring-data-elasticsearch 升级到 4.2.0
3. elasticsearch 升级到 7.10.0
4. 升级Es7后, ElasticsearchTemplate 过期不能使用, 使用ElasticsearchRestTemplate, 修改增删查改语法
因为项目不是spring-boot项目, 是spring项目, 所以:
1. 首先引入jar包:
			org.springframework.data
			spring-data-elasticsearch
			4.2.0
2. 将spring.framework相关的jar包都升级到5.3.10:
			org.springframework
			spring-core
			5.3.10


					commons-logging
					commons-logging


			org.springframework
			spring-context
			5.3.10


			org.springframework
			spring-tx
			5.3.10


			org.springframework
			spring-context-support
			5.3.10


			org.springframework
			spring-aop
			5.3.10


			org.springframework
			spring-jdbc
			5.3.10


			org.springframework
			spring-web
			5.3.10


			org.springframework
			spring-webmvc
			5.3.10


			org.springframework
			spring-jms
			5.3.10


			org.springframework
			spring-expression
			5.3.10


			org.springframework
			spring-test
			5.3.10
			test
3. 创建EsConfig配置文件:
package com.haier.camelot.cdk.base.conf;

import com.alibaba.fastjson.JSONObject;
import lombok.extern.slf4j.Slf4j;
import org.apache.http.HttpHost;
import org.apache.http.auth.AuthScope;
import org.apache.http.auth.UsernamePasswordCredentials;
import org.apache.http.client.CredentialsProvider;
import org.apache.http.impl.client.BasicCredentialsProvider;
import org.apache.http.impl.nio.client.HttpAsyncClientBuilder;
import org.elasticsearch.client.RestClient;
import org.elasticsearch.client.RestClientBuilder;
import org.elasticsearch.client.RestHighLevelClient;
import org.springframework.beans.factory.annotation.Value;
import org.springframework.context.annotation.Bean;
import org.springframework.context.annotation.Configuration;
import org.springframework.data.elasticsearch.config.AbstractElasticsearchConfiguration;
import org.springframework.data.elasticsearch.core.ElasticsearchRestTemplate;
import springfox.documentation.spring.web.json.Json;

import javax.xml.bind.util.JAXBSource;

@Slf4j
@Configuration
public class EsConfig extends AbstractElasticsearchConfiguration {
    @Value("#{app.esUrl}")
    private String esUrl;
    @Value("#{app.esUrlPort}")
    private int esUrlPort;
    @Value("#{app.esUsername}")
    private String esUsername;
    @Value("#{app.esPwd}")
    private String esPwd;

    private static final String HTTP_SCHEME = "http";


    @Bean
    public RestHighLevelClient elasticsearchClient() {
        final CredentialsProvider credentialsProvider = new BasicCredentialsProvider();
        //访问用户名和密码为您创建阿里云Elasticsearch实例时设置的用户名和密码,也是Kibana控制台的登录用户名和密码。
        credentialsProvider.setCredentials(AuthScope.ANY, new UsernamePasswordCredentials(esUsername, esPwd));
        // 设置认证信息:
        // 通过builder创建rest client,配置http client的HttpClientConfigCallback。
        // 单击所创建的Elasticsearch实例ID,在基本信息页面获取公网地址,即为ES集群地址。
        RestClientBuilder builder = RestClient.builder(new HttpHost(esUrl, esUrlPort, HTTP_SCHEME))
                .setHttpClientConfigCallback(new RestClientBuilder.HttpClientConfigCallback() {
                    @Override
                    public HttpAsyncClientBuilder customizeHttpClient(HttpAsyncClientBuilder httpClientBuilder) {
                        return httpClientBuilder.setDefaultCredentialsProvider(credentialsProvider);
                    }
                });
        RestHighLevelClient client = new RestHighLevelClient(builder);
        return client;
    }

    //获取ElasticsearchRestTemplate模板对象, 后面增删查改都是通过ElasticsearchRestTemplate
    @Bean
    public ElasticsearchRestTemplate elasticsearchRestTemplate(){
        RestHighLevelClient client = elasticsearchClient();
        return new ElasticsearchRestTemplate(client);
    }


}
4. 改造增删查改方法: 以下简单列出
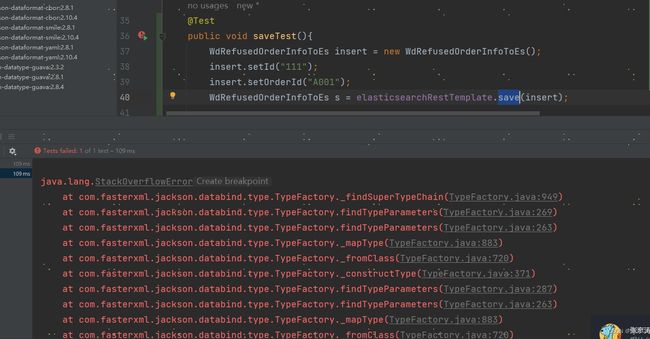
@Test
    public void saveTest(){
        WdRefusedOrderInfoToEs insert = new WdRefusedOrderInfoToEs();
        insert.setId("111");
        insert.setOrderId("A002");
        WdRefusedOrderInfoToEs s = elasticsearchRestTemplate.save(insert);
        System.out.println(s);
    }

    @Test
    public void deleteTest(){
        WdRefusedOrderInfoToEs inset = new WdRefusedOrderInfoToEs();
        inset.setId("111");
        inset.setOrderId("A001");
        //WdRefusedOrderInfoToEs save = elasticsearchRestTemplate.save(inset);
        String delete = elasticsearchRestTemplate.delete(inset);
        System.out.println(delete);
    }

    @Test
    public void updateTest(){
        WdRefusedOrderInfoToEs update = new WdRefusedOrderInfoToEs();
        update.setId("OYADI21030900002-0802ebc5");
        update.setCreatedBy("JYB");
        //创建文档对象
        Document document = Document.create();
        document.put("createdBy", update.getCreatedBy());
        //创建更新查询
        UpdateQuery updateQuery = UpdateQuery.builder(update.getId()).withDocument(document) .withScriptedUpsert(true) .build();
        UpdateResponse up = elasticsearchRestTemplate.update(updateQuery, IndexCoordinates.of("doc_name"));
        System.out.println(up);
    }
以上删除, 更新都正常, 但是save方法一直失败, 报错像是跟jackson有关的无线递归循环: StackOverflow
浪费了好几天没看出问题, 后来找了架构组的同事, 一眼看出是jackson相关jar包缺失,
到spring-data-elasticsearch.4.2.0的.m2下找到pom文件, 分析了一下该包的依赖:
C:\Users\Haier\.m2\repository\org\springframework\data\spring-data-elasticsearch\4.2.0>mvn dependency:tree分析因为的jackson相关包, 发现我们的项目里jackson-databind版本引入是2.12.3, 而因为引用的parent里面写死的版本是2.3.2, 导致版本不匹配, 所以显示在pom里引入一下, 覆盖点以前的版本
   com.fasterxml.jackson.core
   jackson-databind
   2.12.3
save也成功了!
