6.服务调用Ribbon
6.1Ribbon简介
前面讲了eureka服务注册与发现,但是结合eureka集群的服务调用并没有谈到。这里就要用到Ribbon,结合eureka,来实现服务的调用;
Ribbon是Netflix发布的负载均衡器,它有助于控制HTTP和TCP的客户端的行为。为Ribbon配置服务提供者地址后,Ribbon就可基于某种负载均衡算法,自动地帮助服务消费者去请求。
Ribbon默认为我们提供了很多负载均衡算法,例如轮询、随机等。当然,我们也可为Ribbon实现自定义的负载均衡算法。
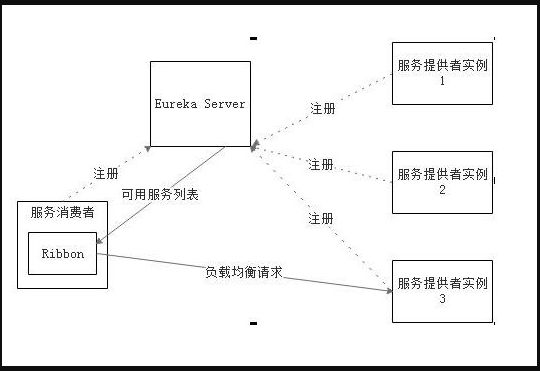
在Spring Cloud中,当Ribbon与Eureka配合使用时,Ribbon可自动从Eureka Server获取服务提供者地址列表,并基于负载均衡算法,请求其中一个服务提供者实例。
Ribbon与Eureka配合使用时的架构如下图:
6.2.Ribbon简单实用
Ribbon是客户端负载均衡,所以肯定集成再消费端,也就是consumer端
我们修改microservice-ticket-consumer-80
第一步: microservice-station-consumer-80,引入依赖,pom.xml 加入 ribbon相关依赖
 1
 2         <dependency>
 3             <groupId>org.springframework.cloudgroupId>
 4             <artifactId>spring-cloud-starter-eurekaartifactId>
 5         dependency>
 6         <dependency>
 7             <groupId>org.springframework.cloudgroupId>
 8             <artifactId>spring-cloud-starter-ribbonartifactId>
 9         dependency>
10         <dependency>
11             <groupId>org.springframework.cloudgroupId>
12             <artifactId>spring-cloud-starter-configartifactId>
13         dependency>
第二步: microservice-station-consumer-80 的 application.yml如下
 1 server:
 2   port: 80
 3   context-path: /
 4
 5 # 客户端负载均衡配置
 6 eureka:
 7   client:
 8     register-with-eureka: false #false 由于注册中心的职责就是维护服务实例,它并不需要去检索服务,所以也设置为false
 9     service-url:
10       defaultZone: http://eureka2001.wfd360.com:2001/eureka/,http://eureka2002.wfd360.com:2002/eureka/,http://eureka2003.wfd360.com:2003/eureka/
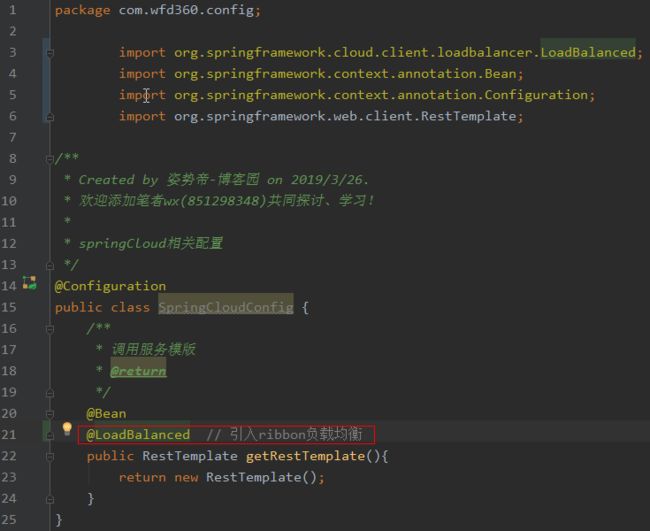
第三步:ribbon结合eureka来调用服务提供者,SpringCloudConfig也改成 要加个负载均衡配置 @LoadBalanced
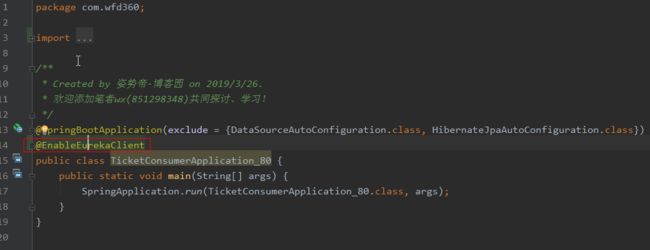
第四步:因为和eureka整合,所以启动类TicketConsumerApplication_80 加个注解 @EnableEurekaClient
第五步:在服务提供者microservice-ticket-provider-1001的application.yml加下配置,指定下应用名称:
application:
name: microservice-ticket
直观图如下:
第六步:修改下TicketConsumerController的URL,改成指定的微服务应用名称,在第五步中我们的服务名称为:microservice-student
代码如下:private static final String URL="http://MICROSERVICE-TICKET/ticket"; // 特别注意 这里需要添加访问的一级地址 ticket,为了引起大家注意,提供的代码中没有这个
控制层全部代码如下:
1 package com.wfd360.controller; 2 3 import com.wfd360.model.Ticket; 4 import org.springframework.beans.factory.annotation.Autowired; 5 import org.springframework.stereotype.Controller; 6 import org.springframework.web.bind.annotation.*; 7 import org.springframework.web.client.RestTemplate; 8 9 import java.util.List; 10 11 /** 12 * Created by 姿势帝-博客园 on 2019/3/26. 13 * 欢迎添加笔者wx(851298348)共同探讨、学习! 14 */ 15 16 /** 17 * 知识点:@RestController注解相当于@ResponseBody + @Controller合在一起的作用。 18 */ 19 @Controller 20 @RequestMapping("/ticket") 21 public class TicketConsumerController { 22 @Autowired 23 private RestTemplate restTemplate; 24 25 /** 26 *服务提供者名称 microservice-ticket 27 * 服务调用者这边的控制器里 url = http://MICROSERVICE-TICKET 28 */ 29 private static final String URL="http://MICROSERVICE-TICKET/"; 30 31 /** 32 * 添加或者修改车票信息 33 * 34 * @param ticket 35 * @return 36 */ 37 @PostMapping(value = "/save") 38 @ResponseBody 39 public boolean save(Ticket ticket) { 40 System.out.println("======su=====save========="); 41 // return restTemplate.postForObject("http://localhost:1001/ticket/save", ticket, Boolean.class); 42 return restTemplate.postForObject(URL+"/save", ticket, Boolean.class); 43 } 44 45 /** 46 * 查询车票信息 47 * 48 * @return 49 */ 50 @SuppressWarnings("unchecked") 51 @GetMapping(value = "/list") 52 @ResponseBody 53 public Listlist() { 54 // return restTemplate.getForObject("http://localhost:1001/ticket/list", List.class); 55 return restTemplate.getForObject(URL+"/list", List.class); 56 } 57 58 /** 59 * 根据id查询车票信息 60 * 61 * @return 62 */ 63 @GetMapping(value = "/get/{id}") 64 @ResponseBody 65 public Ticket get(@PathVariable("id") Integer id) { 66 // return restTemplate.getForObject("http://localhost:1001/ticket/get/" + id, Ticket.class); 67 return restTemplate.getForObject(URL+"/get/" + id, Ticket.class); 68 } 69 70 /** 71 * 根据id删除车票信息 72 * 73 * @return 74 */ 75 @GetMapping(value = "/delete/{id}") 76 @ResponseBody 77 public boolean delete(@PathVariable("id") Integer id) { 78 try { 79 // restTemplate.getForObject("http://localhost:1001/ticket/delete/" + id, Boolean.class); 80 restTemplate.getForObject(URL+"/delete/" + id, Boolean.class); 81 return true; 82 } catch (Exception e) { 83 return false; 84 } 85 } 86 }
第七步:测试 ,先启动3个注册中心,在启动服务提供者,最后启动消费者
访问:http://localhost/ticket/list ,结果如下,则配置成功
ribbon的基本使用结束,案例代码见 v5版本!


