文章目录
- 1 HBase 简介
-
- 1.1 HBase 定义
- 1.2 HBase 数据模型
-
- 1.2.1 HBase 逻辑结构
- 1.2.2 HBase 物理存储结构
- 1.2.3 数据模型
- 1.3 HBase 基本架构
- 2 HBase 快速入门
-
- 2.1 HBase 安装部署
- 2.2 HBase Shell 操作
-
- 3 HBase 进阶
-
- 3.1 架构原理
- 3.2 写流程
- 3.3 MemStore Flush
- 3.4 读流程
- 3.5 StoreFile Compaction
- 3.6 Region Split
1 HBase 简介
1.1 HBase 定义
HBase 是一种分布式、可扩展、支持海量数据存储的 NoSQL 数据库。
1.2 HBase 数据模型
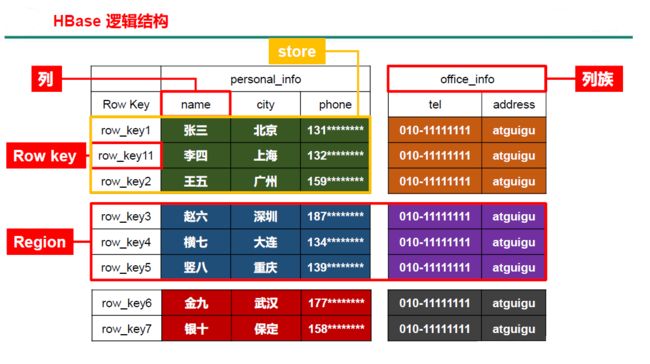
逻辑上,HBase 的数据模型同关系型数据库很类似,数据存储在一张表中,有行有列。但从HBase 的底层物理存储结构(K-V)来看,HBase 更像是一个multi-dimensional map。
1.2.1 HBase 逻辑结构
1.2.2 HBase 物理存储结构

1.2.3 数据模型
1. Name Space
命名空间,类似于关系型数据库的 DatabBase 概念,每个命名空间下有多个表。HBase 有两个自带的命名空间,分别是 hbase 和 default,hbase 中存放的是 HBase 内置的表,default 表是用户默认使用的命名空间。
2. Region
类似于关系型数据库的表概念。不同的是,HBase 定义表时只需要声明列族即可,不需要声明具体的列。这意味着,往 HBase 写入数据时,字段可以动态、按需指定。因此,和关系型数据库相比,HBase 能够轻松应对字段变更的场景。
3. Row
HBase 表中的每行数据都由一个 RowKey 和多个 Column(列)组成,数据是按照 RowKey 的字典顺序存储的,并且查询数据时只能根据 RowKey 进行检索,所以 RowKey 的设计十分重要。
4. Column
HBase 中的每个列都由 Column Family (列族)和 Column Qualifier(列限定符)进行限定,例如 info:name,info:age。建表时,只需指明列族,而列限定符无需预先定义。
5. Time Stamp
用于标识数据的不同版本(version),每条数据写入时,如果不指定时间戳,系统会自动为其加上该字段,其值为写入 HBase 的时间。
6. Cell
由{rowkey, column Family:column Qualifier, time Stamp}唯一确定的单元。cell 中的数据是没有类型的,全部是字节码形式存储。
1.3 HBase 基本架构
HBase 架构(不完整版)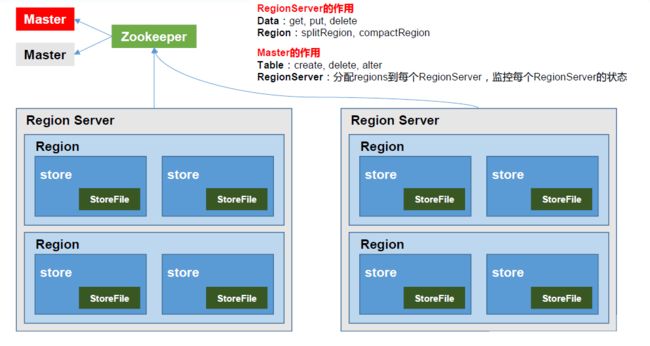
1. Region Server
Region Server 为 Region 的管理者,其实现类为 HRegionServer,主要作用如下:
对于数据的操作:get, put, delete;
对于Region 的操作:splitRegion、compactRegion。
2. Master
Master 是所有 Region Server 的管理者,其实现类为 HMaster,主要作用如下:
对于表的操作:create, delete, alter
对于 RegionServer 的操作:分配 regions 到每个 RegionServer,监控每个 RegionServer 的状态,负载均衡和故障转移。
3. Zookeeper
HBase 通过 Zookeeper 来做 Master 的高可用、RegionServer 的监控、元数据的入口以及集群配置的维护等工作。
4. HDFS
HDFS 为 HBase 提供最终的底层数据存储服务,同时为 HBase 提供高可用的支持。
2 HBase 快速入门
2.1 HBase 安装部署
1. Zookeeper 正常部署
首先保证 Zookeeper 集群的正常部署,并启动:
[Tom@hadoop102 zookeeper-3.5.9]$ bin/zkServer.sh start
[Tom@hadoop103 zookeeper-3.5.9]$ bin/zkServer.sh start
[Tom@hadoop104 zookeeper-3.5.9]$ bin/zkServer.sh start
2. Hadoop 正常部署
Hadoop 集群的正常部署并启动:
[Tom@hadoop102 hadoop-3.1.3]$ sbin/start-dfs.sh
[Tom@hadoop103 hadoop-3.1.3]$ sbin/start-yarn.sh
3. HBase 解压
解压 Hbase 到指定目录:
[Tom@hadoop102 software]$ tar -zxvf hbase-1.3.1-bin.tar.gz -C /opt/module
4. HBase 的配置文件
修改 HBase 对应的配置文件。
(1)hbase-env.sh修改内容:
export JAVA_HOME=/opt/module/jdk1.8.0_212
export HBASE_MANAGES_ZK=false
(2)hbase-site.xml修改内容:
<configuration>
<property>
<name>hbase.rootdir</name>
<value>hdfs://hadoop102:8020/HBase</value>
</property>
<property>
<name>hbase.cluster.distributed</name>
<value>true</value>
</property>
<property>
<name>hbase.master.port</name>
<value>16000</value>
</property>
<property>
<name>hbase.zookeeper.quorum</name>
<value>hadoop102,hadoop103,hadoop104</value>
</property>
<property>
<name>hbase.zookeeper.property.dataDir</name>
<value>/opt/module/zookeeper-3.5.9/zkData</value>
</property>
configuration>
- 1
- 2
- 3
- 4
- 5
- 6
- 7
- 8
- 9
- 10
- 11
- 12
- 13
- 14
- 15
- 16
- 17
- 18
- 19
- 20
- 21
- 22
- 23
- 24
- 25
- 26
- 27
- 28
- 29
(3)regionservers:
hadoop102
hadoop103
hadoop104
(4)软连接 hadoop 配置文件到 HBase
[Tom@hadoop102 module]$ ln -s /opt/module/hadoop-3.1.3/etc/hadoop/core-site.xml /opt/module/hbase-1.3.1/conf/core-site.xml
[Tom@hadoop102 module]$ ln -s /opt/module/hadoop-3.1.3/etc/hadoop/hdfs-site.xml /opt/module/hbase-1.3.1/conf/hdfs-site.xml
5. HBase 远程发送到其他集群
[Tom@hadoop102 hbase-1.3.1]$ xsync hbase-1.3.1/
6. HBase 服务的启动
(1)启动方式1
[Tom@hadoop102 hbase-1.3.1]$ bin/hbase-daemon.sh start master
[Tom@hadoop102 hbase-1.3.1]$ bin/hbase-daemon.sh start regionserver
(2)启动方式2
[Tom@hadoop102 hbase-1.3.1]$ bin/start-hbase.sh
对应的停止服务:
[huxili@hadoop102 hbase-1.3.1]$ bin/stop-hbase.sh
7. 查看 Hbase 页面
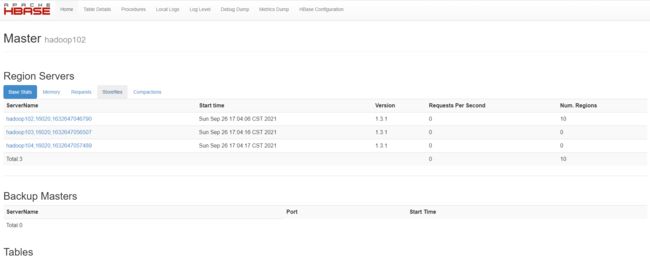
启动成功后,可以通过“host:port”的方式来访问 HBase 管理页面,例如:
http://hadoop102:16010
2.2 HBase Shell 操作
2.2.1 基本操作
1. .进入 HBase 客户端命令行
[Tom@hadoop102 hbase-1.3.1]$ bin/hbase shell
2. 查看帮助命令:
hbase(main):001:0> help
3. 查看当前数据库中有哪些表
hbase(main):002:0> list
TABLE
0808:stu5
fruit
fruit1
fruit2
stu
stu2
stu3
stu4
2.2.2 表的操作
1. 创建表
hbase(main):003:0> create 'student', 'info'
2. 插入数据到表
hbase(main):004:0> put 'student', '1001', 'info:sex', 'male'
0 row(s) in 0.3020 seconds
hbase(main):005:0> put ‘student’, ‘1001’, ‘info:age’, ‘20’
0 row(s) in 0.0330 seconds
hbase(main):006:0> put ‘student’, ‘1002’, ‘info:name’, ‘Lisa’
0 row(s) in 0.0160 seconds
hbase(main):007:0> put ‘student’, ‘1002’, ‘info:sex’, ‘female’
0 row(s) in 0.0220 seconds
hbase(main):008:0> put ‘student’, ‘1002’, ‘info:age’, ‘18’
0 row(s) in 0.0160 seconds
- 1
- 2
- 3
- 4
- 5
- 6
- 7
- 8
- 9
- 10
- 11
- 12
- 13
- 14
3. 扫描查看表数据
hbase(main):010:0> scan 'student'
ROW                                                    COLUMN+CELL
 1001                                                  column=info:age, timestamp=1632647694467, value=20
 1001                                                  column=info:sex, timestamp=1632647667974, value=male
 1002                                                  column=info:age, timestamp=1632647796278, value=18
 1002                                                  column=info:name, timestamp=1632647750748, value=Lisa
 1002                                                  column=info:sex, timestamp=1632647777073, value=female
hbase(main):012:0> scan ‘student’,{STARTROW => ‘1001’,STOPROW => ‘1001’}
ROW COLUMN+CELL
1001 column=info:age, timestamp=1632647694467, value=20
1001 column=info:sex, timestamp=1632647667974, value=male
hbase(main):013:0> scan ‘student’,{STARTROW => ‘1001’}
ROW COLUMN+CELL
1001 column=info:age, timestamp=1632647694467, value=20
1001 column=info:sex, timestamp=1632647667974, value=male
1002 column=info:age, timestamp=1632647796278, value=18
1002 column=info:name, timestamp=1632647750748, value=Lisa
1002 column=info:sex, timestamp=1632647777073, value=female
- 1
- 2
- 3
- 4
- 5
- 6
- 7
- 8
- 9
- 10
- 11
- 12
- 13
- 14
- 15
- 16
- 17
- 18
- 19
- 20
4. 查看表结构
hbase(main):014:0> describe 'student'
Table student is ENABLED
student
COLUMN FAMILIES DESCRIPTION
{NAME => 'info', BLOOMFILTER => 'ROW', VERSIONS => '1', IN_MEMORY => 'false', KEEP_DELETED_CELLS => 'FALSE', DATA_BLOCK_ENCODING => 'NONE', TTL => 'FOREVER', COMPRESSION => 'NONE', MIN_VERSIONS => '0', BLOCKCACHE =>
 'true', BLOCKSIZE => '65536', REPLICATION_SCOPE => '0'}
5. 更新指定字段的数据
hbase(main):015:0> put 'student','1001','info:name','Tom'
0 row(s) in 0.0500 seconds
hbase(main):016:0> put ‘student’,‘1001’,‘info:age’,‘25’
0 row(s) in 0.0220 seconds
6. 查看“指定行”或“指定列族:列”的数据
hbase(main):017:0> get 'student','1001'
COLUMN                                                 CELL
 info:age                                              timestamp=1632648276467, value=25
 info:name                                             timestamp=1632648250164, value=Tom
 info:sex                                              timestamp=1632647667974, value=male
1 row(s) in 0.0600 seconds
hbase(main):018:0> get ‘student’,‘1001’,‘info:name’
COLUMN CELL
info:name timestamp=1632648250164, value=Tom
1 row(s) in 0.0280 seconds
7. 统计表数据行数
hbase(main):019:0> count 'student'
2 row(s) in 0.0430 seconds
=> 2
8. 删除数据
删除某 rowkey 的全部数据:
hbase(main):020:0> deleteall 'student', '1001'
删除某 rowkey 的某一列数据:
hbase(main):021:0> delete 'student','1002','info:sex'
0 row(s) in 0.0170 seconds
9. 清空表数据
hbase(main):023:0> truncate 'student'
Truncating 'student' table (it may take a while):
 - Disabling table...
 - Truncating table...
提示:清空表的操作顺序为先 disable,然后再 truncate。
10. 删除表
首先需要先让该表为 disable 状态:
hbase(main):025:0> disable 'student'
然后才能 drop 这个表:
hbase(main):026:0> drop 'student'
0 row(s) in 1.2890 seconds
提示:如果直接 drop 表,会报错:ERROR: Table student is enabled. Disable it first.
hbase(main):024:0> drop 'student'
ERROR: Table student is enabled. Disable it first.
11. 变更表信息
将 info 列族中的数据存放3 个版本:
hbase(main):004:0> alter 'stu',{NAME=>'info2',VERSIONS=>3}
hbase(main):005:0> get ‘stu’,‘1001’,{ COLUMN=>‘info2:name’,VERSIONS=>3}
COLUMN CELL
info2:name timestamp=1632655775242, value=Nick
info2:name timestamp=1632654981999, value=Green
info2:name timestamp=1632654964002, value=Jack
1 row(s) in 0.0440 seconds
3 HBase 进阶
3.1 架构原理
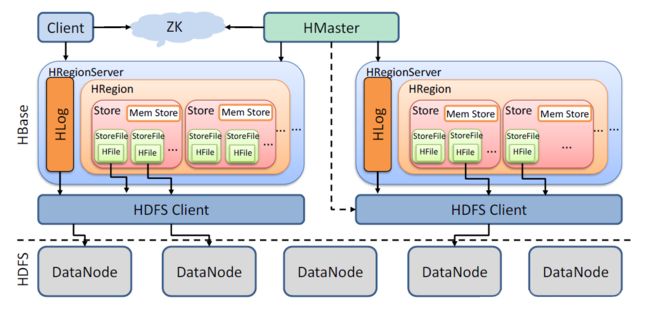
1. StoreFile
保存实际数据的物理文件,StoreFile 以 HFile 的形式存储在 HDFS 上。每个 Store 会有一个或多个StoreFile(HFile),数据在每个 StoreFile 中都是有序的。
2. MemStore
写缓存,由于 HFile 中的数据要求是有序的,所以数据是先存储在 MemStore 中,排好序后,等到达刷写时机才会刷写到 HFile,每次刷写都会形成一个新的HFile。
3. WAL
由于数据要经 MemStore 排序后才能刷写到 HFile,但把数据保存在内存中会有很高的概率导致数据丢失,为了解决这个问题,数据会先写在一个叫做 Write-Ahead logfile 的文件中,然后再写入 MemStore 中。所以在系统出现故障的时候,数据可以通过这个日志文件重建。
3.2 写流程
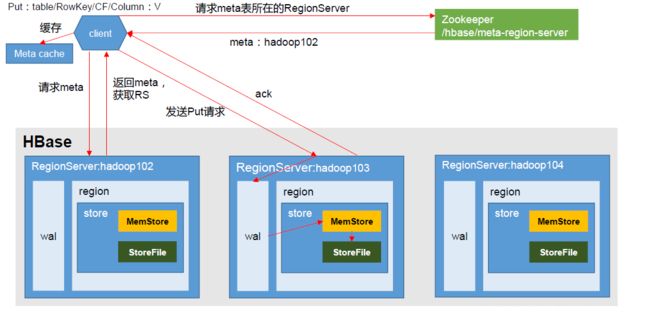
写流程:
(1)Client 先访问 zookeeper,获取 hbase:meta 表位于哪个 Region Server。
(2)访问对应的 Region Server,获取 hbase:meta 表,根据读请求的namespace:table/rowkey,查询出目标数据位于哪个 Region Server 中的哪个 Region 中。并将该 table 的 region 信息以及 meta 表的位置信息缓存在客户端的 meta cache,方便下次访问。
(3)与目标 Region Server 进行通讯。
(4)将数据顺序写入(追加)到 WAL。
(5)将数据写入对应的 MemStore,数据会在 MemStore 进行排序。
(6)向客户端发送 ack;
(7)等达到 MemStore 的刷写时机后,将数据刷写到 HFile。
3.3 MemStore Flush

MemStore 刷写时机:
1.当某个 memstroe 的大小达到了 hbase.hregion.memstore.flush.size(默认值128M),其所在 region 的所有 memstore 都会刷写。
当 memstore 的大小达到了hbase.hregion.memstore.flush.size(默认值128M)* hbase.hregion.memstore.block.multiplier(默认值4)时,会阻止继续往该 memstore 写数据。
2. 当 region server 中 memstore 的总大小达到java_heapsize *hbase.regionserver.global.memstore.size(默认值0.4) *hbase.regionserver.global.memstore.size.lower.limit(默认值0.95),region 会按照其所有 memstore 的大小顺序(由大到小)依次进行刷写。直到 region server 中所有 memstore 的总大小减小到上述值以下。
当 region server 中 memstore 的总大小达到java_heapsize*hbase.regionserver.global.memstore.size(默认值0.4)时,会阻止继续往所有的memstore 写数据。
3.到达自动刷写的时间,也会触发 memstore flush。自动刷新的时间间隔由该属性进行配置hbase.regionserver.optionalcacheflushinterval(默认1 小时)。
4.当 WAL 文件的数量超过hbase.regionserver.max.logs,region 会按照时间顺序依次进行刷写,直到 WAL 文件数量减小到 hbase.regionserver.max.log 以下(该属性名已经废弃,现无需手动设置,最大值为32)。
3.4 读流程

(1)Client 先访问 zookeeper,获取 hbase:meta 表位于哪个 Region Server。
(2)访问对应的 Region Server,获取 hbase:meta 表,根据读请求的 namespace:table/rowkey,查询出目标数据位于哪个 Region Server 中的哪个 Region 中。并将该 table 的 region 信息以及 meta 表的位置信息缓存在客户端的 meta cache,方便下次访问。
(3)与目标 Region Server 进行通讯。
在消息发送的过程中,涉及到了两个线程:main 线程和 Sender 线程 ,以及一个线程共享变量RecordAccumulator。main 主线程负责创建消息,然后通过拦截器、序列化器、分区器作用之后缓存到累加器RecordAccumulator中,Sender 线程不断从 RecordAccumulator中拉取消息发送到 Kafka broker。
(4)分别在 Block Cache(读缓存),MemStore 和 Store File(HFile)中查询目标数据,并将查到的所有数据进行合并。此处所有数据是指同一条数据的不同版本(time stamp)或者不同的类型(Put/Delete)。
(5)将从文件中查询到的数据块(Block,HFile 数据存储单元,默认大小为64KB)缓存到 Block Cache。
(6)将合并后的最终结果返回给客户端。
3.5 StoreFile Compaction
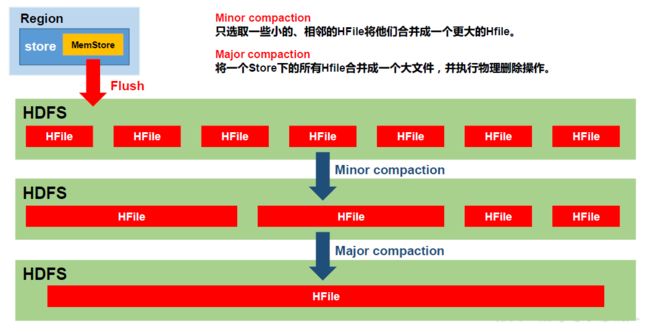
由于 memstore 每次刷写都会生成一个新的 HFile,且同一个字段的不同版本(timestamp)和不同类型(Put/Delete)有可能会分布在不同的 HFile 中,因此查询时需要遍历所有的 HFile。为了减少 HFile 的个数,以及清理掉过期和删除的数据,会进行 StoreFile Compaction。
Compaction 分为两种,分别是 Minor Compaction 和 Major Compaction。Minor Compaction 会将临近的若干个较小的 HFile 合并成一个较大的 HFile,但不会清理过期和删除的数据。Major Compaction 会将一个Store 下的所有的 HFile 合并成一个大 HFile,并且会清理掉过期和删除的数据。
3.6 Region Split
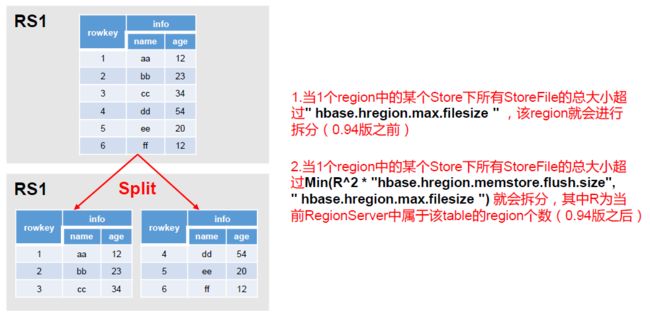
默认情况下,每个 Table 起初只有一个 Region,随着数据的不断写入,Region 会自动进行拆分。刚拆分时,两个子 Region 都位于当前的 Region Server,但处于负载均衡的考虑,HMaster 有可能会将某个 Region 转移给其他的 Region Server。
Region Split 时机:
1.当1 个 region 中的某个 Store 下所有 StoreFile 的总大小超过hbase.hregion.max.filesize,该Region 就会进行拆分(0.94 版本之前)。
2. 当1 个 region 中的某个 Store 下所有 StoreFile 的总大小超过Min(R^2 * "hbase.hregion.memstore.flush.size",hbase.hregion.max.filesize"),该Region 就会进行拆分,其中 R 为当前 Region Server 中属于该 Table 的个数(0.94 版本之后)。
参考:
https://www.bilibili.com/video/BV1Y4411B7jy
文章知识点与官方知识档案匹配,可进一步学习相关知识
MySQL入门技能树首页概览 57744 人正在系统学习中
![]()
![]()
![]()