redis知识复习
redis知识复习
- redis基础知识
-
- 一. redis的认识
-
- 1. 非关系型数据库 与 传统数据库 的区别
- 2. 安装redis并设置自启动
- 3. 熟悉命令行客户端
- 4. 熟悉图形化工具RDM
- 二. redis的命令与数据结构
-
- 1. 数据结构介绍
- 2. redis通用命令(熟练掌握)
- 三. redis的Java客户端
-
- 1. Jedis
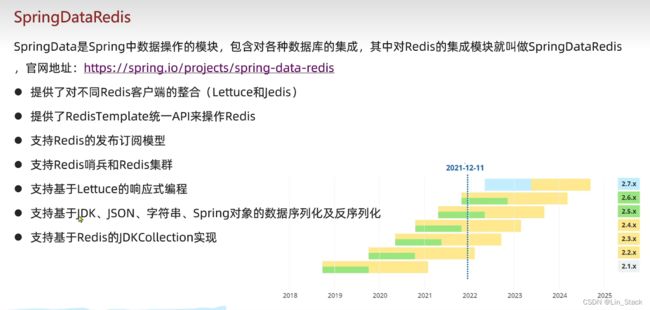
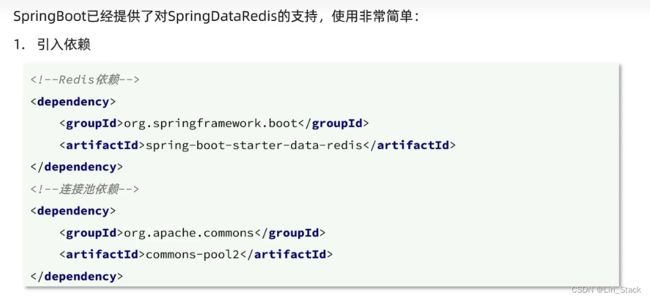
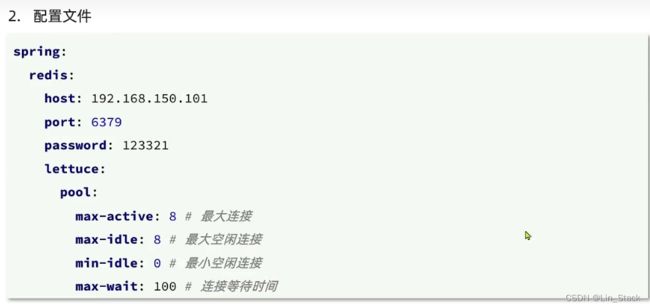
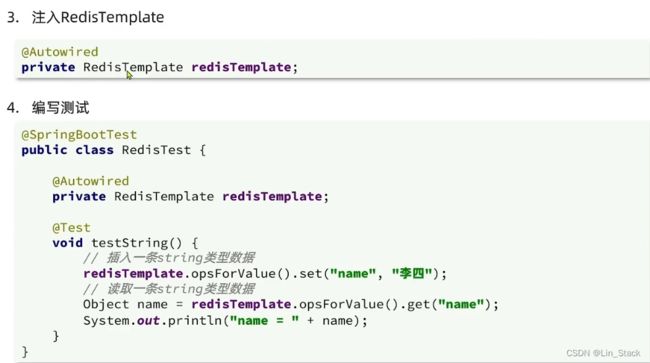
- 2. SpringDataRedis
- 3. StringRedisTemplate(重要掌握)
- redis应用(未完结...)
-
- 四. 处理登录验证
-
- 1. 设计登录拦截
- 五. 处理热点数据的查询工作
-
- 1. 处理缓存穿透
- 2. 处理缓存雪崩
- 3. 处理缓存击穿
- 六. 处理秒杀任务(优惠券)
-
- 1. 处理订单ID的全局生成唯一性
- 2. 优惠券秒杀流程(抢优惠券)
-
- 2.1 单体模式下的优惠券秒杀流程
- 2.2 集群环境下的优惠券秒杀流程(setnx分布式锁)
- 七. redis分布式锁——Redisson(重要掌握)
-
- 1. 快速入门
- 2. Redisson的重要原理
-
- 2.1 可重入锁原理
- 2.2 锁重试和看门狗机制(超时续约/释放)
- 2.3 主从一致性(红锁(Redlock))
- **总结**
- 八. 优化秒杀优惠券业务
-
- 1. 改进方案说明
- 2. 改进方案实操
-
- 2.1 数据库增加优惠券库存量的同时,向redis中同步存储优惠券的库存量
- 2.2 基于Lua脚本实现:判断购买资格,库存是否充足,限制一人一单购买
- 2.3 秒杀优惠券(创建订单)成功,将优惠券ID和用户ID封装并存入阻塞队列
- 2.4 开启线程任务,实现异步下单功能,返回订单ID信息
- 3. 改进流程总结
- 4. 秒杀业务优化总结
- 5. 使用基于redis的消息队列(实际工作直接使用热门MQ)
-
- 5.1 基于 List 结构模拟消息队列
- 5.2 基于 PubSub 的消息队列
- 5.3 基于 Stream 的消息队列(redis5.0以后)
- 5.4 Redis 三种消息队列的对比
- 5.5 Stream消息队列异步秒杀下单(实操)
- 九. 优化博客业务
-
- 1. 优化博客点赞功能
- 2. 优化博客下栏点赞前五名功能
- 3. 优化共同关注功能
- 4. 优化博文推送功能
-
- 4.1基于推模式实现关注推送功能
- 4.1基于滚动分页实现展示功能
- 九. 优化查找附近商铺业务
-
- 1. Redis的GeoHash应用
-
- 1.1 GEO 数据结构基本用法
- 2. 查找附近商铺功能
-
- 2.1 前置工作:店铺数据存储Redis(GEO数据结构)
- 2.2 实现查找附近商铺功能(代码后续补全)
- 十. 优化签到业务
-
- 1. Redis的BitMap应用
- 2. 优化用户签到业务
- 2. 优化签到量统计业务
- 十. 优化网站流量统计业务
-
- 1. Redis的HyperLogLog的统计功能
- 致谢
redis基础知识
一. redis的认识
1. 非关系型数据库 与 传统数据库 的区别
2. 安装redis并设置自启动
-
在Linux环境下 安装redis依赖
yum install -y gcc tcl -
(/usr/local/src目录下) 下载对应的redis安装包(本次为v6.2.6,如果有之前下载过的redis,记得提前删除干净,以防配置环境等因素造成安装的异常)
wget https://download.redis.io/releases/redis-6.2.6.tar.gz -
解压压缩包获得 redis程序安装包
tar -xvf redis-6.2.6.tar.gz -
在该程序包目录下执行 编译安装命令(默认该步骤会将redis软件安装到/usr/local/bin目录下)
make && make install -
执行redis服务命令 即可启动redis,该方式为前台启动方式(不友好,不推荐使用)
redis-server -
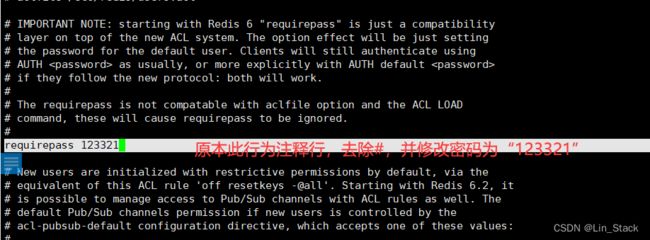
修改配置文件,完成指定配置下的启动准备(记得对redis.conf做备份,以防修改失误)
cp redis.conf redis.conf.bck
vi redis.conf
# 文本内部的修改(供复制粘贴) # 任意ip可访问 bind 0.0.0.0 # 守护进程打开,可后台运行 daemonize yes # 密码设置123321 requirepass 123321 # 打开日志记录,并命名 logfile "redis.log" -
根据指令,完成指定配置文件下的启动
redis-server redis.conf -
查看redis进程命令,以及杀死进程命令
ps -ef | grep redis kill -9 PID(PID为对应的进程序列号) -
开机自启动(在 system系统文件夹中 新建一个配置类文件)
vi /etc/systemd/system/redis.service配置类文件内容如下:
[Unit]
Description=redis-server
After=network.target

[Service]
Type=forking
# 这行配置内容要根据redis的安装目录自定义路径
ExecStart=/usr/local/bin/redis-server /usr/local/src/redis-6.2.6/redis.conf
PrivateTmp=true

[Install]
WantedBy=multi-user.target
重载系统服务,以便配置文件生效
systemctl daemon-reload此时可以使用系统命令实现redis的启动、查看状态或关闭
systemctl start redis

systemctl status redis

systemctl stop redis
执行下面的命令,实现开机自启:
systemctl enable redis查看此时,redis 服务的状态:
systemctl status redis
3. 熟悉命令行客户端
-
在/usr/local/bin/目录下,使用redis-cli实现连通redis
redis-cli -h 192.168.2.190 -p 6379 -a 123321 >ping -
存取数据set/get,换库select [index]
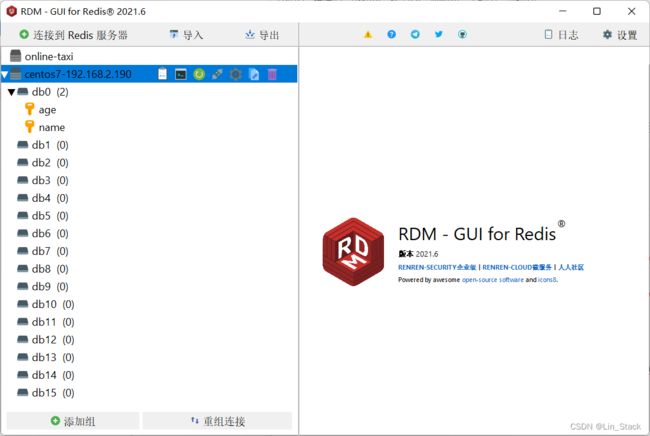
4. 熟悉图形化工具RDM
二. redis的命令与数据结构
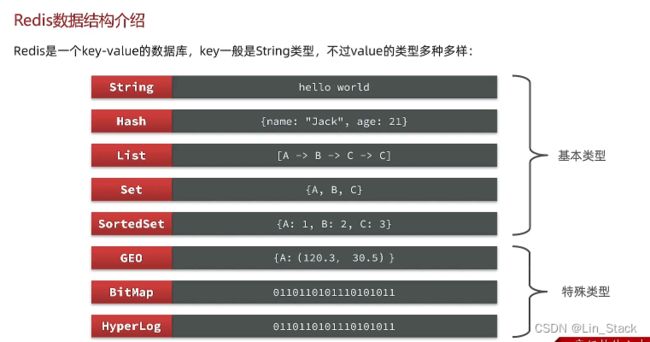
1. 数据结构介绍
2. redis通用命令(熟练掌握)
# keys:查看所有key
keys *
# set:设置添加k-v  mset:批量添加
set k1 v1
mset k1 v1 k2 v2 k3 v3
# del:删除
del k1
# exist 查看是否存在
exist k1
# expire:设置有效期时间,单位s,没有特殊设置则为-1表示永久有效
expire k1 20
# ttl:查看有效期剩余时间(-1表示永久,-2表示过期,正数表示剩余秒数)
ttl k1
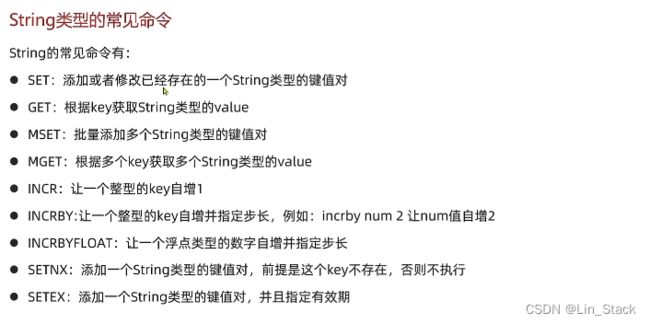
String类型(可存string,int,float)
redis的key的格式:
层级存储:[项目名]:[业务名]:[类型]:[id],这种存储的方式,有一个好处,那就是在使用gui图形界面能看到层级结构
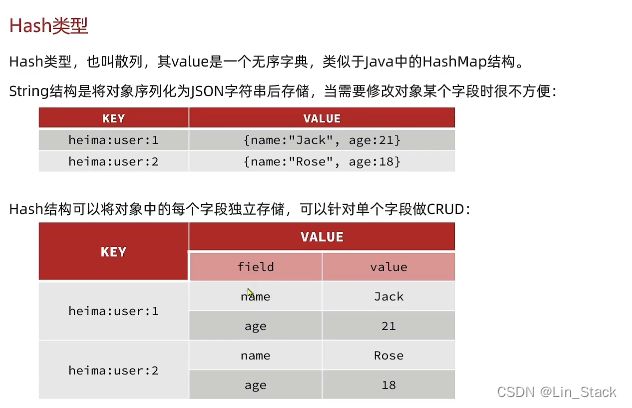
Hash类型

List类型(对比Java的双向链表)

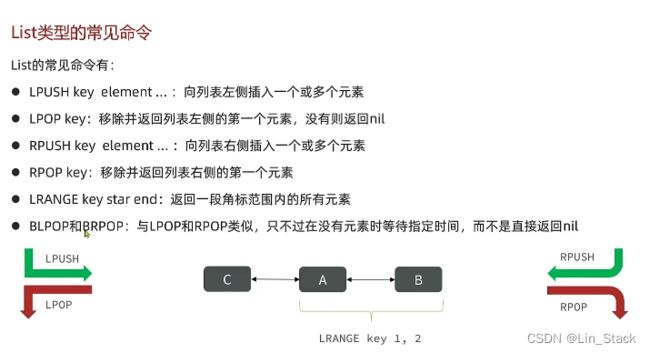
list的总结:可以广泛模拟 栈(同一个方向先进后出) 队列(不同方向进出) 阻塞队列(一头取,一头放,需要设置等待时间)
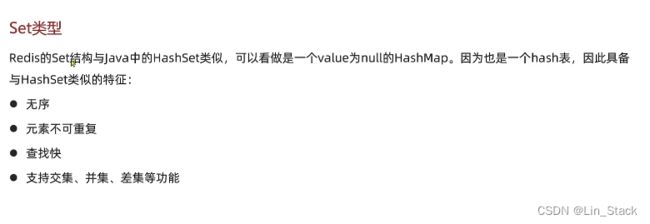
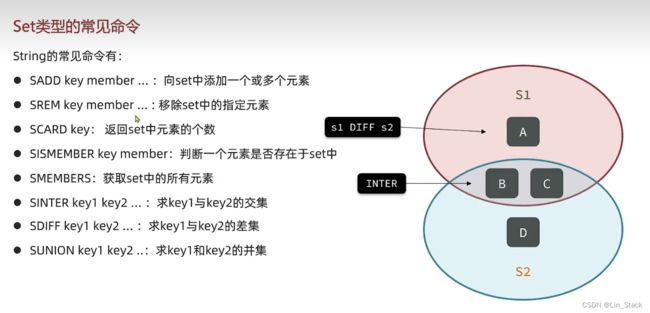
Set类型(对比Java的hashset,相当于底层使用hashmap实现)
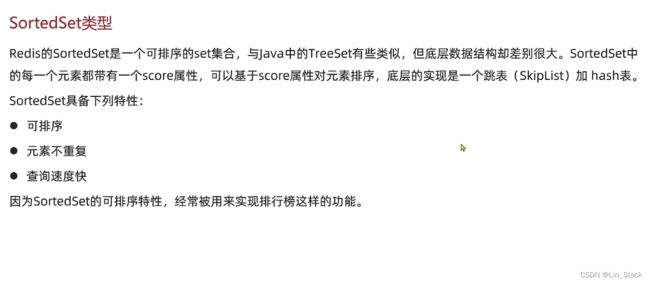
SortedSet类型(功能上类似TreeSet,底层数据结构不同)

三. redis的Java客户端
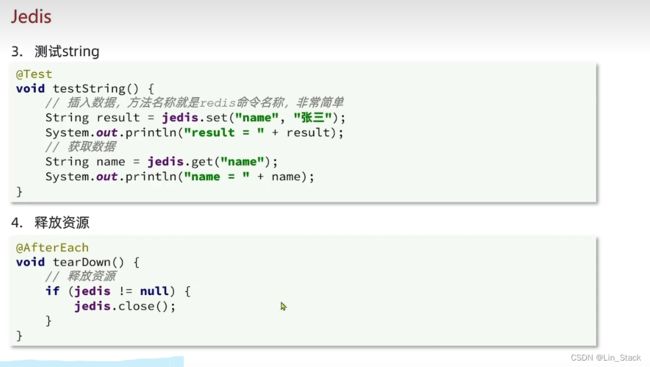
1. Jedis
单例使用流程
Jedis连接池用法
创建连接池对象,设置参数,完成连接池的创建,在使用过程中,与上述直接创建连接不同的是直接从连接池中获取一个连接,其他基本一致
// jedis = new Jedis("192.168.2.190",6379);
jedis = JedisConnectionFactory.getJedis(); //直接从连接池中获取一个
2. SpringDataRedis
<dependency>
    <groupId>com.fasterxml.jackson.coregroupId>
    <artifactId>jackson-databindartifactId>
dependency>
- 自定义序列化方式(最好能理解!实际上由于该方式进行反序列化的必要操作时,会必定携带@class信息,造成占用内存产生大量冗余,并不推荐使用,后续会使用StringRedisTemplate操作key,value则手动进行序列化与反序列化操作)
/**
 * redis反序列化自定义操作工具类
 */

@Configuration
public class RedisConfig {
    /**
     * @param redisConnectionFactory 引入工厂
     * @return 返回经过处理的redisTemplate模板
     */
    @Bean
    public RedisTemplate<String, Object> redisTemplate(RedisConnectionFactory redisConnectionFactory){
        // 创建RedisTemplate对象
        RedisTemplate<String, Object> template = new RedisTemplate<>();
        // 设置连接工厂
        template.setConnectionFactory(redisConnectionFactory);
        // 创建JSON序列化工具
        GenericJackson2JsonRedisSerializer jsonRedisSerializer = new GenericJackson2JsonRedisSerializer();
        // 设置key的序列化
        template.setKeySerializer(RedisSerializer.string());
        template.setHashKeySerializer(RedisSerializer.string());
        // 设置value的序列化
        template.setValueSerializer(jsonRedisSerializer);
        template.setHashKeySerializer(jsonRedisSerializer);
        // 返回RedisTemplate对象
        return template;
    }
}
3. StringRedisTemplate(重要掌握)
(基于内存占用问题,使用StringRedisTemplate来改善内存问题,StringRedisTemplate操作key,value则手动进行序列化与反序列化操作)
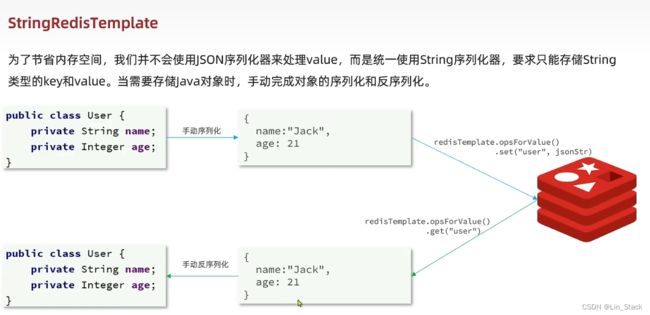

RedisTemplate与StringRedisTemplate处理后两者存取的数据对比:


redis应用(未完结…)
四. 处理登录验证
1. 设计登录拦截
五. 处理热点数据的查询工作
1. 处理缓存穿透
缓存穿透:浏览器不断发送未命中的请求,redis一直未命中,一直查询数据库,给数据库造成很大压力
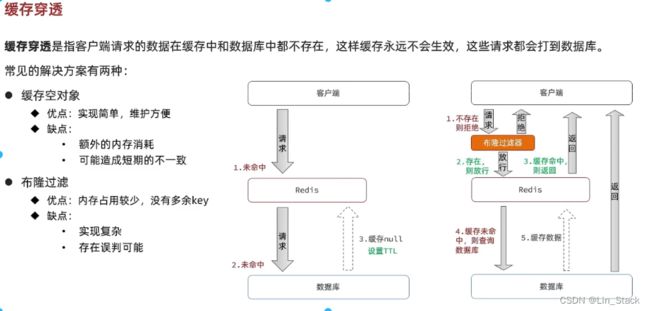
实例:用户查询一个热点商铺/商品/文章信息,信息不存在,持续访问造成数据库压力
解决方案:

2. 处理缓存雪崩
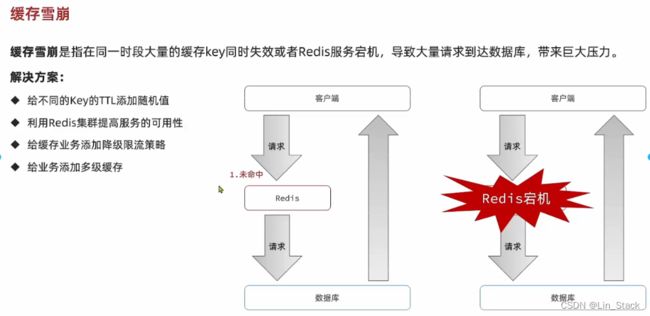
实例:用户分时段查询多个热点商铺/商品/文章信息,结果在某个时间节点该信息全部失效,导致该时间节点需要大量访问数据库造成数据库压力
解决方案:给redis中的缓存数据设置不同的TTL
3. 处理缓存击穿
实例:多名用户在一个定时活动的时间节点访问某个热点商铺/商品/文章信息,结果造成缓存失效,结果造成访问数据库造成数据库的压力过大
六. 处理秒杀任务(优惠券)
1. 处理订单ID的全局生成唯一性
@Component
public class RedisIdWorker {
    //开始时间戳
    private static final long BEGIN_TIMESTAMP = 1674086400L;

    //序列号位数
    private static final int COUNT_BITS = 32;

    private StringRedisTemplate stringRedisTemplate;

    public RedisIdWorker(StringRedisTemplate stringRedisTemplate) {
        this.stringRedisTemplate = stringRedisTemplate;
    }

    public long nextId(String keyPrefix){
        //1.生成时间戳
        LocalDateTime time = LocalDateTime.now();
        long nowSecond = time.toEpochSecond(ZoneOffset.UTC);
        long timestamp = nowSecond - BEGIN_TIMESTAMP;
        //2.生成序列号,redis自增长,redis单个key自增长有上限,2的64次方
        //2.1获取当前日期,精确到天
        String date = time.format(DateTimeFormatter.ofPattern("yyyy:MM:dd"));
        long count = stringRedisTemplate.opsForValue().increment("icr:" + keyPrefix + ":" + date);
        //3.拼接并返回,不能使用字符串方式拼接
        return timestamp << COUNT_BITS | count;//先向左移32位,那么低32位全为0,跟序列号进行或操作
    }
    /**
     * 生成开始时间戳
     * @param args
     */
    public static void main(String[] args) {
        LocalDateTime time = LocalDateTime.of(2023, 1, 19, 0, 0, 0);
        long second = time.toEpochSecond(ZoneOffset.UTC);
        System.out.println(second);
    }
}
2. 优惠券秒杀流程(抢优惠券)
2.1 单体模式下的优惠券秒杀流程
2.2 集群环境下的优惠券秒杀流程(setnx分布式锁)
(在集群模式下,加锁只是该台jvm给当前这台服务器处理的请求加锁,而集群是多台服务器轮询处理请求,会造成每台服务器都有一个加锁的线程,每台服务器都会有一个新订单创建处理)

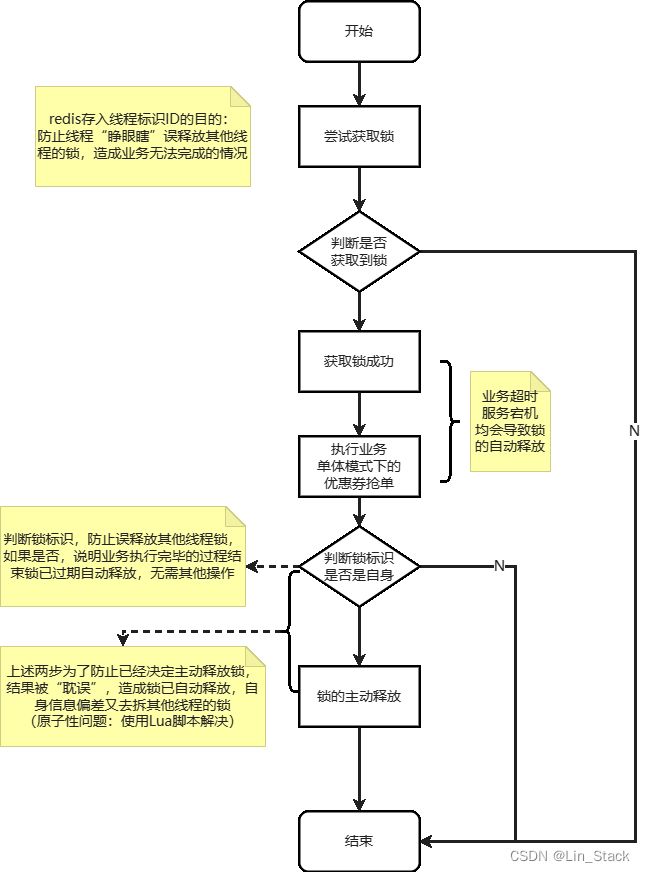
解决原子性问题,造成的锁无法及时释放的Lua脚本代码
-- 这里的 KEYS[1] 就是锁的 key,这里的 ARGV[1] 就是当前线程标识
-- 获取锁中的线程标识 get key
local id = redis.call('get', KEYS[1]);
-- 比较线程标识与锁中的标识是否一致
if (id == ARGV[1]) then
    -- 释放锁 del key
    return redis.call('del', KEYS[1])
end
return 0
七. redis分布式锁——Redisson(重要掌握)
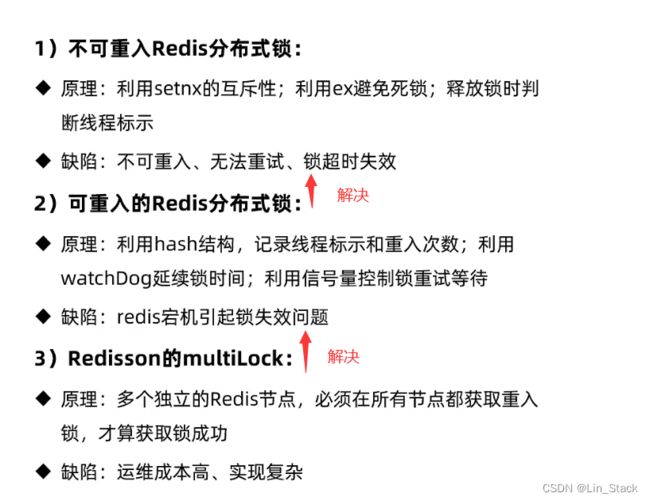
上述集群的基于 setnx 实现的分布式锁存在下面的问题
1.不可重入:同一个线程无法多次获取同一把锁
2.不可重试:获取锁只尝试一次就返回 false,没有重试机制
3.超时释放:锁超时释放虽然可以避免死锁,但如果是业务执行耗时较长,也会导致锁释放,存在安全隐患
4.主从一致性:如果 Redis 提供了主从集群,主从延同步在延迟,当主机宕机时,如果从机同步主机中的数据,则会出现锁失效
为了确保分布式锁可用,我们至少要确保锁的实现同时满足以下四个条件:
互斥性。在任意时刻,只有一个客户端能持有锁。
不会发生死锁。即使有一个客户端在持有锁的期间崩溃而没有主动解锁,也能保证后续其他客户端能加锁。
性能。排队等待锁的节点如果不知道锁何时会被释放,则只能隔一段时间尝试获取一次锁,这样无法保证资源的高效利用,因此当锁释放时,要能够通知等待队列,使一个等待节点能够立刻获得锁。
重入。同一个线程可以重复拿到同一个资源的锁。
Redisson 是一个在 Redis 的基础上实现的 Java 驻内存数据网格
它不仅提供了一系列的分布式的 Java 常用对象,还提供了许多分布式服务,其中就包含了各种分布式锁的实现。redission中提供了多样化的锁,
可重入锁(Reentrant Lock)
公平锁(Fair Lock)
联锁(MultiLock)
红锁(RedLock)
读写锁(ReadWriteLock)
信号量(Semaphore) 等等
1. 快速入门
- 导依赖
<dependency>
    <groupId>org.redissongroupId>
    <artifactId>redissonartifactId>
    <version>3.13.6version>
dependency>
- 建Redisson类
@Configuration
public class RedisConfig {
    @Bean
    public RedissonClient redissionClient() {
        // 配置类
        Config config = new Config();

        // 添加 Redis 地址,此处添加了单点的地址,也可以使用 config.useClusterServers() 添加集群地址
        config.useSingleServer().setAddress("redis://192.168.2.12:6379").setPassword("123321");

        // 创建客户端
        return Redisson.create(config);
    }
}
- 测试基础使用
@Resource
private RedissonClient redissonClient;

@Test
void testRedisson() throws InterruptedException {
    // 获取锁(可重入),指定锁的名称
    RLock lock = redissonClient.getLock("anyLock");
    // 尝试获取锁,参数分别是:获取锁的最大等待时间(期间会重试过),锁自动释放时间,时间单位
    boolean isLock = lock.tryLock(1, 10, TimeUnit.SECONDS);
    // 判断锁是否获取成功
    if (isLock) {
        try {
            System.out.println("执行业务");
        } finally {
            //释放锁
            lock.unlock();
        }
    }
}
2. Redisson的重要原理
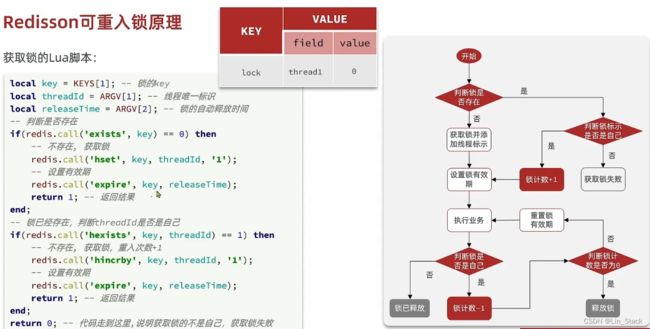
2.1 可重入锁原理
可重入锁,也叫做递归锁,指的是同一线程 外层函数获得锁之后 ,内层递归函数仍然有获取该锁的代码,但不受影响。
/**
     * redission分布式锁-重试时间 秒为单位
     * @param lockName 锁名
     * @param waitTime 重试时间
     * @param leaseTime 锁过期时间
     * @return
     */
    public boolean tryLock(String lockName,long waitTime,long leaseTime){
        try{
            RLock rLock = redissonClient.getLock(lockName);
            return rLock.tryLock(waitTime, leaseTime, TimeUnit.SECONDS);
        }catch (Exception e){
            logger.error("redission lock error with waitTime",e);
        }
        return false;
    }
org.redisson.Redisson#getLock()
// org.redisson.Redisson#getLock()
@Override
public RLock getLock(String name) {
  return new RedissonLock(commandExecutor, name, id);
}
- commandExecutor: 与 Redis 节点通信并发送指令的真正实现。需要说明一下,Redisson 的 CommandExecutor 实现是通过 eval 命令来执行 Lua 脚本,所以要求 Redis 的版本必须为 2.6 或以上
- name: 锁的全局名称,例如上面代码中的 “foobar”,具体业务中通常可能使用共享资源的唯一标识作为该名称。
- id: Redisson 客户端唯一标识。
org.redisson.RedissonLock#lock()
在直接使用 lock() 方法获取锁时,最后实际执行的是 lockInterruptibly(-1, null)
@Override
public void lockInterruptibly(long leaseTime, TimeUnit unit) throws InterruptedException {
    // 1.尝试获取锁
    Long ttl = tryAcquire(leaseTime, unit);
    // 2.获得锁成功
    if (ttl == null) {
        return;
    }
    // 3.等待锁释放,并订阅锁
    long threadId = Thread.currentThread().getId();
    Future<RedissonLockEntry> future = subscribe(threadId);
    get(future);

    try {
        while (true) {
            // 4.重试获取锁
            ttl = tryAcquire(leaseTime, unit);
            // 5.成功获得锁
            if (ttl == null) {
                break;
            }
            // 6.等待锁释放
            if (ttl >= 0) {
                getEntry(threadId).getLatch().tryAcquire(ttl, TimeUnit.MILLISECONDS);
            } else {
                getEntry(threadId).getLatch().acquire();
            }
        }
    } finally {
        // 7.取消订阅
        unsubscribe(future, threadId);
    }
}
tryAcquire() 方法的实现
- 首先尝试获取锁,具体代码下面再看,返回结果是已存在的锁的剩余存活时间,为 null (nil)则说明没有已存在的锁并成功获得锁。如果获得锁则结束流程,回去执行业务逻辑;
- 如果没有获得锁,则需等待锁被释放,并通过 Redis 的 channel 订阅锁释放的消息;
- 订阅锁的释放消息成功后,进入一个不断重试获取锁的循环,循环中每次都先试着获取锁,并得到已存在的锁的剩余存活时间;
- 如果在重试中拿到了锁,则结束循环,跳过第 6 步。
- 如果锁当前是被占用的,那么等待释放锁的消息,具体实现使用了 JDK 并发的信号量工具 Semaphore 来阻塞线程,当锁释放并发布释放锁的消息后,信号量的 release() 方法会被调用,此时被信号量阻塞的等待队列中的一个线程就可以继续尝试获取锁了;
- 在成功获得锁后,就没必要继续订阅锁的释放消息了,因此要取消对 Redis 上相应 channel 的订阅。
private Long tryAcquire(long leaseTime, TimeUnit unit) {
    return get(tryAcquireAsync(leaseTime, unit, Thread.currentThread().getId()));
}

private <T> Future<Long> tryAcquireAsync(long leaseTime, TimeUnit unit, long threadId) {
    if (leaseTime != -1) {
        return tryLockInnerAsync(leaseTime, unit, threadId, RedisCommands.EVAL_LONG);
    }
    // 2.用默认的锁超时时间去获取锁
    Future<Long> ttlRemainingFuture = tryLockInnerAsync(LOCK_EXPIRATION_INTERVAL_SECONDS,
                TimeUnit.SECONDS, threadId, RedisCommands.EVAL_LONG);
    ttlRemainingFuture.addListener(new FutureListener<Long>() {
        @Override
        public void operationComplete(Future<Long> future) throws Exception {
            if (!future.isSuccess()) {
                return;
            }
            Long ttlRemaining = future.getNow();
            // 成功获得锁
            if (ttlRemaining == null) {
                // 3.锁过期时间刷新任务调度
                scheduleExpirationRenewal();
            }
        }
    });
    return ttlRemainingFuture;
}

<T> Future<T> tryLockInnerAsync(long leaseTime, TimeUnit unit, long threadId,
                RedisStrictCommand<T> command) {
    internalLockLeaseTime = unit.toMillis(leaseTime);
    // 3.使用 EVAL 命令执行 Lua 脚本获取锁
    return commandExecutor.evalWriteAsync(getName(), LongCodec.INSTANCE, command,
              "if (redis.call('exists', KEYS[1]) == 0) then " +
                  "redis.call('hset', KEYS[1], ARGV[2], 1); " +
                  "redis.call('pexpire', KEYS[1], ARGV[1]); " +
                  "return nil; " +
              "end; " +
              "if (redis.call('hexists', KEYS[1], ARGV[2]) == 1) then " +
                  "redis.call('hincrby', KEYS[1], ARGV[2], 1); " +
                  "redis.call('pexpire', KEYS[1], ARGV[1]); " +
                  "return nil; " +
              "end; " +
              "return redis.call('pttl', KEYS[1]);",
                Collections.<Object>singletonList(getName()), internalLockLeaseTime,
                        getLockName(threadId));
}
- 获取锁真正执行的命令,Redisson 使用 EVAL 命令执行上面的 Lua 脚本来完成获取锁的操作
- 通过 exists 命令发现当前 key 不存在,即锁没被占用,则执行 hset 写入 Hash 类型数据 key:全局锁名称(例如共享资源ID), field:锁实例名称(Redisson客户端ID:线程ID), value:1,并执行 pexpire 对该 key 设置失效时间,返回空值 nil,至此获取锁成功
- 如果通过 hexists 命令发现 Redis 中已经存在当前 key 和 field 的 Hash 数据,说明当前线程之前已经获取到锁,因为这里的锁是可重入的,则执行 hincrby 对当前 key field 的值加一,并重新设置失效时间,返回空值,至此重入获取锁成功。
- 最后是锁已被占用的情况,即当前 key 已经存在,但是 Hash 中的 Field 与当前值不同,则执行 pttl 获取锁的剩余存活时间并返回,至此获取锁失败。
redisson释放锁
- 使用 EVAL 命令执行 Lua 脚本来释放锁;
- key 不存在,说明锁已释放,直接执行 publish 命令发布释放锁消息并返回 1;
- key 存在,但是 field 在 Hash 中不存在,说明自己不是锁持有者,无权释放锁,返回 nil;
- 因为锁可重入,所以释放锁时不能把所有已获取的锁全都释放掉,一次只能释放一把锁,因此执行 hincrby 对锁的值减一。
- 释放一把锁后,如果还有剩余的锁,则刷新锁的失效时间并返回 0;如果刚才释放的已经是最后一把锁,则执行 del 命令删除锁的 key,并发布锁释放消息,返回 1。
- 上面执行结果返回 nil 的情况(即第2中情况),因为自己不是锁的持有者,不允许释放别人的锁,故抛出异常。
- 执行结果返回 1 的情况,该锁的所有实例都已全部释放,所以不需要再刷新锁的失效时间。
public void unlock() {
    // 1.通过 EVAL 和 Lua 脚本执行 Redis 命令释放锁
    Boolean opStatus = commandExecutor.evalWrite(getName(), LongCodec.INSTANCE,
                    RedisCommands.EVAL_BOOLEAN,
                    "if (redis.call('exists', KEYS[1]) == 0) then " +
                        "redis.call('publish', KEYS[2], ARGV[1]); " +
                        "return 1; " +
                    "end;" +
                    "if (redis.call('hexists', KEYS[1], ARGV[3]) == 0) then " +
                        "return nil;" +
                    "end; " +
                    "local counter = redis.call('hincrby', KEYS[1], ARGV[3], -1); " +
                    "if (counter > 0) then " +
                        "redis.call('pexpire', KEYS[1], ARGV[2]); " +
                        "return 0; " +
                    "else " +
                        "redis.call('del', KEYS[1]); " +
                        "redis.call('publish', KEYS[2], ARGV[1]); " +
                        "return 1; "+
                    "end; " +
                    "return nil;",
                    Arrays.<Object>asList(getName(), getChannelName()),
                            LockPubSub.unlockMessage, internalLockLeaseTime,
                            getLockName(Thread.currentThread().getId()));
    // 2.非锁的持有者释放锁时抛出异常
    if (opStatus == null) {
        throw new IllegalMonitorStateException(
                "attempt to unlock lock, not locked by current thread by node id: "
                + id + " thread-id: " + Thread.currentThread().getId());
    }
    // 3.释放锁后取消刷新锁失效时间的调度任务
    if (opStatus) {
        cancelExpirationRenewal();
    }
2.2 锁重试和看门狗机制(超时续约/释放)
@Resource
private RedissonClient redissonClient;

@Test
void testRedisson() throws InterruptedException {
    // 获取锁(可重入),指定锁的名称
    RLock lock = redissonClient.getLock("anyLock");
    // 尝试获取锁,参数分别是:获取锁的最大等待时间(期间会重试过),锁自动释放时间,时间单位
    boolean isLock = lock.tryLock(1, 10, TimeUnit.SECONDS);
    // 判断锁是否获取成功
    if (isLock) {
        try {
            System.out.println("执行业务");
        } finally {
            //释放锁
            lock.unlock();
        }
    }
}
    public void lock() {
        try {
            this.lockInterruptibly();
        } catch (InterruptedException var2) {
            Thread.currentThread().interrupt();
        }
    }
    private <T> RFuture<Long> tryAcquireAsync(long leaseTime, TimeUnit unit, final long threadId) {
        if (leaseTime != -1L) {
            // 有有效期的
            return this.tryLockInnerAsync(leaseTime, unit, threadId, RedisCommands.EVAL_LONG);
        } else {
            // 没有有效期的,这里启动了一个守护线程对锁续期
            RFuture<Long> ttlRemainingFuture = this.tryLockInnerAsync(this.commandExecutor.getConnectionManager().getCfg().getLockWatchdogTimeout(), TimeUnit.MILLISECONDS, threadId, RedisCommands.EVAL_LONG);
            ttlRemainingFuture.addListener(new FutureListener<Long>() {
                public void operationComplete(Future<Long> future) throws Exception {
                    if (future.isSuccess()) {
                        Long ttlRemaining = (Long)future.getNow();
                        if (ttlRemaining == null) {
                            RedissonLock.this.scheduleExpirationRenewal(threadId);
                        }
                    }
                }
            });
            return ttlRemainingFuture;
        }
    }
看门狗续期
    private void scheduleExpirationRenewal(final long threadId) {
        if (!expirationRenewalMap.containsKey(this.getEntryName())) {
            Timeout task = this.commandExecutor.getConnectionManager().newTimeout(new TimerTask() {
                public void run(Timeout timeout) throws Exception {
                    // 执行lua 进行续期
                    RFuture<Boolean> future = RedissonLock.this.renewExpirationAsync(threadId);
                    future.addListener(new FutureListener<Boolean>() {
                        public void operationComplete(Future<Boolean> future) throws Exception {
                            RedissonLock.expirationRenewalMap.remove(RedissonLock.this.getEntryName());
                            if (!future.isSuccess()) {
                                RedissonLock.log.error("Can't update lock " + RedissonLock.this.getName() + " expiration", future.cause());
                            } else {
                                if ((Boolean)future.getNow()) {
                                    RedissonLock.this.scheduleExpirationRenewal(threadId);
                                }
                            }
                        }
                    });
                }
                // 每隔internalLockLeaseTime/3 = 10秒检查一次
            }, this.internalLockLeaseTime / 3L, TimeUnit.MILLISECONDS);
            if (expirationRenewalMap.putIfAbsent(this.getEntryName(), new RedissonLock.ExpirationEntry(threadId, task)) != null) {
                task.cancel();
            }
        }
    }
释放锁
    public void unlock() {
        try {
            this.get(this.unlockAsync(Thread.currentThread().getId()));
        } catch (RedisException var2) {
            if (var2.getCause() instanceof IllegalMonitorStateException) {
                throw (IllegalMonitorStateException)var2.getCause();
            } else {
                throw var2;
            }
        }
    }
    public RFuture<Void> unlockAsync(final long threadId) {
        final RPromise<Void> result = new RedissonPromise();
        // 执行lua脚本 删除key
        RFuture<Boolean> future = this.unlockInnerAsync(threadId);
        future.addListener(new FutureListener<Boolean>() {
            public void operationComplete(Future<Boolean> future) throws Exception {
                if (!future.isSuccess()) {
                    // 删除expirationRenewalMap缓存,停止watch dog机制
                    RedissonLock.this.cancelExpirationRenewal(threadId);
                    result.tryFailure(future.cause());
                } else {
                    Boolean opStatus = (Boolean)future.getNow();
                    if (opStatus == null) {
                        IllegalMonitorStateException cause = new IllegalMonitorStateException("attempt to unlock lock, not locked by current thread by node id: " + RedissonLock.this.id + " thread-id: " + threadId);
                        result.tryFailure(cause);
                    } else {
                        if (opStatus) {
                            RedissonLock.this.cancelExpirationRenewal((Long)null);
                        }
                        result.trySuccess((Object)null);
                    }
                }
            }
        });
        return result;
    }
    void cancelExpirationRenewal(Long threadId) {
        RedissonLock.ExpirationEntry task = (RedissonLock.ExpirationEntry)expirationRenewalMap.get(this.getEntryName());
        if (task != null && (threadId == null || task.getThreadId() == threadId)) {
            expirationRenewalMap.remove(this.getEntryName());
            task.getTimeout().cancel();
        }
    }
释放锁的操作一定要放到 finally {},保证释放锁的方法unlock()一定被执行,另外unlock()底层的cancelExpirationRenewal()也保证了一定释放锁成功,不会出现死锁现象。
2.3 主从一致性(红锁(Redlock))
场景:(主从结构)中存在明显的竞态:
客户端A从master获取到锁
在master将锁同步到slave之前,master宕掉了。
slave节点被晋级为master节点
客户端B从新的master获取到锁
这个锁对应的资源之前已经被客户端A已经获取到了。安全失效!
连锁策略:不再有主从节点,都获取成功才能获取锁成功,有一个节点获取锁不成功就获取锁失败;
如果多个主节点保证锁的过程中,任意一个主节点宕机,其它线程只能获得一个新主节点的锁(从节点上位成为主节点),从而导致获取数量不一致,还会获取失败
这里主要是防止主节点宕机后,其它线程获得新主节点的锁,引起线程安全问题

总结
八. 优化秒杀优惠券业务
回顾业务:接收优惠券id,扣减优惠券库存,将优惠券信息和用户信息组合创建订单,写入数据库中。(要保证一人一单,禁止超卖)
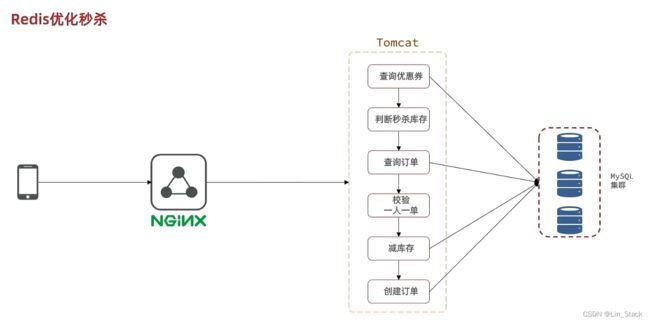
1. 改进方案说明
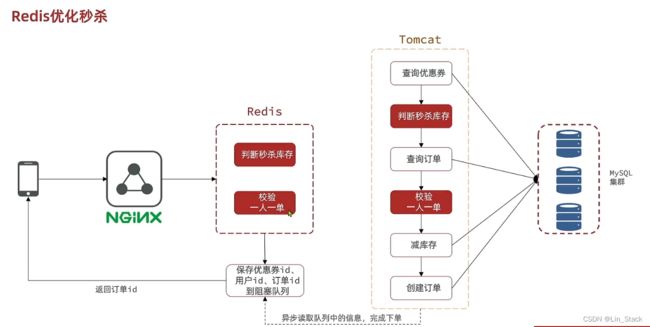
为避免所有操作都在数据库上执行,在此分离成两个线程:
线程1:判断用户的购买资格,符合要求则返回给用户“空头支票”;
线程2:根据有购买资格后的用户信息,处理耗时较久的减库存、写订单的操作。
可以将耗时较短的两步操作放到 Redis 中,在 Redis 中处理对应的秒杀资格的判断。Redis 的性能是比 MySQL 要好的。此外,还需要引入异步队列记录相关的信息。
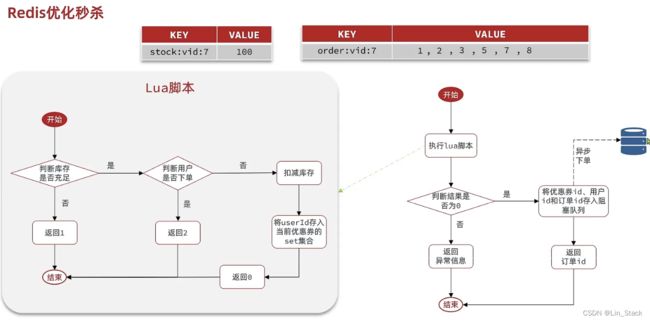
redis部分处理逻辑, Lua脚本封装操作保证原子性, redis这里选择的存储类型为set,因为key不能重复,而set恰好是无序不重复的
2. 改进方案实操
2.1 数据库增加优惠券库存量的同时,向redis中同步存储优惠券的库存量
2.2 基于Lua脚本实现:判断购买资格,库存是否充足,限制一人一单购买
Lua脚本代码
-- 1.参数列表
-- 1.1 优惠券id
local voucherId = ARGV[1]
-- 1.2 用户id
local userId = ARGV[2]

-- 2.数据key
-- 2.1 库存key:优惠券秒杀的业务名称+优惠券id  value:优惠券的库存数
local stockKey = 'seckill:stock:' .. voucherId
-- 2.2 订单key:订单创建业务名+优惠券id  value:用户id(组)
-- 这是一个set集合,凡购买该优惠券的用户都会将其id存入集合中
local orderKey = 'seckill:order:' .. voucherId

-- 3.脚本业务
-- 3.1 判断库存是否充足 get stockKey,tonumber将结果转为数字作比较
if (tonumber(redis.call('get', stockKey)) <= 0)  then
    -- 3.2 库存不足,返回1
    return 1
end
-- 3.3 判断用户是否下单 sismember orderKey userId命令,判断当前key集合中,是否存在该value;返回1存在,0不存在
if (redis.call('sismember', orderKey, userId) == 1) then
    --3.4 存在,是重复下单,返回2
    return 2
end
-- 3.5 扣库存 +(-1) = -1
redis.call('incrby', stockKey, -1)
-- 3.6 下单(保存用户),sadd:set add
redis.call('sadd', orderKey, userId)
return 0
Java执行脚本代码
    private IVoucherOrderService proxy;//定义代理对象,提前定义后面会用到
    //注入脚本
    private static final DefaultRedisScript<Long> SECKILL_SCRIPT;
    static {
        SECKILL_SCRIPT = new DefaultRedisScript<>();
        SECKILL_SCRIPT.setLocation(new ClassPathResource("seckill.lua"));
        SECKILL_SCRIPT.setResultType(Long.class);
    }
    @Override
    public Result seckillVoucher(Long voucherId) { //使用lua脚本
        //获取用户
        Long userId = UserHolder.getUser().getId();
        //1.执行lua脚本
        Long result = stringRedisTemplate.execute(
                SECKILL_SCRIPT,
                Collections.emptyList(), //这里是key数组,没有key,就传的一个空集合
                voucherId.toString(), userId.toString()
        );
        //2.判断结果是0
        int r = result.intValue();//Long型转为int型,便于下面比较
        if (r != 0){
            //2.1 不为0,代表没有购买资格
            return  Result.fail(r == 1?"优惠券已售罄":"不能重复购买");
        }
2.3 秒杀优惠券(创建订单)成功,将优惠券ID和用户ID封装并存入阻塞队列
创建一个BlockingQueue阻塞队列
    //创建阻塞队列  这个阻塞队列特点:当一个线程尝试从队列获取元素的时候,如果没有元素,该线程阻塞,直到队列中有元素才会被唤醒获取
    private BlockingQueue<VoucherOrder> orderTasks = new ArrayBlockingQueue<>(1024 * 1024);//初始化阻塞队列的大小
生成订单,并把订单对象add到阻塞队列中,接上面的代码
        //2.2 为0,有购买资格,把下单信息保存到阻塞队列中
        //7.创建订单   向订单表新增一条数据,除默认字段,其他字段的值需要set
        VoucherOrder voucherOrder = new VoucherOrder();
        //7.1订单id
        long orderId = redisIdWorker.nextId("order");
        voucherOrder.setId(orderId);
        //7.2用户id
        voucherOrder.setUserId(userId);
        //7.3代金券id
        voucherOrder.setVoucherId(voucherId);
        //放入阻塞对列中
        orderTasks.add(voucherOrder);
        //获取代理对象
        proxy = (IVoucherOrderService) AopContext.currentProxy();
        //3.返回订单id
        return Result.ok(orderId);
    }
2.4 开启线程任务,实现异步下单功能,返回订单ID信息
创建一个线程池
    //创建线程池
    private static final ExecutorService SECKILL_ORDER_EXECUTOR = Executors.newSingleThreadExecutor();
    //利用spring提供的注解,在类初始化完毕后立即执行线程任务
    @PostConstruct
    private void init(){
        SECKILL_ORDER_EXECUTOR.submit(new VoucherOrderHandler());
    }
线程任务代码
    //创建线程任务,内部类方式
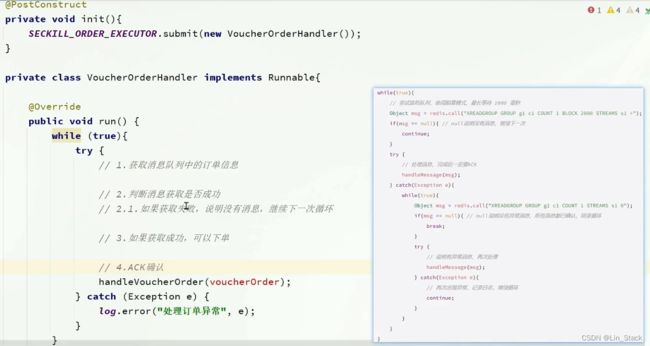
    private class VoucherOrderHandler implements Runnable{

        @Override
        public void run() {
            //1.获取队列中的订单信息
            try {
                VoucherOrder voucherOrder = orderTasks.take();
                //2.创建订单,这是调之前那个创建订单的方法,需要稍作改动
                handleVoucherOrder(voucherOrder);
            } catch (Exception e) {
                log.info("异常信息:",e);
            }
        }
    }
创建调用的handleVoucherOrder方法,这里的获取锁操作只是做最后的兜底,以防万一,因为前面lua脚本都已经判断过了
    private void handleVoucherOrder(VoucherOrder voucherOrder) {
        // 获取用户id,不能使用线程,因为异步线程已变
        Long userId = voucherOrder.getUserId();
        //创建锁对象
        SimpleRedisLock lock = new SimpleRedisLock("order:" + userId, stringRedisTemplate);
        //获取锁
        boolean isLock = lock.tryLock(1200);
        //判断是否获取锁成功
        if (!isLock){
            log.error("您已购买过该商品,不能重复购买");
        }
        try {
            proxy.createVoucherOrder(voucherOrder);//使用代理对象,最后用于提交事务
        } catch (IllegalStateException e) {
            throw new RuntimeException(e);
        } finally {
            lock.unlock();//释放锁
        }
    }
createVoucherOrder创建订单方法,这里一人一单的其实也不必判读了,lua脚本都写好了,这里只是兜底
 @Transactional
    public void createVoucherOrder(VoucherOrder voucherOrder){
        Long voucherId = voucherOrder.getVoucherId();
        //5.一人一单
        Long userId = voucherOrder.getId();
        //5.1查询订单
        int count = query().eq("user_id", userId).eq("voucher_id", voucherId).count();
        //5.2判断是否存在
        if (count > 0){
            log.error("您已经购买过了");
        }
        //6.扣减库存
        boolean success = seckillVoucherService.update()
                .setSql("stock = stock - 1")//set stock = stock -1
                .eq("voucher_id",voucherId).gt("stock",0) //where id = ? and stock > 0
                .update();
        if (!success){
            log.error("库存不足!");
        }
        this.save(voucherOrder);

    }
3. 改进流程总结
- 编写lua脚本,对于超卖问题和一人一单进行解决处理,超卖用CAS方法判断库存是否大于0,一人一单用redis的set集合的sismenber判读该优惠券(key)下的用户id(value)是否唯一;
- Java代码中注入脚本,并执行脚本,判断脚本返回结果,若不为脚本结果0,直接返回错误提示(1:库存不足,2:重复操作);
- 若脚本结果为0,代表有购买优惠券资格,将new VoucherOrder创建订单对象,并set orderId,userId,voucherId。再把订单对象放入阻塞队列中,返回订单id给用户;
- 创建线程池,并定义线程任务,但注意,线程任务必须在方法执行前执行,使用到spring提供的注解在类初始化完成后执行线程任务;
- 线程任务中获取阻塞队列的订单对象,然后调用handleVoucherOrder方法传入voucherOrder;
- handleVoucherOrder方法其实是再次获取锁,这个就是个纯兜底,作用不大。并在获取锁成功后调用createVoucherOrder方法扣减库存创建订单,由于都是对数据库的操作,因此要提交事务。
4. 秒杀业务优化总结
优化思路:利用 Redis 完成库存余量、一人一单的判断,完成抢单业务;再将下单业务放入阻塞队列,利用独立线程异步下单。
基于jvm的阻塞队列的异步秒杀存在哪些问题?
- 内存限制问题 —> 我们使用的是JDK里的阻塞队列,是基于JVM的内存,高并发海量请求下造成内存溢出还有服务宕机情况下内存数据丢失
- 数据安全问题
5. 使用基于redis的消息队列(实际工作直接使用热门MQ)
由于前面的阻塞队列是基于JVM的内存实现,那么不可避免的两个大问题:
①高并发海量访问,创建订单,队列很快就超出上限造成内存溢出;②JVM内存没有持久化机制,若服务出现重启或宕机,阻塞队列中的所有任务都会丢失。
所以我们使用MQ
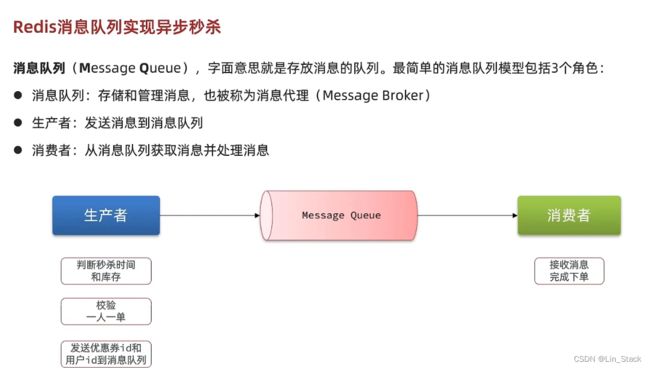
MQ是JVM以外的服务,不受JVM内存限制,且MQ中的所有消息会做持久化,这样即使重启或宕机,数据不会丢失。消息投递给消费者后需要消费者确认,未确认消息会一直存在下一次继续投递,确保消息至少被消费一次
5.1 基于 List 结构模拟消息队列
基于 List 的消息队列有哪些优缺点:
优点:
利用 Redis 存储,不受限于 JVM 内存上限
基于 Redis 的持久化机制,数据安全性有保证
可以满足消息有序性
缺点:
无法避免消息丢失
只支持单消费者
5.2 基于 PubSub 的消息队列
PubSub(发布订阅) 是 Redis 2.0 版本引入的消息传递模型。
顾名思义,消费者可以订阅一个或多个channel,生产者向对应 channel 发送消息后,所有订阅者都能收到相关消息。
SUBSCRIBE channel [channel] :订阅一个或多个频道
PUBLISH channel msg :向一个频道发送消息
PSUBSCRIBE pattern[pattern] :订阅与 pattern 格式匹配的所有频道

pattern – 通配符方式
?:匹配一个字符
*:匹配多个字符
ae:匹配括号内存在的字符
基于 PubSub 的消息队列有哪些优缺点
优点:采用发布订阅模型,支持多生产、多消费
缺点:
不支持数据持久化
无法避免消息丢失
消息堆积有上限,超出时数据丢失
5.3 基于 Stream 的消息队列(redis5.0以后)
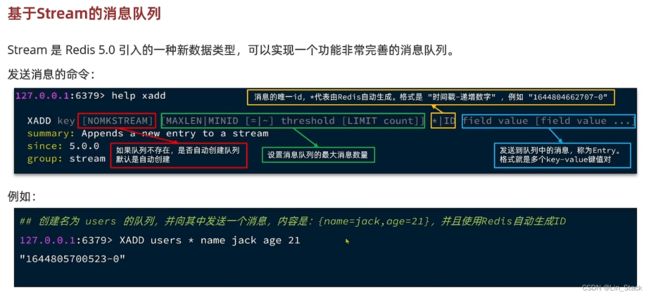
XADD key [NOMKSTREAM] [MAXLEN|MINID [=|~] threshold [LIMIT count]] *|ID field value [field value …]

key:队列名称
[NOMKSTREAM]:如果队列不存在时,确定是否自动创建队列,默认自动创建
[MAXLEN|MINID [=|~] threshold [LIMIT count]]:设置消息队列的最大消息数量
|ID:消息的唯一 ID, 代表由 Redis 自动生成,格式是 ”时间戳-递增数字“,例如:”1666161469358-0“
field value [field value …]:发送到队列中的消息,称为 Entry。格式为多个 Key-Value 键值对。

例如:创建名为 users 的队列,并向其中发送一个消息,内容是:{name=jack,age=21},并且使用 Redis 自动生成 ID
127.0.0.1:6379> XADD users * name jack age 21 “1644805700523-0”
创建消费者组
XGROUP CREATE key groupName ID [MKSTREAM]

key:队列名称
groupName:消费者组名称
ID:起始 ID 标示,$ 代表队列中最后一个消息,0 则代表队列中第一个消息
MKSTREAM:队列不存在时自动创建队列
其他指令
# 删除指定的消费者组
XGROUP DESTORY key groupName

# 给指定的消费者组添加消费者
XGROUP CREATECONSUMER key groupname consumername

# 删除消费者组中的指定消费者
XGROUP DELCONSUMER key groupname consumername
从消费者组读取消息
XREADGROUP GROUP group consumer [COUNT count] [BLOCK milliseconds] [NOACK] STREAMS key [key …] ID [ID …]

group:消费组名称
consumer:消费者名称,如果消费者不存在,会自动创建一个消费者
count:本次查询的最大数量
BLOCK milliseconds:当没有消息时最长等待时间
NOACK:无需手动 ACK,获取到消息后自动确认
STREAMS key:指定队列名称
ID:获取消息的起始 ID:
“>”:从下一个未消费的消息开始
其它:根据指定 id 从 pending-list 中获取已消费但未确认的消息。
例如 0,是从 pending-list 中的第一个消息开始
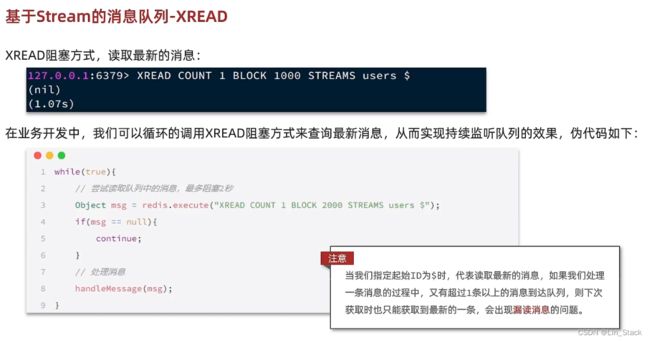
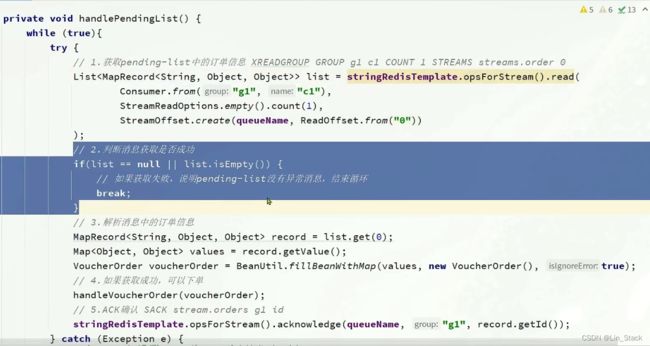
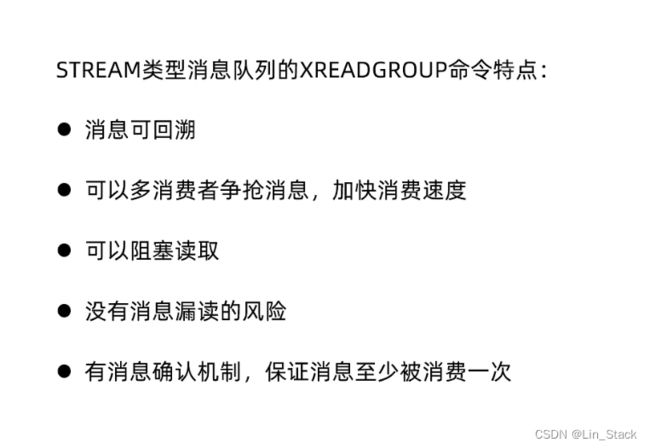
STREAM 类型消息队列的 XREADGROUP 命令特点
5.4 Redis 三种消息队列的对比
5.5 Stream消息队列异步秒杀下单(实操)
场景需求:
- 创建一个 Stream 类型的消息队列,名为 stream.orders
- 修改之前的秒杀下单 Lua 脚本,在认定有抢购资格后,直接向 stream.orders 中添加消息,内容包含 voucherId、userId、orderId
- 项目启动时,开启一个线程任务,尝试获取 stream.orders 中的消息,完成下单
操作:
redis客户端命令行执行如下命令,创建消息队列
XGROUP CREATE stream.orders g1 0 MKSTREAM
Lua脚本改动
-- 1.参数列表
-- 1.1.优惠券 id
local voucherId = ARGV[1]
-- 1.2.用户 id
local userId = ARGV[2]
-- 1.3.订单 id
local orderId = ARGV[3]

-- 2.数据 key
-- 2.1.库存 key
local stockKey = 'seckill:stock:' .. voucherId
-- 2.2.订单 key
local orderKey = 'seckill:order:' .. voucherId

local stockKey_value = redis.call('get', stockKey)

-- 3.脚本业务
-- 3.1.判断库存是否充足 get stockKey
if (tonumber(stockKey_value) <= 0) then
    -- 3.2.库存不足,返回 1
    return 1
end
-- 3.2.判断用户是否下单 SISMEMBER orderKey userId
if (redis.call('sismember', orderKey, userId) == 1) then
    -- 3.3.存在,则说明该用户是重复下单(这是不允许的),则返回 2
    return 2
end
-- 3.4.扣库存 incrby stockKey -1
redis.call('incrby', stockKey, -1)
-- 3.5.下单(保存用户) sadd orderKey userId
redis.call('sadd', orderKey, userId)
-- 3.6.发送消息到队列中:XADD stream.orders * k1 v1 k2 v2 ...
redis.call('xadd', 'stream.orders', '*', 'userId', userId, 'voucherId', voucherId, 'id', orderId)

return 0
九. 优化博客业务
1. 优化博客点赞功能
场景:
点赞功能涉及基于List的点赞列表,以及基于SortedSet的点赞排行榜
直接访问数据库进行点赞的保存操作,会造成数据库的压力,在此使用到redis的set集合,key为blog的id,value为user的id,用set的ismembet方法判断,当前集合是否有userId,来判读该博客,用户是否已经点赞过了。每个key代表每条博客,每个key下的value集合代表所有点赞的用户id集合。
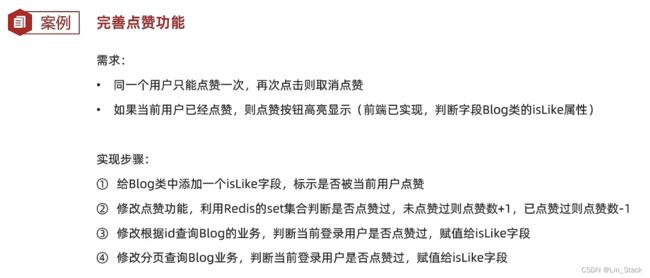

    /**
     * 点赞功能实现及判读逻辑
     * @param id
     * @return
     */
    @Override
    public Result likeBlog(Long id) {
        //1.获取登录用户
        Long userId = UserHolder.getUser().getId();
        //2.判读登录用户是否点赞
        String key = BLOG_LIKED_KEY + id;
        Boolean isMember = stringRedisTemplate.opsForSet().isMember(key, userId.toString());
        //3.若未点赞,可以点赞
        if (BooleanUtil.isFalse(isMember)){
            //3.1 数据库点赞数+1
            boolean isSuccess = update().setSql("liked = liked + 1").eq("id", id).update();
            //3.2 保存用户到redis的set集合中
            if (isSuccess){
                stringRedisTemplate.opsForSet().add(key, userId.toString());
            }
        }else {
            //4.若已点赞,取消点赞
            //4.1 数据库点赞数-1
            boolean isSuccess = update().setSql("liked = liked - 1").eq("id", id).update();
            //4.2 清除redis的set集合里的userId
            if (isSuccess){
                stringRedisTemplate.opsForSet().remove(key, userId.toString());
            }
        }
        return Result.ok();
    }
2. 优化博客下栏点赞前五名功能
场景:点击博客,进入详情页,其实是发送了两个请求,一个是根据id返回博客详细信息,另一个是根据id返回点赞排行榜。
方案:用redis的sortSet来代替set,set集合是无序的,排行榜需要显示前5个点赞的用户,用sortSet,把之前的点赞功能,用户id存入set集合改为存入ZSet,使用sorce(key,value)方法来获取该键值的sorce,若没有则返回null,用来代替之前set的ismember方法
/**
     * 优化点赞功能,实现前五名点赞用户的显示,及判读逻辑
     * @param id
     * @return
     */
    @Override
    public Result likeBlog(Long id) {
        //1.获取登录用户
        Long userId = UserHolder.getUser().getId();
        //2.判读登录用户是否点赞
        String key = BLOG_LIKED_KEY + id;
        Double score = stringRedisTemplate.opsForZSet().score(key, userId.toString());
        //3.若未点赞,可以点赞
        if (socre == null)){
            //3.1 数据库点赞数+1
            boolean isSuccess = update().setSql("liked = liked + 1").eq("id", id).update();
            //3.2 保存用户到redis的zset集合中,使用存储时间作为排名依据
            if (isSuccess){
                stringRedisTemplate.opsForZSet().add(key, userId.toString(),System.currentTimeMillis());
            }
        }else {
            //4.若已点赞,取消点赞
            //4.1 数据库点赞数-1
            boolean isSuccess = update().setSql("liked = liked - 1").eq("id", id).update();
            //4.2 清除redis的set集合里的userId
            if (isSuccess){
                stringRedisTemplate.opsForZSet().remove(key, userId.toString());
            }
        }
        return Result.ok();
    }
    /**
     * 往blog对象填入isLike信息(是否点赞)
     * @param blog
     */
    private void isBlogLinked(Blog blog) {
        //1.获取登录用户
        UserDTO user = UserHolder.getUser();
        if (user == null){
            return;//用户未登录,无需查询是否点赞
        }
        Long userId = user.getId();
        //2.判读登录用户是否点赞
        String key = BLOG_LIKED_KEY + blog.getId();
        Double score = stringRedisTemplate.opsForZSet().score(key, userId.toString());
        //3.将是否点赞信息set到blog中
        blog.setIsLike(score != null?true:false);
    }
注意:sql语句的 list.in(…, …)查询出来的是后点赞的在前,先点赞的在后,需要我们自定义sql查询,用last最后一条sql语句,手写order by的sql,具体代码如下:
    /**
     * 根据博客id查询点赞排行榜
     * @param id
     * @return
     */
    @Override
    public Result queryBlogLikes(Long id) {
        String key = BLOG_LIKED_KEY + id;
        //1.查询top5的点赞用户 zrange key 0 4
        Set<String> top5 = stringRedisTemplate.opsForZSet().range(key, 0, 4);
        if (top5 == null || top5.isEmpty()){
            return Result.ok(Collections.emptyList());
        }
        //2.解析除其中的用户id
        List<Long> ids = top5.stream().map(Long::valueOf).collect(Collectors.toList());
        String idStr = StrUtil.join(",", ids);
        //3.根据用户id查询用户  将user处理为userDTO对象    where id (5 , 1)   order by field(id, 5, 1)
        List<UserDTO> userDTOS = userService.query()
                .in("id", ids).last("order by field(id," + idStr + ")").list()
                .stream()
                .map(user -> BeanUtil.copyProperties(user, UserDTO.class))
                .collect(Collectors.toList());
        //4.返回
        return Result.ok(userDTOS);
    }
3. 优化共同关注功能
共同关注可以使用redis中的set数据结构,来求两个用户关注集合的交集,那么我们就需要更改关注功能的接口了,不仅要把数据存入数据库follow表中,还有把userId存入redis的set集合里
共同关注,取并集
    @Override
    public Result followCommons(Long id) {
        Long userId = UserHolder.getUser().getId();
        String key1 = FOLLOW_USER_ID + userId;  //当前登录用户的关注列表集合
        String key2 = FOLLOW_USER_ID + id;  //点击查看的用户的关注列表集合
        //求交集
        Set<String> intersect = stringRedisTemplate.opsForSet().intersect(key1, key2);
        if (intersect == null || intersect.isEmpty()){
            //无交集
            return Result.ok(Collections.emptyList());
        }
        //解析id集合
        List<Long> ids = intersect.stream().map(Long::valueOf).collect(Collectors.toList());
        //批量查询用户并转换为userDTO对象
        List<UserDTO> userDTOList = userService.listByIds(ids).stream().map(user ->
                        BeanUtil.copyProperties(user, UserDTO.class))
                .collect(Collectors.toList());
        return Result.ok(userDTOList);
    }
4. 优化博文推送功能
关注推送也叫做 Feed 流,直译为投喂。为用户持续的提供 “沉浸式” 的体验,通过无限下拉刷新获取新的信息。
Feed 流产品有两种常见模式:
-
Timeline:不做内容筛选,简单的按照内容发布时间排序,常用于好友或关注。例如朋友圈
优点:信息全面,不会有缺失。并且实现也相对简单
缺点:信息噪音较多,用户不一定感兴趣,内容获取效率低 -
智能排序:利用智能算法屏蔽掉违规的、用户不感兴趣的内容。推送用户感兴趣信息来吸引用户。例如抖音,快手
优点:投喂用户感兴趣信息,用户粘度很高,容易沉迷
缺点:如果算法不精准,可能起到反作用
本例中的个人页面,是基于关注的好友来做 Feed 流,因此采用 Timeline 的模式。
该模式的实现方案有三种:拉模式、推模式、推拉结合
- 拉模式:也叫做读扩散
每次读的时候获取消息,内存消耗小,但读操作过于频繁,若用户关注了许多博主,一次要读的消息也是十分多,造成延迟较高 - 推模式:也叫做写扩散。
发消息时写入粉丝收件箱,内存占用更高,写操作频繁,若博主有许多粉丝,写操作更加繁重 - 推拉结合模式:也叫做读写混合,兼具推和拉两种模式的优点。
普通博主,粉丝少,可以采用推模式,写操作并不是很繁重
大v博主,粉丝多;分两种粉丝,活跃粉,普通粉;活跃粉,数量少,可以采用推模式;普通粉,数量多,但上线查看少,采用拉模式,什么时候看什么时候拉取。
4.1基于推模式实现关注推送功能
实操:
- 修改新增探店笔记的业务,在保存 blog 到数据库的同时,推送到粉丝的收件箱
- 收件箱满足可以根据时间戳排序,必须用 Redis 的数据结构实现
- 查询收件箱数据时,可以实现分页查询
使用sortSet来实现收件箱 ,先将新增保存博客的功能接口修改一下,使得博客发布就能推送到粉丝,代码修改如下:
    public Result saveBlog(Blog blog) {
        // 获取登录用户
        UserDTO user = UserHolder.getUser();
        blog.setUserId(user.getId());
        // 保存探店博文
        boolean isSuccess = save(blog);
        if (!isSuccess){
            return Result.fail("发布失败,请检查重试");
        }
        // 查询博文作者的所有粉丝
        List<Follow> follows = followService.query().eq("follow_user_id", user.getId()).list();
        for (Follow follow : follows) {
            // 获取粉丝id
            Long userId = follow.getUserId();
            // 推送笔记id给所有粉丝
            String key = "feed:" + userId;
            stringRedisTemplate.opsForZSet().add(key, blog.getId().toString(), System.currentTimeMillis());
        }
        // 返回id
        return Result.ok(blog.getId());
    }
4.1基于滚动分页实现展示功能
    /**
     * 滚动查询,展示博主推送的笔记, 新发布的滚动查询查不到,但是往上滚,前端做了处理,就是刷新重新查询,开始位置在当前最新位置
     * @param max
     * @param offset
     * @return
     */
    @Override
    public Result queryBlogOfFollow(Long max, Integer offset) {
        //获取当前用户
        Long userId = UserHolder.getUser().getId();
        //查询收件箱 ZREVRANGEBYSCORE key Max Min LIMIT offset count    limit是小于等于的意思,小于等于查询的最后时间戳
        String key = "feed:" + userId;
        Set<ZSetOperations.TypedTuple<String>> typedTuples = stringRedisTemplate.opsForZSet()
                .reverseRangeByScoreWithScores(key, 0, max, offset, 2);
        //非空判断
        if (typedTuples == null || typedTuples.isEmpty()){
            return Result.ok();
        }
        //解析数据: blogId,minTime(时间戳), offset
        ArrayList<Object> ids = new ArrayList<>(typedTuples.size());
        long minTime = 0;  //这个minTime是上次查询的最小时间戳,作为当次查询的最大时间戳来开始查
        int os = 1;
        for (ZSetOperations.TypedTuple<String> typedTuple : typedTuples) {
            //获取博客id转换为Long型并存入ids数组中
            ids.add(Long.valueOf(typedTuple.getValue()));
            //获取分数      判读得到最后一次的时间戳,以及偏移量
            long time = typedTuple.getScore().longValue();
            if (time == minTime){
                os++;
            }else {
                minTime = time;
                os = 1;
            }
        }

        //根据id查询blog,先把前面保存id的ids数组转为字符串
        String idStr = StrUtil.join(",", ids); //由于用mp提供的listByIds是用in方法查,不能保证顺序
        List<Blog> blogs = query().in("id", ids).last("order by field(id," + idStr + ")").list();
        for (Blog blog : blogs) {
            //查询blog有关用户信息
            queryBlogUser(blog);
            //查询blog是否已被点赞
            isBlogLinked(blog);
        }

        //封装并返回
        ScrollResult r = new ScrollResult();
        r.setList(blogs);
        r.setOffset(os);
        r.setMinTime(minTime);
        return Result.ok(r);
    }
九. 优化查找附近商铺业务
1. Redis的GeoHash应用
1.1 GEO 数据结构基本用法
GEO 就是 Geolocation 的简写形式,代表地理坐标。
Redis 在 3.2 版本中加入了对 GEO 的支持,允许存储地理坐标信息,帮助我们根据经纬度来检索数据。
常见的命令有:
GEOADD:添加一个地理空间信息,包含:经度(longitude)、纬度(latitude)、值(member)
GEODIST:计算指定的两个点之间的距离并返回
GEOHASH:将指定 member 的坐标转为 hash 字符串形式并返回
GEOPOS:返回指定member的坐标
GEORADIUS:指定圆心、半径,找到该圆内包含的所有 member,并按照与圆心之间的距离排序后返回。(6.2.废弃)
GEOSEARCH:在指定范围内搜索 member,并按照与指定点之间的距离排序后返回。范围可以是圆形或矩形。(6.2.新功能)
GEOSEARCHSTORE:与 GEOSEARCH 功能一致,不过可以把结果存储到一个指定的 key。 (6.2.新功能)


2. 查找附近商铺功能
2.1 前置工作:店铺数据存储Redis(GEO数据结构)
    @Test
    void loadShopData(){
        //查询店铺信息
        List<Shop> list = shopService.list();
        //把店铺分组,按照typeId分组,typeId一致的放到一个集合
        Map<Long, List<Shop>> map = list.stream().collect(Collectors.groupingBy(Shop::getTypeId));
        //分批完成写入Redis
        for (Map.Entry<Long, List<Shop>> entry : map.entrySet()) {
            //获取类型id
            Long typeId = entry.getKey();
            String key = "shop:geo" + typeId;
            //获取同类型的店铺的集合
            List<Shop> value = entry.getValue();
            List<RedisGeoCommands.GeoLocation<String>> locations = new ArrayList<>(value.size());
            //写入redis  GEOADD key 经度 纬度 member
            for (Shop shop : value) {
                //stringRedisTemplate.opsForGeo().add(key, new Point(shop.getX(), shop.getY()), shop.getId().toString());
                locations.add(new RedisGeoCommands.GeoLocation<>(
                        shop.getId().toString(),
                        new Point(shop.getX(),shop.getY())
                ));
            }
            stringRedisTemplate.opsForGeo().add(key, locations);
        }
    }
2.2 实现查找附近商铺功能(代码后续补全)
新版本功能需要设计redis新版本,修改 pom.xml,内容如下:
<dependency>
    <groupId>org.springframework.bootgroupId>
    <artifactId>spring-boot-starter-data-redisartifactId>
    <exclusions>
        <exclusion>
            <groupId>org.springframework.datagroupId>
            <artifactId>spring-data-redisartifactId>
        exclusion>
        <exclusion>
            <artifactId>lettuce-coreartifactId>
            <groupId>io.lettucegroupId>
        exclusion>
    exclusions>
dependency>

<dependency>
    <groupId>org.springframework.datagroupId>
    <artifactId>spring-data-redisartifactId>
    <version>2.6.2version>
dependency>
<dependency>
    <artifactId>lettuce-coreartifactId>
    <groupId>io.lettucegroupId>
    <version>6.1.6.RELEASEversion>
dependency>
十. 优化签到业务
1. Redis的BitMap应用
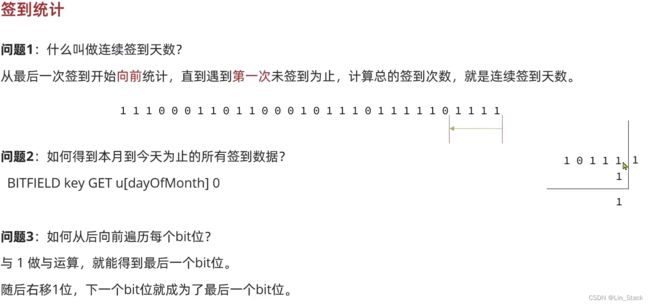
把每一个 bit 位对应当月的每一天,形成映射关系。用0和1标示业务状态(是否完成签到),这样的方式一个月只消耗至多31位(4字节),这种思路就称为位图(BitMap)
Redis 中 是利用 string 类型数据结构实现 BitMap,因此最大上限是 512M,转换为 bit 则是 2^32个 bit 位。
BitMap 的操作命令有:
SETBIT:向指定位置(offset)存入一个 0 或 1
GETBIT :获取指定位置(offset)的 bit 值
BITCOUNT :统计 BitMap 中值为 1 的 bit 位的数量
BITFIELD :操作(查询、修改、自增)BitMap中bit数组中的指定位置(offset)的值
BITFIELD_RO :获取 BitMap 中 bit 数组,并以十进制形式返回
BITOP :将多个 BitMap 的结果做位运算(与 、或、异或)
BITPOS :查找 bit 数组中指定范围内第一个 0 或 1 出现的位置
2. 优化用户签到业务
因为 BitMap 底层是基于 String 数据结构,因此其操作也都封装在字符串相关操作中了
    @Override
    public Result sign() {
        //获取登录用户
        Long userId = UserHolder.getUser().getId();
        //获取当前日期
        LocalDateTime now = LocalDateTime.now();
        //拼接key
        String format = now.format(DateTimeFormatter.ofPattern(":yyyyMM"));
        String key = "sign:"+ userId + format;
        //获取今天是本月的第几天
        int dayOfMonth = now.getDayOfMonth();
        //写入redis select key offset 1
        stringRedisTemplate.opsForValue().setBit(key, dayOfMonth -1, true);//true代表 1为签到,0为未签到
        return Result.ok();
    }
2. 优化签到量统计业务
     /**
     * 统计签到次数
     * @return
     */
    @Override
    public Result signCount() {
        //获取登录用户
        Long userId = UserHolder.getUser().getId();
        //获取当前日期
        LocalDateTime now = LocalDateTime.now();
        //拼接key
        String format = now.format(DateTimeFormatter.ofPattern(":yyyyMM"));
        String key = "sign:"+ userId + format;
        //获取今天是本月的第几天
        int dayOfMonth = now.getDayOfMonth();
        //获取本月截至今天为止的所有签到记录,返回的是一个十进制的数字 BITFIELD sign:5:202203 GET u14 0
        List<Long> result = stringRedisTemplate.opsForValue().bitField(
                key,
                BitFieldSubCommands.create()
                        .get(BitFieldSubCommands.BitFieldType.unsigned(dayOfMonth)).valueAt(0)
        );
        if (result == null || result.isEmpty()){
            //没有任何签到结果
            return  Result.ok(0);
        }
        Long num = result.get(0);
        if (num == null || num == 0){
            return Result.ok(0);
        }
        //循环遍历
        int count = 0;
        while (true){
            //让这个数字与1做与运算,得到数字的最后一个bit位   //判读这个bit位是否为0
            if ((num & 1) == 0){
                //如果为0,说明未签到,结束
                break;
            }else {
                //如果不为0,说明已签到,计数器加1
                count++;
            }
            //把数字右移一位,抛弃最后一个bit位,继续下一个bit位
            num >>>= 1;
        }
        return Result.ok(count);
    }
十. 优化网站流量统计业务
- UV:全称 Unique Visitor,也叫独立访客量,是指通过互联网访问、浏览这个网页的自然人。1 天内同一个用户多次访问该网站,只记录1次。
- PV:全称Page View,也叫页面访问量或点击量,用户每访问网站的一个页面,记录 1 次PV,用户多次打开页面,则记录多次PV。
- 二者往往用来衡量网站的流量。
1. Redis的HyperLogLog的统计功能
Hyperloglog(HLL)是从 Loglog 算法派生的概率算法,用于确定非常大的集合的基数,而不需要存储其所有值。
相关算法原理大家可以参考:https://juejin.cn/post/6844903785744056333#heading-0
Redis 中的 HLL 是基于 string 结构实现的,单个 HLL 的内存永远小于 16 kb,内存占用低,但相对的其测量结果是概率性的,有小于 0.81% 的误差。不过对于 UV 统计的庞大数量来说,这完全可以忽略。
127.0.0.1:6379> PFADD hl1 e1 e2 e3 e4 e5
(integer) 1
127.0.0.1:6379> pfcount hl1
(integer) 5
127.0.0.1:6379> PFADD hl1 e1 e2 e3 e4 e5
(integer) 0
127.0.0.1:6379> pfcount hl1
(integer) 5
测试
@Test
void testHyperLogLog() {
    String[] values = new String[1000];
    int j = 0;
    for (int i = 0; i < 1000000; i++) {
        j = i % 1000;
        values[j] = "user_" + i;
        if (j == 999) {
            // 发送到 Redis
            stringRedisTemplate.opsForHyperLogLog().add("hl2", values);
        }
    }
    //  统计数量
    Long count = stringRedisTemplate.opsForHyperLogLog().size("hl2");
    System.out.println("count = " + count);
}
总结:
- HyperLogLog 的作用:做海量数据的统计工作
- HyperLogLog 的优点:内存占用极低、性能非常好
- HyperLogLog 的缺点:有一定的误差
致谢
- 衷心感谢【黑马程序员】推出的redis系列课程,受益匪浅,课程链接:redis课程
- 感谢社区博主【随身携带的笑
】写的黑马点评项目附带的笔记,记得很全,很适合有一定基础的程序员直接复习,博主主页链接:【随身携带的笑】博主主页


