《SpringBoot从入门到放弃》之第(二)篇——配置文件详解、自定义属性、随机数、多环境配置、日志文件配置
老样子,写博客之前,先说个冷笑话以及理论知识:
老婆打电话给程序员老公:“老公,下班后路过包子铺买一笼包子,遇到卖西瓜的买一个。”
程序员到家后,递给老婆一个包子。
老婆疑惑:“不是让你买一笼包子吗,你怎么只买了一个?”
程序员回答:“因为我看到了卖西瓜的呀!”
OK,问题来了:对于Spring框架的初学者来说,经常会因为一些繁琐的配置文件而却步,对于老手来说,每次新构建项目总是复制粘贴一些差不多的配置文件这样枯燥乏味的事。SpringBoot通过设计大量的自动化配置等方式来简化Spring原有的样板化配置。除了解决一系列配置问题之外,SpringBoot还通过Starter POMs的定义,整合各项功能时,不需要在maven的pom.xml中维护错综复杂的依赖关系。SpringBoot很好融入Docker容器,构建的应用不需要安装Tomcat服务器,只需要将项目打包成jar包,通过命令启动一个web应用。
如果我们在同一台主机上需要启动多个基于SpringBoot的Web应用,若不为每个应用指定特别的端口号,那么默认的8080端口必将导致冲突。所以我们有必要深入了解一些关于SpringBoot中的配置文件知识,比如配置方式、如何实现多环境配置、配置信息的加载顺序等。
SpringBoot的默认配置文件位置是:src/main/resources/application.properties比如我们需要自定义Web模块的服务端口号,可以在application.properties中添加server.port=8888来置顶服务端口,也可以通过spring.application.name=hello来指定应用名(该名字在后续SpringCloud中会被注册为服务名)。
多环境配置
在开发应用时,通常同一套程序会被应用和安装到几个不同的环境中,比如开发、测试、生产等。每个环境的数据库地址、服务器端口等配置都不同,如果在不同环境打包时频繁修改配置文件的话,那必将是个非常繁琐且容易发生错误的事情。可以通过配置多份不同环境的配置文件,再通过打包命令指定需要打包的内容之后进行区分打包。
在SpringBoot中,多环境配置的文件名需要满足application-{profile}.properties的格式,其中profile对应你的环境标志。比如:
application-dev.properties:开发环境,application-test.properties:测试环境,application-prod.properties:生成环境
加载顺序
为了能够合理的重写各个属性的值,SpringBoot使用下面这种较为特别的属性加载顺序:
1、在命令行中传入的参数
2、SPRING_APPLICATION_JSON中的属性。是以json格式配置在系统环境变量中的内容。
3、java:comp/env中的JNDI属性
4、Java的系统属性,可以通过System.getProperties()获得的内容
5、操作系统的环境变量
6、通过random.*配置的随机属性
7、位于当前应用jar包之外,针对不同{profile}环境的配置文件内容。
8、位于当前应用jar包之内,针对不同{profile}环境的配置文件内容。
9、在@Configuration注解修改的类中,通过@PropertySource注解定义的属性。
本例子基于第(一)篇的例子之上进行扩展的。
pom.xml配置不变,Test01Application.java文件不变。
修改application.properties文件,默认的这个application.properties文件在新建项目时是空的,增加如下内容:
com.test.user.name=biandan
com.test.user.sex=男
com.test.user.desc=${com.test.user.name}此刻是小白,未来是架构师。

# 随机字符串
com.test.user.value=${random.value}
# 随机int类型
com.test.user.number=${random.int}
# 10以内的随机数
com.test.user.limit1=${random.int(10)}
# 10-50内的随机数
com.test.user.limit2=${random.int[10,50]}

# 多环境配置文件激活属性
spring.profiles.active=dev
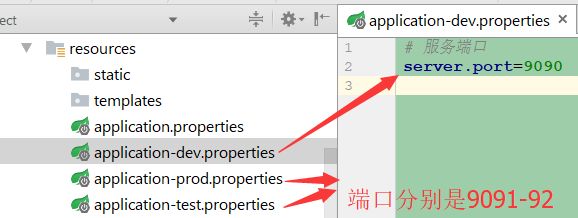
注:多环境配置加载的是application-dev.properties这个文件的内容信息,so,我们新建application-dev.properties:开发环境,application-test.properties:测试环境,application-prod.properties:生成环境 这3个配置文件吧。
然后新建一个entity包,在entity包里新建一个HelloProperties类,给每个属性提供get、set方法:
package com.test.entity;

import org.springframework.beans.factory.annotation.Value;
import org.springframework.stereotype.Component;

@Component /*把普通pojo实例化到spring容器中*/
public class HelloProperties {
    @Value("${com.test.user.name}")
    private String name;

    @Value("${com.test.user.sex}")
    private String sex;

    @Value("${com.test.user.desc}")
    private String desc;

    @Value("${com.test.user.value}")
    private String value;

    @Value("${com.test.user.number}")
    private Integer number;

    @Value("${com.test.user.limit1}")
    private Integer limit1;

    @Value("${com.test.user.limit2}")
    private Integer limit2;

    public String getName() {
        return name;
    }
    public void setName(String name) {
        this.name = name;
    }
    public String getSex() {
        return sex;
    }
    public void setSex(String sex) {
        this.sex = sex;
    }
    public String getDesc() {
        return desc;
    }
    public void setDesc(String desc) {
        this.desc = desc;
    }
    public String getValue() {
        return value;
    }
    public void setValue(String value) {
        this.value = value;
    }
    public Integer getNumber() {
        return number;
    }
    public void setNumber(Integer number) {
        this.number = number;
    }
    public Integer getLimit1() {
        return limit1;
    }
    public void setLimit1(Integer limit1) {
        this.limit1 = limit1;
    }
    public Integer getLimit2() {
        return limit2;
    }
    public void setLimit2(Integer limit2) {
        this.limit2 = limit2;
    }
}
然后去到编辑器给我们默认新建的一个test类叫做Test01ApplicationTests里,增加单元测试的内容。在本主所使用的SpringBoot2.0版本,单元测试类已经简化了很多,默认新建的就已经能用了:
package com.test;

import com.test.entity.HelloProperties;
import org.apache.commons.logging.Log;
import org.apache.commons.logging.LogFactory;
import org.junit.Test;
import org.junit.runner.RunWith;
import org.springframework.beans.factory.annotation.Autowired;
import org.springframework.boot.test.context.SpringBootTest;
import org.springframework.test.context.junit4.SpringRunner;

@RunWith(SpringRunner.class)
@SpringBootTest
public class Test01ApplicationTests {

	private static final Log log= LogFactory.getLog(Test01ApplicationTests.class);

	/**
	 * 自动注入HelloProperties类
	 */
	@Autowired
	private HelloProperties helloProperties;

	@Test
	public void contextLoads() {
		System.out.println("姓名:"+helloProperties.getName());
		System.out.println("性别:"+helloProperties.getSex());
		System.out.println("描述:"+helloProperties.getDesc());
		System.out.println("value="+helloProperties.getValue());
		System.out.println("number="+helloProperties.getNumber());
		System.out.println("limit1="+helloProperties.getLimit1());
		System.out.println("limit2="+helloProperties.getLimit2());

		log.info("姓名:"+helloProperties.getName());
		log.info("性别:"+helloProperties.getSex());
		log.info("描述:"+helloProperties.getDesc());
		log.info("value="+helloProperties.getValue());
		log.info("number="+helloProperties.getNumber());
		log.info("limit1="+helloProperties.getLimit1());
		log.info("limit2="+helloProperties.getLimit2());
	}
}
注:你不能在标准的logback.xml配置文件中使用扩展,因为它加载的太早了(启动服务时就加载了),不过可以使用logback-spring.xml,或指定logging.config属性。
            %date [%thread] %-5level %logger{50}:%L - %msg%n


        ${logDir}/service.log


            ${logDir}/history/service.%d{yyyy-MM-dd}.log.zip

            30


            150


            %date [%thread] %-5level %logger{50}:%L - %msg%n
万事俱备只欠东风,这时候,我们愉快的开启单元测试:
①启动main方法所在的Test01Application类,看看控制台输出:
2018-06-12 15:30:20,304 [main] INFO  org.apache.coyote.http11.Http11NioProtocol:180 - Starting ProtocolHandler ["http-nio-9090"]
2018-06-12 15:30:20,571 [main] INFO  org.apache.tomcat.util.net.NioSelectorPool:180 - Using a shared selector for servlet write/read
2018-06-12 15:30:20,624 [main] INFO  o.s.boot.web.embedded.tomcat.TomcatWebServer:206 - Tomcat started on port(s): 9090 (http) with context path ''
2018-06-12 15:30:20,639 [main] INFO  com.test.Test01Application:59 - Started Test01Application in 7.168 seconds (JVM running for 9.885)
说明使用了dev的配置文件,端口在9090,OK,访问浏览器地址:http://localhost:9090/hello
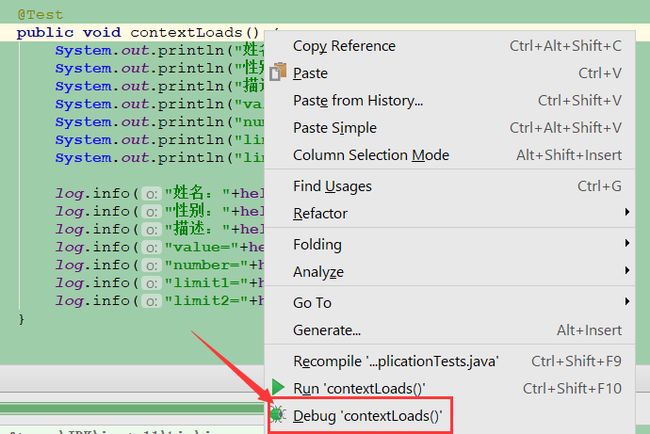
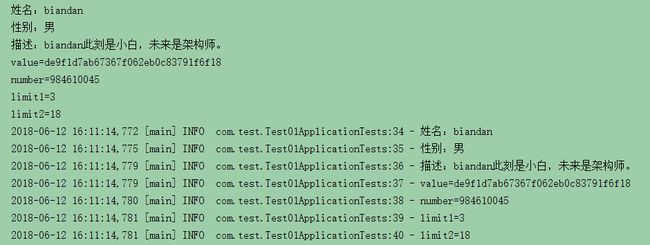
在测试类的contextLoads()方法单机鼠标右键,debug模式:
在控制台和D盘分别瞧瞧发生了什么。
乱码!?!SpringBoot不是号称在pom.xml里添加了UTF-8的编码格式了嘛?!童话里都是骗人的?!
是啊,那又怎样?你能打它?笑话。
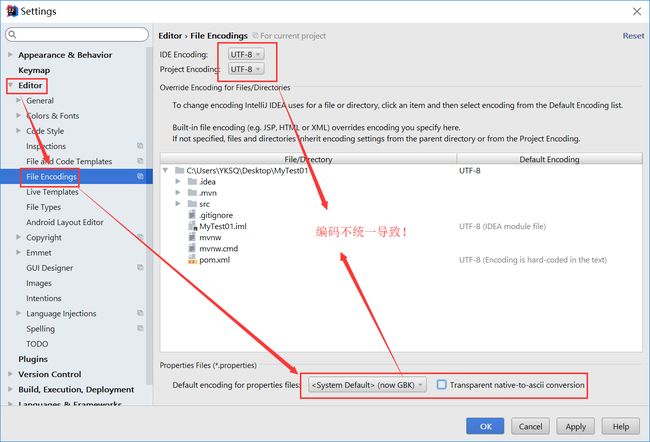
行,行。算我输。我找问题还不行?原来,没设置统一的UTF-8文件编码,导致不统一,出现乱码!
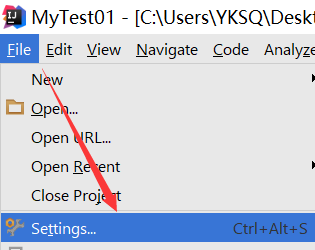
设置这个项目统一UTF-8,为了以绝后患,在默认设置里,统一格式UTF-8:
OK,设置编码统一UTF-8格式
突然间,才发现:
你们老师没告诉你要养成备份的好习惯吗?!
OK,一切弄好之后,继续测试。。
装13的舞台现在交给你们了!未来是你们的,但现在它是我的!
推荐大神自学博客:程序员DD 以及他的 GitHub
