(二)编译PVE内核5.10.6-1-pve及安装内核补丁fullconeNat
编译PVE内核5.10.6-1-pve及安装内核补丁fullconeNat
- 前提
- 1.修改源
- 2.升级系统,安装依赖
-
- 2.1添加 Proxmox VE 存储库(国内用户自行替换)
- 2.2升级系统
- 2.3安装以下编译包
- 3.建新的用户
- 4.编译前工作
-
- 4.1克隆项目
- 4.2 修改配置文件
-
- 4.2.1修改Makefile文件
- 4.2.2手动生成.config(以下脚本就是基于上面注掉的脚本改来的)
-
- 4.2.2.1内核补丁
- 5.编译过程中所有问题都是从操作记录中摘抄出来的,请针对问题内容查看解决处理方法
-
- 问题一
- 问题二
- 问题三
- 6.最后
前提
国内必须全局富强,空间最少留个60G,编译系统推荐用debian10(ubuntu 18测试过编译不成功,缺少包,或者包的版本不够高,只是编译PVE选Debian)
我用的国外vps进行编译
(PS:国内用户可以把debian的源全改为ustc.edu的,并添加源 echo "deb http://mirrors.ustc.edu.cn/proxmox/debian/pve buster pve-no-subscription" >> /etc/apt/sources.list)
1.修改源
vim /etc/apt/sources.list
全部替换为如下:
deb http://ftp.debian.org/debian buster main contrib
deb http://ftp.debian.org/debian buster-updates main contrib

# PVE pve-no-subscription repository provided by proxmox.com,
# NOT recommended for production use
deb http://download.proxmox.com/debian/pve buster pve-no-subscription

# security updates
deb http://security.debian.org/debian-security buster/updates main contrib
2.升级系统,安装依赖
2.1添加 Proxmox VE 存储库(国内用户自行替换)
echo "deb http://download.proxmox.com/debian/pve buster pve-no-subscription" > /etc/apt/sources.list
添加 Proxmox VE 存储库密钥:
wget http://download.proxmox.com/debian/proxmox-ve-release-6.x.gpg -O /etc/apt/trusted.gpg.d/proxmox-ve-release-6.x.gpg
sha512sum /etc/apt/trusted.gpg.d/proxmox-ve-release-6.x.gpg #密钥验证
2.2升级系统
apt update
2.3安装以下编译包
apt install devscripts asciidoc-base automake bc bison cpio dh-python bison flex git kmod
libdw-dev libelf-dev libiberty-dev libnuma-dev libpve-common-perl libslang2-dev libssl-dev
libtool lintian lz4 perl-modules python2-minimal rsync sed sphinx-common tar xmlto zlib1g-dev
dwarves net-tools htop vnstat
3.建新的用户
不要用root用户去git或者编译
groupadd wang #新建组
useradd -m wang -g wang -s /bin/bash -d /home/wang
passwd wang
su wang #切换到用户wang
4.编译前工作
编译PVE历史版本内核,参考下一篇文章:https://blog.csdn.net/w946612410/article/details/113863814
4.1克隆项目
cd ~
git clone git://git.proxmox.com/git/pve-kernel.git

cd pve-kernel
git submodule update --init submodules/ubuntu-hirsute
注意:不同内核编译,ubmodules/ubuntu-*会不同
5.10.6-1-pve内核:git submodule update --init submodules/ubuntu-hirsute
5.4.78-2-pve内核:git submodule update --init submodules/ubuntu-focal
4.2 修改配置文件
4.2.1修改Makefile文件
vim Makefile
找到
cat ${BUILD_DIR}/${KERNEL_SRC}/debian.master/config/config.common.ubuntu ${BUILD_DIR}/${KERNEL_SRC}/debian.master/config/${ARCH}/config.common.${ARCH} ${BUILD_DIR}/${KERNEL_SRC}/debian.master/config/${ARCH}/config.flavour.generic > ${KERNEL_CFG_ORG}
和
cp ${KERNEL_CFG_ORG} ${BUILD_DIR}/${KERNEL_SRC}/.config
前面加 # 号 注掉自动生成config
保存
4.2.2手动生成.config(以下脚本就是基于上面注掉的脚本改来的)
cat debian.master/config/config.common.ubuntu debian.master/config/amd64/config.common.amd64 debian.master/config/amd64/config.flavour.generic > .config
执行后,已经进到了~/pve-kernel/submodules/submodules/ubuntu-hirsute/目录
现在添加xt_FULLCONENAT
方法 参考:https://github.com/Chion82/netfilter-full-cone-nat 有说明和怎么做
4.2.2.1内核补丁
1.复制 xt_FULLCONENAT.c 到 ubuntu-hirsute/net/netfilter/xt_FULLCONENAT.c
cd ~/pve-kernel/submodules/ubuntu-hirsute/net/netfilter
wget https://ghproxy.com/https://raw.githubusercontent.com/Chion82/netfilter-full-cone-nat/master/xt_FULLCONENAT.c

2.将以下行添加到ubuntu-hirsute/net/netfilter/Makefile
obj-$(CONFIG_NETFILTER_XT_TARGET_FULLCONENAT) += xt_FULLCONENAT.o

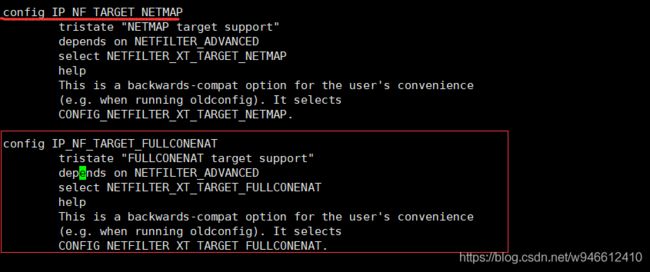
3.打开ubuntu-hirsute/net/ipv4/netfilter/Kconfig,将以下代码插入到config IP_NF_TARGET_NETMAP部分之后:
config IP_NF_TARGET_FULLCONENAT
        tristate "FULLCONENAT target support"
        depends on NETFILTER_ADVANCED
        select NETFILTER_XT_TARGET_FULLCONENAT
        help
        This is a backwards-compat option for the user's convenience
        (e.g. when running oldconfig). It selects
        CONFIG_NETFILTER_XT_TARGET_FULLCONENAT.
4.打开ubuntu-hirsute/net/netfilter/Kconfig,将以下代码插入到config NETFILTER_XT_TARGET_NETMAP部分之后:
config NETFILTER_XT_TARGET_FULLCONENAT
        tristate '"FULLCONENAT" target support'
        depends on NF_NAT
        help
        Full Cone NAT

        To compile it as a module, choose M here. If unsure, say N.

确保现在在目录`~/pve-kernel/submodules下

5.运行 make menuconfig and 选择: Networking support -> Network options -> Network packet filtering framework (Netfilter) -> IP: Netfilter Configuration ->
6.以下添加拔号内核模块
运行 make menuconfig and 选择: Device Drivers > Network device support > PPP(point-to-point protocol) support 由*改为M
保存
7.编译
cd ~/pve-kernel
make
就会自动编译,不需要设置多线程,它会自动调用多线程编译。看CPU能力,编译完把当前目录的 .deb包复制出来,就是内核包
5.编译过程中所有问题都是从操作记录中摘抄出来的,请针对问题内容查看解决处理方法
问题一
编译内核出错:/bin/sh: 1: bison: not found scripts/Makefile.lib:196: recipe for target ‘scripts/kconfig/zco
book@book-VirtualBox:~/project/s3c2440/linux-4.19-rc3$ make menuconfig
  YACC    scripts/kconfig/zconf.tab.c
/bin/sh: 1: bison: not found
scripts/Makefile.lib:196: recipe for target 'scripts/kconfig/zconf.tab.c' failed
make[1]: *** [scripts/kconfig/zconf.tab.c] Error 127
Makefile:550: recipe for target 'menuconfig' failed
make: *** [menuconfig] Error 2
分析:
- 缺乏某些程序,安装即可
解决:
sudo apt-get install bison
sudo apt-get install flex
问题二
dpkg-source: error: LC_ALL=C patch -t -F 0 -N -p1 -u -V never -E -b -B .pc/0001-Check-for-META-and-DCH-consistency-in-autoconf.patch/ --reject-file=- < zfs-linux_0.8.5.orig.XST3cD/debian/patches/0001-Check-for-META-and-DCH-consistency-in-autoconf.patch subprocess returned exit status 1
dpkg-buildpackage: error: dpkg-source -b . subprocess returned exit status 2
貌似是zfs错误
解决:
- 省略这步即可:git submodule update --init submodules/zfsonlinux
实测,编译会自动执行git submodule update --init submodules/zfsonlinux
问题三
BTF: .tmp_vmlinux.btf: pahole (pahole) is not available
Failed to generate BTF for vmlinux
Try to disable CONFIG_DEBUG_INFO_BTF
make[1]: *** [/home/demo_accout/linux-5.8.7/Makefile:1139: vmlinux] Error 1
make[1]: Leaving directory '/home/demo_accout/build/kernel'
make: *** [Makefile:185: __sub-make] Error 2
遇到这个问题是最让人崩溃的,花了两个小时编译,好不容易看到曙光了,结果来了个大霹雳啊,摔电脑的心都有啊!!!
原因:
- dwarves包无法使用或
版本过低只有v1.12-2 编译至少与需要版本v1.16或更高
解决:
- 方法一(推荐):这个是.config配置文件配置项错误导致的,修改配置文件,把之前的CONFIG_DEBUG_INFO_BTF=y改成
CONFIG_DEBUG_INFO_BTF=n
- 方法二:
克隆项目到本地:
git clone https://github.com/acmel/dwarves.git
cd dwarves/
mkdir build
cd build/
cmake -D__LIB=lib ..
make install
移动编译好的文件:
cp pahole /usr/bin/pahole
cp /usr/local/lib/* /usr/lib/
再重新编译一次吧。
6.最后
获取pve历史内核:https://git.proxmox.com/?p=pve-kernel.git;a=summary
参考文章(以下顺序不分先后):
PVE用LXC几乎完美运行openwrt支持fullconeNat,拔号等更新内核5.4.78-2
Fedora32 kernel源码包安装升级过程遇到的问题
dwarves升级:
- dwarves包:https://github.com/acmel/dwarves
- pahole源码:https://git.kernel.org/pub/scm/devel/pahole/pahole.git/about/
pve文档:https://pve.proxmox.com/pve-docs/chapter-sysadmin.html#sysadmin_package_repositories
Chion82/netfilter-full-cone-nat:https://github.com/Chion82/netfilter-full-cone-nat
文件xt_FULLCONENAT.c:https://github.com/Chion82/netfilter-full-cone-nat/blob/master/xt_FULLCONENAT.c
Linux内核升级:https://www.cnblogs.com/networking/p/4821248.html