04_pytest_allure报告的生成
1、官网下载allure报告 :配置环境变量:在dos以及pycharm验证。allure --version
2、生成报告
第一步:在pytest.ini文件 参数一行先生成 json格式的临时报告目录
[pytest]
addopts = -vs --alluredir=./temps/ --clean-alluredir
testpaths = ./api_test/testcase/
python_files = test_*.py
python_classes = Test*
python_functions = test
markers =

#--alluredir=./temps/    //生成json格式的临时报告目录
# --clean-alluredir。   //每次生成json报告自动删除之前报告
第二步:在run.py 函数的入口,生成allure格式报告,需要os 模块
import pytest
import os
import time


if __name__ == '__main__':
    time.sleep(3)
    pytest.main()
    os.system("allure generate ./temps -o ./reports")

##os.system("allure generate ./temps -o ./reports") 从临时目录 output allure报告到 .reports目录下
3、allure报告的优化---企业级allure报告的定制
1、企业级logo定制
(1)配置 allure安装包下面\config\allure.yaml
在 allure\plugin\custom-logo-plugin (这是一个自定义logo插件)
复制这个custom-logo-plugin插件的名字, 添加到到 allure\config\allure.yaml 这个配置文件里面
plugins:
  - junit-xml-plugin
  - xunit-xml-plugin
  - trx-plugin
  - behaviors-plugin
  - packages-plugin
  - screen-diff-plugin
  - xctest-plugin
  - jira-plugin
  - xray-plugin
  - custom-logo-plugin    ##此处添加定制logo的插件
(2)改变默认的logo 和样式
第一步: 自己选择一张logo的图片 放到D:\software\allure-2.13\ plugin\custom-logo-plugin\static\
第二步更改样式: 修改 D:\software\allure-2.13.2\plugins\custom-logo-plugin\static\ styles.css(覆盖原有的样式)
比如
.side-nav__brand {
  background: url('logo.png') no-repeat left center !important;
  margin-left: 10px;
  # margin-left: 30px;  (调节向左的距离)
  # height: 190px   (调节高度)
  # backgriund-size: contain !importtant;
}


# background: url('logo.png') 指的是背景图片的url
# margin-left: 30px;  (调节向左的距离)
# height: 190px   (调节高度)
#通过调节图片大小 左右距离来定制 logo
3、其他的详细定制
(1)allure报告左边的定制
1、史诗(项目名称)必用
@allure.epic("中国移动SAAS营销管理")
2、特性(模块名称)必哟用
@allure.feature("用户模块管理")
3、分组(接口名称) 必用
@allure.story("吗哈桑饥接口")
测试用例标题的定制(2种方法)
@allure.title("测试马山学院正例1")
allure.dynamic.title("测试马山学院正例2")必用 用这个
(2)allure报告右边的定制
1、用例的严重级别(优先级)
BLOCKER致命 CRITICAL严重 NORMAL一般 MINOR提示 TRVIAL轻微
2、用例的描述
@allure.description("用例描述1")
allure.dynamic.description("用例的描述2") 非必用 如果用用这个
3、用例的链接
@allure.link("接口访问的链接")
@allure.issue("bugl链接")
@allure.testcase("测试用例链接")
4、用例的步骤
with allure.step("测试用例第几步")
with allure.step("接口名称")
with allure.step接口地址
5、用例的附件(web自动化必用)
with open(“E:\\shu.jpg",mode="rb”)as f :
allure.attach(body=f.read()),name="登录截图错误",attachment_type=allure.attachment。。。。。。。
六、如何让allure报告在网络中被访问
控制台: allure open ./reports
例如:
import allure
import pytest
def exe_sql():
print("这是一个固件前置执行,需要执行sql")
yield "success"
print("后置执行")
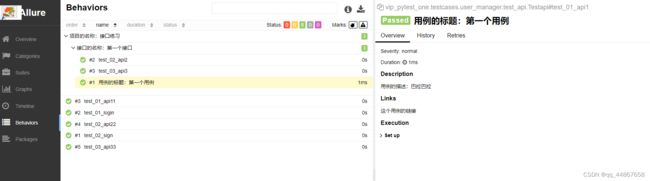
@allure.epic("项目的名称:接口练习")
@allure.story("接口的名称:第一个接口")
class Testapi:
@allure.link("这个用例的链接")
def test_01_api1(self):
allure.dynamic.title("用例的标题:第一个用例")
allure.dynamic.description("用例的描述:巴拉巴拉")
print("第一个用例")
def test_02_api2(self):
print("第二个用例,%s")
def test_03_api3(self):
print("第三个用例")
eg: