Elastic Search(Linux 安装)
## ElasticSearch 是一个基于 Lucene 的搜索服务器。它提供了一个分布式多用户能力的全文搜索引擎,基于 RESTful web 接口。 Elasticsearch 是用 Java 开发的,并作为 Apache 许可条款下的开放源码发布,是当前流行的企业级搜索引擎。设计用于云计算中,能够达到实时搜索,稳定,可靠,快速,安装使用方便。
- 下载安装包并解压
## 获取 elasticsearch 源码包
[root@localhost ~]# wget https://artifacts.elastic.co/downloads/elasticsearch/elasticsearch-8.1.1-linux-x86_64.tar.gz

## 或者 java 源码包,安装 jdk 是因为 es 是使用 java 语言编写
[root@localhost ~]# wget https://download.oracle.com/java/18/latest/jdk-18_linux-x64_bin.tar.gz

## 解压 tar 包到指定目录
[root@localhost ~]# tar zxf elasticsearch-8.1.1-linux-x86_64.tar.gz -C /usr/local/
[root@localhost ~]# tar zxf jdk-18_linux-x64_bin.tar.gz -C /usr/local/
- 设置 jdk 环境变量
[root@localhost ~]# vim /etc/profile
export JAVA_HOME=/usr/local/jdk-18
export PATH=$JAVA_HOME/bin:$PATH

[root@localhost ~]# source /etc/profile

[root@localhost ~]# java -version
java version "18" 2022-03-22
Java(TM) SE Runtime Environment (build 18+36-2087)
Java HotSpot(TM) 64-Bit Server VM (build 18+36-2087, mixed mode, sharing)
- 尝试启动 elasticsearch
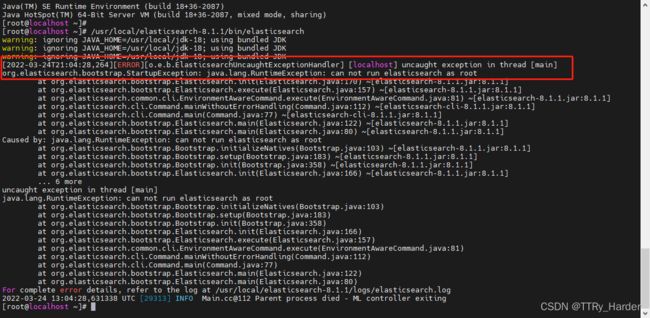
[root@localhost ~]# /usr/local/elasticsearch-8.1.1/bin/elasticsearch

[2022-03-24T21:04:28,264][ERROR][o.e.b.ElasticsearchUncaughtExceptionHandler] [localhost] uncaught exception in thread [main]
org.elasticsearch.bootstrap.StartupException: java.lang.RuntimeException: can not run elasticsearch as root

## 提示不能使用 root 用户运行
[root@localhost ~]# useradd esroot
[root@localhost ~]# echo "输入密码" | passwd --stdin esroot
Changing password for user esroot.
passwd: all authentication tokens updated successfully.

[root@localhost ~]# chown -R esroot:esroot /usr/local/elasticsearch-8.1.1/

## 切换到 esroot 用户,尝试运行集群
[esroot@localhost ~]$ /usr/local/elasticsearch-8.1.1/bin/elasticsearch
## 启动后出现如下报错
[2022-03-24T21:09:59,431][WARN ][o.e.b.BootstrapChecks    ] [localhost] max virtual memory areas vm.max_map_count [65530] is too low, increase to at least [262144]

## 解决方案
[root@localhost ~]# vim /etc/sysctl.conf
vm.max_map_count = 655360

## 使其生效
[root@localhost ~]# sysctl -p

## 说明:
## max_map_count文件包含限制一个进程可以拥有的VMA(虚拟内存区域)的数量。
## 虚拟内存区域是一个连续的虚拟地址空间区域。在进程的生命周期中,每当程序尝试在内存中映射文件,链接到共享内存段,或者分配堆空间的时候,这些区域将被创建。
## 调优这个值将限制进程可拥有VMA的数量。限制一个进程拥有VMA的总数可能导致应用程序出错,因为当进程达到了VMA上线但又只能释放少量的内存给其他的内核进程使用时,操作系统会抛出内存不足的错误。
## 如果你的操作系统在NORMAL区域仅占用少量的内存,那么调低这个值可以帮助释放内存给内核用。
## 注意:除了上述的报错,可能还会出现如下报错:
## 第一种可能出现的错误:
**ERROR: bootstrap checks failed[1]: max file descriptors [4096] for elasticsearch process
## 解决方法
[root@localhost ~]# vim /etc/security/limits.conf
# 在最后面追加下面内容
* soft nofile 65536
* hard nofile 65536
* soft nproc 4096
* hard nproc 4096
## limits.conf 说明:
## limits.conf的格式如下:
# -
# domain:username|@groupname 设置需要被限制的用户名或组,组名前面加 @ 和用户名区别;
# 也可以用通配符 * 来做所有用户的限制。
## type:有 soft,hard 和 -
# soft 指的是当前系统生效的设置值(警告)
# hard 表明系统中所能设定的最大值(错误)
# soft 的限制不能比 hard 限制高,- 表明同时设置了 soft 和 hard 的值。
## item:有很多种,这里只说 noproc
# noproc - 过程最大数量
--------------------------------------------------
--------------------------------------------------
## 第二个可能出现的错误:
**ERROR: max number of threads [3802] for user [chenyn] is too low,increase to at least [4096]**
## 解决方案:
[root@localhost ~]# vim /etc/security/limits.d/20-nproc.conf
# 修改为 启动ES用户名 soft nproc 4096
esroot soft nproc 4096
## 之后就可以正常启动了
[esroot@localhost ~]$ /usr/local/elasticsearch-8.1.1/bin/elasticsearch

## 启动成功之后,可以在本地测试访问;但是此时还无法远程去访问,如果需要远程访问那么得编辑配置文件 elasticsearch.yml
## elasticsearch.yml:ES 启动基础配置
[root@localhost ~]# vim /usr/local/elasticsearch-8.1.1/config/elasticsearch.yml
[root@localhost ~]# cat /usr/local/elasticsearch-8.1.1/config/elasticsearch.yml | grep -v ^# | grep -v ^$
cluster.name: my-es-cluster
node.name: node-1
path.data: /usr/local/elasticsearch-8.1.1/data
path.logs: /usr/local/elasticsearch-8.1.1/logs
network.host: 0.0.0.0
http.port: 9200

## 之后再次启动集群
[esroot@localhost ~]$ /usr/local/elasticsearch-8.1.1/bin/elasticsearch
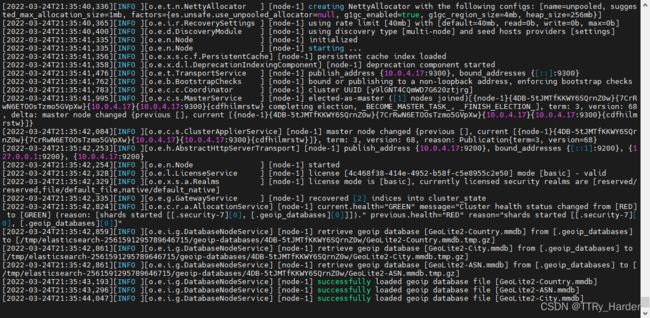
## 下图输出信息,集群已经是正常起来的

## 但是通过尝试访问本机 9200 端口时并不通,排查看到进程都是正常启动的,端口也是通的,但就是访问不了

## 回到启动界面,可以看到刚才的访问有记录到内容:

## 解决方法
## 编辑 elasticsearch.yml 文件
[root@localhost ~]# vim /usr/local/elasticsearch-8.1.1/config/elasticsearch.yml
## 找到下面的配置,将 true 改为 false
xpack.security.enabled: false
xpack.security.enrollment.enabled: false
xpack.security.http.ssl:
  enabled: false
  keystore.path: certs/http.p12
xpack.security.transport.ssl:
  enabled: false
  verification_mode: certificate
  keystore.path: certs/transport.p12
  truststore.path: certs/transport.p12
## 启动集群
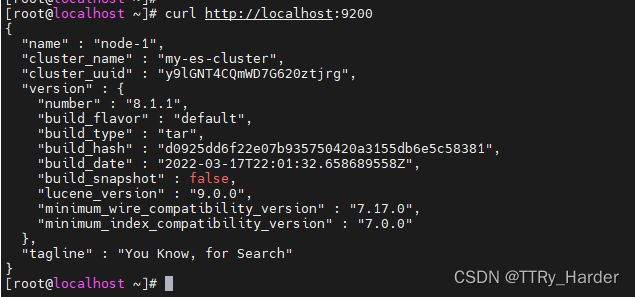
[root@localhost ~]# curl http://localhost:9200
{
  "name" : "node-1",
  "cluster_name" : "my-es-cluster",
  "cluster_uuid" : "y9lGNT4CQmWD7G620ztjrg",
  "version" : {
    "number" : "8.1.1",
    "build_flavor" : "default",
    "build_type" : "tar",
    "build_hash" : "d0925dd6f22e07b935750420a3155db6e5c58381",
    "build_date" : "2022-03-17T22:01:32.658689558Z",
    "build_snapshot" : false,
    "lucene_version" : "9.0.0",
    "minimum_wire_compatibility_version" : "7.17.0",
    "minimum_index_compatibility_version" : "7.0.0"
  },
  "tagline" : "You Know, for Search"
}
## 补充,有时候启动集群时可能会看到有打印如下信息,这里的告警实际并不影响集群的访问
[2022-03-24T21:17:43,265][INFO ][o.e.t.n.NettyAllocator   ] [localhost] creating NettyAllocator with the following configs: [name=elasticsearch_configured, chunk_size=1mb, suggested_max_allocation_size=1mb, factors={es.unsafe.use_netty_default_chunk_and_page_size=false, g1gc_enabled=true, g1gc_region_size=4mb}]

## 解决该告警可参考
## jvm.options:ES 启动时JVM配置
[root@localhost ~]# vim /usr/local/elasticsearch-8.1.1/config/jvm.options
-Xms256m
-Xmx256m
## 关于日志输出:
## 直接启动
[esroot@localhost ~]$ /usr/local/elasticsearch-8.1.1/bin/elasticsearch
## 直接启动可以看到日志实时输出,看日志比较方便,但是当前窗口关闭,进程也就停止了

## 后台启动
[esroot@localhost ~]$ /usr/local/elasticsearch-8.1.1/bin/elasticsearch -d
-d, --daemonize       Starts Elasticsearch in the background
## 日志保存在 logs 目录,以 cluster_name 命名

## 至此,es 部署完成,使用 kibana 可以实现 es 的可视化,kibana 部署参考:
- 源码部署 kibana


