Spring Cloud 系列之OpenFeign:(6)OpenFeign的链路追踪
传送门
Spring Cloud Alibaba系列之nacos:(1)安装
Spring Cloud Alibaba系列之nacos:(2)单机模式支持mysql
Spring Cloud Alibaba系列之nacos:(3)服务注册发现
Spring Cloud 系列之OpenFeign:(4)集成OpenFeign
Spring Cloud 系列之OpenFeign:(5)OpenFeign的高级用法
OpenFeign的高级用法回顾
在前面OpenFeign的高级用法一节里面,重点介绍了OpenFeign的几大高级用法:
-
超时处理
-
日志配置
-
服务降级
以及其它的特性,比如用于debug调试的直连调用,contextId区分多个目标服务,继承特性来优化代码结构等。除了这些之外,OpenFeign还支持使用拦截器,并提供了默认的实现:BasicAuthRequestInterceptor。
那为什么要单独讨论一下拦截器机制呢?因为想通过它来实现一个简易的OpenFeign远程调用的链路追踪功能!
链路追踪原理
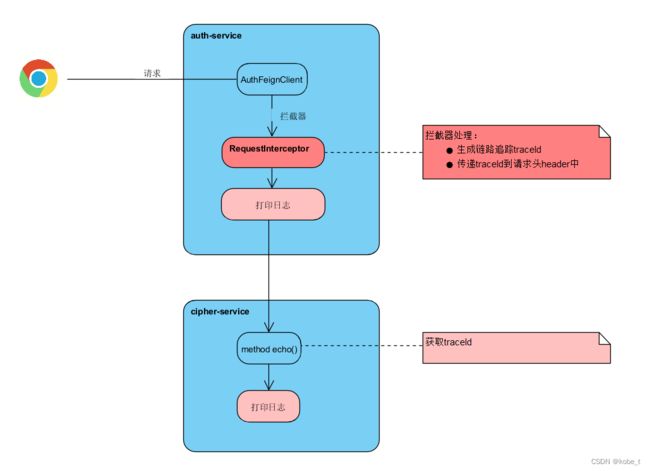
以前刚接触Spring Cloud的时候,使用过Sleuth+Zipkin来实现分布式链路追踪。但是要引入外部组件zipkin,并独立部署。如果微服务不多,可以实现一个简易的链路追踪,其中大致原理如下:
环境因素
要实现OpenFeign的远程调用链接追踪,主要就是要借助OpenFeign的拦截器功能。
OpenFeign的拦截器
OpenFeign有一个接口,可以通过实现这个接口来传递tId。
public interface RequestInterceptor {

  /**
   * Called for every request. Add data using methods on the supplied {@link RequestTemplate}.
   */
  void apply(RequestTemplate template);
}
实现拦截器
所以现在通过实现这个接口,改造一下前面的代码:
@Slf4j
public class FeignRequestInterceptor implements RequestInterceptor
{


    @Override
    public void apply(RequestTemplate template)
    {
        // 生成一个tId,默认UUID
        String tId = "tId" + UUID.randomUUID();
        log.info("----------------传递tId:{}", tId);
        template.header("tId", tId);
    }
}- FeignRequestInterceptor实现RequestInterceptor,覆盖apply方法
- 往RequestTemplate对象里面,添加header头"tId"
- 在日志中打印tId
这里的主要目的就是通过拦截器设置tId到header里面,然后在OpenFeign调用传递到目标服务!
修改FeignClient配置
在前面的配置FeignConfiguration类中,初始化拦截器对象:
@Configuration
public class FeignConfiguration
{

    @Bean
    public FeignRequestInterceptor feignRequestInterceptor()
    {
        return new FeignRequestInterceptor();
    }

    @Bean
    Logger.Level feignLoggerLevel()
    {
        return Logger.Level.FULL;
    }
}
修改CipherFeignClient,添加配置configuration为FeignConfiguration
@FeignClient(name = FeignConstant.CIPHER_SERVICE, fallback = AuthFeignClientFallback.class, configuration = FeignConfiguration.class)
public interface CipherFeignClient
{
    @GetMapping(value = "/echo")
    String echo(@RequestParam(value = "str") String str);

}
修改OpenFeign实现,获取traceId
@RestController
@Slf4j
public class EchoController implements CipherFeignClient
{
    public String echo(@PathVariable String string)
    {
        ServletRequestAttributes attributes = (ServletRequestAttributes)RequestContextHolder.getRequestAttributes();
        HttpServletRequest request = attributes.getRequest();
        String tId = request.getHeader("tId");
        log.info("=============tId:{}", tId);
        return "Hello Nacos Discovery " + string;
    }
}- 获取request对象,从header里面取出tId
- 打印到日志文件中
访问http://localhost:8080/echo/ssss,auth服务控制台打印出:
2023-04-03 21:51:15,532 [http-nio-8080-exec-5] INFO  c.t.t.auth.controller.TestController [TestController.java : 31] - echo init begin..........
2023-04-03 21:51:19,995 [hystrix-HystrixCircuitBreakerFactory-1] INFO  c.t.t.b.c.i.FeignRequestInterceptor [FeignRequestInterceptor.java : 22] - ----------------传递tId:tId965f89a1-3e0b-4146-8387-06f9fd9dade7
而cipher打印出相同的tId,就可以通过这个tId来追踪对应的请求了
2023-04-03 21:51:23.820  INFO 9008 --- [nio-8081-exec-2] o.s.web.servlet.DispatcherServlet        : Completed initialization in 4 ms
2023-04-03 21:51:23.841  INFO 9008 --- [nio-8081-exec-2] c.t.t.cipher.controller.EchoController   : =============tId:tId965f89a1-3e0b-4146-8387-06f9fd9dade7
MDC日志追踪工具
上面虽然能通过手动生成链路追踪的tId,不过在生产环境中,一般不会在每个接口里面都去写代码获取request对象再从header中获取tId,比如上面EchoController:
public String echo(@PathVariable String string)
    {
        ServletRequestAttributes attributes = (ServletRequestAttributes)RequestContextHolder.getRequestAttributes();
        HttpServletRequest request = attributes.getRequest();
        String tId = request.getHeader("tId");
        log.info("=============tId:{}", tId);
        return "Hello Nacos Discovery " + string;
    }
而且通常都是打印到日志中,在java项目中如果是集成了log4j/logback日志框架,可以通过轻量级的日志跟踪工具-MDC来优化。
MDC(Mapped Diagnostic Context,映射调试上下文)是 log4j 和 logback 提供的一种方便在多线程条件下记录日志的功能,也可以说是一种轻量级的日志跟踪工具。
创建MDC上下文
现在想法是在每次请求过来的时候,先检测有没有tId,如果没有就生成一个并保存起来,然后在其它地方调用时,直接获取该tId:这样对于feign调用也是一样,不用重新生成而直接获取该tId即可!对于要实现类似的功能,在java中自然可以想到利用ThreadLocal这个本地线程来实现了:
public class MdcContext
{

    /** MDC上下文,存储tId */
    private static final ThreadLocal CONTEXT = new ThreadLocal();

    /**
     * 获取tId,放入线程上下文中
     * @return
     */
    public static String getTraceId()
    {
        String tId = CONTEXT.get();
        if (StringUtils.isEmpty(tId))
        {
            CONTEXT.set(UUID.randomUUID().toString());
        }
        return CONTEXT.get();
    }

    /**
     * 清除线程上下文
     */
    public static void clear()
    {
        CONTEXT.remove();
    }
}
创建MDC过滤器
利用Spring MVC提供的org.springframework.web.servlet.HandlerInterceptor可以很方便的拦截HTTP请求,对请求处理前后做一些处理:
public class MdcInterceptor implements HandlerInterceptor
{

    @Override
    public boolean preHandle(HttpServletRequest request, HttpServletResponse response, Object handler) throws Exception
    {
        // 获取tId
        String tId = MdcContext.getTraceId();

        // 将tId放入MDC中,方便日志输出
        MDC.put("TraceId", tId);
        return true;
    }

    @Override
    public void afterCompletion(HttpServletRequest request, HttpServletResponse response, Object handler, Exception ex) throws Exception
    {
        // 清除线程上下文
        MdcContext.clear();

        // 清楚MDC内容
        MDC.clear();
    }
}
并将该拦截器配置上:
@Configuration
public class WebConfig implements WebMvcConfigurer {

    @Override
    public void addInterceptors(InterceptorRegistry registry) {
        registry.addInterceptor(new MdcInterceptor());
    }
}
到此,MDC的拦截器就完成了,最后就可以改造一下上面的FeignRequestInterceptor:这个类里面不再生成tId,而是直接从线程上下文中获得:
import com.tw.tsm.base.MdcContext;
import feign.RequestInterceptor;
import feign.RequestTemplate;
import lombok.extern.slf4j.Slf4j;

@Slf4j
public class FeignRequestInterceptor implements RequestInterceptor
{

    /**
     * Called for every request. Add data using methods on the supplied {@link RequestTemplate}.
     *
     * @param template
     */
    @Override
    public void apply(RequestTemplate template)
    {
        String tId = "tId" + MdcContext.getTraceId();
        log.info("----------------传递tId:{}", tId);
        template.header("tId", tId);
    }
}
这里有一点要注意,就是需要配置一下隔离策略:
# 隔离策略,THREAD线程池隔离,SEMAPHORE信号量隔离,默认THREAD
hystrix.command.default.execution.isolation.strategy=SEMAPHORE
这样才能取到本地线程里面的值!
最后就是在logback配置文件中,设置tId的打印格式:
            INFO


            %d [%thread] [%X{TraceId}] %-5level %logger{36} [%file : %line] - %msg%n
