Directx----Stenciling
1. Stencil Buffer (模板缓冲的定义)
注:我看网上都把stencil 命名为模板, 但是个人认为“挡板 ”合适,但是这个名字也许太”俗”了。
每个像素都有自己对应的 Buffer,其实就是一个 32bit 的数,如 Color Buffer, Depth Buffer,
Stencil Buffer. Stencil Buffer 与 Depth Buffer 有点特别,因为他们共用同一个 Buffer,
Depth Buffer 占用 Buffer 前面的 24Bit, Stencil Buffer 占用后面的 8Bit. Stencil Buffer 可
以使用从 1Bit-8Bit. 如在绘制反射时,就像照镜子一样,因为只需要在反射平面上绘制物体的
镜像,即要么在反射平面上绘制,要不就不绘制,所以只需要用到 1Bit 的 Stencil Buffer.
什么叫 Stencil Buffer ?
即是一个模板,也就是说,他可以是一个平面,也可以是一个立体几何图形,如一个四边形,一个
Teapot. 在模板所占据的空间中,他的值为 1(values stored in the stencil buffer), 在启用
Stencil Buffer 时,我们所画的图形只有在这个空间中的部分才能显示出来,所以我们可以创建一
个模板,他是一个字,然后以后画的图形最多只能把这个字给显示出来,这个图形有其他部分都没
有被写进 Color Buffer.
总得来说, stencil buffer 会阻止渲染不需要的区域。比如, 我们渲染一个镜子的时候我们需要
渲染镜子上的物体, 但是在渲染的时候我们想渲染物体在镜子里面的部分而不是所有的部分, 在
这里我们就可以用stencil buffer阻止物体以外的部分被渲染。
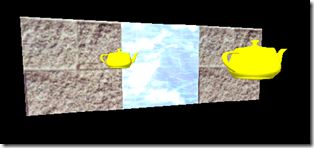
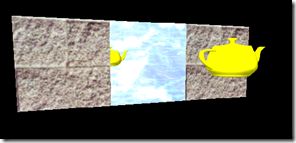
如下图所示:图一未使用stencil buffer, 图二使用了stentcil buffer。
图一 图二
2. 使用Stencil Buffer
在D3D中,如果我们要开启stencil buffer 渲染, 我们只需:
     1

     Device

     ->

     SetRenderState(D3DRS_STENCILENABLE,

     true

     );


     2

     ……


     3

     Device

     ->

     SetRenderState( D3DRS_STENCILENABLE,

     false

     );
3. Stencil Test
stencil Test (模板测试):这个测试就是测试这个像素点能不能被渲染出来。
总的来说 stencil test 干了两件事情:
(1)在光栅阶段要往屏幕上画某一点时,会先找到 stencil buffer 中对应的值做一次条件判断,
条件可以是 value == 0,value != 1,value < 2 等等什么的,只有条件成立时该点才会被绘
制,当然还可以把条件设为一定成立或一定不成立。
(2)当 stencil test 成功后,除了把对应点画出来,还要修改 stencil buffer ,可以自己设置为
等于某个值,加上某个值,减去某个值,取反等等,当然也可以设置为不改变。
其表达是是这样的: (ref & mask) ComparisonOperation(value & mask)
其中:ref = stencil reference value
mask = application-defined masking value
value = 我们要测试的像素放入stencil value
如果测试通过我们把此像素写入back buffer中, 如果失败则不写入back buffer.
当然,如果我们不把一个像素写入back buffer中, 此像素也不会被写入depth buffer中了。
ref 的默认值为0,我们可以按如下方式改变这个值:
     1

     Device

     ->

     SetRenderState(D3DRS_STENCILREF,

     0x1

     );
mask 的默认值为0xffffffff, 我们可以按如下方式这个值:
     1

     Device

     ->

     SetRenderState(D3DRS_STENCILMASK,

     0x0000fffff

     );
ComparisonOperation 的默认方式为D3DCMP_EQUAL, 我们可以按如下方式改变这个值:
     1

     Device

     ->

     SetRenderState(D3DRS_STENCILFUNC, D3DCMP_ALWAYS);
在渲染时,在对某一像素点的处理上, 我们会遇到如下三种方式:
(1) 这个像素点 stencil test 失败。我们可以选择当此像素点失败时候对stencil buffer的处理方式, 如:
Device->SetRenderState(D3DRS_STENCILFAIL, StencilOperation);
(2) 此像素点的depth test失败, 我们同样可以选择一种处理方式,如:
Device->SetRenderState(D3DRS_STENCILZFAIL, StencilOperation);
(3) 此像素点depth test 和stencil test 都成功:
Device->SetRenderState(D3DRS_STENCILPASS, StencilOperation);
StencilOperation的值可以为下面的任意一种情况:
D3DSTENCILOP_KEEP: 不改变 stencil buffer的值。
D3DSTENCILOP_ZERO: 把stencil buffer的值设为0。
D3DSTENCILOP_REPLACE: 用 stencil reference value的值代替stencil buffer的值。
……
如:
     1

     Device

     ->

     SetRenderState(D3DRS_STENCILREF,

     0x1

     );


     2

     Device

     ->

     SetRenderState(D3DRS_STENCILZFAIL, D3DSTENCILOP_KEEP);


     3

     Device

     ->

     SetRenderState(D3DRS_STENCILFAIL, D3DSTENCILOP_KEEP);


     4

     Device

     ->

     SetRenderState(D3DRS_STENCILPASS, D3DSTENCILOP_REPLACE);
4. 一个简单的例子
假设我们现在有了想要实现一个茶杯在镜子里面反射的效果。 我们可以这样实现。
(1). 用镜子的区域填充 stencil buffer
      1

     Device

     ->

     SetRenderState(D3DRS_STENCILENABLE,

     true

     );


      2


      3


     //

     通过如下的设置, 就可以把镜子区域的stencil buffer设为0X1,而其他区域为0


      4


     Device

     ->

     SetRenderState(D3DRS_STENCILFUNC, D3DCMP_ALWAYS);


      5

     Device

     ->

     SetRenderState(D3DRS_STENCILREF,

     0x1

     );


      6

     Device

     ->

     SetRenderState(D3DRS_STENCILMASK,

     0xffffffff

     );


      7

     Device

     ->

     SetRenderState(D3DRS_STENCILWRITEMASK,

     0xffffffff

     );


      8

     Device

     ->

     SetRenderState(D3DRS_STENCILZFAIL, D3DSTENCILOP_KEEP);


      9

     Device

     ->

     SetRenderState(D3DRS_STENCILFAIL, D3DSTENCILOP_KEEP);


     10


     11


     //

     注意我起着非常关键的主用,我的前6句都是为我服务的。


     12


     Device

     ->

     SetRenderState(D3DRS_STENCILPASS, D3DSTENCILOP_REPLACE);


     13
(2). 画镜子, 此时也把stencil buffer的区域填充了
     1

     //

      draw the mirror to the stencil buffer


     2


     Device

     ->

     SetStreamSource(

     0

     , vettexBuf,

     0

     ,

     sizeof

     (Vertex));


     3

     Device

     ->

     SetFVF(FVF_VERTEX);


     4

     Device

     ->

     SetMaterial(

     &

     MirrorMtrl);


     5

     Device

     ->

     SetTexture(

     0

     , MirrorTex);


     6

     D3DXMATRIX I;


     7

     D3DXMatrixIdentity(

     &

     I);


     8

     Device

     ->

     SetTransform(D3DTS_WORLD,

     &

     I);


     9

     Device

     ->

     DrawPrimitive(D3DPT_TRIANGLELIST,

     18

     ,

     2

     );
(3). 只有在镜子区域内部的像素点 才能画出来
     1

     Device

     ->

     SetRenderState(D3DRS_STENCILFUNC, D3DCMP_EQUAL);


     2

     Device

     ->

     SetRenderState(D3DRS_STENCILPASS, D3DSTENCILOP_KEEP);
(4). 开始画镜子里面的茶杯,此时会拿茶杯的ref与 stencil buffer value 比较,
即执行了stencil test。
 代码
代码
       1


      //

       position reflection


       2


       D3DXMATRIX W, T, R;


       3

       D3DXPLANE plane(

      0.0f

      ,

      0.0f

      ,

      1.0f

      ,

      0.0f

      );

      //

       xy plane


       4


       D3DXMatrixReflect(

      &

      R,

      &

      plane);


       5

       D3DXMatrixTranslation(

      &

      T,


       6

       TeapotPosition.x,


       7

       TeapotPosition.y,


       8

       TeapotPosition.z);


       9

       W

      =

       T

      *

       R;


      10


      //

       clear depth buffer and blend the reflected teapot with the mirror


      11


       Device

      ->

      Clear(

      0

      ,

      0

      , D3DCLEAR_ZBUFFER,

      0

      ,

      1.0f

      ,

      0

      );


      12

       Device

      ->

      SetRenderState(D3DRS_SRCBLEND, D3DBLEND_DESTCOLOR);


      13

       Device

      ->

      SetRenderState(D3DRS_DESTBLEND, D3DBLEND_ZERO);


      14


      //

       Finally, draw the reflected teapot


      15


       Device

      ->

      SetTransform(D3DTS_WORLD,

      &

      W);


      16

       Device

      ->

      SetMaterial(

      &

      TeapotMtrl);


      17

       Device

      ->

      SetTexture(

      0

      ,

      0

      );


      18

       Device

      ->

      SetRenderState(D3DRS_CULLMODE, D3DCULL_CW);


      19

       Teapot

      ->

      DrawSubset(

      0

      );
(5). 当一切完成以后,回复Reder state 的状态
     1

     Device

     ->

     SetRenderState(D3DRS_ALPHABLENDENABLE,

     false

     );


     2

     Device

     ->

     SetRenderState( D3DRS_STENCILENABLE,

     false

     );


     3

     Device

     ->

     SetRenderState(D3DRS_CULLMODE, D3DCULL_CCW);
这样一张简单的如图二所示的图片就会出来了。


