gitlib-ci的简单使用
文章目录
-
- 前言
- 安装gitlib-runner
-
- 包管理器安装 -- 失败 -- 可跳过
- 安装二进制文件 -- 可正常使用
- 注册runners
- 编写.gitlab-ci.yml文件
- 其他
前言
最近在公司安装了gitlib-runner,过程中踩了点坑,记录下。
首先需要对gitlib的CI/CD有个基本认识,可以参考:Gitlab Runner的安装与配置 - csdn、GitLab - wiki、极狐GitLab vs GitLab vs GitHub vs Gitee - GitLab
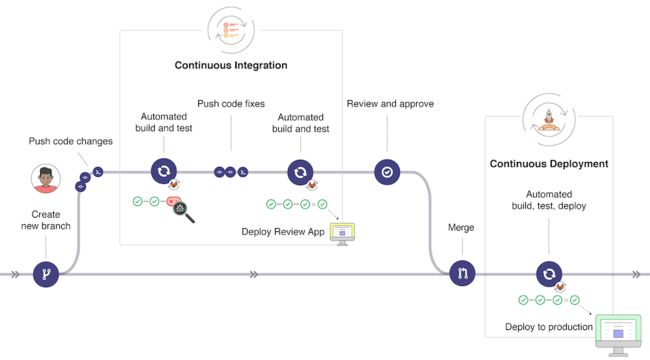
Continuous Integration(持续集成, CI):提交给应用程序的每个更改,甚至是提交给开发分支的更改,都是自动且持续地构建和测试的。这些测试可确保更改通过您为应用程序建立的所有测试、指南和代码合规性标准。下图来自:CI/CD concepts
安装gitlib-runner
混过脸熟之后,我们参考官方文档,来进行Install GitLab Runner manually on GNU/Linux - GitLab
包管理器安装 – 失败 – 可跳过
我第一遍使用的是包管理器进行的安装。
sudo apt install gitlib-runner
这样安装之后,默认会创建一个gitlib-runner的nologin用户,对应的家目录创建在默认位置。
安装过程没有问题,但运行的时候会遇到一个和docker相关的error。我当时没有记录这个问题。
我们卸载这个包。
sudo apt remove gitlib-runner
卸载之后,不知道为啥服务还在。可能是没有运行gitlib-runner stop和glilib-runner uninstall。命令使用可参考gitlib-runner --hlep。 临时的解决方法,可参考Failed to install gitlab-runner: Init already exists - stackoverflow
安装二进制文件 – 可正常使用
# 按照系统来选择二进制文件。我的是Linux x86-64
sudo curl -L --output /usr/local/bin/gitlab-runner "https://gitlab-runner-downloads.s3.amazonaws.com/latest/binaries/gitlab-runner-linux-amd64"

# Give it permissions to execute:
sudo chmod +x /usr/local/bin/gitlab-runner

# Create a GitLab CI user:
sudo useradd --comment 'GitLab Runner' --create-home gitlab-runner --shell /bin/bash

# Install and run as service:
sudo gitlab-runner install --user=gitlab-runner --working-directory=/home/gitlab-runner
sudo gitlab-runner start
注册runners
安装完并启动服务之后,参考Registering runners - gitlab,我们来注册一个runner。
# 先查看服务gitlib-runner的服务有没有起来
➜  systemctl status gitlab-runner.service

# 查看已经注册了哪些runner
➜  sudo gitlab-runner list

# 注册一个runner
sudo gitlab-runner register
# 然后输入url,token,description, tag, executor
其中executor,我选择的是shell,即是Runner 直接在自己的Local 环境执行CI Job。可参考GitLab CI 之Runner 的Executor 该如何选择?
# 再根据信息注销,按注册令牌
gitlab-runner unregister --url http://gitlab.example.com/ --token t0k3n

# gitlab-runner删除无效runner
gitlab-runner verify --delete --name xxx
编写.gitlab-ci.yml文件
要使用 GitLab CI/CD,我们需要编写yml文件,参考:.gitlab-ci.yml文件 - gitlab、创建 .gitlab-ci.yml 文件 - gitlab.cn。
参照官方的示例,照葫芦画瓢就好。
需要注意的是,Runner执行CI/CD job的时候,并不是一个交互过程。当拉取某些仓库,需要验证秘钥的时候,会遇到问题。我们需要提前设置。
-
参考在 GitLab CI/CD 中使用 SSH 密钥 - gitlab.cn,当executor类型是shell的时候,我们可以预先在gitlib-runner用户的家目录的.ssh中放入没有添加密码的秘钥。如果秘钥有密码,我们没法在不交互的情况下,输入密码,会报错[“Enter passphrase for /dev/fd/63” error](“Enter passphrase for /dev/fd/63” error)。
-
或者使用Add a CI/CD variable to a project的方式,将秘钥保存到变量中。接着在before_script中,将秘钥添加到指定位置。我们公司前辈的写法可以参考下:
before_script:
  - mkdir -p ~/.ssh
  - eval $(ssh-agent -s)
  - echo -e "Host *\n\tStrictHostKeyChecking no\n\n" > ~/.ssh/config
  - chmod 600 ~/.ssh/config
  - ssh-add <(echo "$MY_PRIVATE_KEY")
这里稍微解释下这几行命令,虽然理解的不是特别清楚,但是大体明白。
eval $(ssh-agent -s),用于启动ssh-agent。ssh agent详解里面说道:如果您的私钥使用密码短语来加密了的话,每一次使用 SSH 密钥对进行登录的 时候,您都必须输入正确的密码短语。而 SSH agent 程序能够将您的已解密的私钥缓存起来,在需要的时候提供给您的 SSH 客户端。这样子,您就只需要在 使用 ssh-add 时将私钥加入 SSH agent 缓存的时候,输入一次密码短语就可以了。这为经常使用 SSH 连接用户提供了不少便利。
参考添加SSH到SSH-Agent时报错可知,有必要“多此一举”的启动下ssh-agent。
StrictHostKeyChecking=no可以避免第一次ssh连接时候的交互提示,可以参考SSH 协议的 ssh StrictHostKeyChecking
其他
-
报错
ERROR: Job failed (system failure): prepare environment: exit status 1. Check https://docs.gitlab.com/runner/shells/index.html#shell-profile-loading for more information,可参考错误解决方法,删除/home/gitlab-runner/.bash_logout。虽然不知道为什么,但有效。 -
gitlab是如何探测到gitlba-runner的? – URL是如何起作用的?
-
自己机器上的
gitlab-runner暂时不用的话,可以停止它的服务,避免占用CPU和内存。sudo systemctl status gitlab-runner.service sudo systemctl stop gitlab-runner.service sudo systemctl disable gitlab-runner.service -
ssh-agent命令
-a bind_address:bind the agent to the UNIX-domain socket bind_address. -c:生成C-shell风格的命令输出。 -d:调试模式。 -k:把ssh-agent进程杀掉。 -s:生成Bourne shell 风格的命令输出。 -t life:设置默认值添加到代理人的身份最大寿命。 -
ssh-add命令
#把专有密钥添加到 ssh-agent 中
ssh-add ~./ssh/id_dsa
#从 ssh-agent 中删除密钥
sh-add -d ./ssh/id_xxx.pub
#查看 ssh-agent 中的密钥
ssh-add -l
