想阅读更多优质文章请猛戳GitHub博客,一年百来篇优质文章等着你!
z-index 属性,尽管已经写了这么多,仍然被广泛地误解和错误地处理。在复杂的单页web应用程序中堆积问题可能会成为一个主要问题。然而,坚持一些原则,我们可以很容易地避免这些问题。
如果你有过任何复杂的Web UI开发,那么你可能有些时候会疯狂地尝试将元素的 z-index 设置为上千或者很大的一个数,却发现它不能帮助你把它放在其他元素之上,这些元素的z-index更低,甚至根本没有定义。
为什么会这样?更重要的是,如何避免这些问题?
在本文中,我将讲述z-index实际上是什么,以及如何停止猜测它是否适用于任何特定的情况,并开始像对待任何其他方便的工具一样对待它。
层叠上下文的层次结构
如果你把网页想象成三维的,那么z-index是定义了一个元素的z坐标(也称为它的层叠顺序)属性:值越大,元素离观察者越近。你也可以将它看作是影响绘制顺序的属性,因为屏幕是由像素组成的二维网格。因此,z-index 值越大,元素在页面上绘制的时间就越晚。
然而,一个主要的复杂因素是 z-index 值空间不平 - 它是分层的。 元素可以创建层叠上下文,该上下文成为其后代的z-index值的根。 接着通过一个例子来解释层叠上下文的概念。
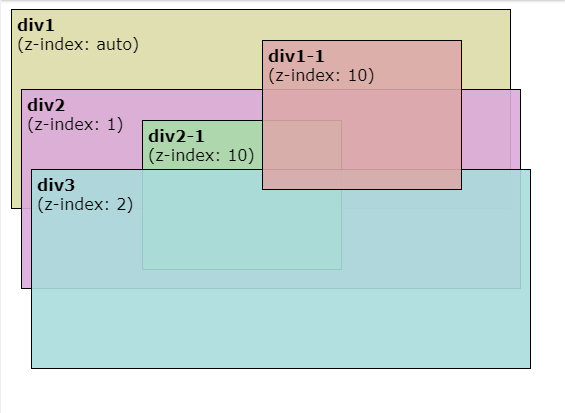
文档正文有五个div节点:div1,div2,div3,div1-1和div2-1。 它们都是绝对定位的并且彼此重叠。 div1-1是div1的子节点,div2-1是div2的子节点。
html
    div1


    (z-index: auto)

      div1-1


      (z-index: 10)


    div2


    (z-index: 1)

      div2-1


      (z-index: 10)


    div3


    (z-index: 2)
css
div {
  box-sizing: border-box;
  border: 1px solid black;
  padding: 5px;
  position: absolute;
  font-family: Verdana;
}

.div1, .div2, .div3 {
  width: 500px;
  height: 200px;
}

.div1-1, .div2-1 {
  width: 200px;
  height: 150px;
}

.div1 {
  left: 10px;
  top: 10px;
  background-color: rgba(220, 220, 170, 0.9);
}

.div1-1 {
  left: 250px;
  top: 30px;
  background-color: rgba(220, 170, 170, 0.9);

  z-index: 10;
}

.div2 {
  left: 20px;
  top: 90px;
  background-color: rgba(220, 170, 220, 0.9);

  z-index: 1;
}

.div2-1 {
  left: 120px;
  top: 30px;
  background-color: rgba(170, 220, 170, 0.9);

  z-index: 10;
}

.div3 {
  left: 30px;
  top: 170px;
  background-color: rgba(170, 220, 220, 0.9);

  z-index: 2;
}
接着我们解释我们所看到的现象。这里有详细绘制顺序,但这里我们只需要比较两件事。
- z-index 值
如果元素具有更高的z-index,则绘制会比值小的晚。
- 样式资源顺序
如果
z-index值相同,那么在样式文件中出现越靠后,绘制越晩。
因此,根据我们的 CSS 文件,如果我们不考虑层叠上下文,顺序应该如下:
- div1
- div2
- div3
- div1-1
- div2-1
注意,div2-1 实际上位于 div3 后面的,为什么会这样?
注意:z-index 值为 auto 不会创建一个 层叠上下文
如果一个元素要创建一个层叠上下文,它会为其子元素的 z-index值创建一个地基或者局部框,因此在确定绘制顺序时,它们永远不会与层叠上下文之外的任何内容进行比较。 换句话说,当一个创建层叠上下文的元素被绘制时,这个元素下的的所有子元素都在它之后和它的任何兄弟之前绘制。
回到示例,body 后代div的实际绘制顺序是
- div1
- div2
- div3
- div1-1
注意列表中没有 div2-1,它是div2的一个子元素,它创建了一个层叠上下文(因为它是一个绝对定位的元素,除了auto的默认值之外,它还有z-index),所以它是在div2之后绘制的,但在div3之前。
div1 没有创建层叠上下文,因为它的z-index 值为 auto,所以在div2和div3之后绘制div1-1(div1的子元素,因为div1-1的 z-index 值为 10 大于 div2 和 div3。
如果你没有看懂,请不要担心。以下是一些资源可以更好地解释这些概念:
- “The Stacking Context” MDN 文档
- “What No One Told You About Z-Index” Philip Walton
然而,本文的重点是,当页面由数十个和数百个组件组成时,如何处理z-index,每个组件都可能定义了z-index的子组件。
关于z-index 最流行的一篇文章建议将所有z-index值分组在一个地方,但是如果这些值不属于相同的层叠上下文(在大型应用程序中可能不容易实现),那么比较这些值就没有意义了。
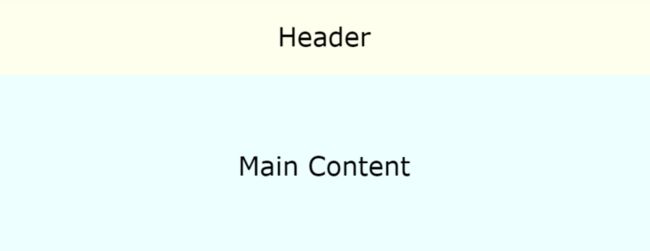
这里一个例子。 假设我们有一个包含 header和 main 部分的页面。 由于某种原因,main 里面内容样式必须设置:position: relative 和 z-index: 1。
// html

  Header


  Main Content
// css
body {
  margin: 0;
  font-family: Verdana;
  text-align: center;
  background-color: white;
}

div {
  display: flex;
  align-items: center;
  justify-content: center;
}

.header {
  background-color: rgba(255, 255, 220, 0.5);
  font-size: 10vmin;
  position: relative;
  height: 30vh;
}

.main {
  background-color: rgba(220, 255, 255, 0.5);
  font-size: 10vmin;
  height: 70vh;
  position: relative;
  z-index: 1;
}
运行效果:
在这里使用的是组件体系结构,所以根组件和每个子组件的 CSS 都是在专用部分中定义的。实际上,组件将驻留在单独的文件中,并且标记将使用你选择的 JavaScript 库(如React)生成,但出于演示目的,将所有内容放在一起也没有问题。
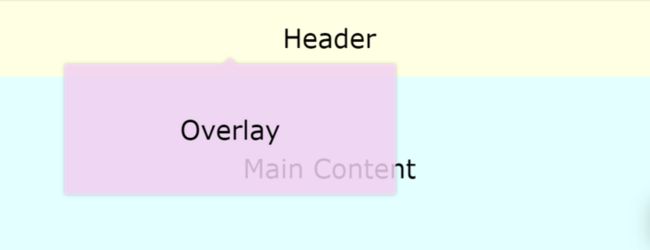
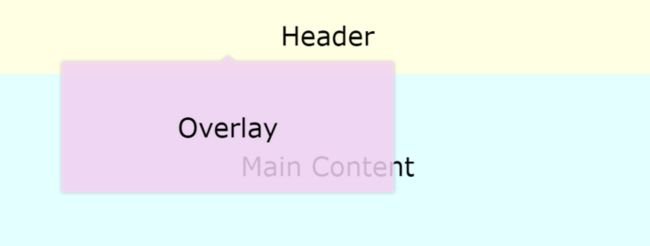
现在,假设我们的任务是在header中创建一个下拉菜单。当然,它必须位于main上面,所以我们给它一个z-index:10
// html
Header
Main Content
// css
body {
  margin: 0;
  font-family: Verdana;
  text-align: center;
  background-color: white;
}

div {
  display: flex;
  align-items: center;
  justify-content: center;
}

.header {
  background-color: rgba(255, 255, 220, 0.8);
  font-size: 10vmin;
  position: relative;
  height: 30vh;
}

.overlay {
  position: absolute;
  z-index: 10;
  background-color: rgba(255, 220, 255, 0.8);
  left: 10vw;
  top: 25vh;
  width: 50vw;
  height: 50vh;
  filter: drop-shadow(0 0 3px rgba(0, 0, 0, 0.3));
}

.overlay::after {
  content: "";
  position: absolute;
  left: 50%;
  transform: translateX(-50%);
  bottom: 100%;
  width: 0;
  height: 0;
  border-top: 10px solid transparent;
  border-right: 10px solid transparent;
  border-left: 10px solid transparent;
  border-bottom: 10px solid rgba(255, 220, 255, 0.8);
}

.main {
  background-color: rgba(220, 255, 255, 0.8);
  font-size: 10vmin;
  height: 70vh;
  position: relative;
  z-index: 1;
}
运行效果:
现在,几个月后,为了让一些不相关的东西更好地工作,我们需要在 header 样式多加一个 transform: translateZ(0)。
// 部分代码
.header {
  background-color: rgba(255, 255, 220, 0.8);
  font-size: 10vmin;
  position: relative;
  height: 30vh;
  transform: translateZ(0);
}
如你所见,布局现已被打破。 在没有z-index规则的情况下,z-index:1的元素位于具有z-index:10的元素的顶部。 原因是header使用transform属性 它创建了一个层叠上下文,默认会有自己的z-index,值为0 低于 main 中 z-index (1)。
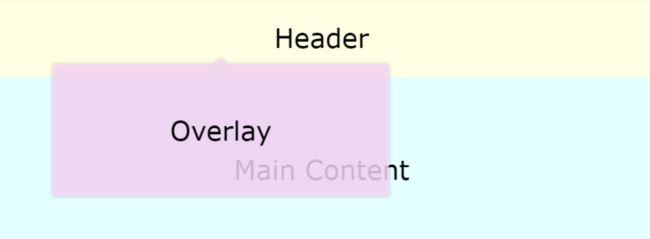
解决方案很简单:给header一个z-index值为2。
// 部分代码
.header {
  background-color: rgba(255, 255, 220, 0.8);
  font-size: 10vmin;
  position: relative;
  height: 30vh;
  transform: translateZ(0);
  z-index: 2;
}
运行效果:
问题是,如果我们在组件内的组件中有组件,每个组件具有不同的z-index元素,我们应该怎么做到这个解决方案? 我们如何确保更改 header 的z-index不会破坏其他任何内容?
答案是需要一种协定,消除了猜测的需要,它是这样的:更改组件内的z-index应该只影响该组件,而不影响其他任何东西。换句话说,在处理某个CSS文件中的z-index值时,理想情况下我们应该只关心该文件中的其他值。
实现它很容易。 我们应该简单地确保每个组件的根创建层叠上下文。 最简单的方法是为它提供鹊确切的 position 和 z-index 的值,而不是使用默认它们自己的默认值。
下面是构建应用程序的一种方法。它使用的元素比前一个多,但是相对额外的DOM元素相关联的计算来说是很划算的,节省开发人员在处理层叠上下文问题时间。
// html
Header
Main Content
// css
body {
  margin: 0;
  font-family: Verdana;
  text-align: center;
  background-color: white;
}


/* Root styles */

.root__container {
  position: relative;
  z-index: 0;
}

.root__header {
  position: relative;
  z-index: 2;
}

.root__main {
  position: relative;
  z-index: 1;
}


/* Header styles */

.header__container {
  background-color: rgba(255, 255, 220, 0.8);
  font-size: 10vmin;
  position: relative;
  height: 30vh;
  transform: translateZ(0);

  display: flex;
  align-items: center;
  justify-content: center;

  z-index: 0;
}

.header__overlay {
  position: absolute;
  z-index: 1;
  background-color: rgba(255, 220, 255, 0.8);
  left: 10vw;
  top: 25vh;
  width: 50vw;
  height: 50vh;
  filter: drop-shadow(0 0 3px rgba(0, 0, 0, 0.3));

  display: flex;
  align-items: center;
  justify-content: center;
}

.header__overlay::after {
  content: "";
  position: absolute;
  left: 50%;
  transform: translateX(-50%);
  bottom: 100%;
  width: 0;
  height: 0;
  border-top: 10px solid transparent;
  border-right: 10px solid transparent;
  border-left: 10px solid transparent;
  border-bottom: 10px solid rgba(255, 220, 255, 0.8);
}

/* Main section styles */

.main__container {
  background-color: rgba(220, 255, 255, 0.8);
  font-size: 10vmin;
  height: 70vh;

  display: flex;
  align-items: center;
  justify-content: center;

  position: relative;
  z-index: 0;
}
运行效果:
-
header__container和main__container都有position: relative和z-index: 0 -
header overlay现有z-index: 1(我们不需要很大的值,因为它只会与header中的其他元素进行比较) -
root__header现有z-index: 2,而root__main保持其z-index: 1,这就是两兄弟正确层叠的原因
(还要注意,两者都有position: relative,因为 z-index 不适用于 position:static的元素。)
如果我们现在查看 header 代码,我们会注意到我们可以完全从container和 overlay 层中删除z-index属性,因为overlay 层是那里唯一定位的元素。 同样,main container 上不需要z-index。 这样分类最大好处:在查看z-index时,只注重组件本身,而不是它的上下文。
// 删除上述所说的 z-index
body {
  margin: 0;
  font-family: Verdana;
  text-align: center;
  background-color: white;
}


/* Root styles */

.root__container {
  position: relative;
  z-index: 0;
}

.root__header {
  position: relative;
  z-index: 2;
}

.root__main {
  position: relative;
  z-index: 1;
}


/* Header styles */

.header__container {
  background-color: rgba(255, 255, 220, 0.8);
  font-size: 10vmin;
  position: relative;
  height: 30vh;
  transform: translateZ(0);

  display: flex;
  align-items: center;
  justify-content: center;
}

.header__overlay {
  position: absolute;
  background-color: rgba(255, 220, 255, 0.8);
  left: 10vw;
  top: 25vh;
  width: 50vw;
  height: 50vh;
  filter: drop-shadow(0 0 3px rgba(0, 0, 0, 0.3));

  display: flex;
  align-items: center;
  justify-content: center;
}

.header__overlay::after {
  content: "";
  position: absolute;
  left: 50%;
  transform: translateX(-50%);
  bottom: 100%;
  width: 0;
  height: 0;
  border-top: 10px solid transparent;
  border-right: 10px solid transparent;
  border-left: 10px solid transparent;
  border-bottom: 10px solid rgba(255, 220, 255, 0.8);
}


/* Main section styles */

.main__container {
  background-color: rgba(220, 255, 255, 0.8);
  font-size: 10vmin;
  height: 70vh;

  display: flex;
  align-items: center;
  justify-content: center;
}
运行效果:
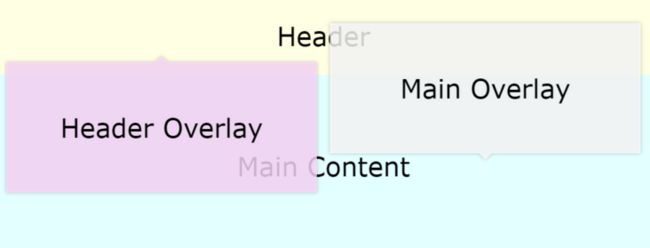
这种架构并非没有缺点。 它以牺牲一些灵活性为代价使应用程序更具可预测性。 例如,你将无法在header和main section内创建此类叠加层:
// html
Header
Main Content
// css
body {
  margin: 0;
  font-family: Verdana;
  text-align: center;
  background-color: white;
}

div {
  display: flex;
  align-items: center;
  justify-content: center;
}

.header {
  background-color: rgba(255, 255, 220, 0.8);
  font-size: 10vmin;
  position: relative;
  height: 30vh;
}

.header-overlay {
  position: absolute;
  z-index: 10;
  background-color: rgba(255, 220, 255, 0.8);
  left: 2vw;
  top: 25vh;
  width: 47vw;
  height: 50vh;
  filter: drop-shadow(0 0 3px rgba(0, 0, 0, 0.3));
}

.header-overlay::after {
  content: "";
  position: absolute;
  left: 50%;
  transform: translateX(-50%);
  bottom: 100%;
  width: 0;
  height: 0;
  border-top: 10px solid transparent;
  border-right: 10px solid transparent;
  border-left: 10px solid transparent;
  border-bottom: 10px solid rgba(255, 220, 255, 0.8);
}

.main {
  background-color: rgba(220, 255, 255, 0.8);
  font-size: 10vmin;
  height: 70vh;
  position: relative;
}

.main-overlay {
  position: absolute;
  z-index: 10;
  background-color: rgba(255, 255, 255, 0.8);
  left: 51vw;
  bottom: 40vh;
  width: 47vw;
  height: 50vh;
  filter: drop-shadow(0 0 3px rgba(0, 0, 0, 0.3));
}

.main-overlay::after {
  content: "";
  position: absolute;
  left: 50%;
  transform: translateX(-50%);
  top: 100%;
  width: 0;
  height: 0;
  border-top: 10px solid rgba(255, 255, 255, 0.8);
  border-right: 10px solid transparent;
  border-left: 10px solid transparent;
  border-bottom: 10px solid transparent;
}
然而,根据我的经验,这很少是一个问题。 你可以使用 main section 中的 overlay 层向下而不是向上,以使其不与header相交。 或者,如果你真的需要它,你可以在正文的末尾注入叠加HTML 并给它一个大的 z-index 值(“大”是比顶层其他部分更大)。
再次说明
- 通过使每个组件的根成为层叠上下文,根据元素的
z-index值隔离组件; - 如果组件中的元素不需要除
auto之外的z-index值,则不必执行此操作; - 在组件的 CSS 文件中,可以以你喜欢的方式维护z索引值。它可能是连续的值,或者你可以给它们一个
10的步长,或者你可以使用变量——这都取决于你的项目约定和组件的大小。最好只将z-index分配给同级元素。否则,你可能会无意中在一个组件中引入更多的层叠上下文。 - 调试变得容易。找到两个没有正确层叠的元素的第一个祖先组件,并根据需要更改该组件中的
z-index。
你的点赞是我持续分享好东西的动力,欢迎点赞!
欢迎加入前端大家庭,里面会经常分享一些技术资源。
![]()
