Raspberry-Pi-PICO系列--第九篇 高级篇 Ubuntu下使用Visual Code开发调试
一、目的
在前面章节中我们已经介绍了Ubuntu下如何搭建开发环境,并且也介绍了通过命令行进行调试的整个过程,相关内容从下面的链接都可以找到。
Raspberry-Pi-PICO系列--第三篇 开发环境搭建-Ubuntu系统_coder.mark的博客-CSDN博客一、目的 上一篇《Raspberry-Pi-PICO系列--第二篇 开发环境搭建-Mac系统》中我们介绍了如何在Mac上搭建raspberry pi picoC/C++ SDK开发环境,本篇我们介绍Uuntu系统上的环境搭建二、准备三、实战...https://blog.csdn.net/tianizimark/article/details/122713031
Raspberry-Pi-PICO系列--第八篇 高级篇使用SWD接口下载和调试(第一章)_coder.mark的博客-CSDN博客_swd下载接口一、目的Raspberry_Pi_PICO板载有SWD接口,上图中的中间的最下面位置(SWCLK/GND/SWDIO)。SWD接口是Cortex-M系列控制器的标准接口,可以用来复位芯片、下载代码、设置代码运行以及调试功能,通过SWD接口烧写代码时不再需要按住BOOTSEL按键。有些朋友可能没有硬件调试器,那么可以购买两个PICO,其中一个通过下面的步骤就可以变成一个SWD接口的硬件调试器和一个USB转串口工具(高级)。...https://blog.csdn.net/tianizimark/article/details/123015115
Raspberry-Pi-PICO系列--第八篇 高级篇使用SWD接口下载和调试(第二章)_coder.mark的博客-CSDN博客_swd下载接口一、目的 在上一篇《Raspberry-Pi-PICO系列--第八篇 高级篇使用SWD接口下载和调试(第一章)》 我们已经介绍了如何准备openocd、如何编译picoprobe、如何进行接线,本篇将继续介绍openocd命令如何使用,如何进行下载调试。二、准备 首先准备好两块raspberry_pi_pico开发板,其中一块已经烧写好picoprobe.uf2固件,我们称之为pico A;另外一块我们称之为pico B。...https://blog.csdn.net/tianizimark/article/details/123020396
但是命令行方式的调试方法对于新手还是有些不太友好,那有没有基于IDE的开发调试方式呢?答案肯定是有,如果你是Windows用户,那么你可以参考
Raspberry-Pi-PICO系列--第四篇 开发环境搭建-Windows系统 + Visual Studio Code开发_coder.mark的博客-CSDN博客_pico图形化编程一、目的 在上一篇《Raspberry-Pi-PICO系列--第四篇 开发环境搭建-Windows系统》我们介绍了windows上开发环境的搭建过程,本篇我们将进一步讲解,在windows如何配合Visual Studio Code进行图形化界面开发。Let's Go!二、准备 下载Visual Studio Code并安装Visual Studio Code - Code Editing. Redefinedhttps://code.visu...https://blog.csdn.net/tianizimark/article/details/123060724
本篇则介绍Ubuntu系统下如何使用Visual Studio Code进行开发调试,请务必把前面的开发环境搭建过程吃透,本篇中不会再重复介绍。
二、准备
1、安装Visual Studio Code
sudo snap install --classic code2、确认PICO SDK相关的环境变量(这个在之前的博文中已经讲过,请自行查阅)
fire@fire-pd:~/workspace/work$ env | grep PICO
PICO_SDK_PATH=/home/fire/workspace/third/raspberry_pi_pico/pico-sdk
PICO_TOOLCHAIN_PATH=/home/fire/workspace/third/raspberry_pi_pico/toolchain/gcc-arm-none-eabi-10.3-2021.10
3、确认openocd可用(注意我们使用的openocd是我们自己编译的版本,这个在之前的博文中已经讲过,请自行查阅)
fire@fire-pd:~/workspace/third/raspberry_pi_pico/openocd/src$ ./openocd
Open On-Chip Debugger 0.11.0-g4f2ae61-dirty (2022-02-20-17:41)
Licensed under GNU GPL v2
For bug reports, read
	http://openocd.org/doc/doxygen/bugs.html
4、确认gdb-multiarch命令还可用
fire@fire-pd:~$ gdb-multiarch
GNU gdb (Ubuntu 8.1.1-0ubuntu1) 8.1.1
Copyright (C) 2018 Free Software Foundation, Inc.
License GPLv3+: GNU GPL version 3 or later
This is free software: you are free to change and redistribute it.
There is NO WARRANTY, to the extent permitted by law. Type "show copying"
and "show warranty" for details.
This GDB was configured as "x86_64-linux-gnu".
Type "show configuration" for configuration details.
For bug reporting instructions, please see:
如果没有安装则用下面的命令安装即可
sudo apt install gdb-multiarch三、实战
1、在pico-examples目录下执行
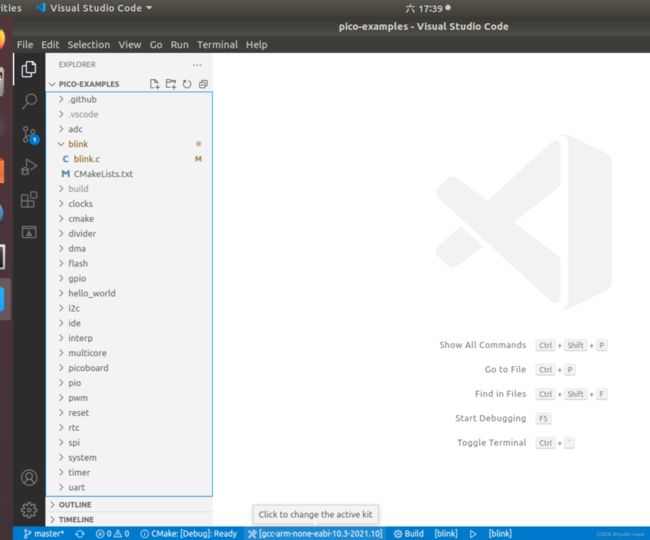
code .此时visual studio code自动打开,如下图
2、安装CMake Tools和Cortex-Debug插件
3、配置CMake Tools
点击左下角齿轮,然后选择Settings
4、选择Extentions-->CMake Tools
5、找到Cmake: Configure Environment,设置PICO_SDK_PATH变量值
6、找到Cmake: Generator,设置成Unix Makefiles,然后关闭Settings
7、在pico-examples目录下新建.vscode目录
mkdir .vscode8、将pico-examples/ide内的文件拷贝至.vscode目录并进行修改
$ cp ide/vscode/launch-raspberrypi-swd.json .vscode/launch.json
launch.json的内容具体如下
{
    "version": "0.2.0",
    "configurations": [
        {
            "name": "Pico Debug",
            "cwd": "${workspaceRoot}",
            "executable": "${command:cmake.launchTargetPath}",
            "request": "launch",
            "type": "cortex-debug",
            "servertype": "openocd",
            // This may need to be arm-none-eabi-gdb depending on your system
            "gdbPath" : "gdb-multiarch",
            "device": "RP2040",
            "searchDir":    ["/home/fire/workspace/third/raspberry_pi_pico/openocd/tcl"],
            "configFiles": [
                "interface/picoprobe.cfg",
                "target/rp2040.cfg"
            ],
            "svdFile": "${env:PICO_SDK_PATH}/src/rp2040/hardware_regs/rp2040.svd",
            "runToMain": true,
            // Work around for stopping at main on restart
            "postRestartCommands": [
                "break main",
                "continue"
            ]
        }
    ]
}
特别注意searchDir需要填写自己的目录
configFiles里面必须改成interface/picoprobe.cfg(因为我们用的picoprobe固件作为调试器固件)
searchDir要设置为下载在本地的openocd/tcl对应的路径,然后保存关闭
9、通过组合键shift+command+p,然后输入CMake: Edit User-Local CMake Kits,这一步是设置交叉编译工具链
在原有的基础上增加如下内容,然后保存
  {
    "name": "gcc-arm-none-eabi-10.3-2021.10",
    "compilers": {
      "C": "/home/fire/workspace/third/raspberry_pi_pico/toolchain/gcc-arm-none-eabi-10.3-2021.10/bin/arm-none-eabi-gcc",
      "CXX": "/home/fire/workspace/third/raspberry_pi_pico/toolchain/gcc-arm-none-eabi-10.3-2021.10/bin/arm-none-eabi-g++"
    }
  }
其中C字段设置gcc编译器,CXX字段设置g++编译器
gcc-arm-none-eabi-10.3-2021.10这个工具链下载地址之前的博文中有提供。
点击Visual Studio Code的正下方的图标,如下图
此时你可以看到我们自己配置的工具链就出现在此列表中,选中我们自己的工具链
10、设置Cortex-Debug配置项,找到Openocd Path并编辑
{
    "workbench.colorTheme": "Default Light+",
    "cmake.configureEnvironment": {
        "PICO_SDK_PATH": "/home/fire/workspace/third/raspberry_pi_pico/pico-sdk"
    },
    "cmake.generator": "Unix Makefiles",
    "cortex-debug.openocdPath": "/home/fire/workspace/third/raspberry_pi_pico/openocd/src/openocd"
}
添加cortex-debug.openocdPath为我们自己的openocd路径
至此,我们已经准备好软件环境,重启一下Visual Studio Code。
四、编译调试
针对工具栏的按钮进行操作
1、再次确认下此时选择工具链是我们自己的配置的工具链
2、点击CMake:[Debug]选择不同的编译类型,此处我们选择debug
3、点击blink选择需要编译的工程,我们这边已经选择blink了
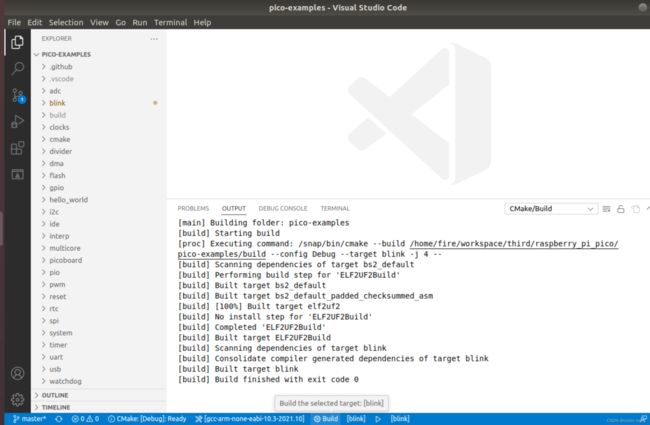
4、点击Build进行编译,如果没有任何问题如下图所示
5、调试
在调试之前先把设备接上并把烧写了picoprobe固件的pico A用USB跟电脑相连,此时注意需要设置picoprobe的usb权限
sudo chmod -R 777 /dev/bus/usb/点击visual studio code的调试按钮就能进入调试模式
以上就是整个开发环境和调试环境的搭建过程,有些地方没有详细讲解,可以参考Windows篇中关于Visual Studio Code的配置,基本过程都是一致的,只需要注意下各个参数的路径设置是否正确。
如果有遇到任何问题请仔细再阅读一遍!!!
好,本篇结束,记得关注+收藏+点赞三连


