在centos8环境下用asterisk18配置pjsip和webrtc音视频通话教程(二)
在上一篇文章,我们介绍了asterisk18在centos8.3环境的编译安装,下面我们继续介绍如何在asterisk18环境中调试成功我们的分机之间通话(包括webrtc)。
1) 通过命令 /opt/asterisk/sbin/asterisk -r 进入asterisk控制台,检查webrtc相关的几个重要模块是否被asterisk加载。如果严格按照本人第一篇教程安装,应该都会加载,如果没有加载,请自行查找原因。请在asterisk控制台用 "module show like 模块名" 进行检测,看到输出Status为"Running"即表示模块加载成功。需要检查的模块如下。
res_http_websocket.so
res_pjsip_transport_websocket.so
codec_opus.so
res_crypto.so
res_srtp.so
下面是我安装的asterisk的模块检测结果。
centos83*CLI> module show like res_http_websocket.so
Module Description Use Count Status Support Level
res_http_websocket.so HTTP WebSocket Support 1 Running core
1 modules loaded
centos83*CLI> module show like res_pjsip_transport_websocket.so
Module Description Use Count Status Support Level
res_pjsip_transport_websocket.so PJSIP WebSocket Transport Support 0 Running core
1 modules loaded
centos83*CLI>
centos83*CLI> module show like codec_opus.so
Module Description Use Count Status Support Level
codec_opus.so OPUS Coder/Decoder 0 Running extended
1 modules loaded
centos83*CLI>
centos83*CLI> module show like res_crypto.so
Module Description Use Count Status Support Level
res_crypto.so Cryptographic Digital Signatures 0 Running core
1 modules loaded
centos83*CLI>
centos83*CLI> module show like res_srtp.so
Module Description Use Count Status Support Level
res_srtp.so Secure RTP (SRTP) 0 Running core
1 modules loaded
centos83*CLI>
此处啰嗦一句:上一篇文章在给asterisk安装opus模块的时候,本人也是弄了好久才安装成功,此模块除了依赖 opus opus-devel opusfile opusfile-devel 四个软件包,还依赖 xmlstarlet 软件包。另外,我本次安装make完成后,用了 make basic-pbx ,只安装了基本的pbx模块配置文件,对于加载 opus模块,还需要安装 codecs.conf,可以用如下命令拷贝配置文件。
[root@centos83 asterisk-18.5.0]# cp configs/samples/codecs.conf.sample /opt/asterisk/etc/asterisk/codecs.conf
[root@centos83 asterisk-18.5.0]#
2)创建证书
由于webrtc通话时浏览器需要调用坐席的麦克风+摄像头硬件资源,html5标准基于安全因素的考虑,只有https协议的网站才有权限调用这些硬件资源。所以我们运行webrtc拨号程序的网站必须是https协议。做过web开发的同学都知道:运行js的网站如果是https,那么就只能和wss协议websocket服务器进行通讯。因此要测试webrtc通话功能,那么就要求aserisk提供的websocket的协议只能是加密的wss。
下面我们将使用asterisk源码目录提供的一个脚本,生成一个自签证书,以便asterisk启动内部mini-http服务器采用这个证书,这样asterisk就可以提供wss协议的websocket服务了。
下面开始制作证书:
2.1)新建证书存放路径
[root@centos83 ~]# mkdir /opt/asterisk/etc/asterisk/keys
[root@centos83 ~]#
2.2)采用asterisk安装源码自带的ast_tls_cert脚本创建证书。
参数说明:
-C:asterisk所在IP
-O: 组织名称,可随便填
-d: 指定证书存放路径,此处是:/opt/asterisk/etc/asterisk/keys/
[root@centos83 ~]# cd /root/asterisk-18.5.0/contrib/scripts/
[root@centos83 scripts]#
[root@centos83 scripts]# ./ast_tls_cert -C 192.168.22.83 -O "DotAsterisk" -b 2048 -d /opt/asterisk/etc/asterisk/keys/
No config file specified, creating '/opt/asterisk/etc/asterisk/keys//tmp.cfg'
You can use this config file to create additional certs without
re-entering the information for the fields in the certificate
Creating CA key /opt/asterisk/etc/asterisk/keys//ca.key
Generating RSA private key, 4096 bit long modulus (2 primes)
..............................................++++
....++++
e is 65537 (0x010001)
Enter pass phrase for /opt/asterisk/etc/asterisk/keys//ca.key:
140021913184064:error:28078065:UI routines:UI_set_result_ex:result too small:crypto/ui/ui_lib.c:905:You must type in 4 to 1023 characters
Enter pass phrase for /opt/asterisk/etc/asterisk/keys//ca.key:
Verifying - Enter pass phrase for /opt/asterisk/etc/asterisk/keys//ca.key:
Creating CA certificate /opt/asterisk/etc/asterisk/keys//ca.crt
Enter pass phrase for /opt/asterisk/etc/asterisk/keys//ca.key:
Creating certificate /opt/asterisk/etc/asterisk/keys//asterisk.key
Generating RSA private key, 2048 bit long modulus (2 primes)
................................................................+++++
.................+++++
e is 65537 (0x010001)
Creating signing request /opt/asterisk/etc/asterisk/keys//asterisk.csr
Creating certificate /opt/asterisk/etc/asterisk/keys//asterisk.crt
Signature ok
subject=CN = 192.168.22.83, O = DotAsterisk
Getting CA Private Key
Enter pass phrase for /opt/asterisk/etc/asterisk/keys//ca.key:
Combining key and crt into /opt/asterisk/etc/asterisk/keys//asterisk.pem
[root@centos83 scripts]#
[root@centos83 scripts]# ls /opt/asterisk/etc/asterisk/keys/
asterisk.crt asterisk.csr asterisk.key asterisk.pem ca.cfg ca.crt ca.key tmp.cfg
[root@centos83 scripts]#
说明:如果是生产环境,资金充沛,可以到相关平台购买可信任证书。
3)配置asterisk内置的 https服务器,提供webrtc需要的wss协议。
先备份一下配置文件:
[root@centos83 ~]# cd /opt/asterisk/etc
[root@centos83 etc]#
[root@centos83 etc]# cp -rp asterisk/ asterisk--bak
[root@centos83 etc]#
在 /opt/asterisk/etc/asterisk/目录新建http.conf文件,直接cat命令打印文件内容如下:
[root@centos83 etc]# cd asterisk
[root@centos83 asterisk]#
[root@centos83 asterisk]# cat http.conf
[general]
enabled=yes
enablestatic=yes
bindaddr=0.0.0.0
bindport=8088
prefix=
sessionlimit=1000
session_inactivity=30000
session_keep_alive=15000
tlsenable=yes
tlsbindaddr=0.0.0.0:8089
tlscertfile=/opt/asterisk/etc/asterisk/keys/asterisk.pem
tlsprivatekey=/opt/asterisk/etc/asterisk/keys/asterisk.key
[root@centos83 asterisk]#
然后进asterisk控制台,重新启动asterisk程序,然后再进控制台,查看asterisk mini-http是否可以支持https和wss,操作如下。
centos83*CLI> core restart now
centos83*CLI>
Disconnected from Asterisk server
Asterisk cleanly ending (0).
Executing last minute cleanups
[root@centos83 ~]#
[root@centos83 ~]# /opt/asterisk/sbin/asterisk -r
Asterisk 18.5.0, Copyright (C) 1999 - 2021, Sangoma Technologies Corporation and others.
Created by Mark Spencer
Asterisk comes with ABSOLUTELY NO WARRANTY; type 'core show warranty' for details.
This is free software, with components licensed under the GNU General Public
License version 2 and other licenses; you are welcome to redistribute it under
certain conditions. Type 'core show license' for details.
=========================================================================
Connected to Asterisk 18.5.0 currently running on centos83 (pid = 95032)
centos83*CLI>
centos83*CLI> http show status
HTTP Server Status:
Prefix:
Server: Asterisk/18.5.0
Server Enabled and Bound to 0.0.0.0:8088
HTTPS Server Enabled and Bound to 0.0.0.0:8089
Enabled URI's:
/httpstatus => Asterisk HTTP General Status
/static/... => Asterisk HTTP Static Delivery
/ws => Asterisk HTTP WebSocket
Enabled Redirects:
None.
centos83*CLI>
centos83*CLI>
Disconnected from Asterisk server
Asterisk cleanly ending (0).
Executing last minute cleanups
[root@centos83 ~]#
[root@centos83 ~]# lsof -i:8089
COMMAND PID USER FD TYPE DEVICE SIZE/OFF NODE NAME
asterisk 95032 root 7u IPv4 128527 0t0 TCP *:8089 (LISTEN)
[root@centos83 ~]#
[root@centos83 ~]#
看到输出状态"HTTPS Server Enabled and Bound to 0.0.0.0:8089",说明wss服务开启成功。
在验证webrtc功能之前,先得用浏览器访问一下 https://
4)配置pjsip的wss通道(transport) 和 pjsip分机(endpoint)
此处细节请参考aserisk相关文档,这里直接贴出 pjsip.conf 里面的配置内容。文件内容中包含一个wss和udp通道,以及8001和8002 两个分机,分机注册密码都是 123456。
[root@centos83 asterisk]#
[root@centos83 asterisk]# pwd
/opt/asterisk/etc/asterisk
[root@centos83 asterisk]#
[root@centos83 asterisk]# cat pjsip.conf
;//-----------全局配置
[global]
type=global
user_agent=asterisk
use_callerid_contact=no
debug=no
keep_alive_interval=90
default_outbound_endpoint=dpma_endpoint
endpoint_identifier_order=ip,username,anonymous,header,auth_username
taskprocessor_overload_trigger=pjsip_only
;//-----------transport配置
[transport-udp]
type=transport
protocol=udp
bind=0.0.0.0:5060
allow_reload=yes
tos=cs3
cos=3
[transport-wss]
type=transport
protocol=wss
bind=0.0.0.0
allow_reload=yes
[transport-ws]
type=transport
protocol=ws
bind=0.0.0.0
allow_reload=yes
;//-----------分机8001和8002配置
[8001]
type=aor
max_contacts=1
remove_existing=yes
qualify_frequency=30
[8002]
type=aor
max_contacts=1
remove_existing=yes
qualify_frequency=30
[auth-8001]
type=auth
auth_type=userpass
username=8001
password=123456
[auth-8002]
type=auth
auth_type=userpass
username=8002
password=123456
[8001]
type=endpoint
aors=8001
auth=auth-8001
context=from-internal
callerid=8001 <8001>
device_state_busy_at=1
dtmf_mode=rfc4733
webrtc=yes
language=cn
ice_support=yes
use_avpf=yes
media_use_received_transport=yes
call_group=1
pickup_group=1
disallow=all
allow=ulaw
allow=alaw
allow=opus
[8002]
type=endpoint
aors=8002
auth=auth-8002
context=from-internal
callerid=8002 <8002>
device_state_busy_at=1
dtmf_mode=rfc4733
webrtc=yes
language=cn
ice_support=yes
use_avpf=yes
media_use_received_transport=yes
call_group=1
pickup_group=1
disallow=all
allow=ulaw
allow=alaw
allow=opus
[root@centos83 asterisk]#
然后重载pjsip模块或者重启asterisk,此时可以在aserisk控制台看到刚才添加的8001和8002分机,如下。
centos83*CLI> pjsip list endpoints
Endpoint:
==========================================================================================
Endpoint: 8001/8001 Unavailable 0 of 1
Endpoint: 8002/8002 Unavailable 0 of 1
Objects found: 2
centos83*CLI>
5)编写拨号规则的 from-internal 的 context 段,实现分机8001和8002互相拨通。此处是asterisk拨号规则相关内容,请自行学习相关拨号规则语法,此处直接上内容。
[root@centos83 asterisk]# cat extensions.conf
[from-internal]
exten => 8001,1,NoOp(--call start--)
same =>n,Dial(PJSIP/${EXTEN})
same =>n,Hangup()
exten => 8002,1,noop(--call start--)
same =>n,Dial(PJSIP/${EXTEN})
same =>n,Hangup()
exten => h,1,Hangup()
[root@centos83 asterisk]#
修改完成后,请重启asterisk或者控制台执行 dialplan reload命令重载拨号规则配置,如下。
centos83*CLI> dialplan reload
Dialplan reloaded.
centos83*CLI>
6)测试软电话8001拨打webrtc分机8002。
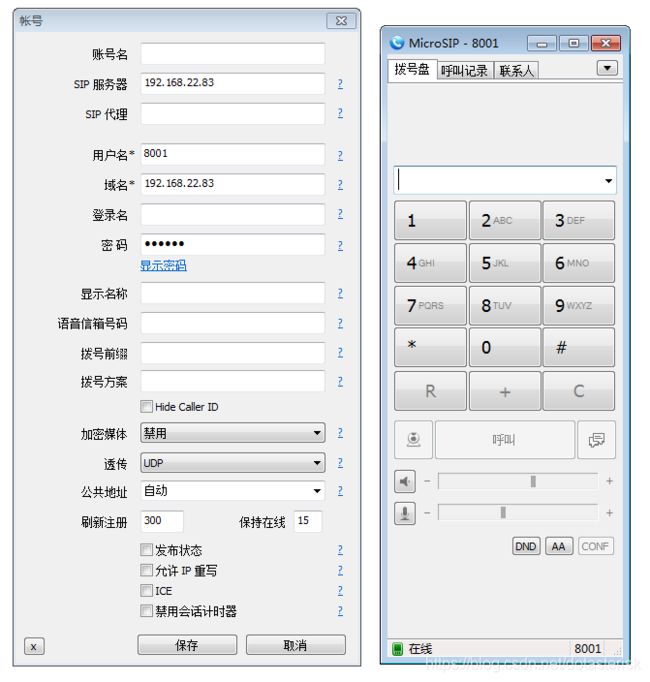
我们用软电话microsip注册8001分机,然后用jssip库的demo网站注册8002分机,demo网站地址为: https://tryit.jssip.net/
软电话microsip 的使用教程,请参考《点星PBX企业呼叫中心——(十五:软电话注册和使用)》
jssip 8002分机demo网站注册,参考如下。
注册成功后,左侧会有绿色标记,如下。
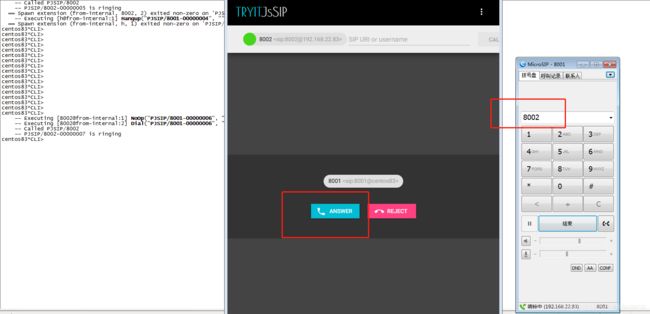
通过软电话8001拨打号码8002,我们可以成功看到浏览器上的8002分机有呼叫呼入,如下图。
至此,基本的webrtc环境搭建成功。
如果上述测试遇到问题,请联系我微信 acmepbx ,QQ 3448691033 , 一起交流学习进步。


