window零基础部署langchain-ChatGLM
一、介绍
从0开始安装运行langchain-ChatGLM-6b-int4模型,主要是版本要配套不然特别容易报错
我的机器配置CPU是Intel® Core™ i7-7700HQ CPU @ 2.80GHz 2.80 GHz,GPU8G。


二、相关版本说明
需要用到的模型以及版本已放到百度网盘中,附录中下载
| gcc version 8.1.0 (x86_64-posix-seh-rev0, Built by MinGW-W64 project) | https://sourceforge.net/projects/mingw-w64/files/ | 必须64位,安装32位不可运行 |
|---|---|---|
| vs_community__studio2019 | https://visualstudio.microsoft.com/zh-hans/vs/older-downloads/ | 安装2019版与cuda11.7版本适配。安装后需要选择C++组件 |
| cuda11.7 | https://developer.nvidia.com/cuda-toolkit-archive | 电脑需要有GPU,运行langchain建议安装11.7 问题会少很多 |
| CUDNN_8.5.0.96_cuda11 | https://developer.nvidia.com/rdp/cudnn-archive | 与cuda11.7搭配 |
| torch-2.0.1+cu117-cp310 | https://download.pytorch.org/whl/torch_stable.html | 与Python以及cuda搭配 |
| Anaconda | https://mirrors.tuna.tsinghua.edu.cn/anaconda/archive/ | 安装langchain方便 |
| python3.10 | conda安装 |
三、前置软件安装
安装这个window比较麻烦,需要依赖很多环境,建议先安装前置软件然后再安装langchain。
1.GCC安装
参考https://blog.csdn.net/BobYuan888/article/details/107576719
gcc64位下载
一定要装64位的gcc,因为我的电脑是w10 64位的,装32位运行langchain报错并配置环境变量
可直接用压缩包中的文件:x86_64-8.1.0-release-posix-seh-rt_v6-rev0.7z
软件下载地址:https://sourceforge.net/projects/mingw-w64/files/

安装后解压,然后将bin目录配置到path目录ixa

gcc64安装验证
gcc -v

2.Visual Studio 2019安装
可直接用压缩包的文件:vs_community__studio2019.exe
官方下载地址:https://visualstudio.microsoft.com/zh-hans/vs/older-downloads/
2019版下载链接,社区版就够用了:https://my.visualstudio.com/Downloads?q=visual%20studio%202019&wt.mc_id=omsftvscom~older-downloads

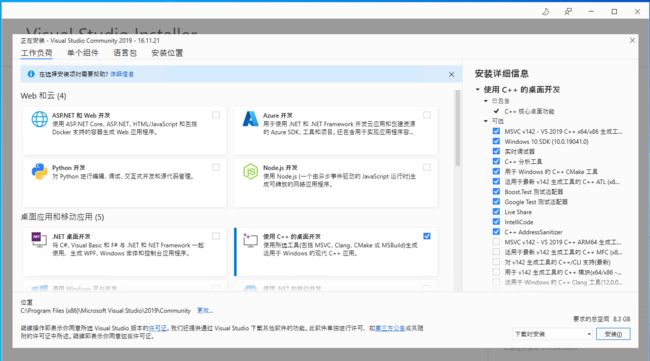
注意,需要选择C++开发模块,其它根据自己的需求安装就好了,安装路径可以默认,也可以根据自己情况更改一下,然后点击安装就好了,后面都是自动安装了,因为需要在线下载东西,过程有点长,耐心等待一下~~
3.Anaconda安装
可直接用压缩包中的文件:Anaconda3-2023.03-0-Windows-x86_64.exe
下载安装
下载地址:https://mirrors.tuna.tsinghua.edu.cn/anaconda/archive/

安装的时候选择所有all users,直接下一步就行
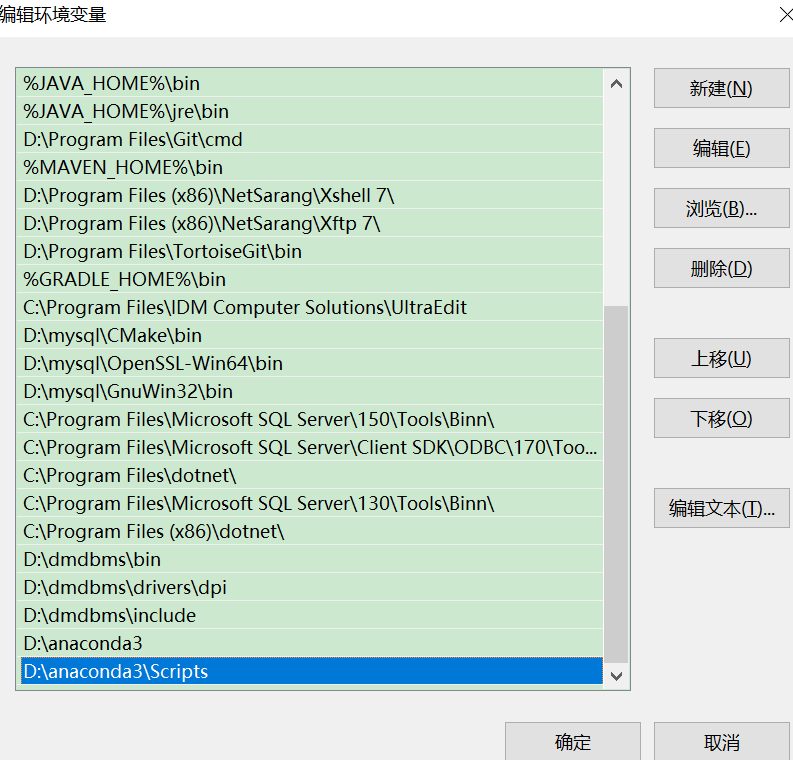
PATH添加环境变量
结合自己的路径自己修改
D:\anaconda3
D:\anaconda3\Scripts
D:\anaconda3\Library\bin
D:\anaconda3\Library\mingw-w64\bin
校验检验
检查是否安装成功
conda --version
conda info

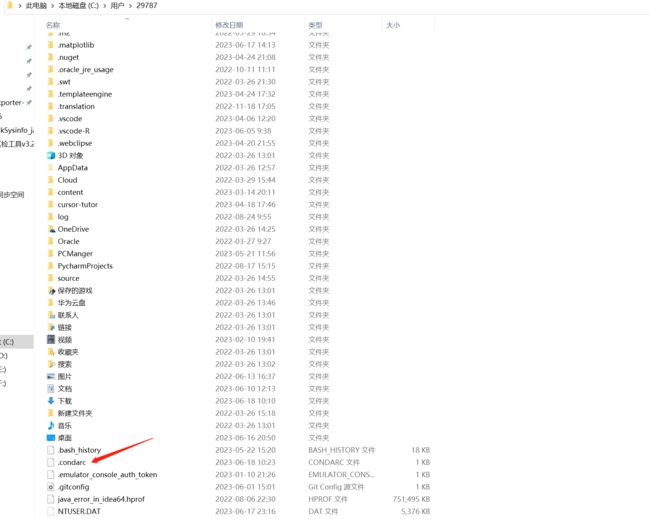
4. 配置conda镜像下载地址
用户目录下没有.condarc文件,先执行 conda config --set show_channel_urls yes 生成该文件之后再修改.condarc文件路径如:C:\Users\用户名,自己的路径对号入座
用如下内容替换.condarc文件内容
channels:
  - http://mirrors.tuna.tsinghua.edu.cn/anaconda/cloud/conda-forge/
  - http://mirrors.tuna.tsinghua.edu.cn/anaconda/pkgs/main/
  - http://mirrors.tuna.tsinghua.edu.cn/anaconda/pkgs/free/
show_channel_urls: true
 、
、
# 搜索时显示通道地址
conda config --set show_channel_urls yes

# 最后,执行conda info
conda info
5. CUDA安装
安装CUDA11.7
参考https://blog.csdn.net/chen565884393/article/details/127905428
下载安装包
可直接用压缩包的文件:cuda_11.7.1_516.94_windows.exe
下载CUDA,根据自己的配置选择,win10还是win11安装包
下载地址:https://developer.nvidia.com/cuda-11-7-1-download-archive?target_os=Windows&target_arch=x86_64&target_version=10&target_type=exe_local

安装软件

下一步

把CUDA选一下,还需要注意一点,如果 你前面没有安装vs,直接安装的这个,需要把CUDA里面的
Visual Studio Integration取消勾选,否则会安装不成功

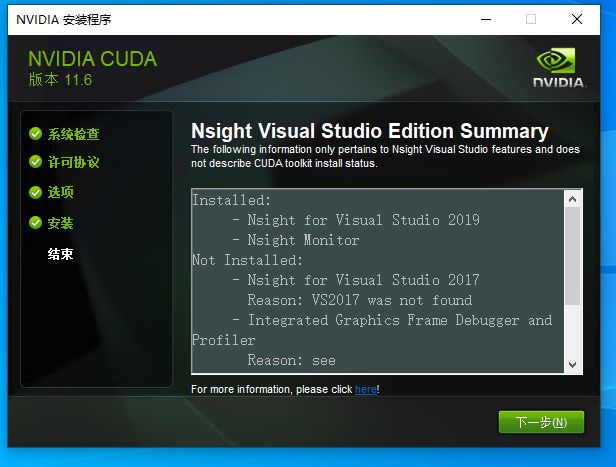
然后下一步安装即可
安装完成后,会提示Nsight Visual studio的整合情况,这里提示安装了vs2019版的,正是我们前面安装的VS版本,这样就能在vs2019里面做GPU方面的开发了
检查安装情况
nvcc -V

6. 安装CUDNN
下载CUDNN
可直接用压缩包的文件:cudnn-windows-x86_64-8.5.0.96_cuda11-archive.zip
下载安装包,在NVIDIA官方网站即可下载,地址为:https://developer.nvidia.com/rdp/cudnn-archive

配置CUDNN
- 直接解压缩,完成后点击去你能看到如下三个文件夹(bin、include、lib)

- 把这三个文件夹的文件分别拷贝到CUDA安装目录对应的(bin、include、lib)文件夹中即可。CUDA的lib目录有x64 、Win32、cmake三个文件夹,拷到其中的x64这个文件夹中
C:\Program Files\NVIDIA GPU Computing Toolkit\CUDA\v11.7

7.Pytorch安装(配置GPU)
参考https://blog.csdn.net/qq_46126258/article/details/112708781
主要是解决torch.cuda.is_available()返回false的问题
torch安装
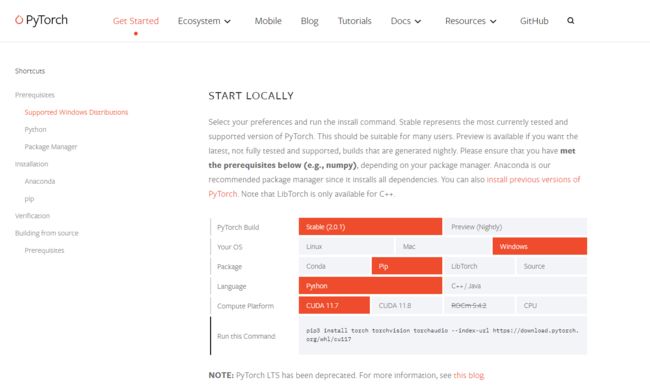
到pytorch官网https://pytorch.org/get-started/locally/#no-cuda-1选择自己版本. 一定要用pip安装,不要用conda,之前网帖有人说conda装下还是存在问题
## 直接在cmd中执行即可
(base) PS C:\Users\29787> pip3 install torch torchvision torchaudio --index-url https://download.pytorch.org/whl/cu117
torch_stable
下载地址:https://download.pytorch.org/whl/torch_stable.html
下载torch==2.0.1+cu117,可以观察到cu117/torch-2.0.1有很多的版本,cp38对应python3.8,win_amd64对应windows的64位操作系统,根据自己的实际情况进行下载即可。 (+cu117表示CUDA10.1,+cpu表示CPU版本)
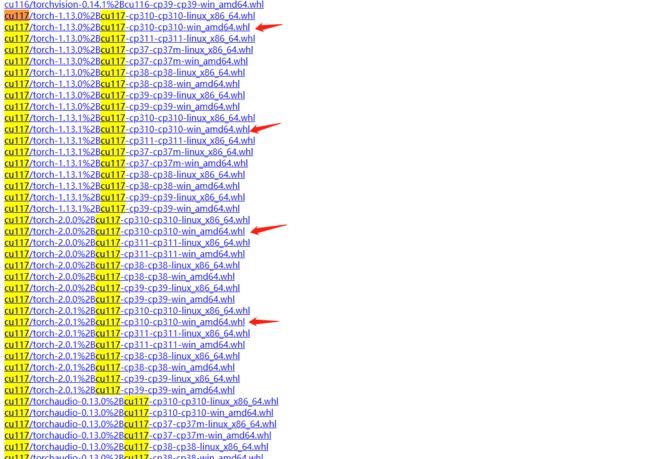
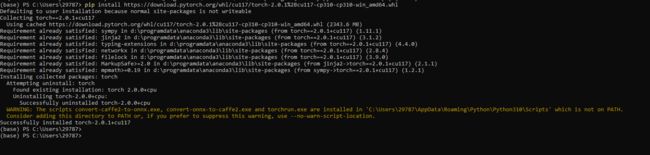
pip install https://download.pytorch.org/whl/cu117/torch-2.0.1%2Bcu117-cp310-cp310-win_amd64.whl

## 文件比较大,或者去安装包中 同目录下直接本地安装
## pip install torch-2.0.1+cu117-cp310-cp310-win_amd64.whl
torch生效校验
新建文件test_gpu.py,输出为True则表示配置成功
import torch


print( torch.__version__)
print( torch.cuda.is_available())

四、安装langchain-ChatGLM
1.conda激活环境
# 第一步:同意版本使用python3.10,可使用conda安装环境
$ conda create -p  aistudio python=3.10
# 第二步:激活环境
$ source activate aistudio


# 关闭环境
#$ source deactivate aistudio
# 删除环境
#$ conda env remove -p aistudio
2.下载langchain-ChatGLM
https://github.com/imClumsyPanda/langchain-ChatGLM
可以自己去github上拉取代码,也可以去资料包下载 langchain-ChatGLM-master.zip
3.安装langchain-ChatGLM依赖包
github的安装步骤:https://github.com/imClumsyPanda/langchain-ChatGLM/blob/master/docs/INSTALL.md
## 我这里我把包放到了E盘
(C:\Users\29787\aistudio) PS C:\Users\29787> e:
(C:\Users\29787\aistudio) PS E:\> cd E:\langchain\langchain-ChatGLM-master
(C:\Users\29787\aistudio) PS E:\langchain\langchain-ChatGLM-master>

# 安装相关依赖,会自动读取requirements.txt依赖,这个步骤消耗的时间特别长。
(C:\Users\29787\aistudio) PS E:\langchain\langchain-ChatGLM-master> pip install -r requirements.txt
安装成功后会有如下提示

安装报错记录
Microsoft Visual C++ 14.0 or greater is required.

本地缺少C++环境,使用安装包的solved_packageMissInInstalling_mu_visual_cpp_build_tools_2015_update_3_x64_dvd_dfd9a39c.iso 进行安装
下载后双击这个文件安装以后,在重新执行这个拉取命令

4.加载chatglm-6b-int4模型
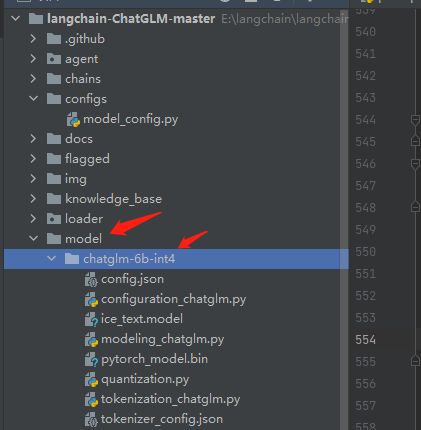
去chatglm-6b-int4官网下载模型https://github.com/THUDM/ChatGLM-6B或者https://huggingface.co/THUDM/chatglm-6b-int4/tree/main。也可以去资料包下载 chatglm-6b-int4.zip
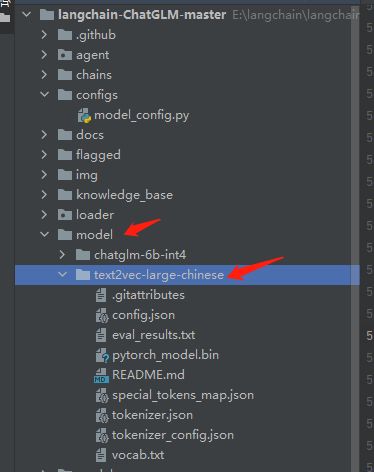
在项目同级目录下新建model/chatglm-6b-int4目录并将模型的文件放进来。
5.加载text2vec-large-chinese
在项目同级目录下新建model/text2vec-large-chinese目录并将模型的文件放进来。用资料包的文件text2vec-large-chinese.zip
6.修改langchain-ChatGLM的配置文件
修改webui.py文件端口映射
调整内容如下:
- 将server_name的0.0.0.0调整为localhost’
- 将share属性调整为True
(demo
 .queue(concurrency_count=3)
 .launch(server_name='localhost',
         server_port=7860,
         show_api=False,
         share=True,
         inbrowser=False))

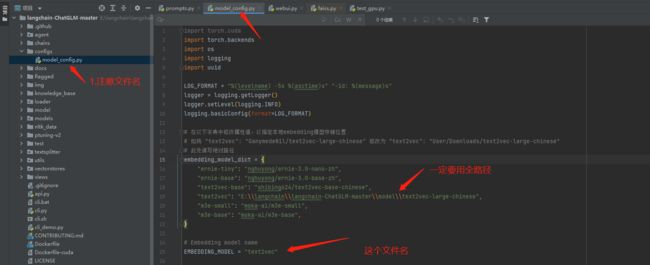
修改model_config.py引入text2vec
修改config下model_config.py文件,路径一定要用全路径。 \转义
embedding_model_dict = {
    "ernie-tiny": "nghuyong/ernie-3.0-nano-zh",
    "ernie-base": "nghuyong/ernie-3.0-base-zh",
    "text2vec-base": "shibing624/text2vec-base-chinese",
    "text2vec": "E:\\langchain\\langchain-ChatGLM-master\\model\\text2vec-large-chinese",
    "m3e-small": "moka-ai/m3e-small",
    "m3e-base": "moka-ai/m3e-base",
}

# Embedding model name
EMBEDDING_MODEL = "text2vec"
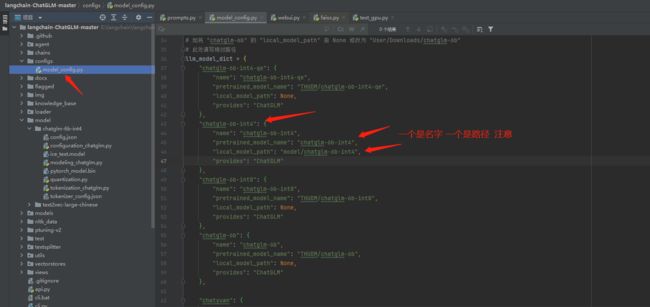
修改model_config.py引入chatglm-6b-int4
修改config下model_config.py文件,修改pretrained_model_name与local_model_path属性以及LLM_MODEL属性。
建议使用相对路径,不然知识库哪块报错
llm_model_dict = {
    "chatglm-6b-int4": {
        "name": "chatglm-6b-int4",
        "pretrained_model_name": "chatglm-6b-int4",
        "local_model_path": "model/chatglm-6b-int4",
        "provides": "ChatGLM"
    },
}
# LLM 名称,注意:只修改llm_model_dict不修改LLM_MODEL也不会生效的
LLM_MODEL = "chatglm-6b-int4"
修改LLM_MODEL属性引入模型,不然不生效

7.运行langchain-ChatGLM
运行langchain
(C:\Users\29787\aistudio) PS E:\langchain\langchain-ChatGLM-master> python .\webui.py
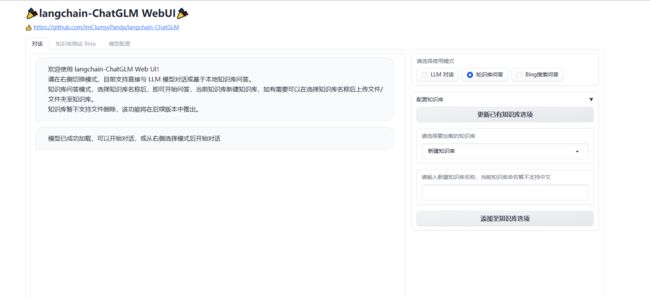
出现如下提示就是运行成功
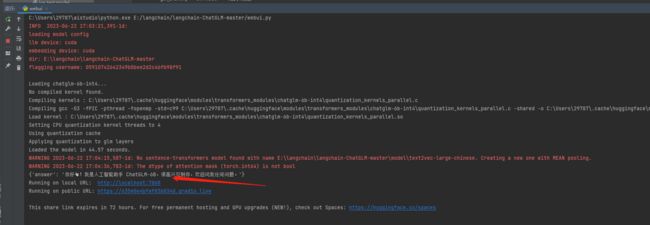
Running on local URL: http://localhost:7860
运行记录报错
ImportError: Using low_cpu_mem_usage=True or a device_map requires Accelerate: pip install accelerate
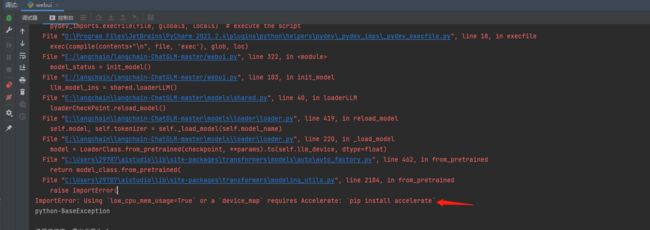
这个报错是因为本地找不到pytorch的GPU,默认走了CPU。
解决方案两个:要不执行pip install accelerate 要不安装上面的教程配置Pytorch
RuntimeError: Library cublasLt is not initialized

可参考:https://github.com/THUDM/ChatGLM-6B/issues/465。按照本教程装的话不存在这个问题
在跑 THUDM/chatglm-6b-int4的时候碰到问题。结果我发现是 cuda 版本太低所致。我之前是跑在 cuda-10.0 上,当我升级到 cuda-12.0 后,问题就解决了。结合之前有的人提到 11.2,11.3 跑不了,后面提到重装 11.7 可以正常使用的情况。那么这个报错会不会是因为它的代码对系统依赖上要求大于11.x 的某个版本的问题所致?
‘gcc’ is not recognized as an internal or external command,

本地没有gcc环境,安装mingw-w64即可,可往上看方案
moduleNotFoundError:No module named’transformers_modules.model/chatglm-6b-int4

修改model_config.py中的属性配置错误,参考如下
这样修改
    "chatglm-6b-int4": {
        "name": "chatglm-6b-int4",
        "pretrained_model_name": "chatglm-6b-int4",
        "local_model_path": "model/chatglm-6b-int4",
        "provides": "ChatGLM"
    },
quantization_kernels_parallel.so Load parallel cpu kernel failed,
Compiling kernels : C:\Users\29787\.cache\huggingface\modules\transformers_modules\chatglm-6b-int4\quantization_kernels_parallel.c
Compiling gcc -O3 -fPIC -pthread -fopenmp -std=c99 C:\Users\29787\.cache\huggingface\modules\transformers_modules\chatglm-6b-int4\quantization_kernels_parallel.c -shared -o C:\Users\29787\.cache\huggingface\modules\transformers_modules\chatglm-6b-int4\quantization_kernels_parallel.so
Load parallel cpu kernel failed, using default cpu kernel code:
Traceback (most recent call last):
File "C:\Users\29787/.cache\huggingface\modules\transformers_modules\chatglm-6b-int4\quantization.py", line 156, in __init__
kernels = ctypes.cdll.LoadLibrary(kernel_file)
File "C:\Users\29787\aistudio\lib\ctypes\__init__.py", line 452, in LoadLibrary
return self._dlltype(name)
File "C:\Users\29787\aistudio\lib\ctypes\__init__.py", line 374, in __init__
self._handle = _dlopen(self._name, mode)
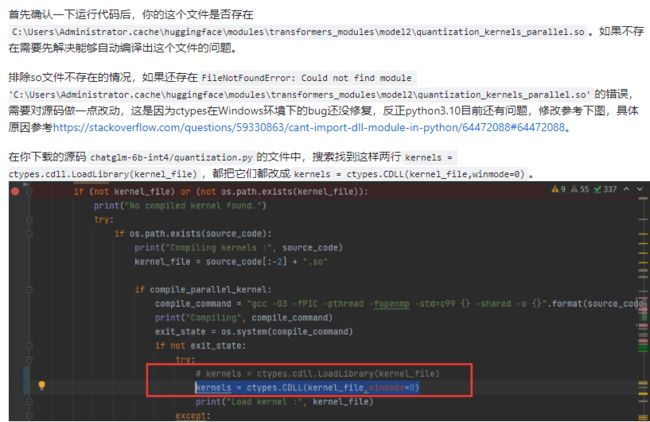
FileNotFoundError: Could not find module 'C:\Users\29787\.cache\huggingface\modules\transformers_modules\chatglm-6b-int4\quantization_kernels_parallel.so' (or one of its dependencies). Try using the full path with constructor syntax.
解决方案:
https://github.com/THUDM/ChatGLM-6B/issues/967

附录
软件安装包
链接:https://pan.baidu.com/s/1r0OrDKRfgQCEZ971t1xTWw?pwd=k1b1
提取码:k1b1