数据分析与可视化(python大作业)
目录
涉及知识
自动打开想要获取到数据的页面
绘制统计图
初步设计过程
自动化测试
所需数据包
初步过程分析
爬取数据
所需数据包
初步过程分析
数据分析与可视化(绘图)
所需数据包
各类统计图简介:
详细设计过程
导入所有数据包与数据集
数据分析
数据情况预览
数据获取与分析
存储
涉及知识
按照实验完成顺序:
·自动化测试:selenium
·爬虫:requests
·数据解析:json
·数据清洗
·数据分析:numpy,matpltlib,pandas
自动打开想要获取到数据的页面
(1)注意伪装好,绕过浏览器识别;
(2)反反爬。
绘制统计图
(1)注意即将绘制的图是否有缺失值等;
(2)注意查看数据问题。
初步设计过程
自动化测试
所需数据包
from selenium import webdriver
from time import sleep
from selenium.webdriver import ActionChains
from selenium.webdriver.common.by import By
from selenium.webdriver.common.keys import Keys
初步过程分析
(1)确定浏览器版本,下载相应驱动。
(2)防止浏览器自动关闭
option = webdriver.EdgeOptions()
option.add_experimental_option('excludeSwitches', ['enable-automation'])
option.add_experimental_option("detach", True)
driver = webdriver.Edge(executable_path='./edge driver', options=option)
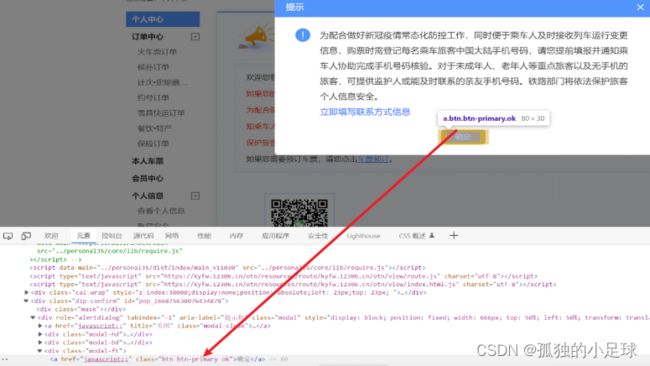
(3)进入12306官网,寻找相应标签,定位元素位置(id, name, class, tag, xpath, css, link等)。
(4)一些网站具有反爬机制,反爬方式多种多样,12306中为验证码滑块,主要用到行为链,让浏览器识别不到爬虫。
具体操作:找到滑块id('nc_1_n1z'),创建对象,判断,执行。
(5) 成功登录后,有目的性地寻找所需标签,模仿鼠标与键盘响应方式。常见的一些方法如下:click(),clear(),send_keys(),perform()等。如下所示:
(6)此次实验,我没有完成最后一步,因为12306每天只有三次取消订单机会,而且我最近测试次数比较多,害怕被拉入黑名单。
(7)完成这些之后,开始爬取当前页面我们想要的数据。
爬取数据
所需数据包
import requests
import pandas as pd
import json
from tqdm import tqdm
初步过程分析
(1)确定目标网址:
如我要获取12306中从太原南到侯马西,往返,2022-11-19日的所有车票信息,网址如下图所示,除此之外,仍然要做好伪装,如下图 3.11所示,其中User-Agent(用户代理,浏览器基本身份标识),Cookie(用户信息,常用于检测是否登陆账号)都是用来伪装的。
(2)获取网页数据:
获取网页数据,也就是通过网址( URL:Uniform Resource Locator,统一资源 定位符),获得网络的数据,充当搜索引擎。当输入网址,我们就相当于对网址服务器发送了一个请求,网站服务器收到以后,进行处理和解析,进而给我们一个相应的相应。如果网络正确并且网址不错,一般都可以得到网页信息,否则告诉我们一个错误代码,比如404. 整个过程可以称为请求和响应。
常见的请求方法有两种,GET和 POST。GET请求是把参数包含在了url里面,而post请求大多是在表单里面进行,也就是让你输入用户名和秘密,在url里面没有体现出来,这样更加安全。POST请求的大小没有限制,而get请求有限制,最多1024个字节。
通过requests数据请求模块里的get请求方法,对于url地址发送请求,携带上headers请求头伪装,最后用response变量接收返回数据。
(3)解析网页数据:
JSON(JavaScript Object Notation) 是一种轻量级的数据交换格式。在Python中的json应用就是实现一些数据结构(列表、元组、字典)到字符串之间的转换,当数据结构变为字符串之后就很容易在程序之间传递。Python中序列化指的是将Python中的数据结构(列表、元组、字典)编码转换为JSON格式的字符串;而反序列化指的是将JSON格式的字符串编码转换为Python中的数据结构(列表、元组、字典);元组经过序列化处理后,再通过反序列化处理后,数据类型不再是元组(而是列表);但列表、字典经过序列化处理后,再通过反序列化处理后,数据类型不变。
JSON在python中分别由list和dict组成。
BeautifulSoup是用来从HTML或XML中提取数据的Python库。
(4)存储数据并分析:
解析完成后,由于数据不是很多,用不到数据库,我选择了保存在csv文本,如下:content.to_csv('data.csv',encoding='gbk'),这样会生成data.csv,可以直接文件中查询。
爬虫的目的是分析网页数据,进的得到我们想要的结论。在 python数据分析中,我们可以使用使用第三步保存的数据直接分析,主要使用的库如下:NumPy、Pandas、 Matplotlib 三个库。
NumPy :它是高性能科学计算和数据分析的基础包。
Pandas : 基于 NumPy 的一种工具,该工具是为了解决数据分析任务而创建的。它可以算得上作弊工具。
Matplotlib:Python中最著名的绘图系统Python中最著名的绘图系统。它可以制作出散点图,折线图,条形图,直方图,饼状图,箱形图散点图,折线图,条形图,直方图,饼状图,箱形图等。
(5)完成以上步骤后,可以得到想要的数据。
数据分析与可视化(绘图)
所需数据包
import matplotlib.pyplot as plt
import numpy as np
import pandas as pd
import math
各类统计图简介:
折线图:比较适合描述和比较多组数据随时间变化的趋势,或者一组数据对另外一组数据的依赖程度。plot(*args,**kwargs)。
散点图:比较适合描述数据在平面或空间中的分布,可以用来帮助分析数据之间的关联,或者观察聚类算法的选择和参数设置对聚类效果的影响。Scatter(x,y,s=None,marker=None,…)。
柱状图:适合用来比较多组数据之间的大小,或者类似的场合,但对大规模数据的可视化不是很适合。
bar(left,height,width=0.8,bottom=None,hold=None,data=None,**kwargs)。
饼状图:比较适合展示一个总体中各类别数据所占的比例。
pie(x,labels,colors,center…)。
雷达图:也称极坐标图,星图,蜘蛛网图,常用于企业经营状况的分析,可以直观地表达企业经营状况全貌,便于企业管理者及时发现薄弱环节进行改进,也可以用于发现异常值。polor(*args,**kwargs)。
详细设计过程
导入所有数据包与数据集
from selenium import webdriver
from time import sleep
from selenium.webdriver import ActionChains
from selenium.webdriver.common.by import By
from selenium.webdriver.common.keys import Keys
import requests
import pandas as pd
import json
from tqdm import tqdm
from bs4 import BeautifulSoup
import csv
import matplotlib.pyplot as plt
import numpy as np
import pandas as pd
import math
数据分析
数据情况预览
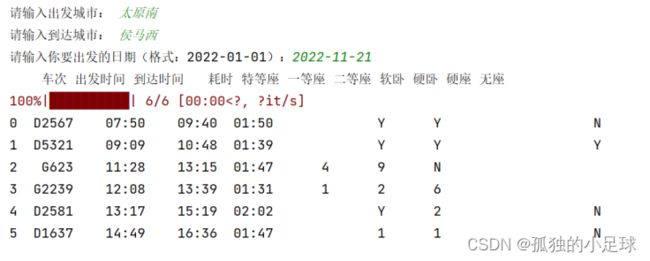
(1)显示想要获得的车票信息
需要注意,pycharm中输出为中文会错行。
(2)显示查询到的天气信息
数据获取与分析
(1)行为链
span = driver.find_element(By.ID,'nc_1_n1z')
action = ActionChains(driver)
action.click_and_hold(span)
for i in range(10):
action.move_by_offset(35, 0).perform()
sleep(0.1)
action.release()
让验证滑块自己滑过去。
Action:创建对象;
action.move_by_offset(x, y).perform():x表示横向滑动距离,y表示纵向滑动距离;preform()表示立即执行;
action.release():释放行为链。
(2)获取车票上各信息出处
url:
我们只能搜索固定的站点之间的信息,将其分割,查询索引
代码:
result = response.json()['data']['result']
lis = []
for index in result:
info = index.replace('有','Y').replace('无','N').split('|')
page = 0
for i in index.split('|'):
print(i)
print('-------',page)
page += 1
print(info)
break
通过上述代码完成以下索引分配:
num = info[3]
start_time = info[8]
end_time = info[9]
use_time = info[10]
topGrade = info[32]
first_class = info[31]
second_class = info[30]
soft_sleeper = info[23]
hard_sleeper = info[28]
hard_seat = info[29]
no_seat = info[26]
(3)获取一天内天气预报信息
利用beaytifulSoup解析会比较方便,
BeautifulSoup是用来从HTML或XML中提取数据的Python库。
一天内温度变化:
hour = list(data['小时'])
tem = list(data['温度'])
tem_ave = sum(tem) / 24
tem_max = max(tem)
tem_max_hour = hour[tem.index(tem_max)]
tem_min = min(tem)
tem_min_hour = hour[tem.index(tem_min)]
x = []
y = []
for i in range(0, 24):
x.append(i)
y.append(tem[hour.index(i)])
plt.figure(1)
plt.plot(x, y, color='#4a9de4', label='温度')
plt.scatter(x, y, color='#3d00ff')
plt.plot([0, 24], [tem_ave, tem_ave], c='#2d9ac1', linestyle='--', label='平均温度')
plt.text(tem_max_hour + 0.15, tem_max + 0.15, str(tem_max), ha='center', va='bottom', fontsize=10.5)
plt.text(tem_min_hour + 0.15, tem_min + 0.15, str(tem_min), ha='center', va='bottom', fontsize=10.5)
plt.xticks(x)
plt.legend()
一天内相对湿度变化:
hour = list(data['小时'])
hum = list(data['相对湿度'])
for i in range(0, 24):
if math.isnan(hum[i]) == True:
hum[i] = hum[i - 1]
hum_ave = sum(hum) / 24
hum_max = max(hum)
hum_max_hour = hour[hum.index(hum_max)]
hum_min = min(hum)
hum_min_hour = hour[hum.index(hum_min)]
x = []
y = []
for i in range(0, 24):
x.append(i)
y.append(hum[hour.index(i)])
plt.figure(2)
plt.plot(x, y, color='#356be6', label='相对湿度')
plt.scatter(x, y, color='blue')
plt.plot([0, 24], [hum_ave, hum_ave], c='#4900fc', linestyle='--', label='平均相对湿度')
plt.text(hum_max_hour + 0.15, hum_max + 0.15, str(hum_max), ha='center', va='bottom', fontsize=10.5)
plt.text(hum_min_hour + 0.15, hum_min + 0.15, str(hum_min), ha='center', va='bottom', fontsize=10.5)
plt.xticks(x)
plt.legend()
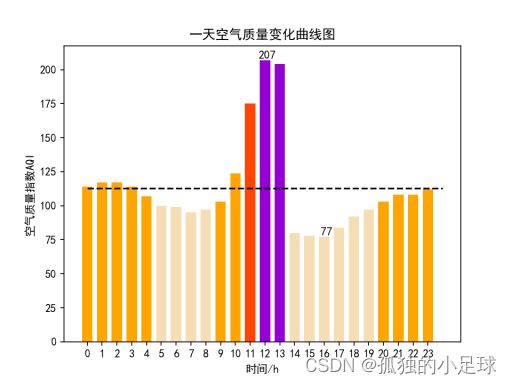
一天内空气质量变化:
hour = list(data['小时'])
air = list(data['空气质量'])
print(type(air[0]))
for i in range(0, 24):
if math.isnan(air[i]) == True:
air[i] = air[i - 1]
air_ave = sum(air) / 24
air_max = max(air)
air_max_hour = hour[air.index(air_max)]
air_min = min(air)
air_min_hour = hour[air.index(air_min)]
x = []
y = []
for i in range(0, 24):
x.append(i)
y.append(air[hour.index(i)])
plt.figure(3)
for i in range(0, 24):
if y[i] <= 50:
plt.bar(x[i], y[i], color='lightgreen', width=0.7)
elif y[i] <= 100:
plt.bar(x[i], y[i], color='wheat', width=0.7)
elif y[i] <= 150:
plt.bar(x[i], y[i], color='orange', width=0.7)
elif y[i] <= 200:
plt.bar(x[i], y[i], color='orangered', width=0.7)
elif y[i] <= 300:
plt.bar(x[i], y[i], color='darkviolet', width=0.7)
elif y[i] > 300:
plt.bar(x[i], y[i], color='maroon', width=0.7)
plt.plot([0, 24], [air_ave, air_ave], c='black', linestyle='--')
plt.text(air_max_hour + 0.15, air_max + 0.15, str(air_max), ha='center', va='bottom', fontsize=10.5)
plt.text(air_min_hour + 0.15, air_min + 0.15, str(air_min), ha='center', va='bottom', fontsize=10.5)
plt.xticks(x)
一天内风级变化:
wind = list(data['风力方向'])
wind_speed = list(data['风级'])
for i in range(0, 24):
if wind[i] == "北风":
wind[i] = 90
elif wind[i] == "南风":
wind[i] = 270
elif wind[i] == "西风":
wind[i] = 180
elif wind[i] == "东风":
wind[i] = 360
elif wind[i] == "东北风":
wind[i] = 45
elif wind[i] == "西北风":
wind[i] = 135
elif wind[i] == "西南风":
wind[i] = 225
elif wind[i] == "东南风":
wind[i] = 315
degs = np.arange(45, 361, 45)
temp = []
for deg in degs:
speed = []
for i in range(0, 24):
if wind[i] == deg:
speed.append(wind_speed[i])
if len(speed) == 0:
temp.append(0)
else:
temp.append(sum(speed) / len(speed))
print(temp)
N = 8
theta = np.arange(0. + np.pi / 8, 2 * np.pi + np.pi / 8, 2 * np.pi / 8)
radii = np.array(temp)
plt.axes(polar=True)
colors = [(1 - x / max(temp), 1 - x / max(temp), 0.6) for x in radii]
plt.bar(theta, radii, width=(2 * np.pi / N), bottom=0.0, color=colors)
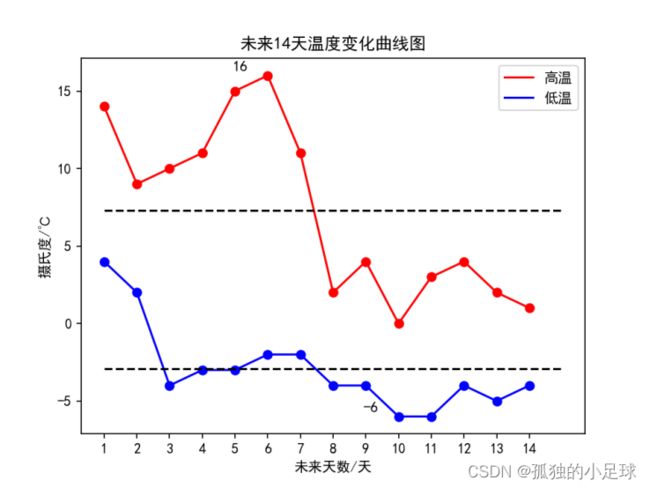
(4)获取十四天天内天气预报信息
如所示:
未来14天温度变化:
date = list(data['日期'])
tem_low = list(data['最低气温'])
tem_high = list(data['最高气温'])
for i in range(0, 14):
if math.isnan(tem_low[i]) == True:
tem_low[i] = tem_low[i - 1]
if math.isnan(tem_high[i]) == True:
tem_high[i] = tem_high[i - 1]
tem_high_ave = sum(tem_high) / 14
tem_low_ave = sum(tem_low) / 14
tem_max = max(tem_high)
tem_max_date = tem_high.index(tem_max)
tem_min = min(tem_low)
tem_min_date = tem_low.index(tem_min)
x = range(1, 15)
plt.figure(1)
plt.plot(x, tem_high, color='red', label='高温')
plt.scatter(x, tem_high, color='red')
plt.plot(x, tem_low, color='blue', label='低温')
plt.scatter(x, tem_low, color='blue')
plt.plot([1, 15], [tem_high_ave, tem_high_ave], c='black', linestyle='--')
plt.plot([1, 15], [tem_low_ave, tem_low_ave], c='black', linestyle='--')
plt.legend()
plt.text(tem_max_date + 0.15, tem_max + 0.15, str(tem_max), ha='center', va='bottom', fontsize=10.5)
plt.text(tem_min_date + 0.15, tem_min + 0.15, str(tem_min), ha='center', va='bottom', fontsize=10.5)
plt.xticks(x)
未来14天风级图:
wind1 = list(data['风向1'])
wind2 = list(data['风向2'])
wind_speed = list(data['风级'])
wind1 = change_wind_direction14(wind1)
wind2 = change_wind_direction14(wind2)
degrees = np.arange(45, 361, 45)
temp = []
for degree in degrees:
speed = []
# 获取 wind_deg 在指定范围的风速平均值数据
for i in range(0, 14):
if wind1[i] == degree:
speed.append(wind_speed[i])
if wind2[i] == degree:
speed.append(wind_speed[i])
if len(speed) == 0:
temp.append(0)
else:
temp.append(sum(speed) / len(speed))
print(temp)
N = 8
theta = np.arange(0. + np.pi / 8, 2 * np.pi + np.pi / 8, 2 * np.pi / 8)
# 数据极径
radii = np.array(temp)
# 绘制极区图坐标系
plt.axes(polar=True)
# 定义每个扇区的RGB值(R,G,B),x越大,对应的颜色越接近蓝色
colors = [(1 - x / max(temp), 1 - x / max(temp), 0.6) for x in radii]
plt.bar(theta, radii, width=(2 * np.pi / N), bottom=0.0, color=colors)
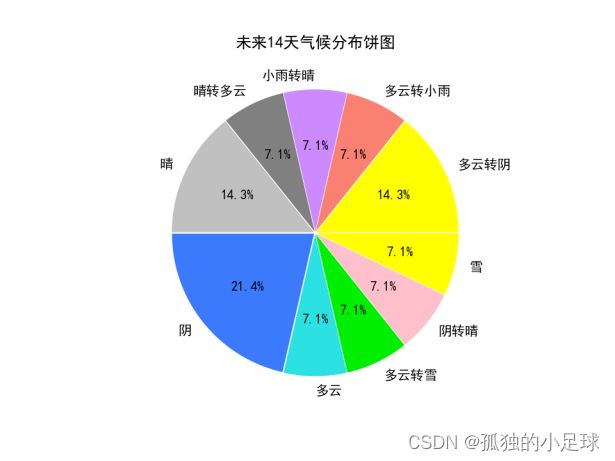
未来14天气候分布:
weather = list(data['气温'])
dic_wea = { }
for i in range(0, 14):
if weather[i] in dic_wea.keys():
dic_wea[weather[i]] += 1
else:
dic_wea[weather[i]] = 1
print(dic_wea)
explode = [0.01] * len(dic_wea.keys())
color = ['yellow', 'salmon', '#cd89fe', 'grey', 'silver', '#3b7afd', '#2ce1e2', '#00ef00', 'pink']
plt.pie(dic_wea.values(), explode=explode, labels=dic_wea.keys(), autopct='%1.1f%%', colors=color)
(3)判断数据中给定数字是否有假。
math.isnan()方法是数学模块的库方法,用于检查给定数字是否为“ NaN” (不是数字),它接受一个数字,如果给定数字为“ NaN” ,则返回True ,否则返回False 。
存储
content.to_csv('data.csv',encoding='gbk')
write_to_csv('weather14.csv', data14,14)
write_to_csv('weather1.csv', data1_7,1)


