RabbitMQ
一. RabbitMQ
一种常用的消息中间件,它是一种接收数据、接收请求、存储数据、发送数据等功能的技术服务。
使用的协议是AMQP协议。
核心概念:
Server:又称Broker,接受客户端的连接,实现AMQP实体服务。
Connection:连接,应用程序与Broker的网络连接 TCP/IP/ 三次握手和四次挥手。
Channel:网络信道,几乎所有的操作都在Channel中进行,Channel是进行消息读写的通道,客户端可以建立各Channel,每个Channel代表一个会话任务。
Message:消息,服务与应用程序之间传送的数据,由Properties和body组成,Properties可是对消息进行修饰,比如消息的优先级,延迟等高级特性,Body则就是消息体的内容。
Virtual Host:虚拟地址,用于进行逻辑隔离,最上层的消息路由,一个虚拟主机理由可以有若干个 exhange 和 queue,同一个虚拟主机里面不能有相同名字的Exchange。
Exchange:交换机,接受消息,根据路由键发送消息到绑定的队列(==不具备消息存储的能力==)。
Bindings:Exchange和Queue之间的虚拟连接,binding中可以保护多个routing key.
Routing key:是一个路由规则,虚拟机可以用它来确定如何路由一个特定消息。
Queue:队列,也成为Message Queue 消息队列,保存消息并将它们转发给消费者。
二. 简单模式
生产者 producer.py
# 简单模式

import pika

# 1. 连接rabbitmq
mq_connection = pika.BlockingConnection(pika.ConnectionParameters("localhost"))
mq_channel = mq_connection.channel()

# 2. 创建队列
mq_channel.queue_declare(queue="hello")

# 3. 向队列中插入数据
mq_channel.basic_publish(exchange="",      # 交换机为空的话,就是使用默认的交换机
                         routing_key="hello",   # 指定队列
                         body="Hello World".encode("utf-8")     # 队列中插入的数据
                         )

print("Sent Hello World to MQ")

mq_channel.close()
mq_connection.close()
消费者 consumer.py
# 简单模式

import pika

# 1. 连接rabbitmq
mq_connection = pika.BlockingConnection(pika.ConnectionParameters("localhost"))
mq_channel = mq_connection.channel()

# 2. 创建队列,如果生产者已经创建好了队列的话,消费者这块就不再创建了
mq_channel.queue_declare(queue="hello")

# 3. 确定回调函数
def call_back(channel, method, properties, body):
    print(f"call back receive body is {body}")

# 4. 确定监听队列参数
mq_channel.basic_consume(queue="hello", auto_ack=True, on_message_callback=call_back)
print("wait for message from MQ")

# 5. 开始正式监听
mq_channel.start_consuming()
三. 参数
3.1 应答参数 auto_ack
应答参数是消费者在消费完消息之后要进行确认。只有确认之后,队列中的数据才会被删除。
True:自动应答 。队列中已消费的数据被删除,如果回调函数逻辑处理失败,则无法重新处理数据。
False:手动应答,需要在回调函数里手动确认应答。只有手动确认之后,队列中已消费的数据才会被删除。
简单模式下生产者不变,要修改消费者consumer.py
# 简单模式

import pika

# 1. 连接rabbitmq
mq_connection = pika.BlockingConnection(pika.ConnectionParameters("localhost"))
mq_channel = mq_connection.channel()

# 2. 创建队列,如果生产者已经创建好了队列的话,消费者这块就不再创建了
mq_channel.queue_declare(queue="hello")

# 3. 确定回调函数
def call_back(channel, method, properties, body):
    print(f"call back receive body is {body}")
    channel.basic_ack(delivery_tag=method.delivery_tag)     # 手动应答时必须手动添加确认应答

# 4. 确定监听队列参数
mq_channel.basic_consume(queue="hello",
                         auto_ack=False,     # True 为自动应答,False为手动应答,如果手动应答的话,需要在回调函数里手动添加确认应答
                         on_message_callback=call_back)

print("wait for message from MQ")

# 5. 开始正式监听
mq_channel.start_consuming()
3.2 持久化参数 durable
持久化参数是为了防止已经入队的数据因服务重启而导致数据丢失。
创建可持久化队列 + 入队数据持久化。
生产者 producer.py
# 简单模式

import pika

# 1. 连接rabbitmq
mq_connection = pika.BlockingConnection(pika.ConnectionParameters("localhost"))
mq_channel = mq_connection.channel()

# 2. 创建可持久队列
mq_channel.queue_declare(queue="hello2",
                         durable=True       # True表示创建一个可持久化的队列
                         )

# 3. 向队列中插入数据
mq_channel.basic_publish(exchange="",      # 交换机为空的话,就是使用默认的交换机
                         routing_key="hello2",   # 指定队列
                         body="Hello World persistent2".encode("utf-8"),     # 队列中插入的数据
                         properties=pika.BasicProperties(
                             delivery_mode=2        # 对入队的数据做持久化
                         )
                         )

print("Sent Hello World to MQ")

mq_channel.close()
mq_connection.close()
消费者 consumer.py
# 简单模式

import pika

# 1. 连接rabbitmq
mq_connection = pika.BlockingConnection(pika.ConnectionParameters("localhost"))
mq_channel = mq_connection.channel()

# 2. 创建可持久队列,如果生产者已经创建好了队列的话,消费者这块就不再创建了
mq_channel.queue_declare(queue="hello2", durable=True)

# 3. 确定回调函数
def call_back(channel, method, properties, body):
    print(f"call back receive body is {body}")
    channel.basic_ack(delivery_tag=method.delivery_tag)

# 4. 确定监听队列参数
mq_channel.basic_consume(queue="hello2",
                         auto_ack=False,
                         on_message_callback=call_back)

print("wait for message from MQ")

# 5. 开始正式监听
mq_channel.start_consuming()
3.3 分发参数
多个消费者同时监听一个消息队列,那么数据是如何分发到各个消费者呢?
- 轮询分发。不管哪个消费者处理数据快或慢,数据总是平均分发到所有消费者。
- 公平分发。消费者处理地越快,分发给他的数据就越多,多劳多得,会造成数据倾斜。要做到公平分发,必须关闭自动应答ack,改成手动应答。
3.3.1 轮询分发
生产者 producer.py
# 简单模式

import time
import pika

# 1. 连接rabbitmq
mq_connection = pika.BlockingConnection(pika.ConnectionParameters("localhost"))
mq_channel = mq_connection.channel()

# 2. 创建队列
mq_channel.queue_declare(queue="hello3")

# 3. 向队列中插入多条数据
for i in range(20):
    mq_channel.basic_publish(exchange="",      # 交换机为空的话,就是使用默认的交换机
                             routing_key="hello3",   # 指定队列
                             body=f"Hello World {i}".encode("utf-8")     # 队列中插入的数据
                             )
    time.sleep(1)
print("Sent Hello World to MQ")

mq_channel.close()
mq_connection.close()
消费者 consumer.py
# 简单模式

import pika

# 1. 连接rabbitmq
mq_connection = pika.BlockingConnection(pika.ConnectionParameters("localhost"))
mq_channel = mq_connection.channel()

# 2. 创建队列
mq_channel.queue_declare(queue="hello3")

# 3. 确定回调函数
def call_back(channel, method, properties, body):
    print(f"call back receive body is {body}")
    channel.basic_ack(delivery_tag=method.delivery_tag)

# 4. 确定监听队列参数
mq_channel.basic_consume(queue="hello3",
                         auto_ack=False,
                         on_message_callback=call_back)

print("wait for message from MQ")

# 5. 开始正式监听
mq_channel.start_consuming()
3.3.2 公平分发
生产者 producer.py
# 简单模式

import time
import pika

# 1. 连接rabbitmq
mq_connection = pika.BlockingConnection(pika.ConnectionParameters("localhost"))
mq_channel = mq_connection.channel()

# 2. 创建队列
mq_channel.queue_declare(queue="hello3")

# 3. 向队列中插入多条数据
for i in range(20):
    mq_channel.basic_publish(exchange="",      # 交换机为空的话,就是使用默认的交换机
                             routing_key="hello3",   # 指定队列
                             body=f"Hello World {i}".encode("utf-8")     # 队列中插入的数据
                             )
    time.sleep(1)
print("Sent Hello World to MQ")

mq_channel.close()
mq_connection.close()
消费者 consumer.py
# 简单模式

import time
import pika

# 1. 连接rabbitmq
mq_connection = pika.BlockingConnection(pika.ConnectionParameters("localhost"))
mq_channel = mq_connection.channel()

# 2. 创建队列
mq_channel.queue_declare(queue="hello3")

# 3. 确定回调函数
def call_back(channel, method, properties, body):
    time.sleep(1)
    print(f"call back receive body is {body}")
    channel.basic_ack(delivery_tag=method.delivery_tag)

# 分发策略改成公平分发,多劳多得
mq_channel.basic_qos(prefetch_count=1)      # prefetch_count=1,限制每次只发送不超过一条数据到同一个消费者

# 4. 确定监听队列参数
mq_channel.basic_consume(queue="hello3",
                         auto_ack=False,
                         on_message_callback=call_back)

print("wait for message from MQ")

# 5. 开始正式监听
mq_channel.start_consuming()
四. 交换机模式
4.1 发布订阅模式 fanout
发布订阅模式会将消息发送给所有的消费者,而消息队列中的数据被消费一次就会消失。所以在发布订阅模式下,RabbitMQ会为每个消费者创建一个队列,生产者在生产消息时,会将消息放置在所有的消息队列里。

生产者不再创建队列了,而是创建交换机,生产出来的数据写入到交换机里;
消费者获取交换机,并创建队列,然后将队列绑定在交换机上,监听队列消费数据。
生产者生产的数据,多个消费者都能同时消费到。
生产者 producer.py
# 发布订阅模式

import pika

# 1. 连接rabbitmq
mq_connection = pika.BlockingConnection(pika.ConnectionParameters("localhost"))
mq_channel = mq_connection.channel()

# 2. 声明一个类型为fanout的交换机
mq_channel.exchange_declare(exchange="logs",    # 交换机名字
                            exchange_type="fanout"  # fanout:发布订阅类型
                            )

# 3. 向交换机中插入数据
msg = "fanout: Hello World".encode("utf-8")
mq_channel.basic_publish(exchange="logs",
                         routing_key="",
                         body=msg
                         )

print("Sent Hello World to fanout exchange")

mq_channel.close()
mq_connection.close()
消费者 consumer.py
# 发布订阅模式

import pika

# 1. 连接rabbitmq
mq_connection = pika.BlockingConnection(pika.ConnectionParameters("localhost"))
mq_channel = mq_connection.channel()

# 2. 声明一个类型为fanout的交换机
mq_channel.exchange_declare(exchange="logs",  # 交换机名字
                            exchange_type="fanout"  # fanout:发布订阅类型
                            )

# 3. 声明一个队列,必须由消费者创建
declare_result = mq_channel.queue_declare("", exclusive=True)   # 服务会自动创建队列
queue_name = declare_result.method.queue
print(queue_name)

# 4. 将队列绑定在交换机上
mq_channel.queue_bind(exchange="logs", queue=queue_name)

# 5. 确定回调函数
def call_back(channel, method, properties, body):
    print(f"call back receive body is {body}")

# 6. 确定监听队列
mq_channel.basic_consume(queue=queue_name, auto_ack=True, on_message_callback=call_back)

# 7. 开始正式监听
mq_channel.start_consuming()
4.2 关键字模式
关键字模式,生产者在向交换机插入数据时候,将这条数据和一个关键字绑定在一块;消费者创建的消息队列,借助一个或者多个关键字,将消息队列和交换机绑定在一起,这样不同的消费者就可以消费不同的数据。

生产者和消费者的关键字要完全匹配,数据才能被消费。
生产者 producer.py
# 关键字模式

import pika

# 1. 连接rabbitmq
mq_connection = pika.BlockingConnection(pika.ConnectionParameters("localhost"))
mq_channel = mq_connection.channel()

# 2. 声明一个类型为direct的交换机
mq_channel.exchange_declare(exchange="logs2",    # 交换机名字
                            exchange_type="direct"  # direct:关键字模式
                            )

# 3. 向交换机中插入数据
msg = "direct: Hello World, error".encode("utf-8")
mq_channel.basic_publish(exchange="logs2",
                         routing_key="error",   # 插入数据时要绑定关键字
                         body=msg
                         )

print("Sent Hello World to direct exchange")

mq_channel.close()
mq_connection.close()
消费者 consumer.py
# 关键字模式

import pika

# 1. 连接rabbitmq
mq_connection = pika.BlockingConnection(pika.ConnectionParameters("localhost"))
mq_channel = mq_connection.channel()

# 2. 声明一个类型为direct的交换机
mq_channel.exchange_declare(exchange="logs2",  # 交换机名字
                            exchange_type="direct"  # direct:关键字模式
                            )

# 3. 声明一个队列,必须由消费者创建
declare_result = mq_channel.queue_declare("", exclusive=True)   # 服务会自动创建队列
queue_name = declare_result.method.queue

# 4. 将队列绑定在交换机上,同时绑定关键字,可以是多个关键字,注意routing_key不能写一个列表,即当前这个消费者可以消费
# 关键字为"info, warn, error"的数据。
mq_channel.queue_bind(exchange="logs2",
                      queue=queue_name,
                      routing_key="info"    # 绑定info关键字
                      )
mq_channel.queue_bind(exchange="logs2", queue=queue_name, routing_key="warn")
mq_channel.queue_bind(exchange="logs2", queue=queue_name, routing_key="error")

# 5. 确定回调函数
def call_back(channel, method, properties, body):
    print(f"call back receive body is {body}")

# 6. 确定监听队列
mq_channel.basic_consume(queue=queue_name, auto_ack=True, on_message_callback=call_back)

# 7. 开始正式监听
mq_channel.start_consuming()
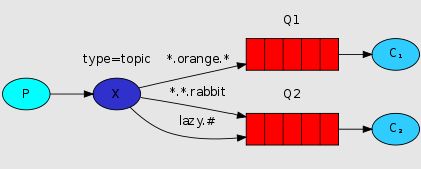
4.3 通配符模式
通配符模式和关键字模式类似,只不过通配符模式支持正则匹配。
符号 “#”:匹配一个或者多个词。
符号 “*”:仅匹配一个词。

生产者 producer.py
# 通配符模式

import pika

# 1. 连接rabbitmq
mq_connection = pika.BlockingConnection(pika.ConnectionParameters("localhost"))
mq_channel = mq_connection.channel()

# 2. 声明一个类型为direct的交换机
mq_channel.exchange_declare(exchange="logs3",    # 交换机名字
                            exchange_type="topic"  # topic: 通配符模式
                            )

# 3. 向交换机中插入数据
msg = "topic type: Hello World".encode("utf-8")
mq_channel.basic_publish(exchange="logs3",
                         routing_key="hehe.weather.news",   # 插入数据时要绑定正则
                         body=msg
                         )

print("Sent Hello World to direct exchange")

mq_channel.close()
mq_connection.close()
消费者 consumer.py
# 通配符模式

import pika

# 1. 连接rabbitmq
mq_connection = pika.BlockingConnection(pika.ConnectionParameters("localhost"))
mq_channel = mq_connection.channel()

# 2. 声明一个类型为direct的交换机
mq_channel.exchange_declare(exchange="logs3",  # 交换机名字
                            exchange_type="topic"  # topic: 通配符模式
                            )

# 3. 声明一个队列,必须由消费者创建
declare_result = mq_channel.queue_declare("", exclusive=True)  # 服务会自动创建队列
queue_name = declare_result.method.queue

# 4. 将队列绑定在交换机上
mq_channel.queue_bind(exchange="logs3", queue=queue_name, routing_key="usa.#")  # 绑定相关正则
mq_channel.queue_bind(exchange="logs3", queue=queue_name, routing_key="#.news")
mq_channel.queue_bind(exchange="logs3", queue=queue_name, routing_key="*.weather")

# 5. 确定回调函数
def call_back(channel, method, properties, body):
    print(f"call back receive body is {body}")

# 6. 确定监听队列
mq_channel.basic_consume(queue=queue_name, auto_ack=True, on_message_callback=call_back)

# 7. 开始正式监听
mq_channel.start_consuming()

