ELK-日志服务【logstash-安装与使用】
目录
【1】安装logstash
logstash input 插件的作用与使用方式
【2】input --> stdin插件:从标准输入读取数据,从标准输出中输出内容
【3】input -- > file插件:从文件中读取数据
【4】input -- > beat插件:从filebeat中读取数据,然后标准输出
【5】input --> kafka插件:从kafka中读取数据
logstash Filter 插件的作用与使用
【6】 Filter --> Grok 插件:将非结构化数据转换成 JSON 结构化数据
【7】Filter --> Geoip插件:根据IP地址提供对应的低于信息,经纬度、城市名等
【8】Filter --> Date插件:将日期字符串解析为日志类型,然后替换@timestamp字段或指定的其他字段
【9】Filter --> useragent插件:根据 agent 字段,解析出浏览器设备、操作系统等
【1】安装logstash
[root@logstash ~]# yum -y install java
[root@logstash ~]# yum -y localinstall logstash-7.4.0.rpm
logstash input 插件的作用与使用方式
【2】input --> stdin插件:从标准输入读取数据,从标准输出中输出内容
[root@logstash ~]# vim /etc/logstash/conf.d/stdin_logstash.conf

input {
  stdin {
    type => "stdin"
    tags => "stdin_tags"
  }
}
output {
  stdout {
    codec => rubydebug
  }
}

## 启动
[root@logstash ~]# /usr/share/logstash/bin/logstash -f /etc/logstash/conf.d/stdin_logstash.conf -r
【3】input -- > file插件:从文件中读取数据
[root@logstash ~]# vim /etc/logstash/conf.d/file_logstash.conf

input {
  file {
    path => "/var/log/messages"
    type => syslog
    exclude => "*.gz"                 # 排除,基于glob匹配语法
    start_position => "beginning"     # 第一次从头读取文件
    stat_interval => "3"              # 定时检查文件是否更新,默认1秒
  }
}
output {
  stdout {
    codec => rubydebug
  }
}

[root@logstash ~]# /usr/share/logstash/bin/logstash -f /etc/logstash/conf.d/file_logstash.conf -r
【4】input -- > beat插件:从filebeat中读取数据,然后标准输出
[root@logstash ~]# vim /etc/logstash/conf.d/beat_logstash.conf

input {
  beats {
    port => 5044
  }
}
output {
  stdout {
    codec => rubydebug
  }
}
【5】input --> kafka插件:从kafka中读取数据
input {
  kafka {
    zk_connect => "kafka1:2181,kafka2:2181,kafka3:2181"
    group_id => "logstash"
    topic_id => "apache_logs"
    consumer_threads => 16
  }
}
logstash Filter 插件的作用与使用
- 数据从源到存储过程中,logstash 的 filter 过滤器能够解析各个事件,识别已命名的字段结构,并将它们转换成通用格式,以便更轻松、更快速地分析和实现商业价值
- Grok 从非结构换数据中派生出结构
- Geoip 从IP 地址分析出地理坐标
- useragent 从请求中分析操作系统、设备类型
【6】 Filter --> Grok 插件:将非结构化数据转换成 JSON 结构化数据
- 我们希望将下面的非结构化数据解析成json结构化的数据格式
- grok中内置了非常多pattern可以直接使用
[root@logstash ~]# tailf /var/log/nginx/access.log
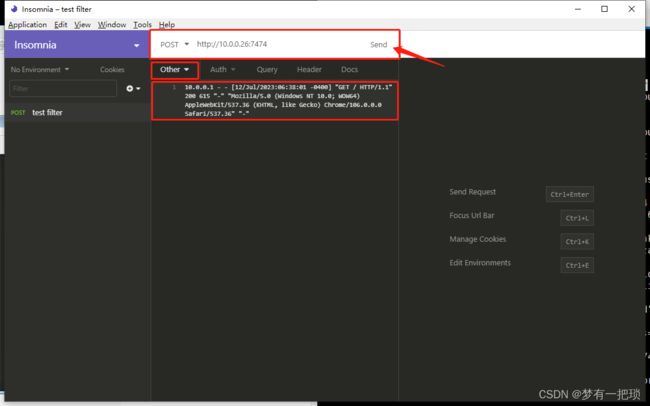
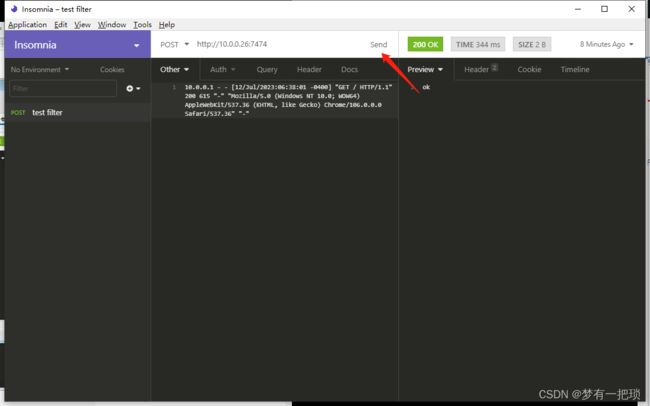
101.201.253.168 - - [12/Jul/2023:07:38:01 -0400] "GET / HTTP/1.1" 200 4 "-" "Mozilla/5.0 (Windows NT 10.0; Win64; x64; rv:109.0) Gecko/20100101 Firefox/115.0" "-"- 使用grok pattern 将nginx 日志格式转化为 json格式,我们先看下没有转换以前的数据样子
[root@logstash ~]# vim /etc/logstash/conf.d/grok_nginx_logstash.conf
input {
  http {
    port => 7474
  }
}
output {
  stdout {
    codec => rubydebug
  }
}

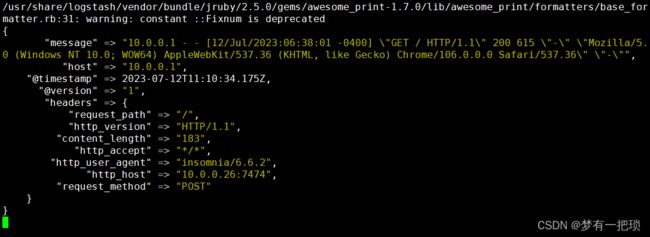
[root@logstash ~]# /usr/share/logstash/bin/logstash -f /etc/logstash/conf.d/grok_nginx_logstash.conf -r- 我们发现日志格式并没有处理,需要使用filter中的grok插件
[root@logstash ~]# vim /etc/logstash/conf.d/grok_nginx_logstash.conf

input {
  http {
    port => 7474
  }
}
filter {
  grok {
    match => {
      "message" => "%{COMBINEDAPACHELOG}"
    }
  }
}
output {
  stdout {
    codec => rubydebug
  }
}
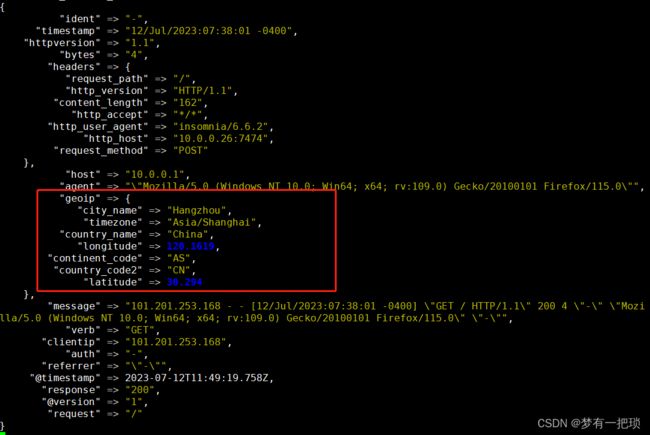
- 被解析的源格式依然在,还会输出解析后的key-value格式的数据
【7】Filter --> Geoip插件:根据IP地址提供对应的低于信息,经纬度、城市名等
- 使用geoip提取nginx日志中clientip字段,获取地域信息
[root@logstash ~]# vim /etc/logstash/conf.d/grok_nginx_logstash.conf

input {
  http {
    port => 7474
  }
}
filter {
  grok {
    match => {
      "message" => "%{COMBINEDAPACHELOG}"
    }
  }
  geoip {
    source => "clientip"
  }
}
output {
  stdout {
    codec => rubydebug
  }
}- 如果内容太多,可以使用fileds选择自己需要的
input {
  http {
    port => 7474
  }
}
filter {
  grok {
    match => {
      "message" => "%{COMBINEDAPACHELOG}"
    }
  }
  geoip {
    source => "clientip"
    fields => ["city_name","country_name","country_code2","timezone","longitude","latitude","continent_code"]
  }
}
output {
  stdout {
    codec => rubydebug
  }
}
【8】Filter --> Date插件:将日期字符串解析为日志类型,然后替换@timestamp字段或指定的其他字段
- match 类型为数组,用于指定日期匹配的格式,可以以此指定多种日期格式
- target 类型为字符串,用于指定赋值的字段名,默认是@timestamp
- timezone 类型为字符串,用于指定时区域
将nginx请求中的timestamp日志进行解析,替换@timestamp中的数据,为什么需要怎么做?
- timestamp:日志的访问时间
- @timestamp:日志的写入时间
- kibana 展示的@timestamp信息中需要的是真实的访问时间,我们就需要将timestamp中的信息覆盖掉@timestamp中
[root@logstash conf.d]# vim /etc/logstash/conf.d/grok_nginx_logstash.conf
input {
  http {
    port => 7474
  }
}
filter {
  grok {
    match => {
      "message" => "%{COMBINEDAPACHELOG}"
    }
  }
  geoip {
    source => "clientip"
    fields => ["city_name","country_name","country_code2","timezone","longitude","latitude","continent_code"]
  }
  date {
    match => ["timestamp", "dd/MMM/yyyy:HH:mm:ss Z" ]
    target => "@timestamp"
    timezone => "Asia/Shanghai"
  }
}
output {
  stdout {
    codec => rubydebug
  }
}
【9】Filter --> useragent插件:根据 agent 字段,解析出浏览器设备、操作系统等
[root@logstash conf.d]# vim /etc/logstash/conf.d/grok_nginx_logstash.conf
input {
  http {
    port => 7474
  }
}
filter {
  grok {
    match => {
      "message" => "%{COMBINEDAPACHELOG}"
    }
  }
  geoip {
    source => "clientip"
    fields => ["city_name","country_name","country_code2","timezone","longitude","latitude","continent_code"]
  }
  date {
    match => ["timestamp", "dd/MMM/yyyy:HH:mm:ss Z" ]
    target => "@timestamp"
    timezone => "Asia/Shanghai"
  }
  useragent {
    source => "agent"
    target => "useragent"   ## 也可以填agent,将agent中的数据覆盖掉
  }
}
output {
  stdout {
    codec => rubydebug
  }
}


