SpringCloud H版、SpringCloud Alibaba整合电商项目(谷粒商城2020)技术总结
目录
- 一、初级篇
-
- 1. docker的使用
-
- 1.1 安装mysql
- 1.2 docker安装redis
- 2. 人人开源 搭建后台管理系统
-
- 2.1 配置
- 2.2. 逆向工程
- 2.3 跨域资源共享
- 2.4 阿里云对象存储(OSS)
- 2.5 JSR303后端校验
- 2.6 设计错误状态码
- 二、高级篇
-
- 1. ELASTICSEARCH
-
- 1.1 概述
- 1.2 商品上架
- 1.3 商品检索
- 2. 搭建域名访问环境
-
- 2.1 正向代理、反向代理
- 2.2 遇到的问题
- 3. 性能压测与优化
-
- 3.1 jvisualvm
- 3.2 Jmeter
- 3.3 Nginx动静分离
- 4. 缓存与分布式锁
-
- 4.1 缓存
- 4.2 分布式锁——Redisson
- 4.3 缓存数据一致性
- 4.4 Spring Cache
- 5. 异步 & 线程池
-
- 5.1 线程回顾
-
- 5.1.1 初始化线程的 4 种方式
- 5.1.2 线程池的 7 大参数
- 5.1.4 开发中为什么使用线程池
- 5.2 CompletableFuture 异步编排
-
- 5.2.1 创建异步对象
- 5.2.2 计算完成时回调方法
- 5.2.3 handle 方法
- 5.2.4 线程串行方法
- 5.2.5 两任务组合
- 8.2.7 多任务组合
- 8.3 异步任务获取 Item
- 6. 认证服务
-
- 6.1 阿里云短信服务发送验证码
- 6.2 用户注册
-
- 6.2.1 编写 vo 接收页面提交
- 6.2.2 RedirectAttributes & 用户注册Controller & MD5与盐值加密
- 6.3 OAuth2.0社交登录
- 6.4 分布式 Session不共享不同步问题
- 6.5 SpringSession
-
- 6.5.1 核心原理
- 6.5.2 整合SpringSession
- 7.购物车服务
-
- 7.1 数据模型分析
-
- 7.1.1 数据存储
- 7.1.2 数据结构
- 7.1 ThreadLocal用户身份鉴别
-
- 7.1.1 用户身份鉴别方式
- 7.1.2 使用ThreadLocal进行用户身份鉴别信息传递
- 8. 订单、库存服务
-
- 8.1 RabbitMQ
-
- 8.1.1 消息代理规范
- 8.1.2 应用场景
- 8.1.3 RabbitMQ核心概念
- 8.1.4 RabbitMQ运行机制
- 8.1.5 RabbitMQ消息确认机制 - 可靠到达
- 8.2 订单确认业务流程
-
- 8.2.1 抽取跳转到订单确认页时携带的Vo:
- 8.2.2 Vo的数据获取
- 8.2.3 Feign远程调用丢失请求头问题
- 8.2.4 Feign 异步情况丢失上下文问题
- 8.2 订单确认业务流程
-
- 8.2.1 模型抽取
- 8.2.2 分布式事务
- 8.3 使用消息队列实现最终一致性
-
- 8.3.1 场景
- 8.3.2 RabbitMQ实现延迟队列
- 8.3.3 定时关单与库存解锁主体逻辑
- 9. 秒杀服务
-
- 9.1 秒杀(高并发)系统关注的问题
- 9.2 秒杀架构设计
-
- 9.2.1 存储模型设计
- 9.3 商品上架
-
- 9.3.1 定时上架(Redisson分布式锁、Redisson信号量、随机码)
- 9.3.2 获取当前商品的秒杀信息
- 9.4 秒杀
- 10. Sentinel服务流控、熔断和降级
-
- 10.1 流控规则设置
- 10.2 自定义流控响应
- 10.3 网关流控
- 10.4 feign的流控和降级
- 11. Zipkin链路追踪
-
- 11.1 相关术语
一、初级篇
1. docker的使用
1.1 安装mysql
-
每个容器,相当于在linux内开辟一个小型的linux,通过
docker exec -it mysql bin/bash进入容器,可看到与linux系统相同的目录结构。 -
vim修改/mydata/mysql/conf/my.conf下的mysql配置文件:
[client]
default-character-set=utf8
[mysql]
default-character-set=utf8
[mysqld]
init_connect='SET collation_connection = utf8_unicode_ci'
init_connect='SET NAMES utf8'
character-set-server=utf8
collation-server=utf8_unicode_ci
skip-character-set-client-handshake
skip-name-resolve
1.2 docker安装redis
同理,我们使用docker安装redis:
mkdir -p /mydata/redis/conf
touch /mydata/redis/conf/redis.conf
touch命令有两个功能:
①是用于把已存在文件的时间标签更新为系统当前的时间(默认方式),它们的数据将原封不动地保留下来;
②是用来创建新的空文件。
docker run -p 6379:6379 --name redis \
-v /mydata/redis/data:/data \
-v /mydata/redis/conf/redis.conf:/etc/redis/redis.conf \
-d redis redis-server /etc/redis/redis.conf
默认是不持久化的。在配置文件中输入appendonly yes,就可以 AOF 持久化了。
vim /mydata/redis/conf/redis.conf
进入redis客户端:
docker exec -it redis redis-cli
2. 人人开源 搭建后台管理系统
2.1 配置
renren-fast + renren-fast-vue 组成了一套前后端分离的后台管理系统
① renren-fast
- 直接拷贝到 kedamall 工程里
- 使用
renren-fast/db/mysql.sql,建表 - 修改项目中的
application.yml
url: jdbc:mysql://云服务器地址/kedamall-admin?useUnicode=true&characterEncoding=UTF-8&serverTimezone=Asia/Shanghai
username: root
password: root
- 测试:
http://localhost:8080/renren-fast/
② renren-fast-vue: 用vscode打开
2.2. 逆向工程
为每个微服务生成最基本的CRUD代码
renren-generator
- 修改
application.yml(以逆向 表kedamall_pms为例)
url: jdbc:mysql://腾讯云外网地址/kedamall-pms?useUnicode=true&characterEncoding=UTF-8&useSSL=false&serverTimezone=Asia/Shanghai
username: root
password: root
- 修改
generator.properties
# 主目录
mainPath=com.example
#包名
package=com.example.kedamall
#模块名
moduleName=product
#作者
author=作者
#email
email=邮箱

#表前缀(类名不会包含表前缀) # 我们的pms数据库中的表的前缀都pms
# 如果写了表前缀,每一张表对于的javaBean就不会添加前缀了
tablePrefix=pms_
- 运行RenrenApplication,访问
http://localhost:801/来逆向生成代码
2.3 跨域资源共享
由vue发送http请求给后端 kedamall 项目的网关localhost:88,但需要解决跨域的问题
① 替换static\config\index.js文件中的window.SITE_CONFIG[‘baseUrl’],统一向网关发送请求:
window.SITE_CONFIG['baseUrl'] = 'http://localhost:88/api';
并将renren-fast注册到nacos注册中心中(我们需要通过网关来完成路径的映射)
application:
    name: renren-fast
  cloud:
    nacos:
      discovery:
        server-addr: 192.168.137.14:8848

      config:
        name: renren-fast
        server-addr: 192.168.137.8848
        namespace: ee409c3f-3206-4a3b-ba65-7376922a886d
并配置网关路由,前台的所有请求都是经由http://localhost:88/api来转发的,在kedamall-gateway中添加路由规则:
- id: admin_route
		  ## lb://renren-fast——表示负载均衡到某一服务(只需写服务名)
          uri: lb://renren-fast
          ## 断言:
          predicates:
          	  ## 是指定的路径就路由过来
            - Path=/api/**
② 此时现在的验证码请求路径:
http://localhost:88/api/captcha.jpg?uuid=69c79f02-d15b-478a-8465-a07fd09001e6
原始的验证码请求路径:
http://localhost:8001/renren-fast/captcha.jpg?uuid=69c79f02-d15b-478a-8465-a07fd09001e6
因此需要对请求路径进行重写一去掉/api前缀
spring:
  cloud:
    gateway:
      routes:
      - id: admin_route
          uri: lb://renren-fast
          predicates:
            - Path=/api/**
          filters:
            # 路径重写
            - RewritePath=/api/(?>/?.*), /renren-fast/$\{segment}
③ 解决跨域问题
![]()
什么是跨域?
- CORS——跨域资源共享
- 同源策略

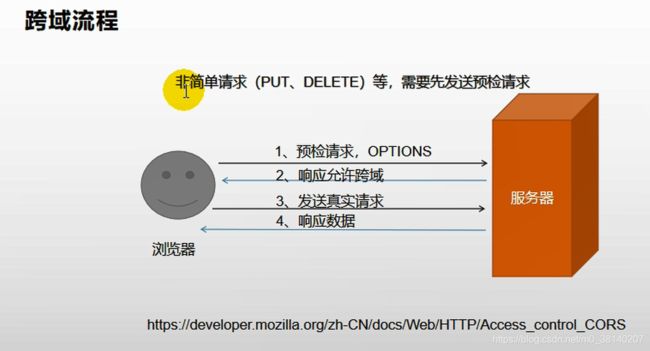
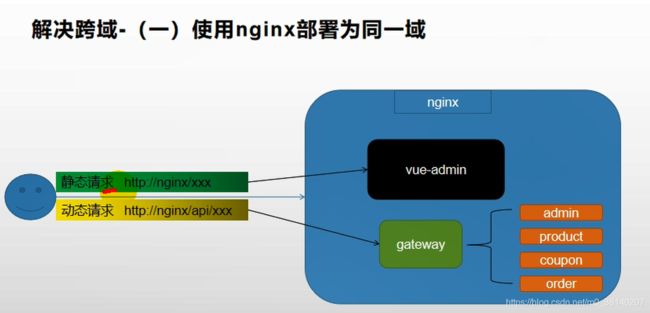

解决方法:在网关中定义“KedamallCorsConfiguration类,用来做过滤——允许所有的请求跨域,即通过设置第2步,告诉浏览器可以跨域
@Configuration
public class KedamallCorsConfiguration {

	// SpringBoot 提供的一个filter
    @Bean
    public CorsWebFilter corsWebFilter(){
        UrlBasedCorsConfigurationSource source=new UrlBasedCorsConfigurationSource();
        CorsConfiguration corsConfiguration = new CorsConfiguration();
        corsConfiguration.addAllowedHeader("*");
        corsConfiguration.addAllowedMethod("*");
        corsConfiguration.addAllowedOrigin("*");
        corsConfiguration.setAllowCredentials(true);

        source.registerCorsConfiguration("/**",corsConfiguration);
        return new CorsWebFilter(source);
    }
}
2.4 阿里云对象存储(OSS)
分布式服务下,我们采用文件存储服务器(采用阿里云的)进行文件存储;具体的,我们把商品的图片等信息存到阿里云OSS中。
2.5 JSR303后端校验
JSR303——Java 规范提案No.303,都在javax.validation.constraints包中;
步骤①:给Bean加校验注解,例如:
@NotNull@NotEmpty——该注解修饰的字段不能为null或""@NotBlank——该注解不能为null,并且至少包含一个非空白字符。
也可自定义错误消息:
@NotBlank(message = "品牌名必须非空")
private String name;
步骤②:在请求方法处使用校验注解@Valid,开启校验:
    @RequestMapping("/save")
    public R save(@Valid @RequestBody BrandEntity brand){
		brandService.save(brand);

        return R.ok();
    }
步骤③:给校验的Bean后,紧跟一个BindingResult,就可以获取到校验的结果。拿到校验的结果,就可以自定义的封装。
 	@RequestMapping("/save")
    public R save(@Valid @RequestBody BrandEntity brand, BindingResult result){
        if( result.hasErrors()){
            Map<String,String> map=new HashMap<>();
            //1.获取错误的校验结果
            result.getFieldErrors().forEach((item)->{
                //获取发生错误时的message
                String message = item.getDefaultMessage();
                //获取发生错误的字段
                String field = item.getField();
                map.put(field,message);
            });
            return R.error(400,"提交的数据不合法").put("data",map);
        }

		brandService.save(brand);
        return R.ok();
    }
步骤④:统一异常处理。使用 SpringMVC 提供的 RestControllerAdvice=@ControllerAdvice+@ResponseBody,通过basePackages能够说明处理哪些路径下的异常。
@Slf4j
@RestControllerAdvice(basePackages = "com.example.kedamall.product.controller")
public class KedamallExceptionAdvice {
    @ExceptionHandler(value = Exception.class)
    public R handleValidException(MethodArgumentNotValidException exception){
        Map<String,String> map=new HashMap<>();
        BindingResult bindingResult = exception.getBindingResult();
        bindingResult.getFieldErrors().forEach(fieldError -> {
            String message = fieldError.getDefaultMessage();
            String field = fieldError.getField();
            map.put(field,message);
        });

        log.error("数据校验出现问题{},异常类型{}",exception.getMessage(),exception.getClass());
        return R.error(BizCodeEnum.VALID_EXCEPTION.getCode(),BizCodeEnum.VALID_EXCEPTION.getMsg()).put("data",map);
    }
2.6 设计错误状态码
正规开发过程中,错误状态码有着严格的定义规则,该在项目中我们的错误状态码定义如下:
错误码和错误信息定义类
- 错误码定义规则为 5位数字
- 前两位表示业务场景,最后三位表示错误码。例如:100001。10——通用,001——系统未知异常
- 维护错误码后需要维护错误描述,将他们定义为枚举形式
package com.example.common.exception;

public enum BizCodeEnum {
    UNKNOW_EXEPTION(10000,"系统未知异常"),
    VALID_EXCEPTION( 10001,"参数格式校验失败"),
    SMS_CODE_EXCEPTION( 10002,"请求频率太高,请稍后再试"),
    USER_EXIST_EXCEPTION( 15001,"用户存在异常"),
    PHONE_EXIST_EXCEPTION( 15002,"手机号存在异常"),
    LOGIN_ACCOUNT_OR_PASSWORD_ERROR_EXCEPTION( 15003,"帐号或密码错误"),
    NO_STOCK_EXCEPTION( 21000,"商品库存不足"),
    PRODUCT_UP_EXCEPTION(11000,"商品上架异常");

    private int code;
    private String msg;


    BizCodeEnum(int code, String msg) {
        this.code = code;
        this.msg = msg;
    }

    public int getCode() {
        return code;
    }

    public String getMsg() {
        return msg;
    }
}
二、高级篇
1. ELASTICSEARCH
1.1 概述
ElasticSearch是一个搜索和分析引擎:
- 全文检索功能比MySQL强大
- 性能更好,因为ES将数据存到内存,且天然支持分布式,不必担心内存不够的问题
| 关系数据库 | 数据库 | 表 | 行 | 列 |
|---|---|---|---|---|
| Elasticsearch | 索引(Index) | 类型(type) | 文档(Docments) | 字段(Fields) |
只保存检索页面需要展示的信息——sku的基本信息;
spu 在 ElasticSearch 中的存储模型的抉择:
- 如果每个sku都存储 同一个spu的规格参数(attrs),会有冗余存储
- 将 规格参数 单独建立索引会出现检索时出现大量数据传输的问题,会阻塞网络
因我们选用第一种存储模型——以空间换时间
1.2 商品上架
步骤①:向ES添加商品属性映射
PUT product
{
    "mappings":{
        "properties": {
            "skuId":{
                "type": "long"
            },
            "spuId":{
                "type": "keyword"
            },
            "skuTitle": {
                "type": "text",
                "analyzer": "ik_smart"
            },
            "skuPrice": {
                "type": "keyword"
            },
            "skuImg":{
                "type": "keyword",
                "index": false,
                "doc_values": false
            },
            "saleCount":{
                "type":"long"
            },
            "hasStock": {
                "type": "boolean"
            },
            "hotScore": {
                "type": "long"
            },
            "brandId": {
                "type": "long"
            },
            "catalogId": {
                "type": "long"
            },
            "brandName": {
                "type": "keyword",
                "index": false,
                "doc_values": false
            },
            "brandImg":{
                "type": "keyword",
                 "index": false,
                "doc_values": false
            },
            "catalogName": {
                "type": "keyword",
                "index": false,
                "doc_values": false
            },
            "attrs": {
                "type": "nested",
                "properties": {
                    "attrId": {
                        "type": "long"
                    },
                    "attrName": {
                        "type": "keyword",
                        "index": false,
                        "doc_values": false
                    },
                    "attrValue": {
                        "type": "keyword"
                    }
                }
            }
        }
    }
}
步骤②:商品上架接口实现
商品上架需要在 ES 中保存 spu 信息并更新 spu 的状态信息,由于SpuInfoEntity与索引的数据模型并不对应,所以我们要建立专门的 TO 进行数据传输
package com.example.common.to.es;

import lombok.Data;
import java.math.BigDecimal;
import java.util.List;
@Data
public class SkuEsModel {
    private Long skuId;
    private Long spuId;
    private String skuTitle;
    private BigDecimal skuPrice;
    private String skuImg;
    private Long saleCount;
    private boolean hasStock;
    private Long hotScore;
    private Long brandId;
    private Long catalogId;
    private String brandName;
    private String brandImg;
    private String catalogName;
    private List<Attr> attrs;

    @Data
    public static class Attr{
        private Long attrId;
        private String attrName;
        private String attrValue;
    }
}
每个spu对应的各个sku的规格参数相同,因此我们将查询规格参数提前,只查询一次
Product微服务下:
	@PostMapping("/{spuId}/up")
    public R spuUp(@PathVariable(value = "spuId") Long spuId){
        spuInfoService.upSpuForSearch(spuId);
        return R.ok();
    }
	public void upSpuForSearch(Long spuId) {
        //1、查出当前spuId对应的所有sku信息,品牌的名字
        List<SkuInfoEntity> skuInfoEntities=skuInfoService.getSkusBySpuId(spuId);
        //4、查出当前sku的所有可以被用来检索的规格属性
        List<ProductAttrValueEntity> productAttrValueEntities = productAttrValueService.list(new QueryWrapper<ProductAttrValueEntity>().eq("spu_id", spuId));
        List<Long> attrIds = productAttrValueEntities.stream().map(attr -> {
            return attr.getAttrId();
        }).collect(Collectors.toList());
        List<Long> searchIds=attrService.selectSearchAttrIds(attrIds);
        Set<Long> ids = new HashSet<>(searchIds);
        List<SkuEsModel.Attr> searchAttrs = productAttrValueEntities.stream().filter(entity -> {
            return ids.contains(entity.getAttrId());
        }).map(entity -> {
            SkuEsModel.Attr attr = new SkuEsModel.Attr();
            BeanUtils.copyProperties(entity, attr);
            return attr;
        }).collect(Collectors.toList());

        //1、发送远程调用,库存系统查询是否有库存
        Map<Long, Boolean> stockMap = null;
        try {
            List<Long> longList = skuInfoEntities.stream().map(SkuInfoEntity::getSkuId).collect(Collectors.toList());
            List<SkuHasStockVo> skuHasStocks = wareFeignService.getSkuHasStocks(longList);
            stockMap = skuHasStocks.stream().collect(Collectors.toMap(SkuHasStockVo::getSkuId, SkuHasStockVo::getHasStock));
        }catch (Exception e){
            log.error("远程调用库存服务失败,原因{}",e);
        }

        //2、封装每个sku的信息
        Map<Long, Boolean> finalStockMap = stockMap;
        List<SkuEsModel> skuEsModels = skuInfoEntities.stream().map(sku -> {
            SkuEsModel skuEsModel = new SkuEsModel();
            BeanUtils.copyProperties(sku, skuEsModel);
            skuEsModel.setSkuPrice(sku.getPrice());
            skuEsModel.setSkuImg(sku.getSkuDefaultImg());
            //TODO 2、热度评分。0
            skuEsModel.setHotScore(0L);
            //TODO 3、查询品牌和分类的名字信息
            BrandEntity brandEntity = brandService.getById(sku.getBrandId());
            skuEsModel.setBrandName(brandEntity.getName());
            skuEsModel.setBrandImg(brandEntity.getLogo());
            CategoryEntity categoryEntity = categoryService.getById(sku.getCatalogId());
            skuEsModel.setCatalogName(categoryEntity.getName());
            //设置可搜索属性
            skuEsModel.setAttrs(searchAttrs);
            //设置是否有库存
            skuEsModel.setHasStock(finalStockMap==null?false:finalStockMap.get(sku.getSkuId()));
            return skuEsModel;
        }).collect(Collectors.toList());

        //TODO 5、将数据发给 ES 进行保存:kedamall-search
        R r = searchFeignService.productStatusUp(skuEsModels);
        if (r.getCode()==0){
            this.baseMapper.upSpuStatus(spuId, ProductConstant.ProductStatusEnum.SPU_UP.getCode());
        }else {
            log.error("商品远程ES保存失败");
        }
    }
Search微服务下:
	//上架商品
    @PostMapping("/product")
    public R productStatusUp(@RequestBody List<SkuEsModel> skuEsModels){
        boolean b = false;
        try {
            b = productSaveService.productStatusUp(skuEsModels);
        } catch (IOException e) {
            log.error("ElasticSaveController商品上架错误:{}",e);
            return R.error(BizCodeEnum.PRODUCT_UP_EXCEPTION.getCode(),
                    BizCodeEnum.PRODUCT_UP_EXCEPTION.getMsg());
        }
        if(!b){
            return R.ok();
        } else return R.error(BizCodeEnum.PRODUCT_UP_EXCEPTION.getCode(),
                BizCodeEnum.PRODUCT_UP_EXCEPTION.getMsg());
    }
	@Autowired
    RestHighLevelClient restHighLevelClient;

    @Override
    public boolean productStatusUp(List<SkuEsModel> skuEsModels) throws IOException {
        BulkRequest bulkRequest = new BulkRequest();
        for (SkuEsModel model : skuEsModels) {
            IndexRequest indexRequest = new IndexRequest("product");
            indexRequest.id(model.getSkuId().toString());
            String s = JSON.toJSONString(model);
            indexRequest.source(s, XContentType.JSON);
            bulkRequest.add(indexRequest);
        }
        BulkResponse bulk = restHighLevelClient.bulk(bulkRequest, KedamallElasticSearchConfig.COMMON_OPTIONS);
        //TODO 如果批量出错
        boolean b = bulk.hasFailures();
        if(b){
            log.error("商品上架错误");
        }
        return b;
    }
1.3 商品检索
① 检索条件:
-
全文检索:skuTitle→ keyword
-
排序:skuPrice(价格)
-
过滤:hasStock、skuPrice区间、brandId、catalog3Id、attrs
-
聚合:attrs
完整查询参数: keyword=华为&sort=saleCount_desc/asc&hasStock=0/1&skuPrice=400_1900&brandId=1&catalog3Id=1&attrs=1_3G:4G:5G&attrs=2_骁龙845&attrs=4_高清屏
② 封装页面传递过来的检索条件
/**
 * 封装页面所有可能传递过来的查询条件
 */
@Data
public class SearchParam {
    private String keyword;

    //品牌id,可以多选
    private List<Long> brandId;

    //三级分类id
    private Long catalog3Id;

    //排序条件:sort=price/salecount/hotscore_desc/asc
    private String sort;

    //是否显示有货
    private Integer hasStock;

    //价格区间查询
    private String skuPrice;

    //按照属性进行筛选
    private List<String> attrs;

    //页码
    private Integer pageNum = 1;

    //原生的所有查询条件
    private String _queryString;

}
③ 创建Vo作为返回给页面的数据
/**
 * 查询结果返回
 */
@Data
public class SearchResult {
    //查询到的所有商品信息
    private List<SkuEsModel> product;

    //当前页码
    private Integer pageNum;

    //总记录数
    private Long total;

    //总页码
    private Integer totalPages;
	//页码遍历结果集(分页)
    private List<Integer> pageNavs;

    //当前查询到的结果,所有涉及到的品牌
    private List<BrandVo> brands;

    //当前查询到的结果,所有涉及到的所有属性
    private List<AttrVo> attrs;

    //当前查询到的结果,所有涉及到的所有分类
    private List<CatalogVo> catalogs;

    //===========================以上是返回给页面的所有信息============================//

    /* 面包屑导航数据 */
    private List<NavVo> navs;

    @Data
    public static class NavVo {
        private String navName;
        private String navValue;
        private String link;
    }

    @Data
    @AllArgsConstructor
    public static class BrandVo {

        private Long brandId;

        private String brandName;

        private String brandImg;
    }

    @Data
    @AllArgsConstructor
    public static class AttrVo {

        private Long attrId;

        private String attrName;

        private List<String> attrValue;
    }

    @Data
    @AllArgsConstructor
    public static class CatalogVo {

        private Long catalogId;

        private String catalogName;
    }
}
④ Controller
	/**
     * 自动将页面提交过来的所有请求查询参数自动封装成指定的对象
     */
    @GetMapping("/list.html")
    public String listPage(SearchParam param, Model model){
        //1、根据传递来的页面参数,去 ES中检索商品
        SearchResult result = mallSearchService.search(param);
        model.addAttribute("result",result);
        return "list";
    }
⑤ Service
@Override
public SearchResult search(SearchParam param) {
    // 1、动态构建出查询需要的 DSL语句
    SearchResult result = null;

    //1、准备检索请求
    SearchRequest searchRequest = buildSearchRequest(param);
    try {
        // 2、执行检索请求
        SearchResponse response = client.search(searchRequest, kedamallElasticsearchConfig.COMMON_OPTIONS);

        // 3、分析响应数据封装成我们需要的格式
        result = buildSearchResult(response, param);
    } catch (Exception e) {
        e.printStackTrace();
    }
    return result;
}
	/**
     * 准备检索请求
     * #模糊匹配、过滤(按照属性、分类、品牌、价格区间、库存)、排序、分页、高亮、聚合分析
     */
    private SearchRequest buildSearchRequest(SearchParam param) {

        SearchSourceBuilder sourceBuilder = new SearchSourceBuilder(); //构建DSL语句
        /**
         * 模糊匹配 过滤(按照属性、分类、品牌、价格区间、库存)
         */
        // 1、构建bool - query
        BoolQueryBuilder boolQuery = QueryBuilders.boolQuery();

        // 1.1 must - 模糊匹配
        if (!StringUtils.isEmpty(param.getKeyword())) {
            boolQuery.must(QueryBuilders.matchQuery("skuTitle", param.getKeyword()));
        }

        // 1.2 bool - filter 按照三级分类id来查询
        if (param.getCatalog3Id() != null) {
            boolQuery.filter(QueryBuilders.termQuery("catalogId", param.getCatalog3Id()));
        }
        // 1.3 bool - filter 按照品牌id来查询
        if (param.getBrandId() != null && param.getBrandId().size() > 0) {
            boolQuery.filter(QueryBuilders.termsQuery("brandId", param.getBrandId()));
        }
        // 1.4 bool - filter 按照所有指定的属性来进行查询 *******不理解这个attr=1_5寸:8寸这样的设计
        if (param.getAttrs() != null && param.getAttrs().size() > 0) {
            for (String attr : param.getAttrs()) {
                // attr=1_5寸:8寸&attrs=2_16G:8G
                BoolQueryBuilder nestedboolQuery = QueryBuilders.boolQuery();
                String[] s = attr.split("_");
                String attrId = s[0];// 检索的属性id
                String[] attrValues = s[1].split(":");
                nestedboolQuery.must(QueryBuilders.termQuery("attrs.attrId", attrId));
                nestedboolQuery.must(QueryBuilders.termsQuery("attrs.attrValue", attrValues));
                // 每一个必须都生成一个nested查询
                NestedQueryBuilder nestedQuery = QueryBuilders.nestedQuery("attrs", nestedboolQuery, ScoreMode.None);
                boolQuery.filter(nestedQuery);
            }
        }
        // 1.5 bool - filter 按照库存是否存在
        boolQuery.filter(QueryBuilders.termQuery("hasStock", param.getHasStock() == 1 ? true : false));
        // 1.6 bool - filter 按照价格区间
        /**
         * 1_500/_500/500_
         */
        if (!StringUtils.isEmpty(param.getSkuPrice())) {
            RangeQueryBuilder rangeQuery = QueryBuilders.rangeQuery("skuPrice");
            String[] s = param.getSkuPrice().split("_");
            if (s.length == 2) {
                // 区间
                rangeQuery.gte(s[0]).lte(s[1]);
            } else if (s.length == 1) {
                if (param.getSkuPrice().startsWith("_")) {
                    rangeQuery.lte(s[0]);
                }
                if (param.getSkuPrice().endsWith("_")) {
                    rangeQuery.gte(s[0]);
                }
            }
            boolQuery.filter(rangeQuery);
        }
        //把以前所有条件都拿来进行封装
        sourceBuilder.query(boolQuery);

        /**
         * 排序、分页、高亮
         */
        //2.1、排序
        if (!StringUtils.isEmpty(param.getSort())) {
            String sort = param.getSort();
            //sort=hotScore_asc/desc
            String[] s = sort.split("_");
            SortOrder order = s[1].equalsIgnoreCase("asc") ? SortOrder.ASC : SortOrder.DESC;
            sourceBuilder.sort(s[0], order);
        }
        //2.2 分页 pageSize:5
        // pageNum:1 from 0 size:5 [0,1,2,3,4]
        // pageNum:2 from 5 size:5
        // from (pageNum - 1)*size
        sourceBuilder.from((param.getPageNum() - 1) * EsConstant.PRODUCT_PAGESIZE);
        sourceBuilder.size(EsConstant.PRODUCT_PAGESIZE);
        //2.3、高亮
        if (!StringUtils.isEmpty(param.getKeyword())) {
            HighlightBuilder builder = new HighlightBuilder();
            builder.field("skuTitle");
            builder.preTags("");
            builder.postTags("");
            sourceBuilder.highlighter(builder);
        }
        /**
         * 聚合分析
         */
        //1、品牌聚合
        TermsAggregationBuilder brand_agg = AggregationBuilders.terms("brand_agg");
        brand_agg.field("brandId").size(50);
        //品牌聚合的子聚合
        brand_agg.subAggregation(AggregationBuilders.terms("brand_name_agg").field("brandName").size(2));
        brand_agg.subAggregation(AggregationBuilders.terms("brand_img_agg").field("brandImg").size(2));
        // TODO 1、聚合brand
        sourceBuilder.aggregation(brand_agg);
        //2、分类聚合
        TermsAggregationBuilder catalog_agg = AggregationBuilders.terms("catalog_agg").field("catalogId").size(20);
        catalog_agg.subAggregation(AggregationBuilders.terms("catalog_name_agg").field("catalogName").size(1));
        // TODO 2、聚合catalog
        sourceBuilder.aggregation(catalog_agg);
        //3、属性聚合 attr_agg
        NestedAggregationBuilder attr_agg = AggregationBuilders.nested("attr_agg", "attrs");
        // 聚合出当前所有的attrId
        TermsAggregationBuilder attr_id_agg = AggregationBuilders.terms("attr_id_agg").field("attrs.attrId");
        //聚合分析出当前attr_id对应的名字
        attr_id_agg.subAggregation(AggregationBuilders.terms("attr_name_agg").field("attrs.attrName").size(1));
        // 聚合分析出当前attr_id对应的可能的属性值attractValue
        attr_id_agg.subAggregation(AggregationBuilders.terms("attr_value_agg").field("attrs.attrValue").size(50));
        attr_agg.subAggregation(attr_id_agg);
        // TODO 3、聚合attr
        sourceBuilder.aggregation(attr_agg);


        String s = sourceBuilder.toString();
        System.out.println("构建的DSL:" + s);
        SearchRequest searchRequest = new SearchRequest(new String[]{EsConstant.PRODUCT_INDEX}, sourceBuilder);
        return searchRequest;
    }
/**
 * 构建结果数据
 */
private SearchResult buildSearchResult(SearchResponse response, SearchParam param) {

    SearchResult result = new SearchResult();
    SearchHits hits = response.getHits();
    List<SkuEsModel> esModels = new ArrayList<>();
    if (hits.getHits() != null && hits.getHits().length > 0) {
        for (SearchHit hit : hits.getHits()) {
            String sourceAsString = hit.getSourceAsString();
            SkuEsModel skuEsModel = JSON.parseObject(sourceAsString, SkuEsModel.class);
            if (!StringUtils.isEmpty(param.getKeyword())) {
                HighlightField skuTitle = hit.getHighlightFields().get("skuTitle");
                String string = skuTitle.getFragments()[0].string();
                skuEsModel.setSkuTitle(string);
            }
            esModels.add(skuEsModel);
        }
    }
    //1、返回所有查询到的商品
    result.setProducts(esModels);
    //2、当前所有商品设计到的所有属性信息
    List<SearchResult.AttrVo> attrVos = new ArrayList<>();
    ParsedNested attr_agg = response.getAggregations().get("attr_agg");
    ParsedLongTerms attr_id_agg = attr_agg.getAggregations().get("attr_id_agg");
    for (Terms.Bucket bucket : attr_id_agg.getBuckets()) {
        SearchResult.AttrVo attrVo = new SearchResult.AttrVo();
        // 1、得到属性的id
        Long attrId = bucket.getKeyAsNumber().longValue();
        // 2、得到属性的名字
        String attrName = ((ParsedStringTerms) bucket.getAggregations().get("attr_name_agg")).getBuckets().get(0).getKeyAsString();
        // 3、得到属性的所有值
        List<String> attrValue = ((ParsedStringTerms) bucket.getAggregations().get("attr_value_agg")).getBuckets().stream().map(item -> {
            String keyAsString = item.getKeyAsString();
            return keyAsString;
        }).collect(Collectors.toList());
        attrVo.setAttrId(attrId);
        attrVo.setAttrName(attrName);
        attrVo.setAttrValue(attrValue);
        attrVos.add(attrVo);
    }
    result.setAttrs(attrVos);
    //3、当前所有商品的分类信息
    ParsedLongTerms Catalog_agg = response.getAggregations().get("catalog_agg");
    List<SearchResult.CatalogVo> catalogVos = new ArrayList<>();
    List<? extends Terms.Bucket> buckets = Catalog_agg.getBuckets();
    for (Terms.Bucket bucket : buckets) {
        SearchResult.CatalogVo catalogVo = new SearchResult.CatalogVo();
        // 得到分类id
        String keyAsString = bucket.getKeyAsString();
        catalogVo.setCatalogId(Long.parseLong(keyAsString));
        // 得到分类名
        ParsedStringTerms catalog_name_agg = bucket.getAggregations().get("catalog_name_agg");
        String catalog_name = catalog_name_agg.getBuckets().get(0).getKeyAsString();
        catalogVo.setCatalogName(catalog_name);
        catalogVos.add(catalogVo);
    }
    result.setCatalogs(catalogVos);

    //4、当前所有商品的品牌信息
    List<SearchResult.BrandVo> brandVos = new ArrayList<>();
    ParsedLongTerms brand_agg = response.getAggregations().get("brand_agg");
    for (Terms.Bucket bucket : brand_agg.getBuckets()) {
        SearchResult.BrandVo brandVo = new SearchResult.BrandVo();
        // 1、得到品牌的id
        long brandId = bucket.getKeyAsNumber().longValue();
        // 2、得到品牌的图片
        String brandImg = ((ParsedStringTerms) bucket.getAggregations().get("brand_img_agg")).getBuckets().get(0).getKeyAsString();
        // 3、得到品牌的姓名
        String brandname = ((ParsedStringTerms) bucket.getAggregations().get("brand_name_agg")).getBuckets().get(0).getKeyAsString();
        brandVo.setBrandName(brandname);
        brandVo.setBrandId(brandId);
        brandVo.setBrandImg(brandImg);
        brandVos.add(brandVo);
    }
    result.setBrands(brandVos);
    //5、分页信息 - 总记录数
    long total = hits.getTotalHits().value;
    result.setTotal(total);
    //6、分页信息 - 页码
    result.setPageNum(param.getPageNum());
    //7、分页信息 - 总页码
    int totalPages = (int) total % EsConstant.PRODUCT_PAGESIZE == 0 ? (int) total / EsConstant.PRODUCT_PAGESIZE : ((int) total / EsConstant.PRODUCT_PAGESIZE + 1);
    result.setTotalPages(totalPages);

    List<Integer> pageNavs = new ArrayList<>();
    for(int i = 1; i <= totalPages; i++) {
        pageNavs.add(i);
    }
    result.setPageNavs(pageNavs);
    return result;
}
2. 搭建域名访问环境
2.1 正向代理、反向代理
- 反向代理——访问科大商城的时候,我们有后台服务集群(内网部署,而不暴露给外界,避免引起攻击),于是我们在后台服务集群前置一个服务器(反向代理,具有公网 IP,nginx)。当访问 nginx 的时候,nginx 会转给服务集群。反向代理
反向代理隐藏了真实的服务端;当我们请求 Nginx 的时候,就像拨打10086一样,背后可能有成千上万台服务器为我们服务,但具体是哪一台,你不知道,也不需要知道,你只需要知道反向代理服务器是谁就好了,Nginx 就是我们的反向代理服务器,反向代理服务器会帮我们把请求转发到真实的服务器那里去。 - 正向代理——比如要访问 youtube,但是不能直接访问,只能先找个tizi软件,通过tizi软件才能访问youtube。这个tizi软件就叫做正向代理。
2.2 遇到的问题
问题:自己的腾讯云服务器ping不通学校宿舍的电脑
解决:frp 和 nginx 搭建一个内网穿透服务器(穿透校园网)
3. 性能压测与优化
3.1 jvisualvm
用于检测 java 应用资源占用和垃圾回收的情况,cmd 输入 jvisualvm 打开,用于监控内存泄漏、跟踪垃圾回收、执行时内存、cpu分析、线程分析…
① 可查看线程状态:
![]()
- 运行:正在运行的
- 休眠:sleep
- 等待:wait
- 驻留:线程池中的空闲线程
- 监视:阻塞的线程(正在等待锁)
3.2 Jmeter
下载后bin目录 jmeter.bat 打开
① 中间件越多,性能损失越大,大多都损失在了网络交互
② 性能测试主要关注如下指标:
- 吞吐量:每秒钟 系统能够处理的请求数,越大表示系统越能支持高并发;
- 响应时间:服务处理一个请求的耗时,越短说明接口性能越好;
- 错误率:一批请求中结果出错的请求所占比例;
3.3 Nginx动静分离
由于动态资源和静态资源目前都处于服务端,所以为了减轻服务器压力,我们将js、css、img 等静态资源放置在 Nginx 端,以减轻服务器压力。
在 nginx 的 html 文件夹创建 staic 文件夹,并将 index/css 等静态资源全部上传到该文件夹中
步骤①:修改index.html的静态资源路径,使其全部带有static前缀src="/static/index/img/img_09.png"
步骤②:修改nginx的配置文件/mydata/nginx/conf/conf.d/kedamall.conf,若遇到有/static为前缀的请求,转发至 html 文件夹
4. 缓存与分布式锁
4.1 缓存
① 为了系统性能的提升,我们一般都会将部分数据放入缓存中,加速访问
哪些数据适合放入缓存?
- 即时性、数据一致性要求不高的
- 访问量大且更新频率不高的数据(读多、写少)
② 本地缓存面临问题
当有多个服务存在时,每个服务的缓存仅能够为本服务使用,这样每个服务都要查询一次数据库,并且当数据更新时只会更新单个服务的缓存数据,就会造成数据不一致的问题;
解决:所有的服务都到同一个 redis 进行获取数据,就可以避免这个问题

③ 高并发下缓存失效问题
-
缓存穿透
指查询一个一定不存在的数据,由于缓存是不命中,将去查询数据库,但是数据库也无此记录,我们没有将这次查询的null写入缓存。这将导致这个不存在的数据每次请求都要到数据库查询,也就失去了缓存的意义。
风险: 利用不存在的数据进行攻击,数据库瞬时压力增大,最终导致崩溃
解决:null结果缓存,并加入短暂过期时间 -
缓存雪崩
指在我们在缓冲中放了很多数据,并设置了相同的过期时间。这就导致缓存在某一时刻,数据大面积失效,这时大并发的请求将被全部转发到数据库,数据库瞬时压力过重,导致雪崩。
解决: 原有的失效时间基础上增加一个随机值,比如1-5分钟随机,这样每一个缓存的过期时间的重复率就会降低,就很难引发集体失效的事件。 -
缓存击穿
对于一些设置了过期时间的key,如果这些key可能会在某些时间点被超高并发地访问,是一种非常“高频热点”的数据。如果这个key在大量请求同时进来前正好失效,那么所有对这个key的数据查询都落到db,我们称为缓存击穿。
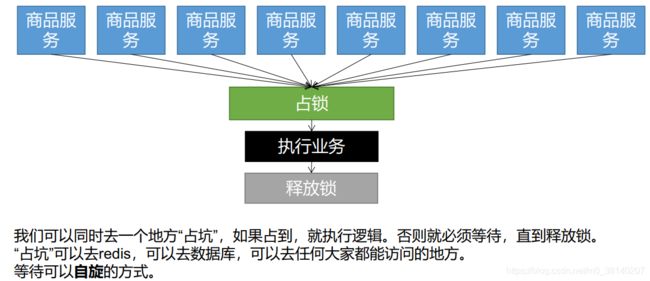
解决: 加锁。大量并发时,只放一个去查数据库,其他人等待,查到以后释放锁,其他人获取到锁,先查缓存,就会有数据,就不用去数据库。
注:内存泄漏及解决办法:进行压力测试时后期后出现堆外内存溢出OutOfDirectMemoryError
-
产生原因:
-
Spring Boot 2.0以后默认使用 Lettuce 操作 Redis 客户端
-
Lettuce 的 bug 导致 Netty 堆外内存溢出
-
-
解决方案:
- 升级lettuce客户端
- 切换使用jedis
④ 本地锁(解决缓存击穿)
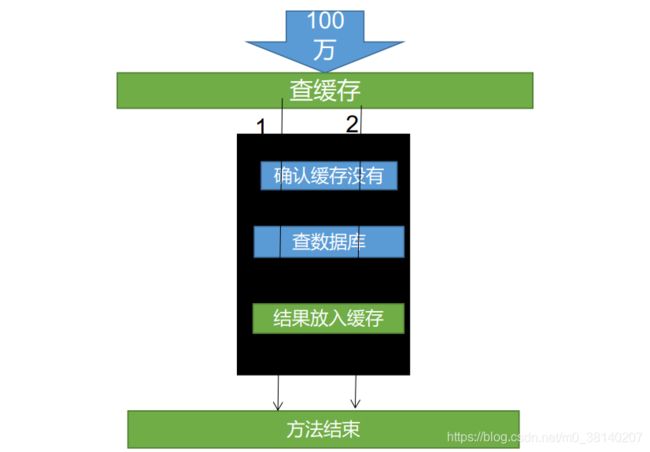
⑤ 分布式锁的演进(解决缓存击穿)
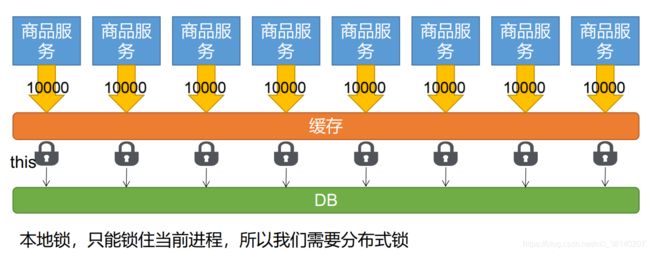
- 当前实例
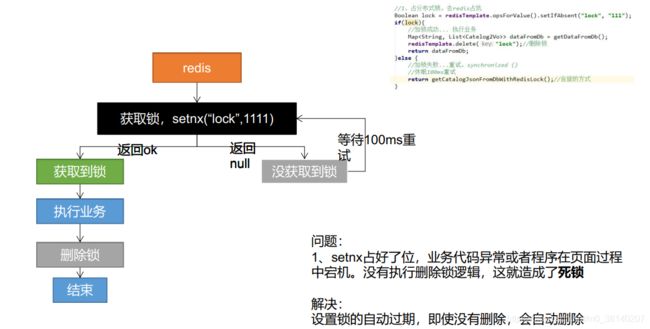
this作为锁,虽然在每个商品服务中是单实例的,只能锁住某个商品服务它自己。这会造成最多有商品服务个数的线程去查数据库。 - 若要在分布式下锁住所有的服务,只放一个进来,就需要用到分布式锁(缺点是影响性能)
	public Map<String, List<Catalog2Vo>> getCatalogJsonDbWithRedisLock() {
        Boolean lock = stringRedisTemplate.opsForValue().setIfAbsent("lock", "111");
        //获取到锁,执行业务
        if (lock) {
            Map<String, List<Catalog2Vo>> categoriesDb = getCategoryMap();
            //删除锁,如果在此之前报错或宕机会造成死锁
            stringRedisTemplate.delete("lock");
            return categoriesDb;
        }else {
            //加锁失败,自旋的方式
            return getCatalogJsonDbWithRedisLock();
        }
    }
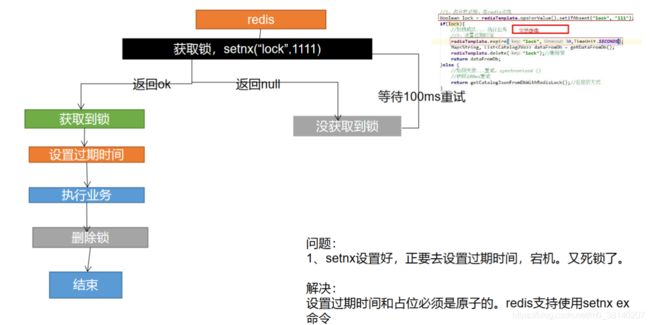
	public Map<String, List<Catalog2Vo>> getCatalogJsonDbWithRedisLock() {
        Boolean lock = redisTemplate.opsForValue().setIfAbsent()
        if (lock) {
            // 加锁成功..执行业务
            // 设置过期时间
            redisTemplate.expire("lock",30,TimeUnit.SECONDS);
            Map<String,List<Catelog2Vo>> dataFromDb = getDataFromDB();
            redisTemplate.delete("lock"); // 删除锁
            return dataFromDb;
        } else {
            // 加锁失败,重试 synchronized()
            // 休眠100ms重试
            return getCatelogJsonFromDbWithRedisLock();
        }
    }
演进三:防止锁过期——占锁时指定UUID;但正好判断通过,锁又恰好过期,误删别人的锁

	public Map<String, List<Catalog2Vo>> getCatalogJsonDbWithRedisLock() {
        String uuid = UUID.randomUUID().toString();
        ValueOperations<String, String> ops = stringRedisTemplate.opsForValue();
     	//为当前锁设置唯一的uuid,只有当uuid相同时才会进行删除锁的操作
        Boolean lock = ops.setIfAbsent("lock", uuid,5, TimeUnit.SECONDS);
        if (lock) {
            Map<String, List<Catalog2Vo>> categoriesDb = getCategoryMap();
            //网络交互很费时!!!!
            String lockValue = ops.get("lock");
            if (lockValue.equals(uuid)) {
                //我删我自己的锁
                stringRedisTemplate.delete("lock");
            }
            return categoriesDb;
        }else {
            return getCatalogJsonDbWithRedisLock();
        }
    }
问题: 如果判断是当前值,正要删除锁的时候,锁已经过期,别人已经设置到了新的值(加了新锁)。那么我们删除的是别人的锁
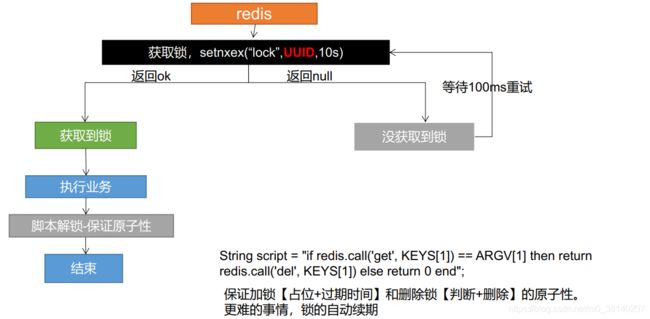
解决: 删除锁必须保证原子性。使用 redis + Lua 脚本完成
	public Map<String, List<Catalog2Vo>> getCatalogJsonDbWithRedisLock() {
        String uuid = UUID.randomUUID().toString();
        ValueOperations<String, String> ops = stringRedisTemplate.opsForValue();
        Boolean lock = ops.setIfAbsent("lock", uuid,5, TimeUnit.SECONDS);
        if (lock) {
        	//业务执行时间超长,则必须考虑锁的自动续期
            Map<String, List<Catalog2Vo>> categoriesDb = getCategoryMap();
            String lockValue = ops.get("lock");
            String script = "if redis.call(\"get\",KEYS[1]) == ARGV[1] then\n" +
                    "    return redis.call(\"del\",KEYS[1])\n" +
                    "else\n" +
                    "    return 0\n" +
                    "end";
            stringRedisTemplate.execute(new DefaultRedisScript<Long>(script, Long.class), Arrays.asList("lock"), lockValue);
            return categoriesDb;
        }else {
            return getCatalogJsonDbWithRedisLock();
        }
    }
4.2 分布式锁——Redisson
官网文档上详细说明了:不推荐使用 setnx来实现分布式锁,应该参考 The Redlock algorithm 的实现

在Java 语言环境下使用 Redisson
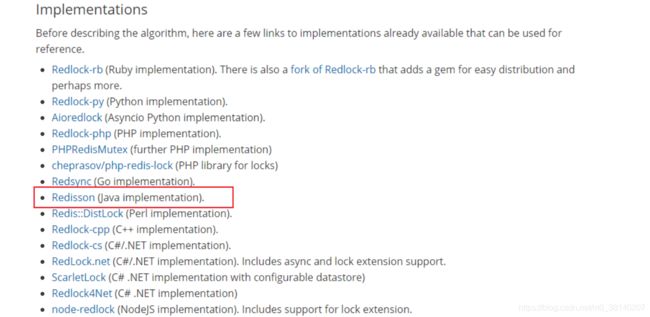
Redisson - Lock 锁测试 & Redisson - Lock 看门狗原理 & Redisson 如何解决死锁
lock.lock()是阻塞式等待。与之相对的是自旋式等待,即return的时候自己把自己再调一遍。
@RequestMapping("/hello")
@ResponseBody
public String hello(){
    // 1、获取一把可重入锁,只要锁得名字一样,就是同一把锁
    RLock lock = redission.getLock("my-lock");

    // 2、加锁
    lock.lock(); // 阻塞式等待,默认加的锁都是30s时间
    // 1、锁的自动续期,如果业务超长,运行期间自动给锁续上新的30s,不用担心业务时间长而导致锁自动过期后被删掉
    // 2、加锁的业务只要运行完成,就不会给当前锁续期
    //不会出现死锁问题:即使不手动解锁,锁默认会在30s以后自动删除

	// 3、加锁
    lock.lock(10, TimeUnit.SECONDS); //10s 后自动删除
    //问题:lock.lock(10, TimeUnit.SECONDS) 在锁时间到了后,不会自动续期

    //原理
    // 1、如果我们传递了锁的超时时间,就发送给 redis 执行脚本,进行占锁,默认超时就是我们指定的时间
    // 2、如果我们未指定锁的超时时间,就是用 LockWatchchdogTimeout = 30 * 1000,即看门狗的默认时间
    	// 2.1、只要占锁成功,就会启动一个定时任务 TimeTask,【重新给锁设置过期时间,新的过期时间就是看门狗的默认时间】,每隔10s就自动续期
    	// 2.2、每 internalLockLeaseTime【看门狗时间】/3 = 10s 调用一次(每10s续期一次)

    //推荐使用: lock.lock(10, TimeUnit.SECONDS)
    // 明确给出超时时间,省掉整个续期操作,手动解锁
    try {
        System.out.println("加锁成功,执行业务..." + Thread.currentThread().getId());
        Thread.sleep(3000);
    } catch (Exception e) {}
      finally {
        // 解锁 将设解锁代码没有运行,reidsson会不会出现死锁
        lock.unlock();
    }
    return "hello";
}
Reidsson - 读写锁
	/**
     * 保证一定能读取到最新数据
     * 修改期间,写锁是一个排他锁(互斥锁,独享锁),读锁是一个共享锁
     * 写锁没释放读锁就必须等待
     * 只要有写的存在,都必须等待
     */
    @RequestMapping("/write")
    @ResponseBody
    public String writeValue() {
        RReadWriteLock lock = redission.getReadWriteLock("rw_lock");
        RLock rLock = lock.writeLock();
        try {
            // 修改数据加写锁,读数据加读锁
            rLock.lock();
        } catch (Exception e) {
            e.printStackTrace();
        } finally {
            rLock.unlock();
        }
        return s;
    }

    @RequestMapping("/read")
    @ResponseBody
    public String readValue() {
        RReadWriteLock lock = redission.getReadWriteLock("rw_lock");
        RLock rLock = lock.readLock();

        try {
        	rLock.lock();
        } catch (Exception e) {
            e.printStackTrace();
        } finally {
            rLock.unlock();
        }
        return "";
    }
Redisson - 闭锁测试
/**
 * 放假锁门
 * 1班没人了
 * 5个班级走完,我们可以锁们了
 * @return
 */
@GetMapping("/lockDoor")
@ResponseBody
public String lockDoor() throws InterruptedException {
    RCountDownLatch door = redission.getCountDownLatch("door");
    door.trySetCount(5);
    door.await();//等待闭锁都完成

    return "所有班级的人都走了,放假了!....";
}
@GetMapping("/gogogo/{id}")
@ResponseBody
public String gogogo(@PathVariable("id") Long id) {
    RCountDownLatch door = redission.getCountDownLatch("door");
    door.countDown();// 计数器减一

    return id + "班的人走了.....";
}
Redisson - 信号量
/**
 * 车库停车
 * 3车位
 * @return
 */
@GetMapping("/park")
@ResponseBody
public String park() throws InterruptedException {
    RSemaphore park = redission.getSemaphore("park");

	//获取一个信号,获取一个值,占用一个车位
	//也是一个阻塞方法
    boolean b = park.tryAcquire();

    return "ok=" + b;
}

@GetMapping("/go")
@ResponseBody
public String go() {
    RSemaphore park = redission.getSemaphore("park");
    park.release(); //释放一个车位

    return "ok";
}
解决缓存击穿的 Redisson 版本
	public Map<String, List<Catelog2VO>> getCatalogJsonFromDBWithRedissonLock() {
		//锁的名字一样,得到的锁就是一样的
		//锁的粒度,越细越快
        RLock lock = redisson.getLock("catalogJson-lock");

        lock.lock();
        Map<String, List<Catelog2Vo>> dataFromDB;
        try {
            dataFromDB = getDataFromDB();
        } finally {
            lock.unlock();
        }
        return dataFromDB;
    }
4.3 缓存数据一致性
双写模式

失效模式

主动更新:删掉缓存,下次查的时候就会再去查数据库
4.4 Spring Cache
简介
- Spring 从3.1开始定义了
org.springframework.cache.Cache和org.sprngframework.cache.CacheManager接口睐统一不同的缓存技术 - 并支持使用
JCache(JSR-107)注解简化我们的开发 - Cache 接口为缓存的组件规范定义,包含缓存的各种操作集合
Cache接口下 Spring 提供了各种 XXXCache的实现,如RedisCache、EhCache,ConcrrentMapCache等等, - 每次调用需要缓存功能实现方法的时候,
Spring会检查检查指定参数的马努表犯法是否已经被调用过,如果有就直接从缓存中获取方法调用后的结果,如果没有就调用方法并缓存结果后返回给用户,下次直接调用从缓存中获取 - 使用
Sprng缓存抽象时我们需要关注的点有以下两点- 1、确定方法需要被缓存以及他们的的缓存策略
- 2、从缓存中读取之前缓存存储的数据
原理:
CacheAutoConfiguration导入RedisCacheConfiguration,RedisCacheConfiguration自动配置了RedisCacheManager(用于初始化缓存,每个缓存决定使用什么配置);如果RedisCacheConfiguration存在自定义配置则使用之,否则使用默认配置
修改缓存配置方法:
在容器中添加一个RedisCacheConfiguration
注解的使用、缓存穿透问题的解决
	/**
     * 1、每一个需要缓存的数据我们都需要指定放到那个名字的缓存
     * 【缓存分区的划分【按照业务类型划分】】
     *
     * 2、@Cacheable({"category"})
     *      代表当前方法的结果需要缓存,如果缓存中有,方法不调用
     *      如果缓存中没有,则会调用方法并将方法结果放入缓存。
     *
     * 3、默认行为:
     *      1、如果缓存中有,方法不用调用
     *      2、key默自动生成,缓存的名字:SimpleKey[](自动生成的key值)
     *      3、缓存中value的值,默认使用jdk序列化,将序列化后的数据存到redis
     *      3、默认的过期时间,-1
     *
     * 4、自定义操作
     *      1、指定缓存使用的key      key属性指定,接收一个SpEl
     *      2、指定缓存数据的存活时间  配置文件中修改ttl
     *      3、将数据保存为json格式
     *
     Spring-Cache的不足:
 	 *      1、读模式:
 	 *          缓存穿透:查询一个null数据,解决 缓存空数据:配置文件Spring-cache-null-values=true
	 *          缓存击穿:大量并发进来同时查询一个正好过期的数据,解决:加锁 ? 默认是无加锁,故无法解决(可通过设置sync = true,加一个本地锁)
	 *          缓存雪崩:大量的 key同时过期,解决:加上随机时间,配置文件Spring-cache-redis-time-to-live
	 *
	 *       2、写模式:(缓存与数据库库不一致)
	 *          1、读写加锁
	 *          2、引入canal,感知到 MySQL的更新去更新数据库
	 *          3、读多写多,直接去数据库查询就行
	 *
	 *    总结:
	 *      常规数据(读多写少,即时性,一致性要求不高的数据)完全可以使用
	 *      SpringCache 写模式( 只要缓存数据有过期时间就足够了)
	 */
    //读模式下使用缓存
    @Cacheable(value = {"category"},key = "#root.method.name",sync = true)
    @Override
    public List<CategoryEntity> getLevel1Categorys() {
        // parent_cid为 0则是一级目录
        List<CategoryEntity> categoryEntities = baseMapper.selectList(new QueryWrapper<CategoryEntity>().eq("parent_cid", 0));
        return categoryEntities;
    }
@CacheEvict实现缓存失效模式
	/**
     * 级联更新所有的关联数据
     * @CacheEvict 失效模式
     * 1、同时进行多种缓存操作 @Caching
     * 2、指定删除某个分区下的所有数据 @CacheEvict(value = {"category"},allEntries = true)
     * 3、存储同一类型的数据,都可以指定成同一分区,分区名默认就是缓存的前缀
     *
     * @param category
     */

	//写模式下使用缓存
	//修改了某处菜单,需要删除两个地方的缓存
    @Caching(evict = {
            @CacheEvict(value = {"category"},key = "'getLevel1Categorys'"),
            @CacheEvict(value = {"category"},key = "'getCatelogJson'")
    })
	//  @CacheEvict(value = {"category"},allEntries = true)
	//  value——区域
    @Transactional
    @Override
    public void updateCascate(CategoryEntity category) {
        // 更新自己表对象
        this.updateById(category);
        // 更新关联表对象
        categoryBrandRelationService.updateCategory(category.getCatId(), category.getName());
    }
自定义配置
@EnableConfigurationProperties(CacheProperties.class)
@EnableCaching
@Configuration
public class MyCacheConfig {

    /**
     * 配置文件中的东西没有用上
     * 1、原来的配置吻技安绑定的配置类是这样子的
     *      @ConfigurationProperties(prefix = "Spring.cache")
     * 2、要让他生效
     *      @EnableConfigurationProperties(CacheProperties.class)
     * @param cacheProperties
     * @return
     */
    @Bean
    RedisCacheConfiguration redisCacheConfiguration(CacheProperties cacheProperties) {
        RedisCacheConfiguration config = RedisCacheConfiguration.defaultCacheConfig();
        // 设置key的序列化
        config = config.serializeKeysWith(RedisSerializationContext.SerializationPair.fromSerializer(new StringRedisSerializer()));
        // 设置value序列化 ->JackSon
        config = config.serializeValuesWith(RedisSerializationContext.SerializationPair.fromSerializer(new GenericJackson2JsonRedisSerializer()));

        CacheProperties.Redis redisProperties = cacheProperties.getRedis();
        if (redisProperties.getTimeToLive() != null) {
            config = config.entryTtl(redisProperties.getTimeToLive());
        }
        if (redisProperties.getKeyPrefix() != null) {
            config = config.prefixKeysWith(redisProperties.getKeyPrefix());
        }
        if (!redisProperties.isCacheNullValues()) {
            config = config.disableCachingNullValues();
        }
        if (!redisProperties.isUseKeyPrefix()) {
            config = config.disableKeyPrefix();
        }
        return config;
    }

}
Spring:
  cache:
    type: redis
    redis:
      time-to-live: 3600000           # 过期时间
      key-prefix: CACHE_              # 如果指定了前缀,就使用指定的前缀,如果没有就默认使用缓存的名字作为前缀
      use-key-prefix: true            # 是否使用写入redis前缀
      cache-null-values: true         # 是否允许缓存空值,解决缓存穿透问题
5. 异步 & 线程池
5.1 线程回顾
5.1.1 初始化线程的 4 种方式
① 继承 Thread
② 实现 Runnable
③ 实现 Callable 接口 + FutureTask(可以拿到返回结果,可以处理异常)
④ 线程池
方式一 和 方式二:主进程无法获取线程的运算结果,不适合当前场景
方式三:主进程可以获取当前线程的运算结果,但是不利于控制服务器种的线程资源,可以导致服务器资源耗尽
方式四:通过如下两种方式初始化线程池
Executors.newFixedThreadPool(3);
//或
new ThreadPollExecutor(corePoolSize,maximumPoolSize,keepAliveTime,TimeUnit,unit,workQueue,threadFactory,handler);
5.1.2 线程池的 7 大参数
1、线程池创建,准备好 core 数量 的核心线程,准备接受任务
2、新的任务进来,用 core 准备好的空闲线程执行
core满了,就将再进来的任务放入阻塞队列中,空闲的core就会自己去阻塞队列获取任务执行- 阻塞队列也满了,就直接开新线程去执行,最大只能开到
max指定的数量 max都执行好了,Max-core数量空闲的线程会在keepAliveTime指定的时间后自动销毁,终保持到core大小- 如果线程数开到了
max数量,还有新的任务进来,就会使用reject指定的拒绝策略进行处理
3、所有的线程创建都是由指定的 factory 创建的
5.1.4 开发中为什么使用线程池
- 通过重复利用已创建好的线程,降低线程的创建和销毁带来的性能损耗
- 当线程池中的线程没有超过线程池的最大上限时,若有线程处于空闲状态,则当任务来时无需创建新的线程就能执行
- 线程池会根据当前系统的特点对池内的线程进行优化处理,减少创建和销毁线程带来的系统开销,无限的创建和销毁线程不仅消耗系统资源,还降低系统的稳定性,使用线程池进行统一分配
5.2 CompletableFuture 异步编排
业务场景:
查询商品详情页逻辑较复杂,有些数据需要远程调用,必然需要花费更多的时间:
- 获取Sku基本信息
- 获取Sku图片信息
- 获取Sku销售属性
- 获取Sku促销(秒杀)信息
…
5.2.1 创建异步对象
java.util.concurrent.CompletableFuture提供了四个静态方法来创建一个异步操作:
public static CompletableFuture<Void> runAsync(Runnable runnable)

public static CompletableFuture<Void> runAsync(Runnable runnable,
                                                   Executor executor)

public static <U> CompletableFuture<U> supplyAsync(Supplier<U> supplier)

public static <U> CompletableFuture<U> supplyAsync(Supplier<U> supplier,
                                                       Executor executor)
runXxx都是没有返回结果的,supplyXxxx都是可以获取返回结果的- 可以传入自定义的线程池,否则就是用默认的线程池
- 根据方法的返回类型来判断是否该方法是否有返回类型
大:
	public static void main(String[] args) throws ExecutionException, InterruptedException {
        CompletableFuture<Void> completableFuture = CompletableFuture.runAsync(() -> {
            System.out.println("当前线程:" + Thread.currentThread().getId());
            int i = 10 / 2;
        }, executor);

        CompletableFuture<Integer> future = CompletableFuture.supplyAsync(() -> {
            System.out.println("当前线程:" + Thread.currentThread().getId());
            int i = 10 / 2;
            return i;
        }, executor);
        //获取返回值
        Integer integer = future.get();
    }
5.2.2 计算完成时回调方法
当CompletableFuture的计算结果完成,或者抛出异常的时候,可以执行特定的 Action:
	public CompletableFuture<T> whenComplete(
        BiConsumer<? super T, ? super Throwable> action)

    public CompletableFuture<T> whenCompleteAsync(
        BiConsumer<? super T, ? super Throwable> action)

    public CompletableFuture<T> whenCompleteAsync(
        BiConsumer<? super T, ? super Throwable> action, Executor executor)

    public CompletableFuture<T> exceptionally(
        Function<Throwable, ? extends T> fn)
whenComplete可以处理正常和异常的计算结果,exceptionally处理异常情况
whenComplete和 whenCompleteAsync的区别
whenComplete:是执行当前任务的线程继续执行whencomplete的任务whenCompleteAsync:是执行把whenCompleteAsync这个任务继续提交给线程池来进行执行
方法不以 Async 结尾,意味着 Action 使用相同的线程执行,而 Async 可能会使用其他线程执行(如何是使用相同的线程池,也可能会被同一个线程选中执行)
大:
CompletableFuture<Integer> future = CompletableFuture.supplyAsync(() -> {
    int i = 10 / 0;
    System.out.println("运行结果:" + i);
    return i;
}, executor).whenComplete((res,exception) ->{
    // 虽然能得到异常信息,但是没法修改返回的数据
    System.out.println("异步任务成功完成了...结果是:" +res + "异常是:" + exception);
}).exceptionally(throwable -> {
    // 可以感知到异常,同时返回默认值
    return 10;
});
5.2.3 handle 方法
public <U> CompletionStage<U> handle(BiFunction<? super T,
		 Throwable, ? extends U> fn);
public <U> CompletionStage<U> handleAsync(BiFunction<? super T,
		 Throwable, ? extends U> fn);
public <U> CompletionStage<U> handleAsync(BiFunction<? super T,
		 Throwable, ? extends U> fn,Execut
和complete一样,可以对结果做最后的处理(可处理异常),可改变返回值
大:
CompletableFuture<Integer> future = CompletableFuture.supplyAsync(() -> {
    int i = 10 / 2;
    System.out.println("运行结果:" + i);
    return i;
}, executor).handle((res,thr) ->{
    if (res != null ) {
        return res * 2;
    }
    if (thr != null) {
        return 0;
    }
    return 0;
});
5.2.4 线程串行方法
	public <U> CompletableFuture<U> thenApply(
        Function<? super T,? extends U> fn)

    public <U> CompletableFuture<U> thenApplyAsync(
        Function<? super T,? extends U> fn)

    public <U> CompletableFuture<U> thenApplyAsync(
        Function<? super T,? extends U> fn, Executor executor)


    public CompletableFuture<Void> thenAccept(Consumer<? super T> action)

    public CompletableFuture<Void> thenAcceptAsync(Consumer<? super T> action)

    public CompletableFuture<Void> thenAcceptAsync(Consumer<? super T> action,
    											Executor executor)


    public CompletableFuture<Void> thenRun(Runnable action)

    public CompletableFuture<Void> thenRunAsync(Runnable action)

    public CompletableFuture<Void> thenRunAsync(Runnable action,
                                                Executor executor)
-
thenApply():获取上一步任务的返回值,处理后返回新的返回值让别人感知; -
thenAccept():接受上一步的执行结果,无返回值; -
thenRun():只要上面任务执行完成,就开始执行thenRun的后续操作(不能拿到上一步的执行结果)
	CompletableFuture<String> future = CompletableFuture.supplyAsync(() -> {
            int i = 10 / 2;
            System.out.println("运行结果:" + i);
            return i;
        }, executor).thenApplyAsync(res -> {
            System.out.println("任务2启动了..." + res);
            return "Hello " + res;
        }, executor);
        String s = future.get();
5.2.5 两任务组合
注:CompletableFuture实现了CompletionStage接口
public <U,V> CompletionStage<V> thenCombine(CompletionStage<? extends U> other,BiFunction<? super T,? super U,? extends V> fn);
public <U,V> CompletionStage<V> thenCombineAsync(CompletionStage<? extends U> other,BiFunction<? super T,? super U,? extends V> fn);
public <U,V> CompletionStage<V> thenCombineAsync(CompletionStage<? extends U> other,BiFunction<? super T,? super U,? extends V> fn,Executor executor);

public <U> CompletionStage<Void> thenAcceptBoth(CompletionStage<? extends U> other,BiConsumer<? super T, ? super U> action);
public <U> CompletionStage<Void> thenAcceptBothAsync(CompletionStage<? extends U> other,BiConsumer<? super T, ? super U> action);
public <U> CompletionStage<Void> thenAcceptBothAsync(CompletionStage<? extends U> other,BiConsumer<? super T, ? super U> action,Executor executor);

public CompletionStage<Void> runAfterBoth(CompletionStage<?> other,Runnable action);
public CompletionStage<Void> runAfterBothAsync(CompletionStage<?> other,Runnable action);
public CompletionStage<Void> runAfterBothAsync(CompletionStage<?> other,Runnable action,Executor)
thenCombine:组合两个future,获取两个future的返回结果,再返回当前任务的返回值
thenAccpetBoth:组合两个future,获取两个future任务的返回结果,然后处理任务,但没有返回值
runAfterBoth:组合两个future,无法获取future的结果,只需要两个future处理完成任务后,再次处理该任务
8.2.7 多任务组合
public static CompletableFuture<Void> allOf(CompletableFuture<?>... cfs)
public static CompletableFuture<Object> anyOf(CompletableFuture<?>... cfs)
allOf:等待所有任务完成
anyOf:只要有一个任务完成
8.3 异步任务获取 Item
@Override
    public SkuItemVo item(Long skuId) throws ExecutionException, InterruptedException {
        SkuItemVo skuItemVo = new SkuItemVo();

        CompletableFuture<SkuInfoEntity> infoFuture = CompletableFuture.supplyAsync(() -> {
            //1.sku基本信息获取
            SkuInfoEntity skuInfoEntity = getById(skuId);
            skuItemVo.setInfo(skuInfoEntity);
            return skuInfoEntity;
        }, threadPool);

        CompletableFuture<Void> saleAttrFuture = infoFuture.thenAcceptAsync(res -> {
            //3.spu的所有销售属性组合
            List<SkuItemSaleAttrVo> saleAttrVos = skuSaleAttrValueService.getSaleAttrsBySpuId(res.getSpuId());
            skuItemVo.setSaleAttr(saleAttrVos);
        }, threadPool);

        CompletableFuture<Void> descFuture = infoFuture.thenAcceptAsync(res -> {
            //4.spu介绍的获取
            SpuInfoDescEntity spuInfoDescEntity = spuInfoDescService.getById(res.getSpuId());
            skuItemVo.setDesc(spuInfoDescEntity);
        }, threadPool);

        CompletableFuture<Void> baseAttrFuture = infoFuture.thenAcceptAsync(res -> {
            //5.sku规格参数信息的获取
            List<SpuItemAttrGroupVo> groupAttrs = attrGroupService.
                    getAttrGroupWithAttrsBySpuId(res.getSpuId(), res.getCatalogId());
            skuItemVo.setGroupAttrs(groupAttrs);
        }, threadPool);

        //2.sku图片信息获取
        CompletableFuture<Void> imagesFuture = CompletableFuture.runAsync(() -> {
            List<SkuImagesEntity> imagesEntities = skuImagesService.getImagesById(skuId);
            skuItemVo.setImages(imagesEntities);
        }, threadPool);

        //查询当前sku是否参与秒杀优惠??
        CompletableFuture<Void> seckillFuture = CompletableFuture.runAsync(() -> {
            R r = seckillFeignService.getSkuSeckillInfo(skuId);
            if (r.getCode() == 0) {
                SeckillInfoVo data = r.getData(new TypeReference<SeckillInfoVo>() {
                });
                skuItemVo.setSeckillInfoVo(data);
            }
        }, threadPool);

        //等待所有任务都完成:
       CompletableFuture.allOf(saleAttrFuture,
               descFuture,
               baseAttrFuture,
               imagesFuture,
               seckillFuture).get();
        return skuItemVo;
    }
6. 认证服务
6.1 阿里云短信服务发送验证码
① 在kedamall-third-party中编写发送短信组件,其中host、path、appcode可在properties配置文件中使用前缀spring.cloud.alicloud.sms进行配置
package com.example.kedamall.thridparty.component;
@Component
@Data
@ConfigurationProperties("spring.cloud.alicloud.sms")
public class SmsComponent {

    private String host;
    private String path;
    private String skin;
    private String sign;
    private String appcode;

    public void sendSmsCode(String phone, String code){
        String urlSend = host + path + "?sign=" + sign + "&skin=" + skin+ "¶m=" + code+ "&phone=" + phone; // 【5】拼接请求链接
        try {
            URL url = new URL(urlSend);
            HttpURLConnection httpURLCon = (HttpURLConnection) url.openConnection();
            httpURLCon.setRequestProperty("Authorization", "APPCODE " + appcode);// 格式Authorization:APPCODE
            // (中间是英文空格)
            int httpCode = httpURLCon.getResponseCode();
            if (httpCode == 200) {
                String json = read(httpURLCon.getInputStream());
                System.out.println("正常请求计费(其他均不计费)");
                System.out.println("获取返回的json:");
                System.out.print(json);
            } else {
                Map<String, List<String>> map = httpURLCon.getHeaderFields();
                String error = map.get("X-Ca-Error-Message").get(0);
                if (httpCode == 400 && error.equals("Invalid AppCode `not exists`")) {
                    System.out.println("AppCode错误 ");
                } else if (httpCode == 400 && error.equals("Invalid Url")) {
                    System.out.println("请求的 Method、Path 或者环境错误");
                } else if (httpCode == 400 && error.equals("Invalid Param Location")) {
                    System.out.println("参数错误");
                } else if (httpCode == 403 && error.equals("Unauthorized")) {
                    System.out.println("服务未被授权(或URL和Path不正确)");
                } else if (httpCode == 403 && error.equals("Quota Exhausted")) {
                    System.out.println("套餐包次数用完 ");
                } else {
                    System.out.println("参数名错误 或 其他错误");
                    System.out.println(error);
                }
            }

        } catch (MalformedURLException e) {
            System.out.println("URL格式错误");
        } catch (UnknownHostException e) {
            System.out.println("URL地址错误");
        } catch (Exception e) {
            // 打开注释查看详细报错异常信息
            // e.printStackTrace();
        }
    }
    private static String read(InputStream is) throws IOException {
        StringBuffer sb = new StringBuffer();
        BufferedReader br = new BufferedReader(new InputStreamReader(is));
        String line = null;
        while ((line = br.readLine()) != null) {
            line = new String(line.getBytes(), "utf-8");
            sb.append(line);
        }
        br.close();
        return sb.toString();
    }
}
② 接口防刷:为了防止恶意攻击,我们不能随意让接口被调用。
- 在 Redis 中以
phone-code将电话号码和验证码进行存储并将当前时间与code一起存储 - 如果调用时以当前 phone 取出的 value 不为空且当前时间在存储时间的 60s 以内,说明 60s 内该号码已经调用过,返回错误信息
- 60s 以后再次调用,需要删除之前存储的 phone-code
- code 存在一个过期时间,我们设置为 10min,10min 内验证该验证码有效
/**
 * 发送短信验证码
 * @param phone 手机号
 * @return
 */
@GetMapping("/sms/sendCode")
@ResponseBody
public R sendCode(@RequestParam("phone") String phone) {
    // TODO 1、接口防刷
    // 先从redis中拿取
    String redisCode = redisTemplate.opsForValue().get(AuthServerConstant.SMS_CODE_CACHE_PREFIX + phone);
    if(!StringUtils.isEmpty(redisCode)) {
        // 拆分
        long l = Long.parseLong(redisCode.split("_")[1]);
        // 当前系统事件减去之前验证码存入的事件 小于60000毫秒=60秒
        if (System.currentTimeMillis() -l < 60000) {
            // 60秒内不能再发
            R.error(BizCodeEnume.SMS_CODE_EXCEPTION.getCode(),BizCodeEnume.SMS_CODE_EXCEPTION.getMsg());
        }
    }
    // 2、验证码的再次效验
    // 数据存入,redis:key-phone,value:code sms:code:131xxxxx - >45678
    String code = UUID.randomUUID().toString().substring(0,5).toUpperCase();
    // 拼接验证码
    String substring = code+"_" + System.currentTimeMillis();
    // redis缓存验证码 防止同一个phone在60秒内发出多次验证吗
    redisTemplate.opsForValue().set(AuthServerConstant.SMS_CODE_CACHE_PREFIX + phone,substring, 10, TimeUnit.MINUTES);

    // 调用第三方服务发送验证码
    thirdPartFeignService.sendCode(phone,code);
    return R.ok();
}
6.2 用户注册
6.2.1 编写 vo 接收页面提交
- 使用到了 JSR303校验
/**
 * 注册数据封装 Vo
 */
@Data
public class UserRegistVo {
    @NotEmpty(message = "用户名必须提交")
    @Length(min = 6,max = 18,message = "用户名必须是6-18位字符")
    private String userName;

    @NotEmpty(message = "密码必须填写")
    @Length(min = 6,max = 18,message = "密码必须是6-18位字符")
    private String password;

    @NotEmpty(message = "手机号码必须提交")
    @Pattern(regexp = "^[1]([3-9])[0-9]{9}$",message = "手机格式不正确")
    private String phone;

    @NotEmpty(message = "验证码必须填写")
    private String code;
}
6.2.2 RedirectAttributes & 用户注册Controller & MD5与盐值加密
① RedirectAttributes是用于重定向之后还能带参数跳转的的工具类,它有两种带参的方式:
- 第一种:
redirectAttributes.addAttributie("prama",value);这种方法相当于在重定向链接地址追加传递的参数,例如:
redirectAttributes.addAttributie("prama1",value1);
redirectAttributes.addAttributie("prama2",value2);

return:"redirect:/path/list"
同于 return:"redirect:/path/list?prama1=value1&prama2=value2" ,注意这种方法直接将传递的参数暴露在链接地址上,非常的不安全,慎用。
- 第二种:
redirectAttributes.addFlashAttributie("prama",value);这种方法是隐藏了参数,链接地址上不直接暴露,但是只能在重定向的“页面”获取参数值。
其原理就是放到session中,session在跳到页面后马上移除对象。如果是重定向一个controller中是获取不到该prama属性值的。除非在controller中用@RequestPrama(value = "prama")String prama注解,采用传参的方式。
例如:
redirectAttributes.addFlashAttributie("prama1",value1);
redirectAttributes.addFlashAttributie("prama2",value2);

return:"redirect:/path/list.jsp"
② 用户注册Controller
/**
 * @param vo 数据传输对象
 * @param result 用于验证参数
 * @param redirectAttributes 数据重定向
 * @return
 */
@PostMapping("/regist")
public String regist(@Valid UserRegistVo vo, BindingResult result,
                     RedirectAttributes redirectAttributes) {
    // 校验是否通过
    if (result.hasErrors()) {
        // 拿到错误信息转换成 Map
        Map<String, String> errors = result.getFieldErrors().stream().collect(Collectors.toMap(FieldError::getField, FieldError::getDefaultMessage));
        //用一次的属性
        redirectAttributes.addFlashAttribute("errors",errors);
        // 校验出错,转发到注册页
        return "redirect:http://auth.kedamall.com/reg.html";
    }

    // 将传递过来的验证码与 存在redis中的验证码进行比较
    String code = vo.getCode();
    String s = redisTemplate.opsForValue().get(AuthServerConstant.SMS_CODE_CACHE_PREFIX + vo.getPhone());
    if (!StringUtils.isEmpty(s)) {
        // 验证码和redis中的一致
        if(code.equals(s.split("_")[0])) {
            // 删除验证码:令牌机制
            redisTemplate.delete(AuthServerConstant.SMS_CODE_CACHE_PREFIX + vo.getPhone());
            // 调用远程服务,真正注册
            R r = memberFeignService.regist(vo);
            if (r.getCode() == 0) {
                // 远程调用注册服务成功
                return "redirect:http://auth.kedamall.com/login.html";
            } else {
                Map<String, String> errors = new HashMap<>();
                errors.put("msg",r.getData(new TypeReference<String>(){}));
                redirectAttributes.addFlashAttribute("errors", errors);
                return "redirect:http://auth.kedamall.com/reg.html";
            }
        } else {
            Map<String, String> errors = new HashMap<>();
            errors.put("code", "验证码错误");
            redirectAttributes.addFlashAttribute("code", "验证码错误");
            // 校验出错,转发到注册页
            return "redirect:http://auth.kedamall.com/reg.html";
        }
    } else {
        Map<String, String> errors = new HashMap<>();
        errors.put("code", "验证码错误");
        redirectAttributes.addFlashAttribute("code", "验证码错误");
        // 校验出错,转发到注册页
        return "redirect:http://auth.kedamall.com/reg.html";
    }
}
③ MD5和盐值加密

kedamall-member下的远程服务:
	@Override
    public void regist(MemberRegistVo vo) {
        MemberEntity memberEntity = new MemberEntity();

        //设置默认等级
        MemberLevelEntity level = memberLevelDao.getDefaultLevel();
        memberEntity.setLevelId(level.getId());

        //检查phone、name唯一性
        checkPhoneUnique(vo.getPhone());
        checkUserNameUnique(vo.getUserName());

        //密码要进行加密存储
        BCryptPasswordEncoder passwordEncoder = new BCryptPasswordEncoder();
        String encode = passwordEncoder.encode(vo.getPassword());
        memberEntity.setPassword(encode);

        //设置UserName
        memberEntity.setUsername(vo.getUserName());
        memberEntity.setNickname(vo.getUserName());

        //其他默认信息的设置

        MemberDao memberDao = this.baseMapper;
        memberDao.insert(memberEntity);
    }
6.3 OAuth2.0社交登录
-
OAuth(开放授权)是一个开放标准,允许用户授权第三方网站访问他们存储在另外的服务提供者上的信息,而不需要将用户名和密码提供给第三方网站或分享他们的数据的内容
-
OAuth2.0:对于用户相关的 OpenAPI(例如获取用户信息,动态同步,照片,日志,分享等),为了保存用户数据的安全和隐私,第三方网站访问用户数据前都需要显示向用户授权
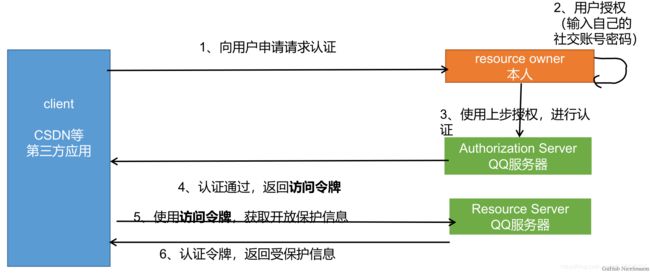
	@GetMapping("/oauth2.0/weibo/success")
    public String weibo(@RequestParam("code") String code, HttpSession session) throws Exception {
        //1.根据code换取Access Token
        Map<String, String> map = new HashMap<>();
        map.put("client_id","36929622814");
        map.put("client_secret","9032be03d4747f");
        map.put("grant_type","authorization_code");
        map.put("redirect_uri","http://auth.kedamall.com/oauth2.0/weibo/success");
        map.put("code",code);
        HttpResponse response = HttpUtils.doPost("https://api.weibo.com",
                "/oauth2/access_token",
                "post",
                new HashMap<String, String>(),
                map,
                new HashMap<String, String>());
        //2.进一步处理
        StatusLine statusLine = response.getStatusLine();
        if(statusLine.getStatusCode()==200){
            //获取到Access Token
            String json = EntityUtils.toString(response.getEntity());
            SocialUser socialUser = JSON.parseObject(json, SocialUser.class);

            R r = memberFeignService.oauthLogin(socialUser);
            if(r.getCode()==0){
                MemberResponseVo responseVo = r.getData("data", new TypeReference<MemberResponseVo>() {
                });
                log.info("登录成功,用户信息:"+responseVo.toString());
                session.setAttribute(AuthServerConstant.LOGIN_USER,responseVo);
                //3.登陆成功,跳回首页
                return "redirect:http://kedamall.com";
            }else {
                return "redirect:http://auth.kedamall.com/login.html";
            }
        }else{
            return "redirect:http://auth.kedamall.com/login.html";
        }
    }
6.4 分布式 Session不共享不同步问题
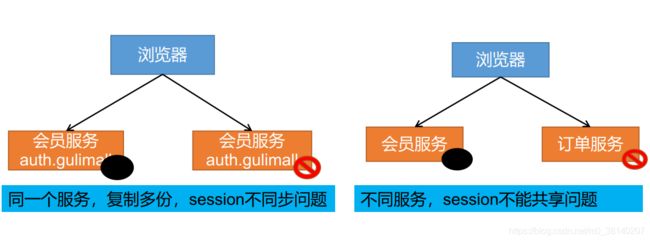
问题描述:
- session不可跨域,它有自己的作用范围。例如:在
auth.kedamall.com中保存session,但是网址跳转到kedamall.com中,取不出auth.kedamall.com中保存的session - 同一个服务,复制多份,session不同步问题。

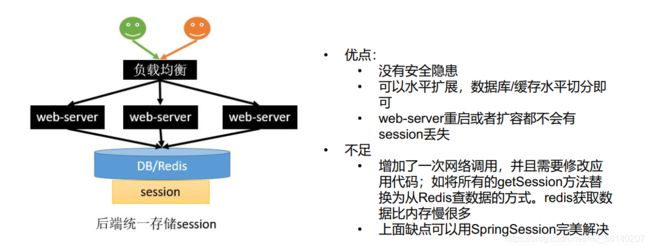
解决方案: 统一存储
6.5 SpringSession
6.5.1 核心原理
@EnableRedisHttpSession导入了RedisHttpSessionConfiguration配置- 这个配置给容器中添加了一个组件
RedisOperationsSessionRepository,这个组件是 Redis 操作 Session 的增删改查封装类。 - 这个配置还添加了一个
SessionRepositoryFilter组件,它是 Session 存储过滤器,每个请求过来必须经过这个 Filter。- 创建的时候,就自动从容器中获取到了上面的
RedisOperationsSessionRepository - 核心原理——装饰者模式
原生的获取session时是通过HttpServletRequest获取的
这里对request进行包装成了wrappedRequest,并且重写了包装request的getSession()方法
- 创建的时候,就自动从容器中获取到了上面的
@Override
protected void doFilterInternal(HttpServletRequest request,
      HttpServletResponse response, FilterChain filterChain)
      throws ServletException, IOException {
   request.setAttribute(SESSION_REPOSITORY_ATTR, this.sessionRepository);

    //对原生的request、response进行包装
   SessionRepositoryRequestWrapper wrappedRequest = new SessionRepositoryRequestWrapper(
         request, response, this.servletContext);
   SessionRepositoryResponseWrapper wrappedResponse = new SessionRepositoryResponseWrapper(
         wrappedRequest, response);

   try {
   	  // Filter放行的是包装后的request和responses
   	  //包装后的request和responses应用到了后面整个执行链
      filterChain.doFilter(wrappedRequest, wrappedResponse);
   }
   finally {
      wrappedRequest.commitSession();
   }
}
6.5.2 整合SpringSession
① 搭建环境
导依赖
<dependency>
	<groupId>org.springframework.sessiongroupId>
	<artifactId>spring-session-data-redisartifactId>
dependency>
<dependency>
	<groupId>org.springframework.bootgroupId>
	<artifactId>spring-boot-starter-data-redisartifactId>
dependency>
写配置
spring:
  redis:
    host: 192.168.56.102
  session:
    store-type: redis
注解
@EnableRedisHttpSession
public class KedamallAuthServerApplication {}
② 自定义配置
-
由于默认使用jdk进行序列化,通过添加组件
RedisSerializer,修改为json序列化 -
通过修改CookieSerializer扩大 Session 的作用域至
**.kedamall.com
@Configuration
public class GulimallSessionConfig {
    @Bean
    public RedisSerializer<Object> springSessionDefaultRedisSerializer() {
        return new GenericJackson2JsonRedisSerializer();
    }
    @Bean
    public CookieSerializer cookieSerializer() {
        DefaultCookieSerializer serializer = new DefaultCookieSerializer();
        serializer.setCookieName("KEDASESSIONID");
        serializer.setDomainName("kedamall.com");
        return serializer;
    }
}
7.购物车服务
7.1 数据模型分析
7.1.1 数据存储
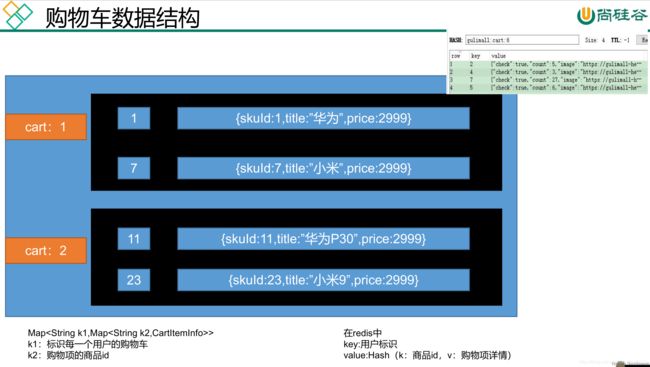
购物车是一个读多写多的场景,因此放入数据库并不合适,但购物车又是需要持久化,因此这里我们选用 Redis 存储购物车数据。
7.1.2 数据结构
一个购物车是由各个购物项组成的,但是我们用List进行存储并不合适,因为使用List查找某个购物项时需要挨个遍历每个购物项,会造成大量时间损耗,为保证查找速度,我们使用Hash进行存储
7.1 ThreadLocal用户身份鉴别
7.1.1 用户身份鉴别方式
- 参考京东,在点击购物车时,会为临时用户生成一个name为
user-key的 Cookie 临时标识,过期时间为一个月; - 如果手动清除
user-key,那么临时购物车的购物项也被清除,所以user-key是用来标识和存储临时购物车数据的

7.1.2 使用ThreadLocal进行用户身份鉴别信息传递
- 在调用购物车的接口前,先通过 Session 信息判断是否登录,并分别进行用户身份信息的封装,并把
user-key放在 Cookie 中 - 这个功能使用
拦截器进行完成
public class CartInterceptor implements HandlerInterceptor {

    public static ThreadLocal<UserInfoTo> threadLocal=new ThreadLocal<>();

    @Override
    public boolean preHandle(HttpServletRequest request, HttpServletResponse response, Object handler) throws Exception {
        HttpSession session = request.getSession();

        //从Session中获取数据
        MemberResponseVo memberResponseVo = (MemberResponseVo) session.getAttribute(AuthServerConstant.LOGIN_USER);
        UserInfoTo userInfoTo = new UserInfoTo();

        //1 用户已经登录,设置userId
        if (memberResponseVo!=null){
            userInfoTo.setUserId(memberResponseVo.getId());
        }

        Cookie[] cookies = request.getCookies();
        for (Cookie cookie : cookies) {
            //2 如果cookie中已经有user-Key,则直接设置
            if (cookie.getName().equals(CartConstant.TEMP_USER_COOKIE_NAME)) {
                userInfoTo.setUserKey(cookie.getValue());
                userInfoTo.setTempUser(true);
            }
        }

        //3 如果cookie没有user-key,我们通过uuid生成user-key
        if (StringUtils.isEmpty(userInfoTo.getUserKey())) {
            String uuid = UUID.randomUUID().toString();
            userInfoTo.setUserKey(uuid);
        }

        //4 将用户身份认证信息放入threadlocal进行传递
        threadLocal.set(userInfoTo);
        return true;
    }

	//业务执行之后,让浏览器保存Cookie
    @Override
    public void postHandle(HttpServletRequest request, HttpServletResponse response, Object handler, ModelAndView modelAndView) throws Exception {
        UserInfoTo userInfoTo = threadLocal.get();

        //如果cookie中没有临时用户信息user-key,我们为其生成
        if (!userInfoTo.getTempUser()) {
            Cookie cookie = new Cookie(CartConstant.TEMP_USER_COOKIE_NAME, userInfoTo.getUserKey());
            cookie.setDomain("kedamall.com");
            cookie.setMaxAge(CartConstant.TEMP_USER_COOKIE_TIMEOUT);
            response.addCookie(cookie);
        }
    }
}
配置:
@Configuration
public class GulimallWebConfig implements WebMvcConfigurer {
    //拦截所有请求
    @Override
    public void addInterceptors(InterceptorRegistry registry) {
        registry.addInterceptor(new CartInterceptor()).addPathPatterns("/**");
    }
}
8. 订单、库存服务
8.1 RabbitMQ
8.1.1 消息代理规范
- JMS(Java Message Service)JAVA消息服务
基于JVM消息代理的规范。ActiveMQ、HornetMQ是 JMS 实现 - AMQP(Advanced Message Queuing Protocol)
高级消息队列协议,也是一个消息代理的规范,兼容JMS
RabbitMQ 是 AMQP 的实现
8.1.2 应用场景
- 异步处理:消息发送的时间取决于业务执行的最长的时间
- 应用解耦:即使下单时库存系统不能正常使用,也不影响正常下单。因为下单后,订单系统写入消息队列就不再关心其他的后续操作了。实现订单系统与库存系统的应用解耦
- 流量消峰:服务器接收用户的请求后,先写入消息队列。假如消息队列长度超过最大数量,则直接抛弃用户请求或跳转到错误页面
秒杀业务中根据消息队列中的请求信息,再做后续处理
8.1.3 RabbitMQ核心概念
-
Message
- 消息,消息是不具名的,它由消息头和消息体组成
- 消息头,包括routing-key(路由键)、priority(相对于其他消息的优先权)、delivery-mode(指出该消息可能需要持久性存储)等
-
Publisher
- 消息的生产者,也是一个向交换器发布消息的客户端应用程序
-
Exchange
- 交换器,将生产者消息路由给服务器中的队列
- 类型有direct(默认),fanout,topic,和headers。具有不同转发策略
-
Queue
- 消息队列,保存消息直到发送给消费者
-
Binding
- 绑定,用于消息队列和交换器之间的关联
-
Connection
- 网络连接,比如一个 TCP 连接
-
Consumer
- 消息的消费者,表示一个从消息队列中取得消息的客户端应用程序
-
Virtual Host
- 虚拟主机,表示一批交换器、消息队列和相关对象。
- vhost 是 AMQP 概念的基础,必须在连接时指定
- RabbitMQ 默认的 vhost 是 /
-
Broker
- 消息队列服务器实体
8.1.4 RabbitMQ运行机制
消息路由:AMQP 中增加了 Exchange 和 Binding 的角色, Binding 决定交换器的消息应该发送到那个队列
Exchange 类型:
-
direct
对点模式,消息中的路由键(routing key)如果和 Binding 中的 binding 的 key 完全一致, 交换器就将消息发到对应的队列中。 -
fanout
广播模式,每个发到 fanout 类型交换器的消息都会分到所有绑定的队列上去 -
topic
将路由键和某个模式进行匹配,此时队列需要绑定到一个模式上。它将路由键和绑定键的字符串切分成单词,这些单词之间用点隔开。
识别通配符:#匹配 0 个或多个单词,*匹配一个单词
8.1.5 RabbitMQ消息确认机制 - 可靠到达
为了保证消息不丢失,可靠抵达而此引入消息确认机制

① ConfirmCallback
消息只要被 broker 接收到就会执行 confirmCallback,如果 cluster 模式,需要所有 broker 接收到才会调用 confirmCallback
被 broker 接收到只能表示 message 已经到达服务器,并不能保证消息一定会被投递到目标 queue 里,所以需要用到接下来的 returnCallback
② ReturnCallback
confirm 模式只能保证消息到达 broker,不能保证消息准确投递到目标 queue 里。在有些模式业务场景下,我们需要保证消息一定要投递到目标 queue 里,此时就需要用到 return 退回模式
③ Ack消息确认机制
- 消费者获取到消息,成功处理,可以回复 Ack 给 Broker
basic.ack用于肯定确认:broker 将移除此消息basic.nack用于否定确认:可以指定 beoker 是否丢弃此消息,可以批量basic.reject用于否定确认,同上,但不能批量
- 默认消息被消费者收到后是自动确认的,即消息会从 queue 中移除
- 消费者收到消息,默认自动ack,但是如果无法确定此消息是否被成功处理,我们可以开启手动ack模式
- 消息处理成功,ack(),接受下一条消息,此消息broker就会移除
- 消息处理失败,nack()/reject() 重新发送给其他人进行处理,或者容错处理后ack
- 消息一直没有调用ack/nack方法,brocker认为此消息正在被处理,不会投递给别人,此时客户端断开,消息不会被broker移除,会投递给别人
# 开启发送端确认
spring.rabbitmq.publisher-confirms=true

# 开启发送端消息抵达队列的确认
spring.rabbitmq.publisher-returns=true

# 只要抵达队列,以异步发送优先回调 publisher-returns
spring.rabbitmq.template.mandatory=true

# 手动ack消息
spring.rabbitmq.listener.simple.acknowledge-mode=manual
8.2 订单确认业务流程
8.2.1 抽取跳转到订单确认页时携带的Vo:
public class OrderConfirmVo {

    @Getter
    @Setter
    /** 会员收获地址列表 **/
    private List<MemberAddressVo> memberAddressVos;

    @Getter @Setter
    /** 所有选中的购物项 **/
    private List<OrderItemVo> items;

    /** 发票记录 **/
    @Getter @Setter
    /** 优惠券(会员积分) **/
    private Integer integration;

    /** 防止重复提交的令牌 **/
    @Getter @Setter
    private String orderToken;

    @Getter @Setter
    Map<Long,Boolean> stocks;

    public Integer getCount() {
        Integer count = 0;
        if (items != null && items.size() > 0) {
            for (OrderItemVo item : items) {
                count += item.getCount();
            }
        }
        return count;
    }

    /** 订单总额 **/
    //BigDecimal total;
    //计算订单总额
    public BigDecimal getTotal() {
        BigDecimal totalNum = BigDecimal.ZERO;
        if (items != null && items.size() > 0) {
            for (OrderItemVo item : items) {
                //计算当前商品的总价格
                BigDecimal itemPrice = item.getPrice().multiply(new BigDecimal(item.getCount().toString()));
                //再计算全部商品的总价格
                totalNum = totalNum.add(itemPrice);
            }
        }
        return totalNum;
    }

    /** 应付价格 **/
    //BigDecimal payPrice;
    public BigDecimal getPayPrice() {
        return getTotal();
    }
}
8.2.2 Vo的数据获取
- 查询购物项、库存和收货地址都要调用远程服务,串行会浪费大量时间,因此我们使用
CompletableFuture进行异步编排 - 可能由于延迟,订单提交按钮可能被点击多次。为了防止重复提交(保证幂等性),我们在返回订单确认页时,在Redis中放入一个随机生成的令牌,过期时间为 30mi;,提交的订单时会携带这个令牌,我们将会在订单提交的处理页面核验此令牌
@RequestMapping("/toTrade")
public String toTrade(Model model) {
    OrderConfirmVo confirmVo = orderService.confirmOrder();
    model.addAttribute("confirmOrder", confirmVo);
    return "confirm";
}
	@Override
    public OrderConfirmVo confirmOrder() throws ExecutionException, InterruptedException {
        OrderConfirmVo confirmVo = new OrderConfirmVo();
        MemberResponseVo memberResponseVo = LoginUserInterceptor.loginUser.get();

        RequestAttributes requestAttributes = RequestContextHolder.getRequestAttributes();

        CompletableFuture<Void> getAddressFuture = CompletableFuture.runAsync(() -> {
            //1.远程调用:查询所有的收货地址列表

            //每个线程都共享之前的request数据
            RequestContextHolder.setRequestAttributes(requestAttributes);
            List<MemberAddressVo> addresses = memberFeignService.getAddress(memberResponseVo.getId());
            confirmVo.setAddresses(addresses);
        }, executor);

        CompletableFuture<Void> cartItemFuture = CompletableFuture.runAsync(() -> {
            //2.远程调用:查询购物车中所有选中的购物项
			RequestContextHolder.setRequestAttributes(requestAttributes);
			//cartFeignService是 Feign Client的代理对象
            List<OrderItemVo> cartItems = cartFeignService.getCurrentUserCartItems();
            confirmVo.setItems(cartItems);
        }, executor).thenRunAsync(()->{
            RequestContextHolder.setRequestAttributes(requestAttributes);
            List<OrderItemVo> items = confirmVo.getItems();
            List<Long> skuIds = items.stream().map(OrderItemVo::getSkuId).collect(Collectors.toList());
            //3.远程调用:查询库存
            R skuHasStock = wmsFeignService.getSkuHasStock(skuIds);
            List<SkuStockVo> data = skuHasStock.getData("data", new TypeReference<List<SkuStockVo>>() {
            });
            if(data!=null){
                Map<Long, Boolean> map = data.stream().collect(Collectors.toMap(SkuStockVo::getSkuId, SkuStockVo::getHasStock));
                confirmVo.setStocks(map);
            }
        },executor);

        //4.查询用户积分
        Integer integration = memberResponseVo.getIntegration();
        confirmVo.setIntegration(integration);

		//5.总价自动计算
        //6.设置一个30min过期的防重令牌 放入Redis
        String token = UUID.randomUUID().toString().replace("-", "");
        confirmVo.setOrderToken(token);
        //redis放一份
        redisTemplate.opsForValue().
                set(OrderConstant.USER_ORDER_TOEKN_PREFIX+memberResponseVo.getId(),token,30, TimeUnit.MINUTES);

        CompletableFuture.allOf(getAddressFuture,cartItemFuture).get();
        return confirmVo;
    }
8.2.3 Feign远程调用丢失请求头问题
Feign 远程调用的请求头中没有含有 JSESSIONID 的 Cookie,所以也就不能得到服务端的 Session 数据,Cart(远程服务)认为没登录,也就获取不了用户信息
分析:
- Feign 会创建一个新的 Request(没有任何请求头)
- 在 Feign 的调用过程中,会使用容器中的
RequestInterceptor对RequestTemplate进行处理,因此我们可以通过向容器中导入定制的RequestInterceptor为请求加上 Cookie。
@Configuration
public class KedaFeignConfig {
    //每次远程调用,都会触发拦截器
    @Bean("requestInterceptor")
    public RequestInterceptor requestInterceptor(){
        return new RequestInterceptor() {
            @Override
            public void apply(RequestTemplate requestTemplate) {
                //拦截器和原生请求都在同一个线程
                //RequestContextHolder拿到刚进来的请求

                ServletRequestAttributes requestAttributes = (ServletRequestAttributes) RequestContextHolder.getRequestAttributes();
                HttpServletRequest request = requestAttributes.getRequest();
                //同步请求头信息
                if(request!=null){
                    requestTemplate.header("Cookie",request.getHeader("Cookie"));
                    System.out.println("feign之前进行的requestInterceptor");
                }
            }
        };
    }
}
其中,RequestContextHolder为 SpingMVC 中共享request数据的上下文,底层由ThreadLocal实现。
8.2.4 Feign 异步情况丢失上下文问题
- 由于
RequestContextHolder使用ThreadLocal共享数据,所以在开启异步时获取不到老请求的信息,自然也就无法共享 Cookie 了 - 在这种情况下,我们需要在开启异步的时候将老请求的
RequestContextHolder的数据设置进去
8.2 订单确认业务流程
8.2.1 模型抽取
页面提交数据
@Data
public class OrderSubmitVo {

    /** 收获地址的id **/
    private Long addrId;

    /** 支付方式 **/
    private Integer payType;
    //无需提交要购买的商品,去购物车再获取一遍
    //优惠、发票

    /** 防重令牌 **/
    private String orderToken;

    /** 应付价格 **/
    private BigDecimal payPrice;

    /** 订单备注 **/
    private String remarks;

    //用户相关的信息,直接去session中取出即可
}
成功后,转发至支付页面携带的Vo
@Data
public class SubmitOrderResponseVo {

    private OrderEntity order;

    /** 错误状态码 **/
    private Integer code;
}
8.2.2 分布式事务
8.3 使用消息队列实现最终一致性
8.3.1 场景
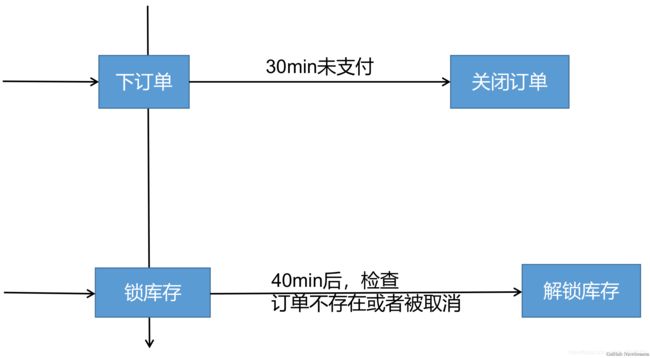
比如未付款的订单,超过一定时间后,系统自动取消订单并释放占有物品
常用解决方案:
Spring 的 Schedule 定时任务轮询数据库、消息队列
缺点:
如果恰好在一次扫描后完成业务逻辑,那么就会等待两个扫描周期才能扫到过期的订单,不能保证时效性
最终解决方案: RabbitMQ 的消息 TTL 和死信 Exchange 结合
8.3.2 RabbitMQ实现延迟队列
定义:延迟队列存储的对象肯定是对应的延时消息;所谓"延时消息"是指当消息被发送以后,并不想让消费者立即拿到消息,而是等待指定时间后,消费者才拿到这个消息进行消费。
实现:RabbitMQ可以通过设置队列的TTL和 死信路由 实现延迟队列
-
TTL:
RabbitMQ 可以针对 Queue 设置x-expires或者针对 Message 设置x-message-ttl,来控制消息的生存时间;如果超时(两者同时设置以最先到期的时间为准),则消息变为 Dead Letter(死信) -
死信路由 DLX
RabbitMQ 的 Queue 可以配置x-dead-letter-exchange和x-dead-letter-routing-key(可选)两个参数,如果队列内出现了 Dead Letter,则按照这两个参数重新路由转发到指定的队列。x-dead-letter-exchange:出现dead letter之后将 Dead Letter 重新发送到指定 exchangex-dead-letter-routing-key:出现dead letter之后将 Dead Letter 重新按照指定的 routing-key 发送
8.3.3 定时关单与库存解锁主体逻辑
① 订单超时未支付触发订单过期状态修改与库存解锁
创建订单时消息会被发送至队列order.delay.queue,经过 TTL 的时间后消息会变成死信以order.release.order的路由键经交换机转发至队列order.release.order.queue,再通过监听该队列的消息来实现过期订单的处理
- 如果该订单已支付,则无需处理
- 否则说明该订单已过期,修改该订单的状态并通过路由键
order.release.other发送消息至队列stock.release.stock.queue进行库存解锁
② 库存锁定后延迟检查是否需要解锁库存
在库存锁定后通过路由键stock.locked发送至延迟队列stock.delay.queue,延迟时间到,死信通过路由键stock.release转发至stock.release.stock.queue,通过监听该队列进行判断当前订单状态,来确定库存是否需要解锁
- 由于关闭订单和库存解锁都有可能被执行多次,因此要保证业务逻辑的幂等性,在执行业务时重新查询当前的状态进行判断
- 订单关闭和库存解锁都会进行库存解锁的操作,来确保业务异常或者订单过期时库存会被可靠解锁
实现:
kedamall-order:
	//提交订单
	@PostMapping("/submitOrder")
    public String submitOrder(OrderSubmitVo vo, Model model, RedirectAttributes redirectAttributes){
        try {
            //创建订单、验令牌、验价格、锁库存等等.......
            SubmitOrderResponseVo responseVo = orderService.submitOrder(vo);
            //成功则来到支付页
            if(responseVo.getCode()==0) {
                //成功则来到支付页
                model.addAttribute("submitOrderResponse", responseVo);
                return "pay";
            }else {
                //失败回到失败页
                String msg = "下单失败;";
                switch (responseVo.getCode()){
                    case 1:msg+="令牌校验失败";break;
                    case 2:msg+="库存锁定失败(库存不足)";
                }
                redirectAttributes.addFlashAttribute("msg",msg);
                return "redirect:http://order.kedamall.com/toTrade";
            }

        } catch (Exception e){
            if (e instanceof NoStockException) {
                String message = e.getMessage();
                redirectAttributes.addFlashAttribute("msg", message);
            }
            return "redirect:http://order.kedamall.com/toTrade";
        }
    }
	@Override
    @Transactional
    //@GlobalTransactional Seata不适用与高并发
    /**
     * 通过异常机制控制事务回滚
     * 如果在锁定库存失败则抛出 NoStockExceptions
     * 订单服务和库存服务都会回滚。
     */
    public SubmitOrderResponseVo submitOrder(OrderSubmitVo vo) {
        MemberResponseVo memberResponseVo = LoginUserInterceptor.loginUser.get();

        SubmitOrderResponseVo responseVo = new SubmitOrderResponseVo();
        responseVo.setCode(0);
        submitVoThreadLocal.set(vo);
        //1.验令牌 保证原子性
        String orderToken = vo.getOrderToken();
        String sciprt = "if redis.call('get', KEYS[1]) == ARGV[1] then return redis.call('del', KEYS[1]) else return 0 end";
        Long result = redisTemplate.execute(new DefaultRedisScript<Long>(sciprt, Long.class),
                Arrays.asList(OrderConstant.USER_ORDER_TOEKN_PREFIX + memberResponseVo.getId()),
                orderToken);
        if(result == 1L){
            //令牌校验成功啦
            OrderCreateTo order = createOrder();

            //保存订单
            saveOrder(order);

            //远程调用:锁定库存,有异常就回滚
            WareSkuLockVo lockVo = new WareSkuLockVo();
            lockVo.setOrderSn(order.getOrderEntity().getOrderSn());
            List<OrderItemVo> orderItemVos = order.getOrderItems().stream().map(item -> {
                OrderItemVo orderItemVo = new OrderItemVo();
                orderItemVo.setSkuId(item.getSkuId());
                orderItemVo.setCount(item.getSkuQuantity());
                orderItemVo.setTitle(item.getSkuName());
                return orderItemVo;
            }).collect(Collectors.toList());
            lockVo.setLocks(orderItemVos);
            R r = wmsFeignService.orderLockStock(lockVo);
            if(r.getCode()==0){
                //库存锁定成功
                responseVo.setOrderEntity(order.getOrderEntity());
                //TODO 远程扣减积分
                //int i=1/0;
                // 订单创建成功,发送消息给MQ
                rabbitTemplate.convertAndSend("order-event-exchange","order.create.order",order.getOrderEntity());
                return responseVo;
            }else {
                //库存锁定失败
                throw new NoStockException((String) r.get("msg"));
            }
        }else {
            //令牌校验失败
            responseVo.setCode(1);
            return responseVo;
        }
    }
@Service
@RabbitListener(queues = "order.release.order.queue")
public class OrderCloseListener {
    @Autowired
    OrderService orderService;

    @RabbitHandler
    public void listener(OrderEntity entity, Channel channel, Message message) throws IOException {
        System.out.println("收到过期的订单信息:"+entity+",准备关闭订单"+entity.getOrderSn());
        try {
            orderService.closeOrder(entity);
            channel.basicAck(message.getMessageProperties().getDeliveryTag(),false);
        }catch (Exception e){
            channel.basicReject(message.getMessageProperties().getDeliveryTag(),true);
        }
    }
}
	@Transactional
    @Override
    public void closeOrder(OrderEntity entity) {
        OrderEntity orderEntity = this.getById(entity.getId());
        if (orderEntity.getStatus().equals(OrderStatusEnum.CREATE_NEW.getCode())) {
            // 关闭订单
            OrderEntity update = new OrderEntity();
            update.setId(entity.getId());
            update.setStatus(OrderStatusEnum.CANCLED.getCode());
            this.updateById(update);
            OrderTo orderTo = new OrderTo();
            BeanUtils.copyProperties(orderEntity, orderTo);
            rabbitTemplate.convertAndSend("order-event-exchange", "order.release.other", orderTo);
        }
    }
kedamall-ware:
	/**
     * 为某个订单锁定库存
     * 默认运行时异常都回滚
     * @param vo
     * @return
     */
    @Override
    @Transactional(rollbackFor = NoStockException.class)
    public Boolean orderLockStock(WareSkuLockVo vo) {

        /**
         * 保存库存工作单的详情
         * 用于追溯
         */
        WareOrderTaskEntity taskEntity = new WareOrderTaskEntity();
        taskEntity.setOrderSn(vo.getOrderSn());
        wareOrderTaskService.save(taskEntity);


        //1.找到每个商品在哪个仓库有库存
        List<OrderItemVo> locks = vo.getLocks();
        List<SkuWareHasStock> collect = locks.stream().map(item -> {
            SkuWareHasStock stock = new SkuWareHasStock();
            Long skuId = item.getSkuId();
            stock.setSkuId(skuId);
            stock.setNum(item.getCount());
            //查询这个商品在哪里有库存
            List<Long> wareId = wareSkuDao.listWareIdHasSkuStock(skuId);
            stock.setWareId(wareId);
            return stock;
        }).collect(Collectors.toList());

        //2.锁定库存
        Boolean allLock = true;
        for (SkuWareHasStock hasStock : collect) {
            Boolean skuStock = false;
            Long skuId = hasStock.getSkuId();
            List<Long> wareIds = hasStock.getWareId();
            if(wareIds==null && wareIds.size()==0){
                throw new NoStockException(skuId);
            }
            for (Long wareId : wareIds) {
                Long count = wareSkuDao.lockSkuStock(skuId, wareId,hasStock.getNum());
                if(count==0){
                    //当前仓库锁失败
                }else {
                    //锁成功
                    skuStock=true;
                    //TODO 告诉MQ库存锁定成功
                    /**
                     * 保存锁定成功的详情
                     * 用于追溯
                     */
                    WareOrderTaskDetailEntity taskDetailEntity = new WareOrderTaskDetailEntity(null,skuId,"",hasStock.getNum(),taskEntity.getId(),wareId,1);
                    wareOrderTaskDetailService.save(taskDetailEntity);

                    StockLockedTo stockLockedTo = new StockLockedTo();
                    stockLockedTo.setId(taskEntity.getId());
                    //只发detail的id不行 防止taskDetail回滚后找不到数据
                    StockDetailTo stockDetailTo = new StockDetailTo();
                    BeanUtils.copyProperties(taskDetailEntity,stockDetailTo);
                    stockLockedTo.setDetail(stockDetailTo);
                    rabbitTemplate.convertAndSend("stock-event-exchange","stock.locked",stockLockedTo);
                    break;
                }
            }
            if(skuStock==false){
                throw new NoStockException(skuId);
            }
        }
        //全部锁定成功
        return true;
    }
@Service
@RabbitListener(queues = "stock.release.stock.queue")
public class StockReleaseListener {

    @Autowired
    WareSkuService wareSkuService;

    @RabbitHandler
    public void handleStockLockedRelease(StockLockedTo to, Message message, Channel channel) throws IOException{
        System.out.println("收到解锁库存的消息...");
        try {
            wareSkuService.unlockStock(to);
            channel.basicAck(message.getMessageProperties().getDeliveryTag(), false);
        } catch (Exception e) {
            channel.basicReject(message.getMessageProperties().getDeliveryTag(), true);
        }
    }
    @RabbitHandler
    public void handleOrderCloseRelease(OrderTo orderTo, Message message, Channel channel) throws IOException {
        System.out.println("订单关闭,准备解锁库存...");
        try {
            wareSkuService.unlockStock(orderTo);
            channel.basicAck(message.getMessageProperties().getDeliveryTag(), false);
        } catch (Exception e) {
            channel.basicReject(message.getMessageProperties().getDeliveryTag(), true);
        }
    }
}
9. 秒杀服务
9.1 秒杀(高并发)系统关注的问题
![]()
![]()
9.2 秒杀架构设计
① 项目独立部署,独立秒杀模块 kedamall-seckill
② 使用定时任务每天三点上架最新秒杀商品,削减高峰期压力
③ 秒杀链接加密,为秒杀商品添加唯一商品随机码,在开始秒杀时才暴露接口
- 在 Redis 中保存秒杀商品信息时,为redisTo 保存一个随机码并保存在Redis中;加载商品页(Item)的时候,如果在秒杀时间内,就可携带随机码;否则不显示随机码。
④ 库存预热,先从数据库中扣除一部分库存以 Redisson 信号量的形式存储在 Redis 中
- 在 Redis 中保存秒杀商品信息时,商品可以秒杀的数量作为分布式信号量
⑤ 队列削峰,秒杀成功后立即返回,然后以发送消息的形式创建订单
- 只要通过校验并信号量获取成功,就发送消息给 kedamall-order 服务
⑥ Nginx 做好动静分离。保证秒杀和商品详情页的动态请求才打到后端的服务集群。
9.2.1 存储模型设计
秒杀场次存储的List可以当做hash key在SECKILL_CHARE_PREFIX中获得对应的商品数据(Sku)
//存储的秒杀场次对应数据
//K: SESSION_CACHE_PREFIX + startTime + "_" + endTime
//V: sessionId+"-"+skuId 的一个List
private final String SESSION_CACHE_PREFIX = "seckill:sessions:";


//存储的秒杀商品数据
//K: 固定值SECKILL_CHARE_PREFIX
//V: hash,k为sessionId+"-"+skuId,v为对应的商品信息SeckillSkuRedisTo
private final String SECKILL_CHARE_PREFIX = "seckill:skus";


//K: SKU_STOCK_SEMAPHORE+商品随机码
//V: 秒杀的库存件数
private final String SKU_STOCK_SEMAPHORE = "seckill:stock:";    //+商品随机码
9.3 商品上架
9.3.1 定时上架(Redisson分布式锁、Redisson信号量、随机码)
① 开启对定时任务的支持
@EnableAsync //开启对异步的支持,防止定时任务之间相互阻塞
@EnableScheduling //开启对定时任务的支持
@Configuration
public class ScheduledConfig {
}
每天凌晨三点远程调用coupon服务上架最近三天的秒杀商品
由于在分布式情况下该方法可能同时被调用多次,因此加入 Redisson 分布式锁,同时只有一个服务可以调用该方法:
	//秒杀商品上架功能的锁
    private final String upload_lock = "seckill:upload:lock";

    /**
     * 定时任务
     * 每天三点上架最近三天的秒杀商品
     */
    @Async
    @Scheduled(cron = "0 0 3 * * ?")
    public void uploadSeckillSkuLatest3Days() {
        //为避免分布式情况下多服务同时上架的情况,使用分布式锁
        RLock lock = redissonClient.getLock(upload_lock);
        try {
            lock.lock(10, TimeUnit.SECONDS);
            secKillService.uploadSeckillSkuLatest3Days();
        }catch (Exception e){
            e.printStackTrace();
        }finally {
            lock.unlock();
        }
    }
@Override
    public void uploadSeckillSkuLatest3Days() {
        //1.远程调用:最近三天需要参与秒杀的活动
        R r = couponFeignService.getLatest3DaySession();
        if(r.getCode()==0){

            //1.上架商品;
            List<SeckillSessionsWithSkus> sessionData = r.getData(new TypeReference<List<SeckillSessionsWithSkus>>() {
            });
            if(!CollectionUtils.isEmpty(sessionData)){
                //2.商品缓存到redis
                //2.1缓存活动信息
                saveSessionInfos(sessionData);

                //2.2缓存活动的关联商品信息
                saveSessionSkuInfo(sessionData);
            }
        }
    }
在 Redis 中保存秒杀商品信息(使用Redisson信号量、随机码)
	private void saveSessionSkuInfo(List<SeckillSessionsWithSkus> sessions){
        sessions.stream().forEach(session->{
            //准备哈希操作
            BoundHashOperations<String, Object, Object> hashOps = redisTemplate.boundHashOps(SKUKILL_CACHE_PREFIX);

            session.getRelationSkus().stream().forEach(seckillSkuVo -> {
                Boolean hasKey = hashOps.hasKey(seckillSkuVo.getPromotionId() + "_" + seckillSkuVo.getSkuId().toString());
                if(!hasKey){
                    SecKillSkuRedisTo redisTo = new SecKillSkuRedisTo();
                    //远程调用:获取sku的基本数据
                    R r = productFeignService.getSkuInfo(seckillSkuVo.getSkuId());
                    if(r.getCode()==0){
                        SkuInfoVo skuInfo = r.getData("skuInfo", new TypeReference<SkuInfoVo>() {
                        });
                        redisTo.setSkuInfo(skuInfo);
                    }
                    //sku的秒杀信息
                    BeanUtils.copyProperties(seckillSkuVo,redisTo);

                    //设置当前秒杀商品的的开始、结束时间
                    redisTo.setStartTime(session.getStartTime().getTime());
                    redisTo.setEndTime(session.getEndTime().getTime());

                    //设置商品的随机码,防止恶意攻击
                    String token = UUID.randomUUID().toString().replace("-", "");
                    redisTo.setRandomCode(token);

                    String s = JSON.toJSONString(redisTo);
                    hashOps.put(seckillSkuVo.getPromotionId() + "_" + seckillSkuVo.getSkuId().toString(),s);

                    //商品可以秒杀的数量作为分布式信号量(限流)
                    RSemaphore semaphore = redissonClient.getSemaphore(SKU_STOCK_SEMAPHORE + token);
                    semaphore.trySetPermits(seckillSkuVo.getSeckillCount().intValue());
                }
            });
        });
    }
![]()
9.3.2 获取当前商品的秒杀信息
@ResponseBody
@GetMapping(value = "/getSeckillSkuInfo/{skuId}")
public R getSeckillSkuInfo(@PathVariable("skuId") Long skuId) {
    SeckillSkuRedisTo to = secKillService.getSeckillSkuInfo(skuId);
    return R.ok().setData(to);
}
	@Override
    public SecKillSkuRedisTo getSkuSeckillInfo(Long skuId) {
        //找到所有需要参与秒杀的商品的Key信息(seckill:skus是一个 Hash结构)
        BoundHashOperations<String, String, String> hashOps = redisTemplate.boundHashOps(SKUKILL_CACHE_PREFIX);
        Set<String> keys = hashOps.keys();
        if(!CollectionUtils.isEmpty(keys)){
            //正则表达式匹配:数字_当前skuid的商品
            String reg = "\\d_" + skuId;
            for (String key : keys) {
                boolean matches = Pattern.matches(reg, key);
                if(matches){
                    String json = hashOps.get(key);
                    SecKillSkuRedisTo redisTo = JSON.parseObject(json, SecKillSkuRedisTo.class);
                    //处理随机码:
                    //如果在秒杀时间内:则不处理;否则不显示随机码
                    long time = new Date().getTime();
                    if(time<redisTo.getStartTime() && time>redisTo.getEndTime()){
                        redisTo.setRandomCode(null);
                    }
                    return redisTo;
                }
            }
        }
        return null;
    }
9.4 秒杀
(1) 秒杀接口
- 点击立即抢购时,会发送请求
- 秒杀请求会对请求校验时效、商品随机码、当前用户是否已经抢购过当前商品、库存和购买量,通过校验的则秒杀成功,发送消息创建订单
	$("#seckillA").click(function () {
        const isLogin = [[${session.loginUser != null}]]; // 已登录
        if (isLogin) {
            const killId = $(this).attr("sessionId") + "_" + $(this).attr("skuId");

            const key = $(this).attr("code");//随机码
            const num = $("#numInput").val();
            location.href = "http://seckill.kedamall.com/kill?killId=" + killId + "&key=" + key + "&num=" + num;
        } else {
            alert("想要进行秒杀的话请先进行登录");
        }

        return false;
    })
@GetMapping("/kill")
public String kill(@RequestParam("killId") String killId,
                   @RequestParam("key")String key,
                   @RequestParam("num")Integer num,
                   Model model) {
    String orderSn= null;
    try {
        orderSn = secKillService.kill(killId, key, num);
        model.addAttribute("orderSn", orderSn);
    } catch (InterruptedException e) {
        e.printStackTrace();
    }
    return "success";
}
	@Override
    public String kill(String killId, String key, Integer num) {
        //绑定哈希操作
        BoundHashOperations<String, String, String> hashOps = redisTemplate.boundHashOps(SKUKILL_CACHE_PREFIX);

		//1.获取秒杀商品的详细信息
        String s = hashOps.get(killId);
        if(StringUtils.isEmpty(s)){
        	//非空判断
            return null;
        }else {
            SecKillSkuRedisTo redisTo = JSON.parseObject(s, SecKillSkuRedisTo.class);
            //2.合法性校验
            //2.1秒杀时间校验
            Long startTime = redisTo.getStartTime();
            Long endTime = redisTo.getEndTime();
            long time = new Date().getTime();
            long ttl = endTime - startTime;
            if(time<startTime && time>endTime){
                return null;
            }
            //2.2随机码校验和商品ID
            String randomCode = redisTo.getRandomCode();
            String id = redisTo.getPromotionSessionId() + "_" + redisTo.getSkuId();
            if(!key.equals(randomCode) || !killId.equals(id)){
                return null;
            }
            //2.3购买数量是否超过限购数量
            if(num>redisTo.getSeckillLimit().intValue())return null;

            //2.4验证这个人是否购买过了(幂等性)==》只要秒杀成功就去redis占位;数据格式 userId_sessionId_skuId
            MemberResponseVo memberResponseVo = LoginUserInterceptor.loginUser.get();
            String occupyKey = memberResponseVo.getId() + "_" + id;
            Boolean absent = redisTemplate.opsForValue().setIfAbsent(occupyKey, num.toString(), ttl, TimeUnit.MILLISECONDS);
            if(!absent){
                //占位失败:已买过
                return null;
            }

            //TODO 3.开始秒杀!!!!
            RSemaphore semaphore = redissonClient.getSemaphore(SKU_STOCK_SEMAPHORE + randomCode);
            boolean acquire = semaphore.tryAcquire(num);
            //只要信号量获取成功
            if(acquire){
                // 秒杀成功 快速下单 发送消息到 MQ 整个操作时间在 10ms 左右
                String timeId = IdWorker.getTimeId();
                SeckillOrderTo seckillOrderTo = new SeckillOrderTo();
                seckillOrderTo.setOrderSn(timeId);
                seckillOrderTo.setMemberId(memberResponseVo.getId());
                seckillOrderTo.setNum(num);
                seckillOrderTo.setPromotionSessionId(redisTo.getPromotionSessionId());
                seckillOrderTo.setSkuId(redisTo.getSkuId());
                seckillOrderTo.setSeckillPrice(redisTo.getSeckillPrice());
                rabbitTemplate.convertAndSend("order-event-exchange", "order.seckill.order", seckillOrderTo);
                return timeId;
            }
        }
        return null;
    }
kedamall-order:
//监听器
@RabbitListener(queues = "order.seckill.order.queue")
@Component
@Slf4j
public class OrderSeckillListener {
    @Autowired
    private OrderService orderService;

    @RabbitHandler
    public void listener(SeckillOrderTo seckillOrder, Channel channel, Message message) throws IOException {
        try {
            log.info("准备创建秒杀订单的详细信息...");
            orderService.createSeckillOrder(seckillOrder);
            channel.basicAck(message.getMessageProperties().getDeliveryTag(), false);
        } catch (Exception e) {
            channel.basicReject(message.getMessageProperties().getDeliveryTag(), true);
        }
    }
}
10. Sentinel服务流控、熔断和降级
10.1 流控规则设置
10.2 自定义流控响应
@Component
public class KedamallSentinelConfig implements UrlBlockHandler{
    @Override
    public void blocked(HttpServletRequest request, HttpServletResponse response, BlockException ex) throws IOException {
        R r = R.error(BizCodeEnum.SECKILL_EXCEPTION.getCode(),BizCodeEnum.SECKILL_EXCEPTION.getMsg());
        response.setContentType("application/json;charset=utf-8");
        response.getWriter().write(JSON.toJSONString(r));
    }
}
10.3 网关流控
如果能在网关层就进行流控,可以避免请求流入业务,减小服务压力
<dependency>
    <groupId>com.alibaba.cloudgroupId>
    <artifactId>spring-cloud-alibaba-sentinel-gatewayartifactId>
    <version>2.1.0.RELEASEversion>
dependency>
10.4 feign的流控和降级
默认情况下,Sentinel 是不会对 Feign 进行监控的,需要开启配置
feign:
  sentinel:
    enabled: true
Feign 的降级:在@FeignClient设置fallback属性
@FeignClient(value = "kedamall-seckill",fallback = SeckillFeignServiceFallback.class)
public interface SeckillFeignService {
    @GetMapping("/sku/seckill/{skuId}")
    R getSkuSeckillInfo(@PathVariable("skuId") Long skuId);
}
package com.example.kedamall.product.feign.fallback;

@Component
@Slf4j
public class SeckillFeignServiceFallback implements SeckillFeignService {
    @Override
    public R getSkuSeckillInfo(Long skuId) {
        log.info("熔断方法调用........getSkuSeckillInfo");
        return R.error(BizCodeEnum.SMS_CODE_EXCEPTION.getCode(),BizCodeEnum.SMS_CODE_EXCEPTION.getMsg());
    }
}
11. Zipkin链路追踪
- 由于微服务项目模块众多,相互之间的调用关系十分复杂;
- 为了分析工作过程中的调用关系,需要使用 Zipkin 来进行链路追踪
Sleuth 是 Spring Cloud 的组件之一,它为Spring Cloud实现了一种分布式追踪解决方案,兼容Zipkin基于日志的追踪系统。
11.1 相关术语
① Span ---- 基本的工作单元。无论是发送一个RPC(Remote Procedure Call)或是向RPC发送一个响应都是一个Span。每一个Span通过一个64位ID来进行唯一标识,并通过另一个64位ID对Span所在的Trace进行唯一标识。
Span能够启动和停止,他们不断地追踪自身的时间信息,当你创建了一个Span,你必须在未来的某个时刻停止它。
提示:启动一个Trace的初始化Span被叫作 Root Span ,它的 Span ID 和 Trace Id 相同。
② Trace ---- 由一系列 Span 组成的一个树状结构。例如,如果你要执行一个分布式大数据的存储操作,这个Trace也许会由你的PUT请求来形成。
