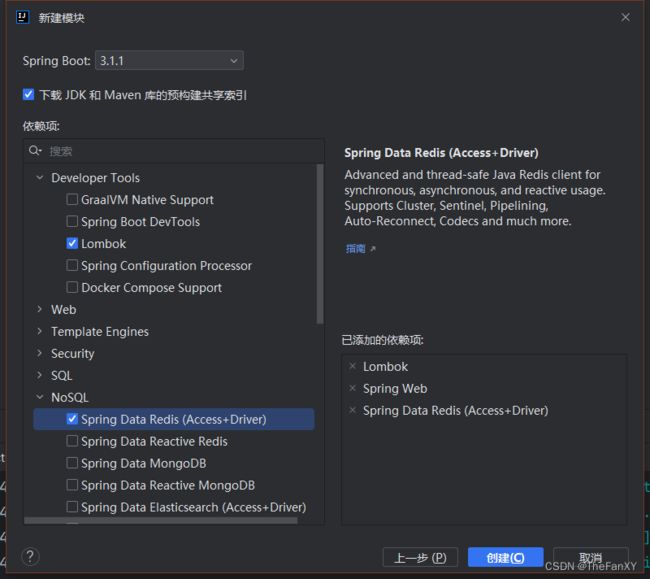
SpringBoot3【⑥ 场景整合:①NoSQL:Redis】
0. 阳哥Redis科普
1. 常用的三个库的联系
Jedis、Lettuce 和 RedisTemplate 都是 Java 库,用于连接和与 Redis 进行交互,Redis 是一种内存数据结构存储。
Jedis 是一种流行的库,提供了一个简单易用的 Redis 操作接口。它支持所有 Redis 命令,以其高性能而闻名。
Lettuce 是另一种 Java 库,用于 Redis,它提供了更先进和可扩展的 Redis 连接方式。它支持 Redis Sentinel、Redis Cluster 和 Redis Pub/Sub,因此非常适合较大和更复杂的 Redis 环境。
RedisTemplate 是 Spring Data Redis 库的一部分,它提供了更高级别的抽象,用于与 Redis 进行交互。它简化了执行常见 Redis 操作所需的代码,并可以轻松地与其他 Spring 技术集成。
总体而言,这三个库为在 Java 应用程序中使用 Redis 提供了不同级别的抽象和功能。
2. 本地Java链接Redis常见问题
- bind配置需要注释掉
- 保护模式设置为
no - Linux系统的防火墙设置要么设置白名单,要么关闭防火墙
- redis服务器的ip地址和密码
- 忘记写访问redis的服务器端口号和auth密码
3. 集成Jedis
1. 是什么
Jedis Client 是 Redis 官网推荐的一个面向java客户端,提供了一个简单易用的 Redis 操作接口。它支持所有 Redis 命令,以其高性能而闻名。
2. 建立module 改写Pom文件
<project xmlns="http://maven.apache.org/POM/4.0.0"
         xmlns:xsi="http://www.w3.org/2001/XMLSchema-instance"
         xsi:schemaLocation="http://maven.apache.org/POM/4.0.0 http://maven.apache.org/xsd/maven-4.0.0.xsd">
    <modelVersion>4.0.0modelVersion>

    <groupId>com.atguigu.redis7groupId>
    <artifactId>redis7_studyartifactId>
    <version>1.0-SNAPSHOTversion>

    <parent>
        <groupId>org.springframework.bootgroupId>
        <artifactId>spring-boot-starter-parentartifactId>
        <version>2.6.10version>
        <relativePath/>
    parent>

    <properties>
        <project.build.sourceEncoding>UTF-8project.build.sourceEncoding>
        <maven.compiler.source>1.8maven.compiler.source>
        <maven.compiler.target>1.8maven.compiler.target>
        <junit.version>4.12junit.version>
        <log4j.version>1.2.17log4j.version>
        <lombok.version>1.16.18lombok.version>
    properties>

    <dependencies>

        <dependency>
            <groupId>org.springframework.bootgroupId>
            <artifactId>spring-boot-starter-webartifactId>
        dependency>

        <dependency>
            <groupId>redis.clientsgroupId>
            <artifactId>jedisartifactId>
            <version>4.3.1version>
        dependency>

        <dependency>
            <groupId>junitgroupId>
            <artifactId>junitartifactId>
            <version>${junit.version}version>
        dependency>
        <dependency>
            <groupId>org.springframework.bootgroupId>
            <artifactId>spring-boot-starter-testartifactId>
            <scope>testscope>
        dependency>
        <dependency>
            <groupId>log4jgroupId>
            <artifactId>log4jartifactId>
            <version>${log4j.version}version>
        dependency>
        <dependency>
            <groupId>org.projectlombokgroupId>
            <artifactId>lombokartifactId>
            <version>${lombok.version}version>
            <optional>trueoptional>
        dependency>
    dependencies>

    <build>
        <plugins>
            <plugin>
                <groupId>org.springframework.bootgroupId>
                <artifactId>spring-boot-maven-pluginartifactId>
            plugin>
        plugins>
    build>

project>
主要是导入redis的配置
        <dependency>
            <groupId>redis.clientsgroupId>
            <artifactId>jedisartifactId>
            <version>4.3.1version>
        dependency>
@Slf4j
public class JedisDemo {

    public static void main(String[] args) {

        // 1 获取connection 指定ip和端口号
        Jedis jedis = new Jedis("192.168.110.100", 6379);

        // 2 指定访问服务器的密码
        jedis.auth("123456");

        // 3 获得jedis客户端,可以像jdbc一样,访问redis
        log.info("redis conn status:{}","连接成功");
        log.info("redis ping retvalue:{}",jedis.ping());

        // 4 一些功能就可以使用了
        jedis.set("k1", "v1");
        jedis.rpush("list1", "1", "2", "3", "4");
        System.out.println(jedis.lrange("list1", 0, -1));


        HashMap<String, String> map1 = new HashMap<>();
        map1.put("name", "wxf");
        jedis.hmset("hmap1", map1);
        System.out.println(jedis.hgetAll("hmap1"));
    }
}
4. 集成Jedis
1. 是什么
ettuce是一个Redis的Java驱动包,Lettuce翻译为生菜,没错,就是吃的那种生菜,所以它的Logo长这样
2. lettuce VS Jedis
3. 实际使用
1. 改pom
        <dependency>
            <groupId>io.lettucegroupId>
            <artifactId>lettuce-coreartifactId>
            <version>6.2.1.RELEASEversion>
        dependency>
2. 操作
@Slf4j
public class LettuceDemo {

    public static void main(String[] args) {
        // 1 使用构建器链式编程来builder我们的RedisURI
        RedisURI uri = RedisURI.builder()
                .redis("192.168.110.100")
                .withPort(6379)
                .withAuthentication("default", "123456")
                .build();

        // 2 创建连接客户端
        RedisClient redisClient = RedisClient.create(uri);
        StatefulRedisConnection<String, String> connect = redisClient.connect();

        // 3 通过连接创建操作的command
        RedisCommands<String, String> commands = connect.sync();
        // ========biz=============
        // keys
        String s = commands.get("k1");
        System.out.println(s);

        commands.setex("k2", 20L, "v2");

        commands.rpush("list1", "10", "12", "13");
        System.out.println(commands.lrange("list1", 0, -1));


        // ========biz=============
        // 4 关闭释放资源
        connect.close();
        redisClient.shutdown();
    }
}
1. 雷神简易科普整合
依赖导入
<dependency>
    <groupId>org.springframework.bootgroupId>
    <artifactId>spring-boot-starter-data-redisartifactId>
dependency>
配置
spring.data.redis.host=192.168.110.100
spring.data.redis.password=123456
测试
@Autowired
StringRedisTemplate redisTemplate;

@Test
void redisTest(){
    redisTemplate.opsForValue().set("a","1234");
    Assertions.assertEquals("1234",redisTemplate.opsForValue().get("a"));
}
2. 自动配置原理
META-INF/spring/org.springframework.boot.autoconfigure.AutoConfiguration.imports中导入了RedisAutoConfiguration、RedisReactiveAutoConfiguration和RedisRepositoriesAutoConfiguration。所有属性绑定在RedisProperties中RedisReactiveAutoConfiguration属于响应式编程,不用管。RedisRepositoriesAutoConfiguration属于 JPA 操作,也不用管RedisAutoConfiguration配置了以下组件
1.1.LettuceConnectionConfiguration: 给容器中注入了连接工厂LettuceConnectionFactory,和操作 redis 的客户端DefaultClientResources。
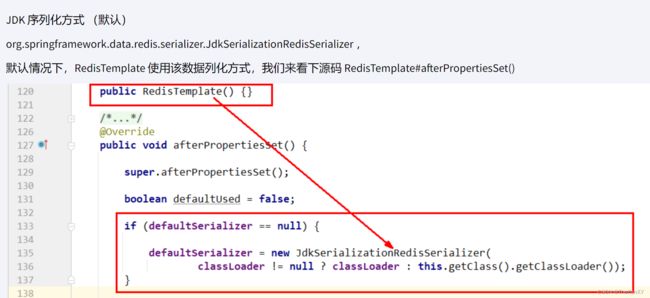
1.2.RedisTemplate: 可给 redis 中存储任意对象,会使用 jdk 默认序列化方式。
1.3.StringRedisTemplate: 给 redis 中存储字符串,如果要存对象,需要开发人员自己进行序列化。key-value都是字符串进行操作
3. 定制化
1. 序列化机制
@Configuration
public class AppRedisConfiguration {


    /**
     * 允许Object类型的key-value,都可以被转为json进行存储。
     * @param redisConnectionFactory 自动配置好了连接工厂
     * @return
     */
    @Bean
    public RedisTemplate<Object, Object> redisTemplate(RedisConnectionFactory redisConnectionFactory) {
        RedisTemplate<Object, Object> template = new RedisTemplate<>();
        template.setConnectionFactory(redisConnectionFactory);
        //把对象转为json字符串的序列化工具
        template.setDefaultSerializer(new GenericJackson2JsonRedisSerializer());
        return template;
    }
}
2. redis客户端
RedisTemplate、StringRedisTemplate: 操作redis的工具类
- 要从redis的连接工厂获取链接才能操作redis
- Redis客户端
- Lettuce: 默认
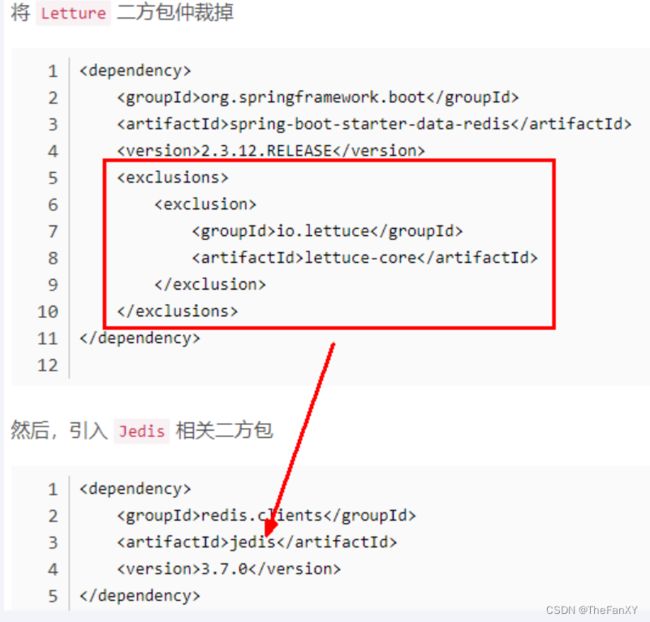
- Jedis:可以使用以下切换
        <dependency>
            <groupId>org.springframework.bootgroupId>
            <artifactId>spring-boot-starter-data-redisartifactId>
            <exclusions>
                <exclusion>
                    <groupId>io.lettucegroupId>
                    <artifactId>lettuce-coreartifactId>
                exclusion>
            exclusions>
        dependency>


        <dependency>
            <groupId>redis.clientsgroupId>
            <artifactId>jedisartifactId>
        dependency>
3. 配置参考
spring.data.redis.host=8.130.74.183
spring.data.redis.port=6379
#spring.data.redis.client-type=lettuce

#设置lettuce的底层参数
#spring.data.redis.lettuce.pool.enabled=true
#spring.data.redis.lettuce.pool.max-active=8

spring.data.redis.client-type=jedis
spring.data.redis.jedis.pool.enabled=true
spring.data.redis.jedis.pool.max-active=8
2. 阳哥RedisTemplate场景整合
1. 连接单机
1. 配置maven
这里还引入了和微服务有关的swagger关于微服务的包
<project xmlns="http://maven.apache.org/POM/4.0.0"
         xmlns:xsi="http://www.w3.org/2001/XMLSchema-instance"
         xsi:schemaLocation="http://maven.apache.org/POM/4.0.0 http://maven.apache.org/xsd/maven-4.0.0.xsd">
    <modelVersion>4.0.0modelVersion>

    <groupId>com.atguigu.redis7groupId>
    <artifactId>redis7_studyartifactId>
    <version>1.0-SNAPSHOTversion>

    <parent>
        <groupId>org.springframework.bootgroupId>
        <artifactId>spring-boot-starter-parentartifactId>
        <version>2.6.10version>
        <relativePath/>
    parent>

    <properties>
        <project.build.sourceEncoding>UTF-8project.build.sourceEncoding>
        <maven.compiler.source>1.8maven.compiler.source>
        <maven.compiler.target>1.8maven.compiler.target>
        <junit.version>4.12junit.version>
        <log4j.version>1.2.17log4j.version>
        <lombok.version>1.16.18lombok.version>
    properties>

    <dependencies>

        <dependency>
            <groupId>org.springframework.bootgroupId>
            <artifactId>spring-boot-starter-webartifactId>
        dependency>

        <dependency>
            <groupId>org.springframework.bootgroupId>
            <artifactId>spring-boot-starter-data-redisartifactId>
        dependency>
        <dependency>
            <groupId>org.apache.commonsgroupId>
            <artifactId>commons-pool2artifactId>
        dependency>

        <dependency>
            <groupId>io.springfoxgroupId>
            <artifactId>springfox-swagger2artifactId>
            <version>2.9.2version>
        dependency>
        <dependency>
            <groupId>io.springfoxgroupId>
            <artifactId>springfox-swagger-uiartifactId>
            <version>2.9.2version>
        dependency>

        <dependency>
            <groupId>junitgroupId>
            <artifactId>junitartifactId>
            <version>${junit.version}version>
        dependency>
        <dependency>
            <groupId>org.springframework.bootgroupId>
            <artifactId>spring-boot-starter-testartifactId>
            <scope>testscope>
        dependency>
        <dependency>
            <groupId>log4jgroupId>
            <artifactId>log4jartifactId>
            <version>${log4j.version}version>
        dependency>
        <dependency>
            <groupId>org.projectlombokgroupId>
            <artifactId>lombokartifactId>
            <version>${lombok.version}version>
            <optional>trueoptional>
        dependency>
    dependencies>

    <build>
        <plugins>
            <plugin>
                <groupId>org.springframework.bootgroupId>
                <artifactId>spring-boot-maven-pluginartifactId>
            plugin>
        plugins>
    build>

project>
2. 配置文件设置
server.port=7777

spring.application.name=redis7_study

# ========================logging=====================
logging.level.root=info
logging.level.com.atguigu.redis7=info
logging.pattern.console=%d{yyyy-MM-dd HH:mm:ss.SSS} [%thread] %-5level %logger- %msg%n

logging.file.name=D:/mylogs2023/redis7_study.log
logging.pattern.file=%d{yyyy-MM-dd HH:mm:ss.SSS} [%thread] %-5level %logger- %msg%n

# ========================swagger=====================
spring.swagger2.enabled=true
#在springboot2.6.X结合swagger2.9.X会提示documentationPluginsBootstrapper空指针异常,
#原因是在springboot2.6.X中将SpringMVC默认路径匹配策略从AntPathMatcher更改为PathPatternParser,
# 导致出错,解决办法是matching-strategy切换回之前ant_path_matcher
spring.mvc.pathmatch.matching-strategy=ant_path_matcher

# ========================redis单机=====================
spring.redis.database=0
# 修改为自己真实IP
spring.redis.host=192.168.111.185
spring.redis.port=6379
spring.redis.password=111111
spring.redis.lettuce.pool.max-active=8
spring.redis.lettuce.pool.max-wait=-1ms
spring.redis.lettuce.pool.max-idle=8
spring.redis.lettuce.pool.min-idle=0
3. 配置类
1. RedisConfig
一开始不需要配置,为了演示序列化的问题
public class RedisConfig {

}
最后版本
@Configuration
public class RedisConfig
{
    /**
     * redis序列化的工具配置类,下面这个请一定开启配置
     * 127.0.0.1:6379> keys *
     * 1) "ord:102"  序列化过
     * 2) "\xac\xed\x00\x05t\x00\aord:102"   野生,没有序列化过
     * this.redisTemplate.opsForValue(); //提供了操作string类型的所有方法
     * this.redisTemplate.opsForList(); // 提供了操作list类型的所有方法
     * this.redisTemplate.opsForSet(); //提供了操作set的所有方法
     * this.redisTemplate.opsForHash(); //提供了操作hash表的所有方法
     * this.redisTemplate.opsForZSet(); //提供了操作zset的所有方法
     * @param lettuceConnectionFactory
     * @return
     */
    @Bean
    public RedisTemplate<String, Object> redisTemplate(LettuceConnectionFactory lettuceConnectionFactory)
    {
        RedisTemplate<String,Object> redisTemplate = new RedisTemplate<>();

        redisTemplate.setConnectionFactory(lettuceConnectionFactory);
        //设置key序列化方式string
        redisTemplate.setKeySerializer(new StringRedisSerializer());
        //设置value的序列化方式json,使用GenericJackson2JsonRedisSerializer替换默认序列化
        redisTemplate.setValueSerializer(new GenericJackson2JsonRedisSerializer());

        redisTemplate.setHashKeySerializer(new StringRedisSerializer());
        redisTemplate.setHashValueSerializer(new GenericJackson2JsonRedisSerializer());

        redisTemplate.afterPropertiesSet();

        return redisTemplate;
    }
}
2. SwaggerConfig
@Configuration
@EnableSwagger2
public class SwaggerConfig
{
    @Value("${spring.swagger2.enabled}")
    private Boolean enabled;

    @Bean
    public Docket createRestApi() {
        return new Docket(DocumentationType.SWAGGER_2)
                .apiInfo(apiInfo())
                .enable(enabled)
                .select()
                .apis(RequestHandlerSelectors.basePackage("com.fanxy.redis")) //你自己的package
                .paths(PathSelectors.any())
                .build();
    }
    public ApiInfo apiInfo() {
        return new ApiInfoBuilder()
                .title("springboot利用swagger2构建api接口文档 "+"\t"+ DateTimeFormatter.ofPattern("yyyy-MM-dd").format(LocalDateTime.now()))
                .description("springboot+redis整合,有问题给管理员阳哥邮件:[email protected]")
                .version("1.0")
                .termsOfServiceUrl("https://www.atguigu.com/")
                .build();
    }
}
4. service
@Service
@Slf4j
public class OrderService {

    public static final String ORDER_KEY = "ord:";

    @Resource
    private RedisTemplate redisTemplate;

    public void addOrder() {
        int keyId = ThreadLocalRandom.current().nextInt(1000) + 1;
        String serialNo = UUID.randomUUID().toString();

        String key = ORDER_KEY + keyId;
        String value = "京东订单" + serialNo;

        redisTemplate.opsForValue().set(key, value);

        log.info("-------->   key:{}", key);
        log.info("-------->   value:{}", value);
    }

    public String getOrderById(String keyId) {
        return (String) redisTemplate.opsForValue().get(ORDER_KEY + keyId);
    }
}
5. controller
@RestController
@Slf4j
@Api(tags = "订单接口")
public class OrderController {

    @Resource
    private OrderService orderService;

    @ApiOperation("增加订单")
    @GetMapping (value = "/order/add")
    public void addOrder(){
        orderService.addOrder();
    }

    @ApiOperation("按照keyId查询订单")
    @GetMapping (value = "/order/{keyId}")
    public void getOrder(@PathVariable("keyId") String keyId){
        String order = orderService.getOrderById(keyId);
    }
}
6. Swagger地址
http://localhost:7777/swagger-ui.html#
7. 序列化问题
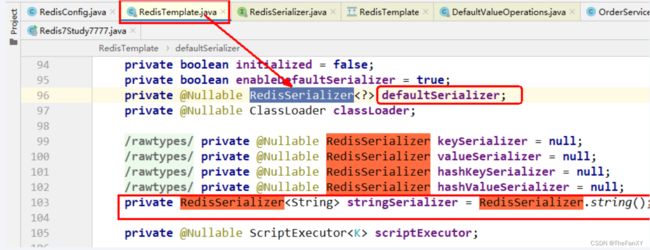
1. Why? ---------> JDK序列化方式(默认)惹的祸
这里一般有两种方法解决。
- 直接用
StringRedisTemplace类型
因为底层序列化都固定用String的类型。此时我们前面的返回值的时候默认就是String类型,也没有必要强转了。
但是这个时候会带来另外一个问题,我们key不再是乱码状态了,但是到服务器查询,发现value还是乱码。调试发现swagger和浏览器其实返回都是正常的中文,体现在redis客户端查询发现是乱码。
如果在redis客户端查询也想返回中文,连接服务器可以通过命令 redis-cli -a xxxxx -p 6379 --raw开启对中文的支持
- 还想用
RedisTemplace类型,因为想保存String以外的类型,通过配置,根据源码,我们自己添加序列化的方式,这里可以使用上文的配置类进行配置。
2. 连接集群
1. 改写Yaml
启动6台Redis集群实例
server.port=7777

spring.application.name=redis7_study

# ========================logging=====================
logging.level.root=info
logging.level.com.atguigu.redis7=info
logging.pattern.console=%d{yyyy-MM-dd HH:mm:ss.SSS} [%thread] %-5level %logger- %msg%n

logging.file.name=D:/mylogs2023/redis7_study.log
logging.pattern.file=%d{yyyy-MM-dd HH:mm:ss.SSS} [%thread] %-5level %logger- %msg%n

# ========================swagger=====================
spring.swagger2.enabled=true
#在springboot2.6.X结合swagger2.9.X会提示documentationPluginsBootstrapper空指针异常,
#原因是在springboot2.6.X中将SpringMVC默认路径匹配策略从AntPathMatcher更改为PathPatternParser,
# 导致出错,解决办法是matching-strategy切换回之前ant_path_matcher
spring.mvc.pathmatch.matching-strategy=ant_path_matcher


# ========================redis集群=====================
spring.redis.password=111111
# 获取失败 最大重定向次数
spring.redis.cluster.max-redirects=3
spring.redis.lettuce.pool.max-active=8
spring.redis.lettuce.pool.max-wait=-1ms
spring.redis.lettuce.pool.max-idle=8
spring.redis.lettuce.pool.min-idle=0
spring.redis.cluster.nodes=192.168.111.175:6381,192.168.111.175:6382,192.168.111.172:6383,192.168.111.172:6384,192.168.111.174:6385,192.168.111.174:6386
2. Swagger地址
http://localhost:7777/swagger-ui.html#
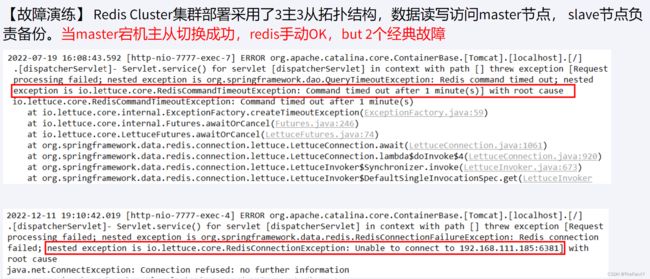
3. 出现问题
模拟master-6381机器意外宕机,手动shutdown
Redis7集群笔记
先对redis集群进行操作,验证各种读写命令,看看是否完成从机上位。
发现Redis Cluster集群能自动感知并自动完成主从切换,对应的slave机器被选为新的master节点
而微服务操作,发现无限转圈,无法读写,而redis服务器端和客户端操作,没有任何问题。
4. 导致原因
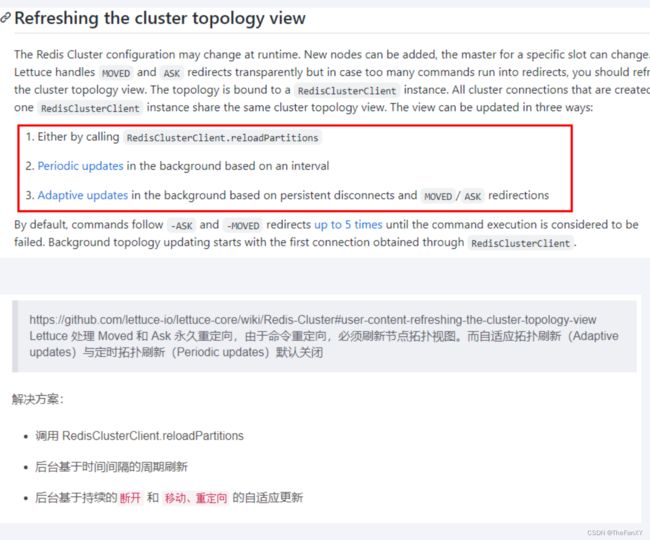
Springboot 2.x 版本,Redis默认采用 Lettuce,当Redis集群节点发生变化,Letture默认不会刷新节点拓扑图
5. 解决方案
1. 排除lettuce使用Jedis(不推荐)
2. 重写工厂实例源码(极度不推荐)
//仅做参考,不写,不写,不写。

@Bean

public DefaultClientResources lettuceClientResources() {

    return DefaultClientResources.create();

}


@Bean

public LettuceConnectionFactory lettuceConnectionFactory(RedisProperties redisProperties, ClientResources clientResources) {


    ClusterTopologyRefreshOptions topologyRefreshOptions = ClusterTopologyRefreshOptions.builder()

            .enablePeriodicRefresh(Duration.ofSeconds(30)) //按照周期刷新拓扑

            .enableAllAdaptiveRefreshTriggers() //根据事件刷新拓扑

            .build();


    ClusterClientOptions clusterClientOptions = ClusterClientOptions.builder()

            //redis命令超时时间,超时后才会使用新的拓扑信息重新建立连接

            .timeoutOptions(TimeoutOptions.enabled(Duration.ofSeconds(10)))

            .topologyRefreshOptions(topologyRefreshOptions)

            .build();


    LettuceClientConfiguration clientConfiguration = LettuceClientConfiguration.builder()

            .clientResources(clientResources)

            .clientOptions(clusterClientOptions)

            .build();


    RedisClusterConfiguration clusterConfig = new RedisClusterConfiguration(redisProperties.getCluster().getNodes());

    clusterConfig.setMaxRedirects(redisProperties.getCluster().getMaxRedirects());

    clusterConfig.setPassword(RedisPassword.of(redisProperties.getPassword()));


    LettuceConnectionFactory lettuceConnectionFactory = new LettuceConnectionFactory(clusterConfig, clientConfiguration);


    return lettuceConnectionFactory;

}
3. 刷新节点集群拓扑动态感应(推荐)
........
# ========================redis集群=====================
spring.redis.password=123456
# 获取失败 最大重定向次数
spring.redis.cluster.max-redirects=3
spring.redis.lettuce.pool.max-active=8
spring.redis.lettuce.pool.max-wait=-1ms
spring.redis.lettuce.pool.max-idle=8
spring.redis.lettuce.pool.min-idle=0
spring.redis.cluster.nodes=192.168.110.100:6381,192.168.110.100:6382,192.168.110.101:6383,192.168.110.101:6384,192.168.110.102:6385,192.168.110.102:6386
加入如下两行代码
spring.redis.password=123456
#支持集群拓扑动态感应刷新,自适应拓扑刷新是否使用所有可用的更新,默认false关闭
spring.redis.lettuce.cluster.refresh.adaptive=true
#定时刷新
spring.redis.lettuce.cluster.refresh.period=2000
# 获取失败 最大重定向次数
spring.redis.cluster.max-redirects=3
spring.redis.lettuce.pool.max-active=8
spring.redis.lettuce.pool.max-wait=-1ms
spring.redis.lettuce.pool.max-idle=8
spring.redis.lettuce.pool.min-idle=0
spring.redis.cluster.nodes=192.168.110.100:6381,192.168.110.100:6382,192.168.110.101:6383,192.168.110.101:6384,192.168.110.102:6385,192.168.110.102:6386


