基于SpringBoot的图书管理系统
基于SpringBoot的图书管理系统
里面整合了比较全的内容,可以说是麻雀虽小五脏俱全,如果看懂了所有的内容可以说是已经非常精通SpringBoot了
一:引言
由于近期看了SpringBoot,一站式开发特别方便,情不自禁用SpringBoot整合了一下Web框架,Mybatis框架和thymeleaf框架写了一个图书管理系统。
其实可以直接用前后端分离来写的,但是我想练练手,用一个小demo把这些内容都整合到一起。
(其实前后端分离我还没学到)
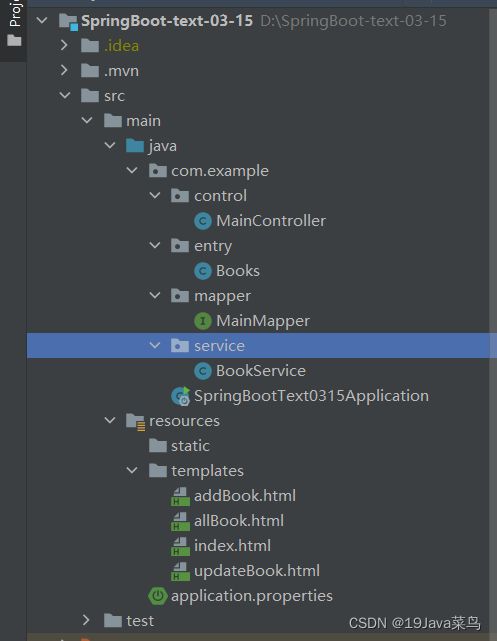
二:项目目录
1.文件目录
2.导入依赖
<dependency>
            <groupId>org.springframework.boot</groupId>
            <artifactId>spring-boot-starter-web</artifactId>
        </dependency>

        <dependency>
            <groupId>org.projectlombok</groupId>
            <artifactId>lombok</artifactId>
            <optional>true</optional>
        </dependency>
        <dependency>
            <groupId>org.springframework.boot</groupId>
            <artifactId>spring-boot-starter-test</artifactId>
            <scope>test</scope>
        </dependency>
        <dependency>
            <groupId>org.springframework.boot</groupId>
            <artifactId>spring-boot-starter-web</artifactId>
        </dependency>

        <dependency>
            <groupId>org.projectlombok</groupId>
            <artifactId>lombok</artifactId>
            <optional>true</optional>
        </dependency>
        <dependency>
            <groupId>org.springframework.boot</groupId>
            <artifactId>spring-boot-starter-test</artifactId>
            <scope>test</scope>
        </dependency>

        <dependency>
            <groupId>org.mybatis.spring.boot</groupId>
            <artifactId>mybatis-spring-boot-starter</artifactId>
            <version>2.2.0</version>
        </dependency>
        <dependency>
            <groupId>mysql</groupId>
            <artifactId>mysql-connector-java</artifactId>
        </dependency>
        <dependency>
            <groupId>org.springframework.boot</groupId>
            <artifactId>spring-boot-starter-test</artifactId>
        </dependency>


        <dependency>
            <groupId>org.springframework.boot</groupId>
            <artifactId>spring-boot-starter-thymeleaf</artifactId>
        </dependency>
3.proterties文件存储数据库连接信息
注意,我这里的url是我的数据库url,数据库名称是db10,不过不用担心,为了避免调试带来的麻烦,我创建数据库的时候直接创建了db10.
spring.datasource.url=jdbc:mysql://localhost:3306/db10?useUnicode=true&characterEncoding=UTF-8&userSSL=false&serverTimezone=GMT%2B8
spring.datasource.username=root
spring.datasource.password=123456
spring.datasource.driver-class-name=com.mysql.cj.jdbc.Driver
4.control控制器
import com.example.entry.Books;
import com.example.service.BookService;
import org.springframework.stereotype.Controller;
import org.springframework.ui.Model;
import org.springframework.web.bind.annotation.*;
import javax.annotation.Resource;
import java.util.List;
import java.util.Map;

@Controller

public class MainController {

    @Resource
    BookService bookService;

//    首页
    @RequestMapping("/index")
    public String index() {
        return "/index";
    }

//    这里是回显所有书本的逻辑
    @RequestMapping("/allBook")
    private String getBooksList(Model model) {
        List<Books> booksList = bookService.bookList("%");
        System.out.println(booksList);
        model.addAttribute("books",booksList);
        return "/allBook";
    }

    //    这里是添加过后的逻辑
    @RequestMapping(value = "addED",method = RequestMethod.POST)
    public String addBook(@RequestParam("bookName")String bookName,
                          @RequestParam("bookCounts")int bookCounts,
                          @RequestParam("detail")String detail){
        bookService.addBook(bookName,bookCounts,detail);
        return "redirect:/allBook";
    }

//    这里是添加之前的逻辑
    @RequestMapping("/adding")
    public String index4() {
        return "/addBook";
    }

    //    这里是删除逻辑,删除完了直接重定向
    @RequestMapping(value = "delBook",method = RequestMethod.GET)
    public String addBook(@RequestParam("bookID") int bookID){
        bookService.Del(bookID);
        return "redirect:allBook";
    }

//    修改前
    @RequestMapping("/update")
    public String update(@RequestParam("bookID") int bookID,Model model){
        Books book =bookService.findByID(bookID);
        model.addAttribute("book",book);
        return "updateBook";
    }
//    修改后重定向
    @RequestMapping("/updateBook2")
    public String updateBook2(@ModelAttribute(value = "demo") Books demo, Model model){
//        这里是一个测试,测试提交完信息的内容是否会改变
        System.out.println(demo.toString()+"这里是接收到的信息");
        bookService.update(demo.getBookID(),demo.getBookName(),demo.getBookCounts(),demo.getDetail());
        return "redirect:allBook";
    }
}
5.Books实体类
import lombok.Data;

@Data

public class Books {
    public int bookID;
    public String bookName;
    public int bookCounts;
    public String detail;
}
6.mapper接口
import com.example.entry.Books;
import org.apache.ibatis.annotations.*;

import java.util.List;

@Mapper
public interface MainMapper {

    //    查看所有数据,这里用到了模糊查询
    @Select("select *from books where bookName like#{name}")
    List<Books> bookList(String name);

    //    查找书籍,用于修改书籍时候的数据回显
    @Select("select * from books where bookID=#{bookID}")
    Books findByID(@Param("bookID") int bookID);


    //    删除书籍
    @Delete("delete from books where bookID=#{bookID}")
    void Del(@Param("bookID") int bookID);

    //    增加书籍
    @Insert("insert into books (bookName,bookCounts,detail) values ( #{bookName} , #{bookCounts} , #{detail} )")
    void addBook(@Param("bookName") String bookName, @Param("bookCounts") int bookCounts, @Param("detail") String Detail);

    //    修改书籍
    @Update("update books set bookName=#{bookName} , bookCounts=#{bookCounts} , detail=#{detail} where bookID=#{bookID}")
    void update(@Param("bookID")int bookID,@Param("bookName") String bookName, @Param("bookCounts") int bookCounts, @Param("detail") String Detail);


}
7.service操作
import com.example.entry.Books;
import com.example.mapper.MainMapper;
import org.springframework.stereotype.Service;

import javax.annotation.Resource;
import java.util.List;

@Service
public class BookService {
//    数据源
    @Resource
    MainMapper mapper;

//    会先数据,显示所有书籍的列表
    public List<Books> bookList(String name) {
        return mapper.bookList("%");
    }

//    删除书籍操作
    public void Del(int bookID) {
        mapper.Del(bookID);
    }

//    添加书籍操作
    public void addBook(String name, int count, String detail) {
        mapper.addBook(name, count, detail);
    }

//    修改书籍操作,这里由于是涉及到了修改,所以自然要回显数据
    public Books findByID(int bookID) {
        return mapper.findByID(bookID);
    }

//    更新操作
    public void update(int id, String name, int counts, String detail) {
        mapper.update(id, name, counts, detail);
    }


}
8.前端页面
index首页
<html xmlns:th="http://www.thymeleaf.org">
<head>
    <title>首页</title>
    <style type="text/css">
        a {
            text-decoration: none;
            color: black;
            font-size: 18px;
        }

        h3 {
            width: 180px;
            height: 38px;
            margin: 100px auto;
            text-align: center;
            line-height: 38px;
            background: deepskyblue;
            border-radius: 4px;
        }
    </style>
</head>
<body>
<h3>
<!--    这里跳转,显示全部书籍-->
    <a href="/allBook">点击进入列表页</a>
</h3>
</body>
</html>
addBook添加图书页面
<html xmlns:th="http://www.thymeleaf.org">
<head>
    <title>新增书籍</title>
    <meta name="viewport" content="width=device-width, initial-scale=1.0">
    <!-- 引入 Bootstrap -->
    <link href="https://cdn.bootcss.com/bootstrap/3.3.7/css/bootstrap.min.css" rel="stylesheet">
</head>
<body>
<div class="container">

    <div class="row clearfix">
        <div class="col-md-12 column">
            <div class="page-header">
                <h1>
                    <small>新增书籍</small>
                </h1>
            </div>
        </div>
    </div>
<!--    添加过后,提交到addED控制,但是逻辑打不通-->
    <form action="/addED" method="post">
        书籍名称:<input type="text" name="bookName"><br><br><br>
        书籍数量:<input type="text" name="bookCounts"><br><br><br>
        书籍详情:<input type="text" name="detail"><br><br><br>
        <input type="submit" value="添加">
    </form>

</div>
allBook显示所有图书
<html  xmlns:th="http://www.thymeleaf.org">
<head>
    <title>书籍列表</title>
    <meta name="viewport" content="width=device-width, initial-scale=1.0">
    <!-- 引入 Bootstrap -->
    <link href="https://cdn.bootcss.com/bootstrap/3.3.7/css/bootstrap.min.css" rel="stylesheet">
</head>
<body>
<div class="container">

    <div class="row clearfix">
        <div class="col-md-12 column">
            <div class="page-header">
                <h1>
                    <small>书籍列表 —— 显示所有书籍</small>
                </h1>
            </div>
        </div>
    </div>

    <div class="row">
        <div class="col-md-4 column">
            <a class="btn btn-primary" href="/adding">新增</a>
        </div>
    </div>


    <div class="row clearfix">
        <div class="col-md-12 column">
            <table class="table table-hover table-striped">
                <thead>
                <tr>
                    <th>书籍编号</th>
                    <th>书籍名字</th>
                    <th>书籍数量</th>
                    <th>书籍详情</th>
                    <th>删除</th>
                    <th>修改</th>
                </tr>
                </thead>

                <tbody>

<!--                这里是thymeleaf操作,回显所有的书籍。-->
                <tr th:each="book:${books}">

                    <td th:text="${book.getBookID()}"></td>
                    <!--/*@thymesVar id="getBookName" type=""*/-->
                    <td th:text="${book.getBookName()}"></td>
                    <td th:text="${book.getBookCounts()}"></td>
                    <td th:text="${book.getDetail()}"></td>、
<!--                    这里是关联操作,关联该条数据的id-->
                    <td class="relative">
                        <a class="action-btn " th:href="@{/delBook?bookID=}+${book.getBookID()}">
                            <input type="button" value="删除">
                        </a>
                    </td>
<!--                    这里是关联操作,关联该条数据的id-->
                    <td class="relative">
                        <a class="action-btn " th:href="@{/update?bookID=}+${book.getBookID()}">
                            <input type="button" value="修改">
                        </a>
                    </td>


                </tr>
                </tbody>

            </table>
        </div>
    </div>
</div>

</body>
</html>
updateBook更新图书信息页面
<html xmlns:th="http://www.thymeleaf.org">
<head>
    <title>修改信息</title>
    <meta name="viewport" content="width=device-width, initial-scale=1.0">
    <!-- 引入 Bootstrap -->
    <link href="https://cdn.bootcss.com/bootstrap/3.3.7/css/bootstrap.min.css" rel="stylesheet">
</head>
<body>
<div class="container">

    <div class="row clearfix">
        <div class="col-md-12 column">
            <div class="page-header">
                <h1>
                    <small>修改信息</small>
                </h1>
            </div>
        </div>
    </div>


<!--    这里的提交是提交的一个object数据,把页面所有的信息都提交走,这样的话便于后端处理-->
    <form action="/updateBook2" method="post" th:object="${demo}">
        <input type="hidden" name="bookID" th:value="${book.getBookID()}"/>
        书籍名称:<input type="text" name="bookName" th:value="${book.getBookName()}"/>
        书籍数量:<input type="text" name="bookCounts" th:value="${book.getBookCounts()}"/>
        书籍详情:<input type="text" name="detail" th:value="${book.getDetail()}"/>
        <input type="submit" value="提交">
    </form>

</div>