如何使用 Arduino ESP32 将数据存储到 microsdcard(软 SPI )
esp32从传感器记录的数据或者日志,并将这些数据保存到SD卡中
1.我们将使用图书馆SD卡进行通信。您可以在此处下载:
https://github.com/nhatuan84/esp32-micro-sdcard

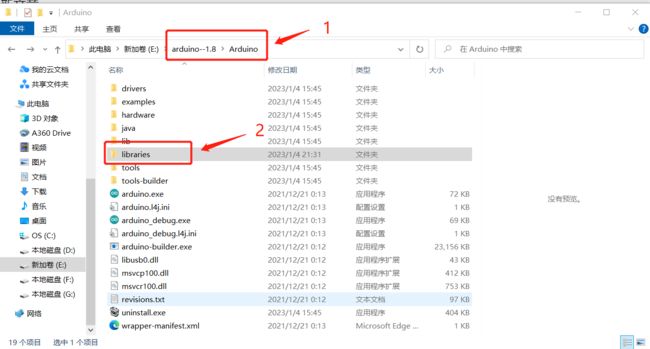
下载后,解压缩并将其解压缩到Arduino文件夹下的库文件夹中:
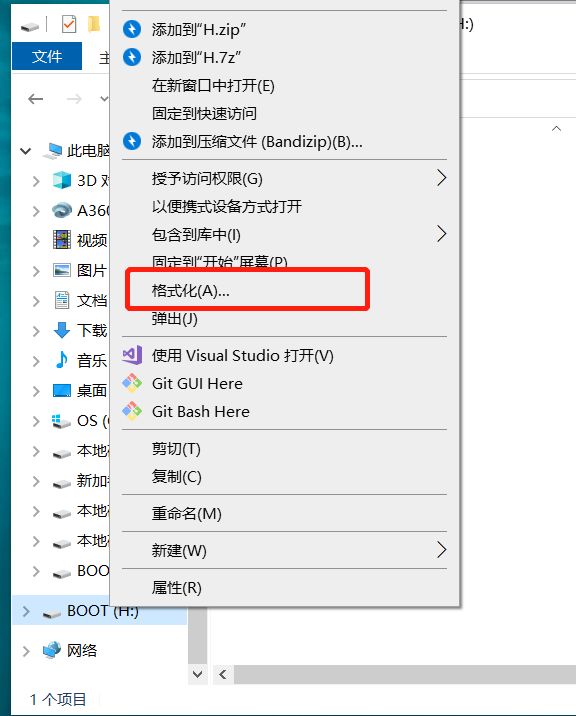
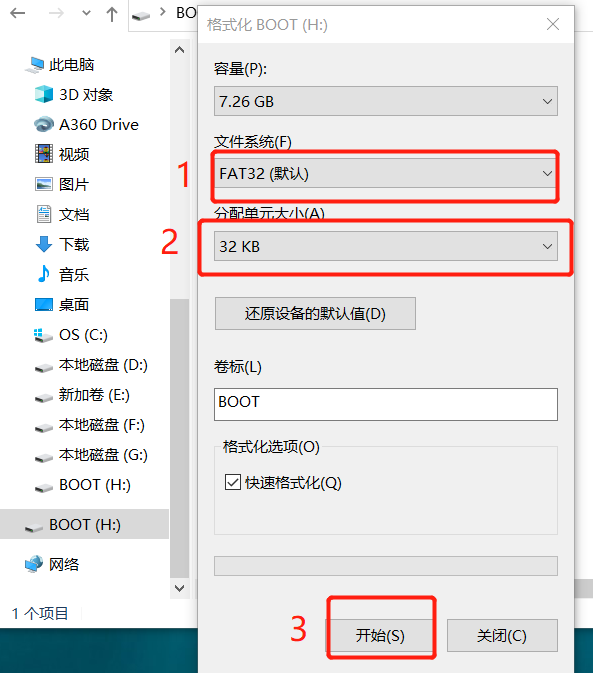
2.格式化 microSD 卡:
将 microSD 卡与 ESP32 配合使用时,应先对其进行格式化。
3.接线方式:
[ESP32 IO26 – CS(D3) MICROSD]
[ESP32 IO14 – MOSI(CMD) MICROSD]
[ESP32 IO13 – MISO(D0) MICROSD]
[ESP32 IO27 – SCK(SCLK) MICROSD]
[ESP32 GND – GND MICROSD]
[3.3V – VCC MICROSD]
4.代码以及说明:
- SD.begin(uint8_t cs , int8_t mosi , int8_t miso , int8_t sck): initialize library with SPI pins
- SD.open(filename, FILE_WRITE): open file for writing
- SD.open(filename): open file for reading
- SD.open("/"): open sdcard at root “/”
以下是代码部分:
#include

ext::File root;
int a = 0;
int b = 0,c=0;

void setup()
{
  Serial.begin(115200);

  Serial.print("Initializing SD card...");
  /* 使用软 SPI 引脚初始化 SD 库,如果使用硬 SPI 替换为这个 SD.begin()*/
  if (!SD.begin(26, 14, 13, 27)) {
    Serial.println("initialization failed!");
    return;
  }
  Serial.println("initialization done.");
  /* Begin at the root "/" */
  root = SD.open("/");
  if (root) {
    printDirectory(root, 0);
//    读取sd卡中的文件
    root.close();
  } else {
    Serial.println("error opening test.csv");
  }
  /* open "test.csv" for writing */
  root = SD.open("test.csv", FILE_WRITE);
  /* 如果成功打开 -> root != NULL
    然后写字符串“Hello world!”对它
  */

  if (root) {
    root.println("1,2,3,4,5");

//    root.println("250,255,255,200,100,250,255,255,200,100,250,255,255,200,100");
    root.flush();
   /* 关闭文件 */
    root.close();
  } else {
    /*  如果文件打开错误,打印错误 */
    Serial.println("error opening test.csv");
  }
  delay(1000);
  /* 写入后重新打开文件并读取 */
  root = SD.open("test.csv");
  if (root) {
    /* 从文件中读取直到其中没有其他内容 */
    while (root.available()) {
      /* 读取文件并打印到终端 */
      Serial.write(root.read());
    }
    root.close();
  } else {
    Serial.println("error opening test.csv");
  }

  Serial.println("done!");
}

void loop()
{
  root = SD.open("/");
  if (root) {
    printDirectory(root, 0);
//    读取sd卡中的文件
    root.close();
  } else {
    Serial.println("error opening test.csv");
  }
  /* open "test.csv" for writing */
  root = SD.open("test.csv", FILE_WRITE);
  /* 如果成功打开 -> root != NULL
    然后写字符串“Hello world!”对它
  */

  if (root) {
//    root.println("1,2,3,4,5");

    root.println("250,255,255,200,100,250,255,255,200,100,250,255,255,200,100,255,255,200,100,250,255,255,200,100,250");
    root.flush();
   /* 关闭文件 */
    root.close();
  } else {
    /*  如果文件打开错误,打印错误 */
    Serial.println("error opening test.csv");
  }
  delay(1000);
  /* 写入后重新打开文件并读取 */
  root = SD.open("test.csv");
  if (root) {
    /* 从文件中读取直到其中没有其他内容 */
    while (root.available()) {
      /* 读取文件并打印到终端 */
      c=1;
      if (c == 1){
        a = micros();
        }
      Serial.write(root.read());
    }
    b = micros();
    Serial.print(b - a );
    root.close();
  } else {
    Serial.println("error opening test.csv");
  }

  Serial.println("done!");
}
void printDirectory(ext::File dir, int numTabs) {

  while(true) {
     ext::File entry =  dir.openNextFile();
     if (! entry) {
       break;
     }
     for (uint8_t i=0; i
5.打开串口监视器,查看文件已经成功输入:
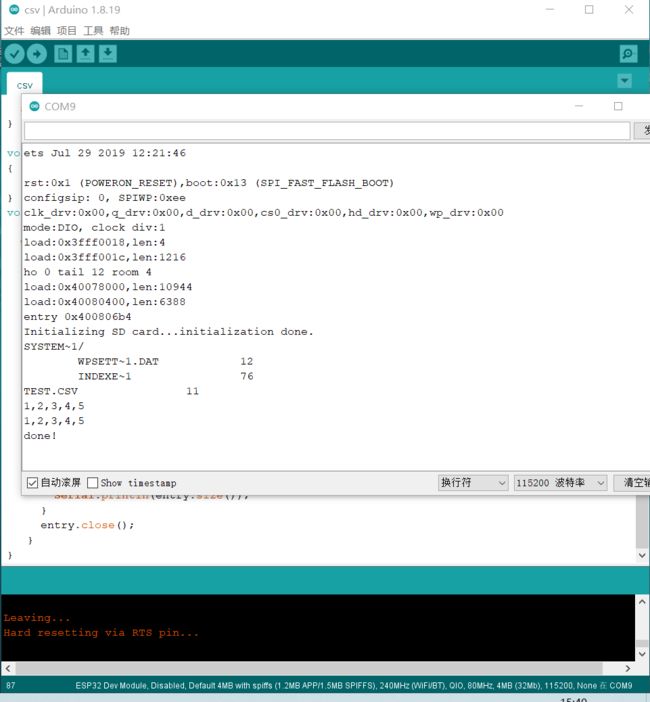
6.打开csv文件,内容已经写入:

文章参考来源:Demo 7: How to use Arduino ESP32 to store data to microsdcard (Soft SPI and Hard SPI) (iotsharing.com)