hive的安装和使用
1、安装MySQL
查询以前安装的mysql相关包:
rpm -qa | grep mysql

如果以前有安装,但已经不能正常使用或者想重新安装,则先卸载:
输入指令,逐个卸载:
rpm -e mysql-community-client-5.6.41-2.el7.x86_64 --nodeps
然后进行安装:
下载:wget http://dev.mysql.com/get/mysql-community-release-el7-5.noarch.rpm
解压:rpm -ivh mysql-community-release-el7-5.noarch.rpm
安装:yum install mysql-community-server
2、启动和配置MySQL
启动:
systemctl start mysqld.service -- 启动
systemctl restart mysqld.service -- 重启
systemctl stop mysqld.service -- 关闭
systemctl enable mysqld.service -- 开机自启动
配置MySQL用户密码
首次登录无密码:mysql -uroot -p
use mysql;
update user set password=password("123456") where user="root";
登录MySQL,创建hive数据库:
CREATE DATABASE hive;
命令行配置MySQL:
GRANT ALL PRIVILEGES ON hive.* TO 'root'@'%' IDENTIFIED BY '123456' WITH GRANT OPTION;
FLUSH PRIVILEGES;
3、安装hive
到官网下载hive,上传到服务器,然后解压安装:
tar -zxvf apache-hive-2.1.1-bin.tar.gz -C /home/sparkuser/apps
mv /home/sparkuser/apps/apache-hive-2.1.1-bin /home/sparkuser/apps/hive
配置环境变量:
vim /etc/profiles
添加:
export HIVE_HOME=/home/sparkuser/apps/hive
export PATH=$PATH:$HIVE_HOME/bin
任意目录下输入指令:hive --version 正常显示hive版本时,证明配置成功
4、配置hive:
hive的配置文件为hive-site.xml,
进入目录:cd /home/sparkuser/apps/hive/conf
cp hive-default.xml.template hive-site.xml
vim hive-site.xml
  javax.jdo.option.ConnectionURL
  jdbc:mysql://myspark:3306/hive?createDatabaseIfNotExist=true
  JDBC connect string for a JDBC metastore


   javax.jdo.option.ConnectionDriverName
   com.mysql.jdbc.Driver
   Driver class name for a JDBC metastore


  javax.jdo.option.ConnectionUserName
  root
  username to use against metastore database


  javax.jdo.option.ConnectionPassword
  123456
  password to use against metastore database
下载mysql-connector-java-5.1.40-bin.jar并将其放到hive/lib/目录下
然后进入/home/sparkuser/apps/hive/bin:
cd /home/sparkuser/apps/hive/bin
执行:./schematool -dbType mysql -initSchema
5、启动hive
命令行输入:hive

6、建表和导入数据
-- 指定表名为user_info, 字段包括id account name age 分隔符为','。
create table user_info (id int, account string, name string, age int) row format delimited fields terminated by ',';
-- 创建外部表,user_info为表名,文件存储地址为/hive_data。
create external table user_info (id int, name string) row format delimited fields terminated by ',' location '/hive_data';
-- 加载本地文件到表(user.txt为文件名)
load data local inpath './user.txt' overwrite into table user_info; -- 覆盖表数据
load data local inpath './user.txt' into table user_info; -- 不覆盖表数据
-- 加载hdfs数据时,去掉以上命令的local即可(/data为hdfs存放数据文件的目录):
load data inpath '/data' overwrite into table user_info; -- 覆盖表数据
load data inpath '/data' into table user_info; -- 不覆盖表数据
7、建分区表和导入数据
-- 表名book,分区author,分隔符'\t'
create table book (id bigint, name string) partitioned by (author string) row format delimited fields terminated by '\t';
-- 将book.txt文件中的数据导入到book表author='鲁迅'的分区中
load data local inpath './book.txt' overwrite into table book partition (author='鲁迅');
-- 删除分区
ALTER TABLE book DROP PARTITION (author='luxun');
8、hive不支持删除和修改,目前所知的,也不能支持如insert into tmp(id, name)values(1,'andy');之类的操作,只能用insert into tmp select id, name from user_info;这样的语句进行插入。
9、分桶操作
-- 创建分桶表
#创建分桶表 以sno分成四个桶
create table stu_buck(sno int,sname string,sex string,sage int,sdept string)
clustered by(sno)
sorted by(sno DESC)
into 4 buckets
row format delimited
fields terminated by ',';
#设置变量,设置分桶为true, 设置reduce数量是分桶的数量个数
set hive.enforce.bucketing = true;
set mapreduce.job.reduces=4;
#开会往创建的分通表插入数据(插入数据需要是已分桶, 且排序的)
#可以使用distribute by(sno) sort by(sno asc) 或是排序和分桶的字段相同的时候使用Cluster by(字段)
#注意使用cluster by 就等同于分桶+排序(sort)
insert into table stu_buck
select sno,sname,sex,sage,sdept from student distribute by(sno) sort by(sno asc);
10、hiveserver2和beeline
进入hive/bin目录下输入命令:
前台启动:./hiveserver2
后台启动:nohup ./hiveserver2 1>/var/log/hiveserver.log 2>/var/log/hiveserver.err &
启动metastore:hive --service metastore
此时可查看此端口已被监听:netstat -anp|grep 10000:

打开另一个窗口,到hive/bin目录执行:./beeline
连接:
!connect jdbc:hive2://myspark:10000
输入用户名和密码:

成功!这里注意:
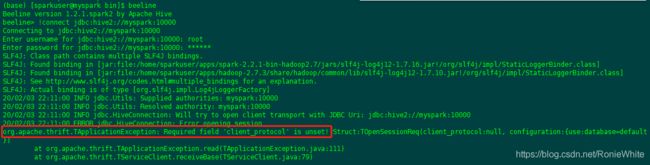
如果你安装了spark并配置了SPARK_HOME,此时如果直接输入:beeline,则会打开spark版本的beeline:
![]()
此时做连接会报错:Required field 'client_protocol' is unset!
注:要用hive当然少不了hdfs的支持啦,部署好你的hadoop。