通过浏览器html5操作Windows远程桌面,linux,记Apache Guacamole的安装与使用
通过浏览器html5操作Windows远程桌面,linux,记Apache Guacamole的安装与使用
- 一、Apache Guacamole介绍
- 二、Apache guacamole架构
- 三、guacamole-server部署
- 四、guacamole-client部署
- 五、字体设置(乱码时可以试试)
- 六、docker方式安装
-
- 1.安装docker
- 2.拉取Guacamole服务器、Guacamole客户端和MySQL的Docker镜像
- 3.运行Mysql
- 4.Guacamole的guack服务启动
- 5.启动guacamole,并连接guacd,mysql
- 6.查看运行的docker进程
- 7.访问已经运行的guacamole
- 8.创建连接,以windows的rdp为例
- 七、在页面中集成远程桌面,去掉基础认证
最近项目中要用到通过web版,html访问linux和windows的功能,找了下发现Apache Guacamole具有此类功能,因此测试体验了下,还是挺不错的,记录下来,备查。
一、Apache Guacamole介绍
官网:https://guacamole.apache.org/
上面主要说的是Apache Guacamole是一个无需客户端就能访问的远程桌面的程序,支持标准VNC,RDP,ssh等,因此像windows的远程桌面,linux的ssh等就能支持使用了,直接使用html5,一个浏览器就可。

二、Apache guacamole架构
架构图如下:
·Apache Guacamole Server主要有两部分,Guacamole和guacd组成。用户通过浏览器连接Guacamole程序,Guacamole部署在tomcat中,采集java实现,而guacd采用c实现,总的流程是:HTML5 web browser -> Guacamole -> guacd -> (RDP/VNC/Ssh等)

三、guacamole-server部署
现在有好几个版本,有些有坑,有些正常,经过几个版本的试用,最终确定1.2.0版作为我的选择,
https://guacamole.apache.org/releases/1.2.0/
重要提示:经过最近几轮最新测试:1.2.0版本也是有问题,源码需要下载master版本,不然guacd服务在rdp协议访问时无故的会中断,guacamole-server换成master版本编绎就可(可能是官方bug),guacamole的war包换成1.3.0,其他步骤不变,
master版本下载地址:https://github.com/apache/guacamole-server.git
为防止后续有变化,我将master的当前版本备份放在baidu盘中:guacamole-server-master.zip
链接:https://pan.baidu.com/s/1NVSG-SbnKcDwsGROeMd-wQ
提取码:wf91

- ##下载
wget https://archive.apache.org/dist/guacamole/1.2.0/source/guacamole-server-1.2.0.tar.gz
- ##编绎前准备一些yum组件的安装
参考:
https://guacamole.apache.org/doc/gug/installing-guacamole.html#required-dependencies
yum install -y gcc gcc-c++
yum install -y cairo-devel
yum install -y libjpeg-turbo-devel
yum install -y libjpeg-devel
yum install -y libpng-devel
yum install -y libtool
yum install -y uuid-devel
yum install -y freerdp-devel
yum install -y pango-devel
yum install -y libssh2-devel
yum install -y libvncserver-devel
yum install -y pulseaudio-libs-devel
yum install -y openssl-devel
yum install -y libvorbis-devel
yum install -y libwebp-devel
- ##编绎
tar xvf guacamole-server-1.2.0.tar.gz
cd guacamole-server-1.2.0/
autoreconf -fi
./configure --with-init-dir=/etc/init.d
make
make install
ldconfig
- ##启动、停止
##启动
/etc/init.d/guacd start

##停止
/etc/init.d/guacd stop
##重启
/etc/init.d/guacd restart
- ##启动后检查
guacamole-server启动后,会占用4822端口,并以进程方式常驻,通过netat -luntp命令查看
[root@localhost guacamole-server-1.2.0]# /etc/init.d/guacd start
Starting guacd: guacd[12900]: INFO:     Guacamole proxy daemon (guacd) version 1.2.0 started
SUCCESS
##通过命令查看端口在线情况
netstat -luntp

##如果报netstat命令找不到,执行net-tools的安装
yum install -y net-tools
[root@localhost guacamole-server-1.2.0]# netstat -luntp|grep guacd
tcp        0      0 127.0.0.1:4822          0.0.0.0:*               LISTEN      14029/guacd
四、guacamole-client部署
- ##jdk安装(可以以你自己的方安装),我安装过程如下
tar -xvf jdk-8u191-linux-x64.tar.gz -C /usr/local

cat >> /etc/profile << EOF

export JAVA_HOME=/usr/local/jdk1.8.0_191/
export PATH=\$JAVA_HOME/bin:\$PATH
export CLASSPATH=.:\$JAVA_HOME/lib/dt.jar:\$JAVA_HOME/lib/tools.jar
EOF

source /etc/profile
- ##准备tomcat,直接去官网下载一个
wget https://dlcdn.apache.org/tomcat/tomcat-9/v9.0.52/bin/apache-tomcat-9.0.52.tar.gz

##解压tomcat(需要Jdk支持,提前安装,略)
tar xvf apache-tomcat-9.0.52.tar.gz
- ##准备war包,方式任选
##方式一:直接网上下载现成的war包
wget https://archive.apache.org/dist/guacamole/1.2.0/binary/guacamole-1.2.0.war
##方式二:通过下载源码编绎生成war包,编绎后将在guacamole目录下的target生成相应的war文件
wget https://archive.apache.org/dist/guacamole/1.2.0/source/guacamole-client-1.2.0.tar.gz

##通过maven进行编绎生成war包
mvn clean package

3. ##war包放在tomcat的webapp下
[root@localhost webapps]# pwd
/root/apache-tomcat-9.0.52/webapps
[root@localhost webapps]# ls -hl
total 12M
drwxr-x---. 15 root     root     4.0K Sep  2 10:19 docs
drwxr-x---.  7 root     root       99 Sep  2 10:19 examples
-rw-rw-r--.  1 testuser testuser  12M Sep  1 15:22 guacamole-1.2.0.war
drwxr-x---.  6 root     root       79 Sep  2 10:19 host-manager
drwxr-x---.  6 root     root      114 Sep  2 10:19 manag
- ##创建guacamole配置文件和目录
mkdir /etc/guacamole/
- ##修改guacd的默认只能本地ip访问的配置(guacamole-client与guacamole-server不是部署在同一台机时需要配置,我为了方便调试,就直接配置了)
vi /etc/guacamole/guacd.conf
[server]
bind_host = 0.0.0.0
bind_port = 4822

##重启guacd
/etc/init.d/guacd stop
/etc/init.d/guacd start
- ##创建guacamole.properties文件
vi /etc/guacamole/guacamole.properties
guacd-hostname: localhost
guacd-port: 4822
user-mapping.xml: /etc/guacamole/user-mapping.xml
enable-clipboard-integration: true
- ##创建user-mapping.xml文件
以下示例配置了一个windows的远程访问及一个linux的ssh协议访问
vi /etc/guacamole/user-mapping.xml
<user-mapping>
        <authorize password="123456" username="admin"> #登录界面账号密码

        <connection name="rdp-192.168.60.18">
                <protocol>rdp</protocol>  #RDP协议配置
                <param name="hostname">192.168.60.18</param> #远程主机IP
                <param name="port">4389</param> #rdp 默认端口
                <param name="username">testuser</param> #远程主机用户
                <param name="password">123456</param> #远程主机用户密码
                <param name="ignore-cert">true</param>
        </connection>

        <connection name="ssh-172.168.201.148">
                <protocol>ssh</protocol>
                <param name="hostname">172.168.201.148</param>
                <param name="port">55314</param>
                <param name="username">testuser</param>
                <param name="password">123456</param>
                <param name="enable-sftp">true</param>  #sftp参数配置(没有安装则以下sftp可不用添加)
                <param name="sftp-hostname">172.168.201.148</param>
                <param name="sftp-root-directory">/home/testuser</param>
                <param name="sftp-username">testuser</param>
                <param name="sftp-password">123456</param>
                <param name="color-scheme">white-black</param> #远程登录显示字体颜色
        </connection>

      </authorize>
</user-mapping>
注:详细的配置参考https://guacamole.apache.org/doc/gug/configuring-guacamole.html
8. ##tomcat启动,然后进行访问测试
cd /root/apache-tomcat-9.0.52/bin/
./startup.sh
访问地址如:http://192.168.56.101:8080/guacamole-1.2.0/
账号密码:admin/123456(user-mapping.xml中配置的)

linux的访问效果如下:

window7远程访问效果

五、字体设置(乱码时可以试试)
如果发现有乱码,可以尝试设置字体,如下:
- ##查看是否有安装fontconfig
##检查目录是否存在
cd /usr/share/fonts/

##如果没有目录则执行
yum install -y fontconfig
- ##在windows系统拷贝字体,选择宋体和黑体,
window字体位置:C:\Windows\Fonts
simsun.ttc
simhei.ttf
- ##将字体放进linux
##在/usr/shared/fonts目录下新建一个目录chinese
mkdir /usr/shared/fonts/chinese

##将windows下两个字体,放置在该目录下
[root@localhost chinese]# ls -hl /usr/share/fonts/chinese
total 27M
-rw-r--r--. 1 root root 9.4M Mar  2  2019 simhei.ttf
-rw-r--r--. 1 root root  18M Mar 19  2019 simsun.ttc
- ##更新字体缓存并查看
##内存中的字体缓存
fc-cache

##可查看字体列表
fc-list
最后,在第六节补充下docker方式的安装如下:
六、docker方式安装
如果想docker方式安装,可采集三个docker容器部署的方式,支持连接通过数据库进行管理,更灵活,步骤如下:
1.安装docker
2.拉取Guacamole服务器、Guacamole客户端和MySQL的Docker镜像
docker pull guacamole/guacamole:1.3.0
docker pull guacamole/guacd:latest
docker pull mysql/mysql-server:latest
3.运行Mysql
- ##数据库初始化脚本
docker run --rm guacamole/guacamole:1.3.0 /opt/guacamole/bin/initdb.sh --mysql > initdb.sql
- ##启动mysql
docker run --name mysqltest -e MYSQL_RANDOM_ROOT_PASSWORD=yes -e MYSQL_ONETIME_PASSWORD=yes -d mysql/mysql-server:latest
- ##查看日志,获取密码
docker logs mysqltest|grep GENERATED

##部分日志如下:
[Entrypoint] GENERATED ROOT PASSWORD: 4/YUumoN8;%76j,6d?f53*doL0BHb*:y
- ##重命名脚本并转移到已经运行的sql容器
docker cp initdb.sql mysqltest:/guac_db.sql
- ##进入mysql容器
docker exec -it mysqltest bash
- ##登录mysql
mysql -uroot -p

然后输入前面docker logs mysqltest|grep GENERATED获取到的密码
- ##修改root用户密码,mysql的默认密码第一次使用修改修改
ALTER USER 'root'@'localhost' IDENTIFIED BY '123456';
- ##创建数据库和远程用户
CREATE DATABASE guacamole_db;
CREATE USER 'root'@'%' IDENTIFIED BY '123456';
GRANT SELECT,INSERT,UPDATE,DELETE ON guacamole_db.* TO 'root'@'%';
flush privileges;
- ##使用脚本创建数据表
cat guac_db.sql | mysql -u root -p guacamole_db
然后输入123456的密码
- ##验证数据库操作是否成功
docker exec -it mysqltest bash
mysql -uroot -p123456 guacamole_db
show tables

mysql> show tables;
+---------------------------------------+
| Tables_in_guacamole_db                |
+---------------------------------------+
| guacamole_connection                  |
| guacamole_connection_attribute        |
| guacamole_connection_group            |
| guacamole_connection_group_attribute  |
| guacamole_connection_group_permission |
| guacamole_connection_history          |
| guacamole_connection_parameter        |
| guacamole_connection_permission       |
| guacamole_entity                      |
| guacamole_sharing_profile             |
| guacamole_sharing_profile_attribute   |
| guacamole_sharing_profile_parameter   |
| guacamole_sharing_profile_permission  |
| guacamole_system_permission           |
| guacamole_user                        |
| guacamole_user_attribute              |
| guacamole_user_group                  |
| guacamole_user_group_attribute        |
| guacamole_user_group_member           |
| guacamole_user_group_permission       |
| guacamole_user_history                |
| guacamole_user_password_history       |
| guacamole_user_permission             |
+---------------------------------------+
23 rows in set (0.00 sec)
4.Guacamole的guack服务启动
docker run --name myguacd -d guacamole/guacd
5.启动guacamole,并连接guacd,mysql
docker run --name myguacamole --link myguacd:guacd --link mysqltest:mysql -e MYSQL_DATABASE=guacamole_db -e MYSQL_USER=root -e MYSQL_PASSWORD=123456 -d -p 0.0.0.0:8080:8080 guacamole/guacamole:1.3.0
6.查看运行的docker进程
[root@localhost testuser]# docker ps
CONTAINER ID   IMAGE                       COMMAND                  CREATED          STATUS                    PORTS                       NAMES
3ebfcea7298b   guacamole/guacamole:1.3.0   "/opt/guacamole/bin/…"   42 minutes ago   Up 42 minutes             0.0.0.0:8080->8080/tcp      myguacamole
cc540e84d147   guacamole/guacd             "/bin/sh -c '/usr/lo…"   45 minutes ago   Up 45 minutes (healthy)   4822/tcp                    myguacd
443ebd96a8bb   mysql/mysql-server:latest   "/entrypoint.sh mysq…"   49 minutes ago   Up 49 minutes (healthy)   3306/tcp, 33060-33061/tcp   mysqltest
7.访问已经运行的guacamole
在浏览器中访问http://192.168.56.101:8080/guacamole/#/。
默认账户:guacadmin
默认密码:guacadmin
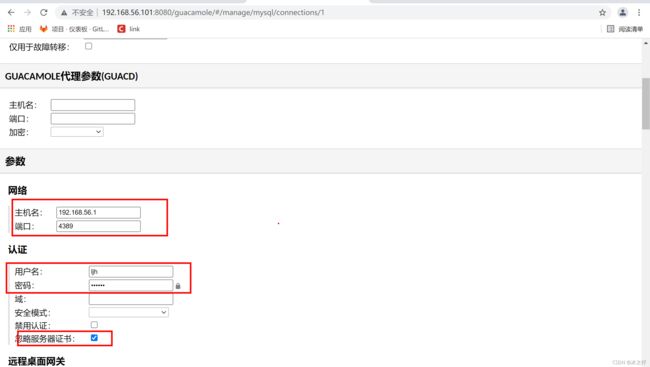
8.创建连接,以windows的rdp为例
新建一个连接:
1.名称任填,如win7
2.位置默认
3.协议选RDP
4.网络->主机名,我这里填192.168.56.1
5.网络->端口,我这里填了4389,我的远程桌面的端口设置成4389的
6.认证-用户名
7.认证-密码
8.忽略服务器证书这个再勾上
然后保存
最后看下效果:


七、在页面中集成远程桌面,去掉基础认证
如果项目中对安全性要求不高,去掉基础认证,直接通过浏览器能进行访问,怎么做?官网给出了一个较好的例子,位置在:https://guacamole.apache.org/doc/gug/writing-you-own-guacamole-app.html,我也在网上找了些例子,然后集成了个springboot工程,修改里面的配置即可。
gitee: https://gitee.com/jxlhljh/springboot-guacamole.git
github: https://github.com/jxlhljh/springboot-guacamole.git
下载工程,修改里面的配置即可

然后启动,通过地址访问如:http://localhost:9632/remotewindows

