SpringBoot应用监控SpringBoot+Prometheus+Grafana
SpringBoot应用监控SpringBoot+Prometheus+Grafana
- 1. SpringBoot应用监控
-
- 1.1 SpringBoot应用监控
- 1.2 SpringBoot应用搭建
- 2. Prometheus
-
- 2.1 Prometheus简介
- 2.2 Prometheus下载安装
- 2.3 Prometheus配置
- 2.4 Prometheus启动
- 2.5 Prometheus验证
- 3. Grafana
-
- 3.1 Grafana简介
- 3.2 Grafana下载安装
- 3.3 Grafana启动
- 3.4 Grafana测试验证
1. SpringBoot应用监控
1.1 SpringBoot应用监控
SpringBoot的应用监控方案比较多,SpringBoot+Prometheus+Grafana是目前比较常用的方案之一。
SpringBoot:系统应用。
Prometheus:用于数据采集。
Grafana:数据可视化及预警。
1.2 SpringBoot应用搭建
1.maven依赖
<project xmlns="http://maven.apache.org/POM/4.0.0" xmlns:xsi="http://www.w3.org/2001/XMLSchema-instance"
         xsi:schemaLocation="http://maven.apache.org/POM/4.0.0 https://maven.apache.org/xsd/maven-4.0.0.xsd">
    <modelVersion>4.0.0modelVersion>
    <parent>
        <groupId>org.springframework.bootgroupId>
        <artifactId>spring-boot-starter-parentartifactId>
        <version>1.5.7.RELEASEversion>
        <relativePath/>
    parent>
    <groupId>com.jerrygroupId>
    <artifactId>auto-monitorartifactId>
    <version>0.0.1-SNAPSHOTversion>
    <name>auto-monitorname>
    <description>Demo project for Spring Bootdescription>
    <properties>
        <java.version>1.8java.version>
    properties>

    <dependencies>
        <dependency>
            <groupId>org.springframework.bootgroupId>
            <artifactId>spring-boot-starterartifactId>
        dependency>
        <dependency>
            <groupId>org.springframework.bootgroupId>
            <artifactId>spring-boot-starter-webartifactId>
        dependency>
        <dependency>
            <groupId>org.springframework.bootgroupId>
            <artifactId>spring-boot-starter-testartifactId>
            <scope>testscope>
        dependency>


        <dependency>
            <groupId>org.springframework.bootgroupId>
            <artifactId>spring-boot-starter-actuatorartifactId>
        dependency>
        <dependency>
            <groupId>io.prometheusgroupId>
            <artifactId>simpleclient_spring_bootartifactId>
            <version>0.8.1version>
        dependency>
        <dependency>
            <groupId>org.springframework.bootgroupId>
            <artifactId>spring-boot-starter-securityartifactId>
        dependency>
        <dependency>
            <groupId>org.projectlombokgroupId>
            <artifactId>lombokartifactId>
            <optional>trueoptional>
        dependency>
    dependencies>

project>
注意:这里的SpringBoot版本是1.5.7.RELEASE,之所以不用最新的2.X是因为最新的simpleclient_spring_boot只支持1.5.X,不确定2.X版本的能否支持。
2.配置文件application.yml
spring:
  application:
    name: monitor

server:
  port: 8848

# 安全检查
security:
  user:
    name: admin
    password: 123456
  basic:
    enabled: true
    # 安全路径列表,逗号分隔,此处只针对/admin路径进行认证
    path: /admin

# 开启监控指标
management:
  context-path: /admin
  # actuator暴露接口使用的端口,为了和api接口使用的端口进行分离
  port: 8888
  security:
    enabled: true
    roles: SUPERUSER
3.启动类增加注解
package com.jerry.monitor;

import io.prometheus.client.spring.boot.EnablePrometheusEndpoint;
import io.prometheus.client.spring.boot.EnableSpringBootMetricsCollector;
import org.springframework.boot.SpringApplication;
import org.springframework.boot.autoconfigure.SpringBootApplication;

/**
 * 监控应用
 * Spring Boot + Prometheus + Grafana 打造可视化监控
 *
 * @author zrj
 * @since 2022/4/26
 **/
@EnablePrometheusEndpoint
@SpringBootApplication
@EnableSpringBootMetricsCollector
public class AutoMonitorApplication {

    public static void main(String[] args) {
        SpringApplication.run(AutoMonitorApplication.class, args);
    }
}
4.代码实现
MonitorController
package com.jerry.monitor.controller;

import com.jerry.monitor.entity.Response;
import org.springframework.web.bind.annotation.GetMapping;
import org.springframework.web.bind.annotation.RequestMapping;
import org.springframework.web.bind.annotation.RestController;

import java.util.Map;
import java.util.concurrent.ConcurrentHashMap;

/**
 * 监控控制器
 *
 * @author zrj
 * @since 2022/4/26
 **/
@RestController
@RequestMapping("/monitor")
public class MonitorController {

    private static Map<String, Object> monitorMap = new ConcurrentHashMap<>();
    private static int monitorMapSize = 10000000;

    /**
     * 测试
     */
    @GetMapping("/test")
    public Response<String> test() {
        System.out.println("【SpringBoot应用监控】测试成功!");
        return Response.success(null);
    }

    /**
     * 指标监控测试
     *
     * @return String
     */
    @GetMapping("/index")
    public Response<String> heapIndexTest() {
        System.out.println("获取监控指标,创建对象放入集合!开始执行!" + monitorMap.size() + "");
        for (int i = 0; i < monitorMapSize; i++) {
            monitorMap.put(i + "", new Object());
        }
        System.out.println("获取监控指标,创建对象放入集合!执行完成!" + monitorMap.size() + "");
        return Response.success(monitorMap.size() + "");
    }


}
Response
package com.jerry.monitor.entity;

import lombok.Data;
import org.springframework.stereotype.Component;

/**
 * 响应对象
 *
 * @author zrj
 * @since 2022/3/23
 **/
@Data
@Component
public class Response<T> {
    /**
     * 状态码
     */
    private static String successCode = "200";
    private static String successMsg = "执行成功";
    private static String failCode = "500";
    private static String failMsg = "执行失败";

    /**
     * 提示消息
     */
    private String message;

    /**
     * 状态码
     */
    private String code;

    /**
     * 具体返回的数据
     */
    private T data;

    public Response() {
    }

    private Response(String code, String msg) {
        this.message = msg;
        this.code = code;
    }

    private Response(String code, String message, T data) {
        this.message = message;
        this.code = code;
        this.data = data;
    }

    /**
     * 返回成功Response对象
     */
    public static <T> Response<T> success(T data) {
        return new Response<>(successCode, successMsg, data);
    }

    public static <T> Response<T> success(String successMessage, T data) {
        return new Response<>(successCode, successMessage, data);
    }

    public static <T> Response<T> success(String code, String successMessage, T data) {
        return new Response<>(code, successMessage, data);
    }

    /**
     * 返回错误Response对象
     */
    public static <T> Response<T> fail(String failMsg) {
        return new Response<>(failCode, failMsg);
    }

    public static <T> Response<T> fail(String failCode, String failMsg) {
        return new Response<>(failCode, failMsg);
    }

    public static <T> Response<T> fail(String failCode, String failMsg, T data) {
        return new Response<>(failCode, failMsg, data);
    }
}
5.验证测试
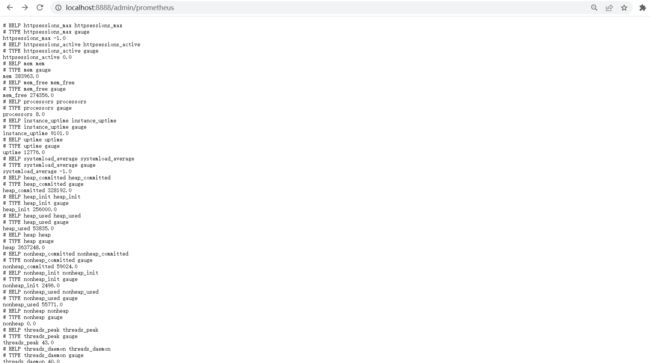
启动完毕,访问http://localhost:8888/admin/prometheus就可以看到服务暴露的那些监控指标了。
注意:由于开启了安全认证,所以访问这个URL的需要提示输入账号/密码,admin/123456,如果提示404请检查下你的请求地址是否正确,如果不设置management.context-path则默认地址是http://ip:port/prometheus
2. Prometheus
2.1 Prometheus简介
Prometheus 是一款基于时序数据库的开源监控告警系统。它受启发于Google的Brogmon监控系统,由工作在SoundCloud的前google员工在2012年创建,作为社区开源项目进行开发,并于 2015年正式发布。2016年,Prometheus正式加入Cloud Native Computing Foundation(CNCF)基金会的项目,成为受欢迎度仅次于Kubernetes 的项目。2017年底发布了基于全新存储层的2.0版本,能更好地与容器平台、云平台配合。Prometheus作为新一代的云原生监控系统,目前已经有超过650+位贡献者参与到Prometheus的研发工作上,并且超过120+项的第三方集成。
Prometheus:https://prometheus.io/

2.2 Prometheus下载安装
本文下载的是Windows版本prometheus-2.35.0.windows-amd64.zip。
Prometheus下载地址:https://prometheus.io/download/
2.3 Prometheus配置
解压后修改prometheus.yml文件,配置数据采集的目标信息。更多配置信息请查看官方文档。
scrape_configs:
  # The job name is added as a label `job=<job_name>` to any timeseries scraped from this config.
  # - job_name: 'prometheus'

    # metrics_path defaults to '/metrics'
    # scheme defaults to 'http'.

    # static_configs:
    # - targets: ['localhost:9090']
  - job_name: 'monitor-demo'
    scrape_interval: 5s # 刮取的时间间隔
    scrape_timeout: 5s
    metrics_path: /admin/prometheus
    scheme: http
    basic_auth: #认证信息
      username: admin
      password: 1234
    static_configs:
      - targets:
        - 127.0.0.1:8888  #此处填写 Spring Boot 应用的 IP + 端口号
2.4 Prometheus启动
启动Prometheus了,命令行输入
prometheus.exe --config.file=prometheus.yml
2.5 Prometheus验证
访问http://localhost:9090/targets,查看Spring Boot采集状态是否正常。

3. Grafana
3.1 Grafana简介
Grafana是一款开源的数据可视化工具,可用于数据监控统计分析以及预警功能。
Grafana:https://grafana.com/
3.2 Grafana下载安装
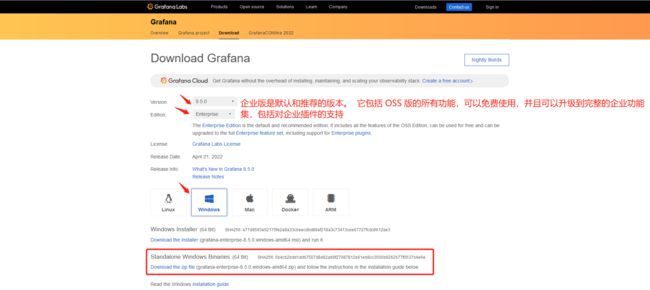
本文用到的是Windows版本grafana-6.3.3.windows-amd64.zip,6.3.3版本启动异常,缺少License.jwt文件,所以本文采用最新的grafana-enterprise-8.5.0.windows-amd64.zip。
下载地址:https://grafana.com/grafana/download
3.3 Grafana启动
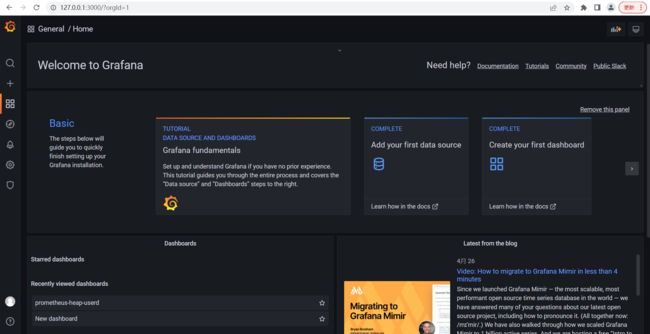
解压后运行bin目录下的grafana-server.exe启动,游览器访问http://localhost:3000即可看到登录页面,默认账号密码是admin/admin。
3.4 Grafana测试验证
1.登录验证
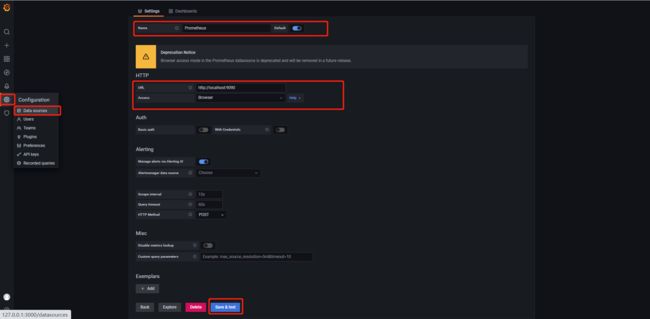
2.设置数据源
3.创建Dashboard

4.填写采集的指标点
注意:这里的指标点不能随便填,必须是已有的可以在 Prometheus看到。
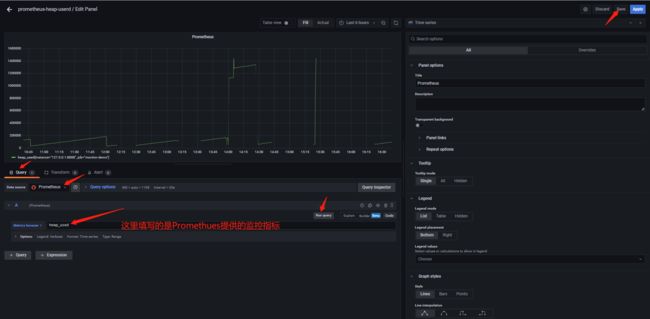 至此SpringBoot+Prometheus+Grafana集成完毕,Grafana展示的即为Prometheus从SpringBoot actuator搜集的监控指标数据。