- 【总结】Pytest vs Behave,BDD 测试框架哪家强?
软件测试pytestbehave
引言在测试驱动开发(TDD)和行为驱动开发(BDD)流行的今天,Pytest和Behave成为了Python生态中最常见的自动化测试框架。那么,究竟该选择哪一个?它们各自有哪些优缺点?本篇文章将为你全面解析!1.什么是Pytest?Pytest是一个强大且灵活的Python测试框架,适用于单元测试、功能测试和API测试。它支持简单的函数式测试,同时具备强大的插件机制。Pytest的核心特点:✅语法
- Pytest项目_day01(HTTP接口)
丿罗小黑
Pytestpytesthttp网络协议
HTTPHTTP是一个协议(服务器传输超文本到浏览器的传送协议),是基于TCP/IP通信协议来传输数据(HTML文件,图片文件,查询结果等)。访问域名例如www.baidu.com就是百度的域名,我们想要访问百度,就需要使用DNS,来将www.baidu.com域名解析为ip地址。随后客户端向服务端发起TCP请求,三次握手进行连接,三次握手如下:客户端向服务端说:你准备好了吗,我要发送请求了服务端
- Python的Pytest(2)
活跃家族
pythonpytest开发语言
1、思考:完整项目框架里每个模块单独用一个py文件管理,注册模块-py文件,登录模块-py文件==放在用例层目录下管理,testcases多个模块、py文件里的用例,批量执行==需要收集所有模块的用例,一起执行。1、pytest智能自动收集所有用例:pytest.main():自动在这个文件所在目录下收集符合命名规则的用例=pytest.main()通常写在入口文件run.py或main.py。2
- Python的Pytest测试框架(1)
活跃家族
pythonpytest开发语言
1、Pytest测试框架手工执行测试:熟悉业务写用例(分模块)执行用例并记录生成本轮的测试报告自动化测试:熟悉业务写用例(手工用例转化为自动化测试用例)用代码表达用例(代码写出用例)代码收集测试用例代码执行测试用例代码生成测试报告。自动化的思路基本是跟手工测试一样的,建立在手工测试基础上的一种更高效率的进阶和升华的方式。测试框架:unittestpytest,技术栈,提供了表示测试用例,发现测试用
- Pytest教程系列(8)读取Yaml文件
爱测试的小浩
pytestpytestpythonlinux
Pytest教程系列(8)读取Yaml文件读取yaml文件代码如下:importyamlyaml_path=r'C:\Users\admin\Documents\pytest-selenium-new\Data\DataYaml\login.yaml'defread_yaml_all():try:#打开文件withopen(yaml_path,"r",encoding="utf-8")asf:da
- request+pytest根据yaml文件发送请求
等枝桠~成繁花
pytest
request怎么跟pytest结合起来,然后根据yaml文件去发一个基本的请求呢?下面是一个简单的示例。1、先新建一个名为“demo.yaml”的yaml文件,用来存放测试数据的。-name:G广州研发中心parentid:1#第一次用例的数据正常expect:60008#对请求结果进行断言-name:""parentid:1#第二次用例的数据name为空expect:40058#对请求结果进行
- 使用python反射,实现pytest读取yaml并发送请求
南部余额
pythonpythonpytest
pytest+yamlyaml-feature:用户模块story:登录title:添加用户request:method:POSTurl:/system/user/listheaders:nullparams:nullvalidate:nullread_yaml_alldefread_yaml_all(path):withopen(path,'r',encoding='utf-8')asf:val
- 代码质量的基石:Python 单元测试实战 (unittest vs pytest)
清水白石008
pythonPython题库python单元测试pytest
代码质量的基石:Python单元测试实战(unittestvspytest)引言在软件开发的浩瀚征程中,代码质量是决定项目成败的关键因素。如同建筑物的地基,稳固的代码质量能够支撑起复杂而庞大的系统,反之则可能导致系统崩溃、维护困难,甚至安全漏洞。单元测试,作为保障代码质量的第一道防线,扮演着至关重要的角色。Python,作为一门以简洁优雅著称的编程语言,拥有丰富的测试框架,其中unittest和p
- unittest vs pytest区别
賢843
接口自动化测试pytest
unittestvspytest对比unittest像“手动挡汽车”:操作步骤多,规则严格,适合老司机。pytest像“自动挡汽车”:开起来轻松,功能强大,适合新手和高效开发。区别点unittest(你学过的)pytest(更强大的新工具)测试用例写法必须写一个类,继承unittest.TestCase不用类!直接写函数,函数名以test_开头就行断言语法必须用self.assertEqual(a
- pytest+allure 入门
大霞上仙
测试pytest
使用allure如何生成自动化测试报告?一文详解allure的使用。_allure测试报告-CSDN博客例子:
[email protected]("闹钟")@allure.feature("闹钟增删")classTestSchedule():defsetup_class(self):print("清理测试数据--------删除所有闹钟")@a
- pytest-xdist 进行多进程并发测试!
小码哥说测试
技术分享自动化测试软件测试pytest单元测试压力测试seleniumpostman网络协议软件测试
在软件开发过程中,测试是确保代码质量和可靠性的关键步骤。随着项目规模的扩大和复杂性的增加,测试用例的执行效率变得尤为重要。为了加速测试过程,特别是对于一些可以并行执行的测试用例,pytest-xdist提供了一种强大的工具,可以在多个进程中并发运行测试,从而显著提高测试效率。本文将深入探讨pytest-xdist的多进程并发测试功能,介绍其基本概念、用法和一些最佳实践,以帮助开发者更好地利用这一功
- 通过 Ollama 本地部署 DeepSeek-r1:1.5b 模型后,用 Python 调用推理并生成基于 pytest + PO 设计模式的 Playwright 自动化测试文件
Python测试之道
测试提效pythonpythonpytest设计模式
以下是完整的实现步骤和代码示例,详细说明了如何通过Python调用本地部署的DeepSeek-r1:1.5b模型,将功能测试用例转换为适合pytest和PageObject(PO)设计模式的Playwright自动化测试脚本。一、前提条件DeepSeek模型本地部署通过Ollama部署DeepSeek-r1:1.5b模型。Ollama提供的本地推理服务默认可通过HTTPAPI访问,地址通常为:ht
- pytest框架 核心知识的系统复习
双子测试
pytest
1.pytest介绍是什么:Python最流行的单元测试框架之一,支持复杂的功能测试和插件扩展。优点:语法简洁(用assert替代self.assertEqual)。自动发现测试用例。丰富的插件生态(如失败重试、并发执行、报告生成)。兼容unittest框架,比自带unittest框架更加简洁高效,在unittest框架迁移到pytest框架时不需要重写代码。适用场景:单元测试、接口测试、UI自动
- Pytest自动化框架搭建
柯有Q
pytest自动化python运维
背景入职了一家小公司,需要从0开始搭建一个自动化测试环境,因为是测试板卡项目,所以需要使用串口连接工具pyserial,测试用例批量化执行工具pytest,测试报告自动生成工具allure,大家根据这三个关键词选择是否需要继续阅读1.技术实现1.1技术说明使用pyserial作为串口连接工具,发送读写命令;使用pytest作为用例批量管理工具;使用allure对测试结果进行可视化处理,自动生成测试
- Web自动化中多浏览器并发
进阶的DW
自动化selenium
一、背景1、当自动化用例比较多时,执行需要很长时间,为了提高执行效率可以将用例分配到多个浏览器执行2、兼容性测试,在多个不同的浏览器上执行自动化用例,测试这些用例在不同浏览器上是否正常二、设计方案1、使用pytest-xdist插件2、执行用例的时候,框架需要知道执行哪些浏览器可以在pytest执行时,指定一个命令行参数,--browsers,表示要执行的浏览器名称,多个浏览器用逗号分隔--bro
- 接口自动化并发执行,多进程
进阶的DW
自动化python运维
一、多进程基础操作1、安装插件pytest-xdist该插件实现进程级别的并发pipinstallpytest-xdist-iSimpleIndex2、使用插件该插件主要使用的是插件提供的pytest执行时的命令行参数,所以我们要在pytest.ini中增加addopts中增加参数*指定并发进程个数-n2#指定两个进程并发-nauto#根据当前电脑cpu自动生成最大进程个数[pytest];-n2
- ollama本地部署的deepseek解析接口文档,结合Python生成pytest+yml的框架用例
Python测试之道
python测试提效python人工智能pytest
前言在接口测试中,测试工程师通常需要根据开发提供的接口文档手动编写测试用例。这种方式不仅耗时,还容易遗漏边界场景。通过DeepSeek模型的语义理解能力,可以自动从接口文档中生成详细的接口测试用例,并结合pytest和YAML测试框架,打造一套高效、易于维护、可扩展的接口测试解决方案。本篇文章以实战为核心,展示如何通过DeepSeek辅助生成接口测试用例,并结合pytest和YAML框架实现落地化
- pytest的bug
XuMeng_first
pytestbug
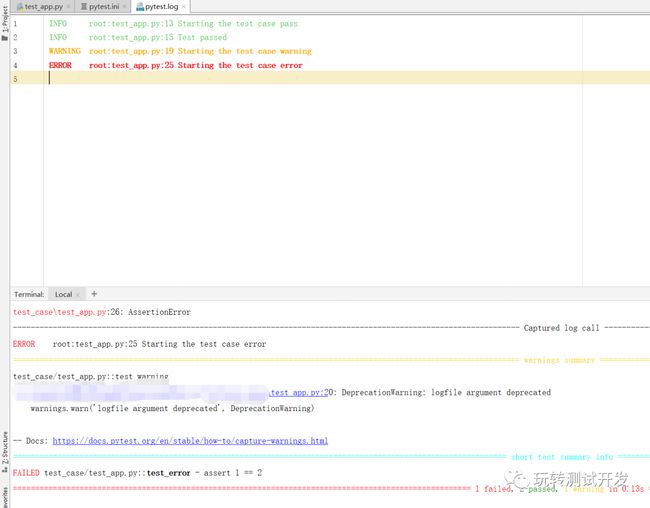
在pytest框架学习中无意发现一个bug,在写case时候,如果有两个case.py文件,第一个test_log.py,第二个test_show.py文件,那么如果我使用了多行注释把test_show.py文件的代码case注释掉了,我在执行test_log.py模块的代码的时候,会多执行一遍,但是如果使用的是单行注释,那么就执行正常,不会多执行一遍。图上的是多行注释的case模块,在执行运行模
- Python测试框架Pytest的参数化
天才测试猿
windows测试工具软件测试自动化测试pythonpytest职场和发展
上篇博文介绍过,Pytest是目前比较成熟功能齐全的测试框架,使用率肯定也不断攀升。在实际工作中,许多测试用例都是类似的重复,一个个写最后代码会显得很冗余。这里,我们来了解一下@pytest.mark.parametrize装饰器,可以很好解决上述问题。源代码分析defparametrize(self,argnames,argvalues,indirect=False,ids=None,scope
- pytest简易教程(13):parametrize参数化
全栈测试笔记
pytest
pytest简易教程汇总,详见:https://www.cnblogs.com/uncleyong/p/17982846关于parametrize参数化之前我们分享了通过fixture返回值实现参数化(详见:https://www.cnblogs.com/uncleyong/p/17957896)今天我们分享parametrize参数化,也就是在测试函数/测试类进行参数化parametrize是一
- 坑:pytest 运行报错unknown hook 'pytest_namespace' in plugin
weixin_30387423
测试python
右键运行pytestrun时报错,原因是pytest版本过高导致的。有时候会遇到在自己本机没问题,拉取服务器代码下来后就出问题了,所以把pytest版本改低就可以,亲测有效,希望对你有帮助完整报错信息如下:plugins:allure-adaptor-1.7.10,forked-1.0.2,html-1.20.0,metadata-1.8.0,xdist-1.29.0collected17item
- Python测试框架pytest核心库pluggy详解
美团程序员
自动化测试软件测试面试pythonpytest开发语言
代码案例12345678910111213141516171819202122232425262728293031323334353637383940414243444546importpluggy#HookspecMarker和HookimplMarker实质上是一个装饰器带参数的装饰器类,作用是给函数增加额外的属性设置hookspec=pluggy.HookspecMarker("myproj
- python调用C++,使用pybind11
Qt小当家
Qtpython开发语言
一.准备工作:1.安装python环境(如果编译的是32位的python库,则需要安装32位的python环境,如果编译64位的则安装64位环境)2.安装环境后敲打命令pipinstallpytest下载pytest,敲打命令pipinstallpybind11下载pybind11二.创建项目,配置cmake引入python和pybind11相关库如下面cmake所看到的,我安装了python的3
- pytest文档77 - parametrize 参数化跳过部分用例(pytest.param)
上海-悠悠
Pythonpytestpython测试用例单元测试
前言pytest参数化的时候,希望能跳过部分测试用例,可以用pytest.param来实现。parametrize参数化示例parametrize参数化
[email protected]('input1,input2,expected',[["a","b","ab"],["1","2","12"],[2,3,5],[1,3,4],])deftest_foo(i
- pytest之什么是 parametrize参数化?
北凡说测试
pythonpytest
前言我们都知道pytest和unittest是兼容的,但是它也有不兼容的地方,比如ddt数据驱动,测试夹具fixtures(即setup、teardown)这些功能在pytest中都不能使用了,因为pytest已经不再继承unittest了。不使用ddt数据驱动那pytest是如何实现参数化的呢?答案就是mark里自带的一个参数化标签。一、源码解读关键代码:@pytest.mark.paramet
- python+pytest+yaml框架接口关联参数存储&获取
liang_la
python开发语言后端测试用例
以下方法是用于python+pytest+yaml框架下,多个接口之间的参数关联。例如:登录接口返回的token用于下一个接口使用。方法一:使用os.environ来存储及获取参数yaml文件编写如下,动态获取的参数为$sms-case_id:login_successtitle:获取登录需要的参数url:/regloginmethod:getdata:mobile:18829354854sms:
- python+requests+pytest+allure自动化测试框架
测试1998
python软件测试自动化测试单元测试pytest职场和发展测试工具
视频学习:文末有免费的配套视频可观看关注公众号【互联网杂货铺】,回复1,免费获取软件测试全套资料,资料在手,涨薪更快1、核心库requestsrequest请求openpyxlexcel文件操作loggin日志smtplib发送邮件configparserunittest.mockmock服务2、目录结构baseutilstestDatasconftestCasestestReportlogs其他
- Python+requests+pytest+allure自动化测试框架
测试1998
软件测试自动化测试测试工具测试用例pythonpytest职场和发展
点击文末小卡片,免费获取软件测试全套资料,资料在手,涨薪更快1、核心库requestsrequest请求openpyxlexcel文件操作loggin日志smtplib发送邮件configparserunittest.mockmock服务2、目录结构baseutilstestDatasconftestCasestestReportlogs其他2.1basebase_path.py存放绝对路径,do
- Pytest学习笔记(6)-配置文件pytest.ini
_黎晟
Pytest学习笔记python测试用例开发语言
文章目录配置文件pytest.ini前言常用配置项markerstestpathsaddoptsxfail_strictlog_clinorecursedirs更改测试用例收集规则注意事项配置文件pytest.ini前言很多pytestsettings可以设置在配置文件,它通常位于存储库的根目录或测试文件夹中pytest.ini文件优先于其他文件,即使是空的pytest配置文件可以改变pytest
- pytest系列——pytest_collection_modifyitems钩子函数修改测试用例执行顺序
测试中二
pytest框架测试用例pytest
视频学习方式:www.bilibili.com/video/BV14i4y1c7Jowww.bilibili.com/video/BV14i4y1c7Jo前言pytest默认执行用例是根据项目下的文件名称按ascii码去收集运行的;文件中的用例是从上往下按顺序执行的。pytest_collection_modifyitems这个函数顾名思义就是收集测试用例、改变用例的执行顺序的。【严格意义上来说,
- iOS http封装
374016526
ios服务器交互http网络请求
程序开发避免不了与服务器的交互,这里打包了一个自己写的http交互库。希望可以帮到大家。
内置一个basehttp,当我们创建自己的service可以继承实现。
KuroAppBaseHttp *baseHttp = [[KuroAppBaseHttp alloc] init];
[baseHttp setDelegate:self];
[baseHttp
- lolcat :一个在 Linux 终端中输出彩虹特效的命令行工具
brotherlamp
linuxlinux教程linux视频linux自学linux资料
那些相信 Linux 命令行是单调无聊且没有任何乐趣的人们,你们错了,这里有一些有关 Linux 的文章,它们展示着 Linux 是如何的有趣和“淘气” 。
在本文中,我将讨论一个名为“lolcat”的小工具 – 它可以在终端中生成彩虹般的颜色。
何为 lolcat ?
Lolcat 是一个针对 Linux,BSD 和 OSX 平台的工具,它类似于 cat 命令,并为 cat
- MongoDB索引管理(1)——[九]
eksliang
mongodbMongoDB管理索引
转载请出自出处:http://eksliang.iteye.com/blog/2178427 一、概述
数据库的索引与书籍的索引类似,有了索引就不需要翻转整本书。数据库的索引跟这个原理一样,首先在索引中找,在索引中找到条目以后,就可以直接跳转到目标文档的位置,从而使查询速度提高几个数据量级。
不使用索引的查询称
- Informatica参数及变量
18289753290
Informatica参数变量
下面是本人通俗的理解,如有不对之处,希望指正 info参数的设置:在info中用到的参数都在server的专门的配置文件中(最好以parma)结尾 下面的GLOBAl就是全局的,$开头的是系统级变量,$$开头的变量是自定义变量。如果是在session中或者mapping中用到的变量就是局部变量,那就把global换成对应的session或者mapping名字。
[GLOBAL] $Par
- python 解析unicode字符串为utf8编码字符串
酷的飞上天空
unicode
php返回的json字符串如果包含中文,则会被转换成\uxx格式的unicode编码字符串返回。
在浏览器中能正常识别这种编码,但是后台程序却不能识别,直接输出显示的是\uxx的字符,并未进行转码。
转换方式如下
>>> import json
>>> q = '{"text":"\u4
- Hibernate的总结
永夜-极光
Hibernate
1.hibernate的作用,简化对数据库的编码,使开发人员不必再与复杂的sql语句打交道
做项目大部分都需要用JAVA来链接数据库,比如你要做一个会员注册的 页面,那么 获取到用户填写的 基本信后,你要把这些基本信息存入数据库对应的表中,不用hibernate还有mybatis之类的框架,都不用的话就得用JDBC,也就是JAVA自己的,用这个东西你要写很多的代码,比如保存注册信
- SyntaxError: Non-UTF-8 code starting with '\xc4'
随便小屋
python
刚开始看一下Python语言,传说听强大的,但我感觉还是没Java强吧!
写Hello World的时候就遇到一个问题,在Eclipse中写的,代码如下
'''
Created on 2014年10月27日
@author: Logic
'''
print("Hello World!");
运行结果
SyntaxError: Non-UTF-8
- 学会敬酒礼仪 不做酒席菜鸟
aijuans
菜鸟
俗话说,酒是越喝越厚,但在酒桌上也有很多学问讲究,以下总结了一些酒桌上的你不得不注意的小细节。
细节一:领导相互喝完才轮到自己敬酒。敬酒一定要站起来,双手举杯。
细节二:可以多人敬一人,决不可一人敬多人,除非你是领导。
细节三:自己敬别人,如果不碰杯,自己喝多少可视乎情况而定,比如对方酒量,对方喝酒态度,切不可比对方喝得少,要知道是自己敬人。
细节四:自己敬别人,如果碰杯,一
- 《创新者的基因》读书笔记
aoyouzi
读书笔记《创新者的基因》
创新者的基因
创新者的“基因”,即最具创意的企业家具备的五种“发现技能”:联想,观察,实验,发问,建立人脉。
第一部分破坏性创新,从你开始
第一章破坏性创新者的基因
如何获得启示:
发现以下的因素起到了催化剂的作用:(1) -个挑战现状的问题;(2)对某项技术、某个公司或顾客的观察;(3) -次尝试新鲜事物的经验或实验;(4)与某人进行了一次交谈,为他点醒
- 表单验证技术
百合不是茶
JavaScriptDOM对象String对象事件
js最主要的功能就是验证表单,下面是我对表单验证的一些理解,贴出来与大家交流交流 ,数显我们要知道表单验证需要的技术点, String对象,事件,函数
一:String对象;通常是对字符串的操作;
1,String的属性;
字符串.length;表示该字符串的长度;
var str= "java"
- web.xml配置详解之context-param
bijian1013
javaservletweb.xmlcontext-param
一.格式定义:
<context-param>
<param-name>contextConfigLocation</param-name>
<param-value>contextConfigLocationValue></param-value>
</context-param>
作用:该元
- Web系统常见编码漏洞(开发工程师知晓)
Bill_chen
sqlPHPWebfckeditor脚本
1.头号大敌:SQL Injection
原因:程序中对用户输入检查不严格,用户可以提交一段数据库查询代码,根据程序返回的结果,
获得某些他想得知的数据,这就是所谓的SQL Injection,即SQL注入。
本质:
对于输入检查不充分,导致SQL语句将用户提交的非法数据当作语句的一部分来执行。
示例:
String query = "SELECT id FROM users
- 【MongoDB学习笔记六】MongoDB修改器
bit1129
mongodb
本文首先介绍下MongoDB的基本的增删改查操作,然后,详细介绍MongoDB提供的修改器,以完成各种各样的文档更新操作 MongoDB的主要操作
show dbs 显示当前用户能看到哪些数据库
use foobar 将数据库切换到foobar
show collections 显示当前数据库有哪些集合
db.people.update,update不带参数,可
- 提高职业素养,做好人生规划
白糖_
人生
培训讲师是成都著名的企业培训讲师,他在讲课中提出的一些观点很新颖,在此我收录了一些分享一下。注:讲师的观点不代表本人的观点,这些东西大家自己揣摩。
1、什么是职业规划:职业规划并不完全代表你到什么阶段要当什么官要拿多少钱,这些都只是梦想。职业规划是清楚的认识自己现在缺什么,这个阶段该学习什么,下个阶段缺什么,又应该怎么去规划学习,这样才算是规划。
- 国外的网站你都到哪边看?
bozch
技术网站国外
学习软件开发技术,如果没有什么英文基础,最好还是看国内的一些技术网站,例如:开源OSchina,csdn,iteye,51cto等等。
个人感觉如果英语基础能力不错的话,可以浏览国外的网站来进行软件技术基础的学习,例如java开发中常用的到的网站有apache.org 里面有apache的很多Projects,springframework.org是spring相关的项目网站,还有几个感觉不错的
- 编程之美-光影切割问题
bylijinnan
编程之美
package a;
public class DisorderCount {
/**《编程之美》“光影切割问题”
* 主要是两个问题:
* 1.数学公式(设定没有三条以上的直线交于同一点):
* 两条直线最多一个交点,将平面分成了4个区域;
* 三条直线最多三个交点,将平面分成了7个区域;
* 可以推出:N条直线 M个交点,区域数为N+M+1。
- 关于Web跨站执行脚本概念
chenbowen00
Web安全跨站执行脚本
跨站脚本攻击(XSS)是web应用程序中最危险和最常见的安全漏洞之一。安全研究人员发现这个漏洞在最受欢迎的网站,包括谷歌、Facebook、亚马逊、PayPal,和许多其他网站。如果你看看bug赏金计划,大多数报告的问题属于 XSS。为了防止跨站脚本攻击,浏览器也有自己的过滤器,但安全研究人员总是想方设法绕过这些过滤器。这个漏洞是通常用于执行cookie窃取、恶意软件传播,会话劫持,恶意重定向。在
- [开源项目与投资]投资开源项目之前需要统计该项目已有的用户数
comsci
开源项目
现在国内和国外,特别是美国那边,突然出现很多开源项目,但是这些项目的用户有多少,有多少忠诚的粉丝,对于投资者来讲,完全是一个未知数,那么要投资开源项目,我们投资者必须准确无误的知道该项目的全部情况,包括项目发起人的情况,项目的维持时间..项目的技术水平,项目的参与者的势力,项目投入产出的效益.....
- oracle alert log file(告警日志文件)
daizj
oracle告警日志文件alert log file
The alert log is a chronological log of messages and errors, and includes the following items:
All internal errors (ORA-00600), block corruption errors (ORA-01578), and deadlock errors (ORA-00060)
- 关于 CAS SSO 文章声明
denger
SSO
由于几年前写了几篇 CAS 系列的文章,之后陆续有人参照文章去实现,可都遇到了各种问题,同时经常或多或少的收到不少人的求助。现在这时特此说明几点:
1. 那些文章发表于好几年前了,CAS 已经更新几个很多版本了,由于近年已经没有做该领域方面的事情,所有文章也没有持续更新。
2. 文章只是提供思路,尽管 CAS 版本已经发生变化,但原理和流程仍然一致。最重要的是明白原理,然后
- 初二上学期难记单词
dcj3sjt126com
englishword
lesson 课
traffic 交通
matter 要紧;事物
happy 快乐的,幸福的
second 第二的
idea 主意;想法;意见
mean 意味着
important 重要的,重大的
never 从来,决不
afraid 害怕 的
fifth 第五的
hometown 故乡,家乡
discuss 讨论;议论
east 东方的
agree 同意;赞成
bo
- uicollectionview 纯代码布局, 添加头部视图
dcj3sjt126com
Collection
#import <UIKit/UIKit.h>
@interface myHeadView : UICollectionReusableView
{
UILabel *TitleLable;
}
-(void)setTextTitle;
@end
#import "myHeadView.h"
@implementation m
- N 位随机数字串的 JAVA 生成实现
FX夜归人
javaMath随机数Random
/**
* 功能描述 随机数工具类<br />
* @author FengXueYeGuiRen
* 创建时间 2014-7-25<br />
*/
public class RandomUtil {
// 随机数生成器
private static java.util.Random random = new java.util.R
- Ehcache(09)——缓存Web页面
234390216
ehcache页面缓存
页面缓存
目录
1 SimplePageCachingFilter
1.1 calculateKey
1.2 可配置的初始化参数
1.2.1 cach
- spring中少用的注解@primary解析
jackyrong
primary
这次看下spring中少见的注解@primary注解,例子
@Component
public class MetalSinger implements Singer{
@Override
public String sing(String lyrics) {
return "I am singing with DIO voice
- Java几款性能分析工具的对比
lbwahoo
java
Java几款性能分析工具的对比
摘自:http://my.oschina.net/liux/blog/51800
在给客户的应用程序维护的过程中,我注意到在高负载下的一些性能问题。理论上,增加对应用程序的负载会使性能等比率的下降。然而,我认为性能下降的比率远远高于负载的增加。我也发现,性能可以通过改变应用程序的逻辑来提升,甚至达到极限。为了更详细的了解这一点,我们需要做一些性能
- JVM参数配置大全
nickys
jvm应用服务器
JVM参数配置大全
/usr/local/jdk/bin/java -Dresin.home=/usr/local/resin -server -Xms1800M -Xmx1800M -Xmn300M -Xss512K -XX:PermSize=300M -XX:MaxPermSize=300M -XX:SurvivorRatio=8 -XX:MaxTenuringThreshold=5 -
- 搭建 CentOS 6 服务器(14) - squid、Varnish
rensanning
varnish
(一)squid
安装
# yum install httpd-tools -y
# htpasswd -c -b /etc/squid/passwords squiduser 123456
# yum install squid -y
设置
# cp /etc/squid/squid.conf /etc/squid/squid.conf.bak
# vi /etc/
- Spring缓存注解@Cache使用
tom_seed
spring
参考资料
http://www.ibm.com/developerworks/cn/opensource/os-cn-spring-cache/
http://swiftlet.net/archives/774
缓存注解有以下三个:
@Cacheable @CacheEvict @CachePut
- dom4j解析XML时出现"java.lang.noclassdeffounderror: org/jaxen/jaxenexception"错误
xp9802
java.lang.NoClassDefFoundError: org/jaxen/JaxenExc
关键字: java.lang.noclassdeffounderror: org/jaxen/jaxenexception
使用dom4j解析XML时,要快速获取某个节点的数据,使用XPath是个不错的方法,dom4j的快速手册里也建议使用这种方式
执行时却抛出以下异常:
Exceptio