前言
前文我们已经了解了NIO的三大核心组件,本篇文章会详细介绍FileChannel中的使用方法和原理。
FileChannel
FileChannel是对一个文件读,写,映射,操作的Channel。FileChannel是线程安全的,可以被多个线程并发使用。同一个进程中的多个FileChannel看到的同一个文件的视图是相同的,由于底层操作系统执行的缓存和网络文件系统协议引起的延迟,不同进程中在同一时间看到的文件视图可能会不同。
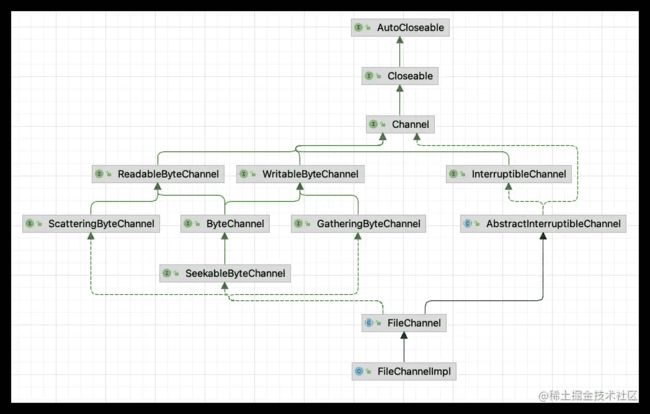
FileChannel的类图如下,FileChannel是一个抽象类,它的具体实现是FileChannelImpl。
FileChannel的创建
获取FileChannel的方式有下面四种
- FileChannel.open()
直接调用FileChannel的open()方法,传入Path即可获得FileChannel
// 直接传入Path默认是只读FileChannel
FileChannel fileChannel = FileChannel.open(Path.of("./tmp/linshifu.txt"));
// 和直接传入Path相比,支持传入OpenOption数组
FileChannel channel = FileChannel.open(Path.of("./tmp/linshifu.txt"), StandardOpenOption.WRITE);
OpenOption是一个空接口,我们可以传入StandardOpenOption枚举,StandardOpenOption有如下值
public enum StandardOpenOption implements OpenOption {
    // 可读Channel
    READ,
    // 可写Channel
    WRITE,
    // 如果Channel是可写(WRITE)的,缓冲中的数据会从文件末尾开始写,而不是从头开始写
    APPEND,
    // 如果Channel是可写(WRITE)的,文件的长度会被置为0
    TRUNCATE_EXISTING,
    // 如果文件不存在,则会创建一个新的文件,如果配置了CREATE,则CREATE_NEW会失效
    CREATE,
    // 创建换一个新的文件,如果文件已经存在,则会失败
    CREATE_NEW,
    // Channel关闭时删除
    DELETE_ON_CLOSE,
    // 稀疏文件
    SPARSE,
    // 要求对文件内容或元数据的每次更新都同步写入基础存储设备。
    SYNC,
    // 要求对文件内容的每次更新都同步写入基础存储设备。
    DSYNC;
}
- FileInputStream.getChannel()
通过FileInputStream的getChannel()方法获取FileChannel
FileInputStream fileInputStream = new FileInputStream("./tmp/linshifu.txt");
FileChannel fileChannel = fileInputStream.getChannel();
FileInputStream创建的FileChannel不可写,只能读
- FileOutputStream.getChannel()
通过FileOutputStream的getChannel()方法获取FileChannel
FileOutputStream fileInputStream = new FileOutputStream("./tmp/linshifu.txt");
FileChannel fileChannel = fileInputStream.getChannel();
FileOutputStream创建FileChannel不可读,只能写
- RandomAccessFile.getChannel()
通过RandomAccessFile的getChannel()方法获取FileChannel
RandomAccessFile file = new RandomAccessFile("./tmp/linshifu.txt", "rw");
FileChannel fileChannel = file.getChannel();
RandomAccessFile中的模式
与OutputStream和InputStream不同的是创建RandomAccessFile需要传入模式,RandomAccessFile的模式也会影响到FileChannel,创建RandomAccessFile可以传入的模式有下面4种
r
只读模式,创建的RandomAccessFile只能读,如果使用只读的RandomAccessFile创建的FileChannel写数据会抛出NonWritableChannelException
rw
读写模式,创建的RandomAccessFile即可读,也可写
rws
与rw一样,打开以进行读取和写入,并且还要求对文件内容或元数据的每次更新同步写入基础存储设备
rwd
与rw一样,打开以进行读取和写入,并且还要求对文件内容的每次更新都同步写入底层存储设备
FileChannel操作文件
读文件操作
读文件的方法有如下三个
// 从position位置读取ByteBuffer.capacity个byte,Channel的position向后移动capacity个位置
public abstract int read(ByteBuffer dst) throws IOException;
// 从传入的position开始读取ByteBuffer.capacity个byte,Channel的positon位置不变
public abstract int read(ByteBuffer dst, long position) throws IOException;
// 按顺序读取文件到ByteBuffer数组中,会将数据读取到ByteBuffer数组的[offset,offset+length)的ByteBuf子数组中
public abstract long read(ByteBuffer[] dsts, int offset, int length) throws IOException;
我们准备一个
写一个demo
写文件操作
// 从position开始写入ByteBuffer中的数据
public abstract int write(ByteBuffer src) throws IOException;
// 从position开始将ByteBuffer数组的[offset,offset+length)的ByteBuf子数组中的数据写入文件
public abstract long write(ByteBuffer[] srcs, int offset, int length) throws IOException;
// 从position开始将ByteBuffer数组中的数据写入文件
public final long write(ByteBuffer[] srcs) throws IOException {
    return write(srcs, 0, srcs.length);
}
写一个Demo
对文件的更新强制输出到底层存储设备
这种方式可以确保在系统崩缺时不会丢失数据,参数中的boolean表示刷盘时是否将文件元数据也同时写到磁盘上。
public abstract void force(boolean metaData) throws IOException;
通道之间数据传输
如果需要将FileChannel的数据快速传输到另一个Channel,可以使用transferTo和transFrom
// 将字节从此通道的文件传输到给定的可写字节通道
public abstract long transferTo(long position, long count,WritableByteChannel target) throws IOException;
// 将字节从给定的可读字节通道传输到此通道的文件中
public abstract long transferFrom(ReadableByteChannel src,long position, long count) throws IOException;
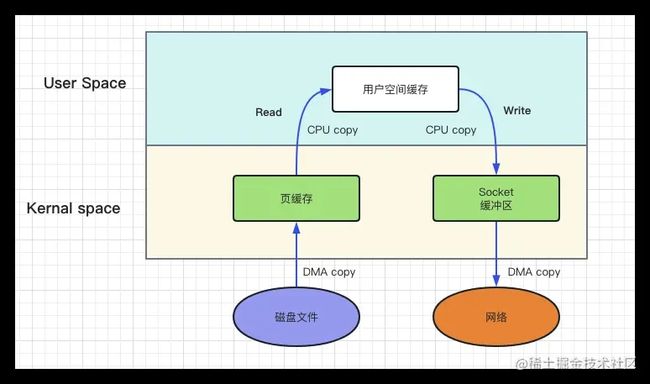
通常情况下我们要将一个通道的数据传到另一个通道。例如,从一个文件读取数据通过socket通道进行发送。比如通过http协议读取服务器上的一个静态文件,要经过下面几个阶段
- 将文件从硬盘拷贝到页缓冲区
- 从页缓冲区读拷贝到用户缓冲区
- 用户缓冲区的数据拷贝到socket内核缓冲区,最终再将socket内核缓冲区的数据拷贝到网卡中
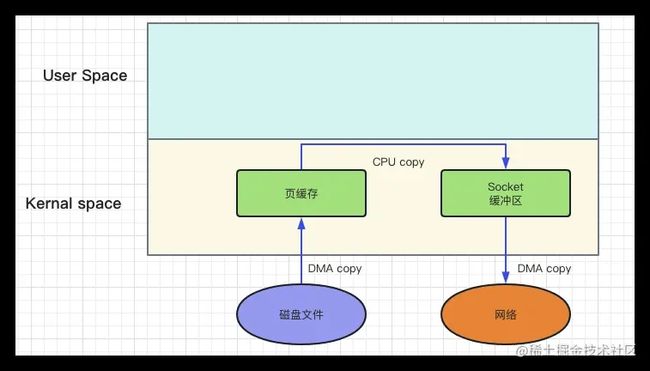
当我们通过transferTo或者transferFrom在通道之间传输数据时,如果内核支持,则会使用零拷贝的方式传输数据
零拷贝技术可以避免将数据拷贝到用户空间中
MappedByteBuffer
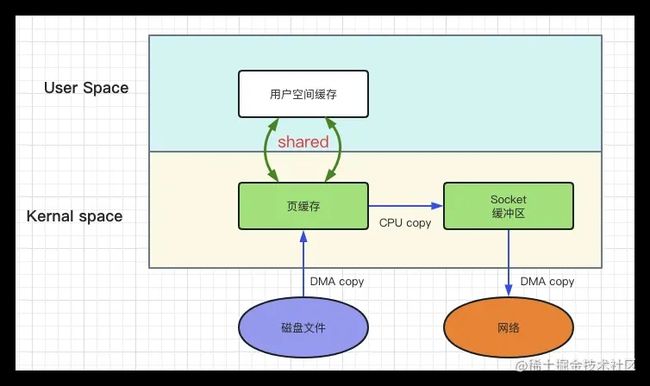
MappedByteBuffer是NIO中应对的操作大文件的方式,它的读写性能极高,它是一种基于mmap的零拷贝方案,通常情况下可以映射出整个文件,如果文件比较大,也支持分段映射。这其初听起来似乎不过就是将整个文件读到内存中,但是事实上并不是这样。 一般来说,只有文件中实际读取或者写入的部分才会映射到内存中。
mmap通过内存映射,将文件映射到内核缓冲区,同时,用户空间可以共享内核空间的数据。这样在进行网络传输时,就可以减少内核空间到用户空间的拷贝次数。mmap需要4次上下文切换,3次数据拷贝。
MappedByteBuffer使用的是虚拟内存,因此分配(map)的内存大小不受JVM的-Xmx参数限制。
MappedByteBuffer使用的方式也比较简单,首先我们准备一个文件,文件内容如下所示,文件大小34B
我们利用MappedByteBuffer写一段代码,将上面文件的第一个字符改成a,代码如下
public static void main(String[] args) throws Exception {
    RandomAccessFile file = new RandomAccessFile("./tmp/01.txt", "rw");
    MappedByteBuffer mbf = file.getChannel().map(FileChannel.MapMode.READ_WRITE, 0, 1024);
    mbf.put(0, (byte) 'a');
    file.close();
}
执行完上面代码之后,这个文件的第一个字符确实被改成了a,但是在文字的末尾也多了很多奇怪的符号
再次查看文件,发现文件大小变为了1KB,我们在进行文件映射时应当注意文件的position和size不应当超出文件的范围,否则可能导致"文件空洞",磁盘上物理文件中写入数据间产生间隙。
以上就是NIO深入理解FileChannel的详细内容,更多关于NIO深入理解FileChannel的资料请关注脚本之家其它相关文章!


