angular知识点--@ViewChild详解
@ViewChild和@ViewChildren是Angular提供给我们的装饰器,用于从模板视图中获取匹配的元素
@ViewChild可以获取到当前组件视图中的单个元素
@ViewChildren获取子组件对象列表
碎碎念:都是一些自己在学习过程中的一点点体会,想记录下来。如果有什么不对的感谢大家指正一起学习!大量摘抄自各个文章,侵权删。
一、通过viewChild访问Dom元素
1. 通过局部变量访问
点击’icon’,我们改变‘icon’背景颜色及大小
a) 在元素上添加局部变量
b) 通过render添加样式
//html
icon

//ts
  @ViewChild('changeIcon') changeIcon;

  constructor(
    private renderer: Renderer2
  ) { }

  clickDemo() {
   //点击之后给元素加上class‘bg’
    this.renderer.addClass(this.changeIcon.nativeElement, "bg");
    console.log(this.changeIcon.nativeElement)
  }

// css
.bg{
    background-color: red;
    width: 50px;
    height: 50px;
}
效果预览:
控制台打印出来nativeElement元素
![]()
2.直接指定组件类
//html(父组件中的子组件)
//ts (父组件)

 @ViewChild(TestComponent) test: TestComponent;
二、@ViewChild其他用法
1.通过@ViewChild来拿到Service类
(未验证此处只是做参考记录)
1.1子组件provider提供了一个ChildService类。我们通过@ViewChild来拿到这个ChildService类
import {Component, OnInit} from '@angular/core';
import {ChildService} from './child.service';

@Component({
  selector: 'app-child',
  template: `
    自定义的一个子组件
  `,
  providers: [
    ChildService
  ]
})
export class ChildComponent implements OnInit {

  @ViewChild(ChildService) childService: ChildService;

  constructor(public childService: ChildService) {
  }

}
1.2.子组件provider通过string token提供的类
子组件的pprovider通过 string token valued的形式提供了一个StringTokenValue类,string token 对应的是tokenService。
import {Component} from '@angular/core';
import {StringTokenValue} from './string-token-value';

@Component({
  selector: 'app-child',
  template: `
    自定义的一个子组件
  `,
  styleUrls: ['./child.component.less'],
  providers: [
    {provide: 'tokenService', useClass: StringTokenValue}
  ]
})

   @ViewChild('tokenService') tokenService: StringTokenValue;

	export class ChildComponent {

	}
2.创建内嵌视图(ViewContainerRef)
把 ng-template的内容认为是嵌入视图。
template在页面上默认不显示,通过创建视图显示出来
2.1. 要显示的位置和内容是自身模板
//html

    默认我是不会显示的
//ts
export class HomeComponent implements OnInit, AfterViewInit {

  @ViewChild('domTemplate') tpl: TemplateRef;
  @ViewChild('domTemplate', { read: ViewContainerRef })
  tplVcRef: ViewContainerRef;

  constructor(
    private elementRef: ElementRef,
  ) { }

  ngAfterViewInit(): void {
    //创建内嵌视图
    this.tplVcRef.createEmbeddedView(this.tpl);

  }
效果:最后页面上会显示模板的内容----“默认我是不会显示的”;
(忘记截图…)
2.2 指定插入位置
//html


    元素title
    元素内容元素内容元素内容
export class AppComponent implements AfterViewInit {

  @ViewChild('temContainer', { read: ViewContainerRef })
  temContainer: ViewContainerRef

  @ViewChild('temElement') temElement: TemplateRef;

  ngAfterViewInit(): void {

    //创建内嵌视图,以下任意一种方法都可以
    // this.temContainer.insert(this.temElement.createEmbeddedView(null))
    this.temContainer.createEmbeddedView(this.temElement)

  }

}
三、@ViewChildren
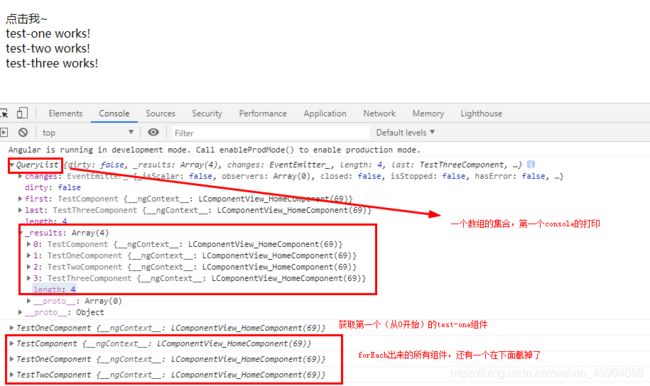
ViewChildren 装饰器是用来从模板视图中获取匹配的多个元素,返回的结果是一个 QueryList 集合。
(获得一个视图集合,它是一个类数组的形式)
1.匹配多个子组件并访问
1.1 在父组件html中调用子组件
//html
1.2.父组件通过ViewChildren装饰器获取一个组件列表,并赋值给一个变量
//ts
  @ViewChildren('aaa') fromList: QueryList;
  //获取所有的 Child组件
   @ViewChildren(ChildComponent) componentChildList: QueryList;
1.3.父组件通过变量访问子组件的方法
ngAfterViewInit(): void {

    //所有组件对象数组的集合
    console.log(this.fromList)

    //获取某个对象(QueryList原型中的toArray())
     console.log(this.fromList.toArray()[1] as any)

    //forEach()
     if (this.fromList != null && this.fromList.length !== 0) {
       this.fromList.forEach(elementRef => console.log(elementRef));
     }
  }
总结:
1.第一是通过fromList.forEach()方法,第二是先调用QueryList原型中的toArray()方法,接着再用数组的方式进行处理
2.监听视图变化
(未验证此处只是做参考记录)
假设我们有一个由多个my-child组成列表,它可以添加或移除my-child组件,我们希望在my-child集合被改动时都做出回应,此时Observable就派上用场了,QueryList为我们提供了一个changes的Observable
我们只需要订阅它就可以完成这个需求了:
this.mychild.changes.subscribe((data)=>{
      // do something
    })
四、相关概念
-
在 Angular 中,我们可以通过 ViewChild 装饰器来获取视图中定义的模板元素,然后利用 ViewContainerRef对象的 createEmbeddedView() /insert()方法,创建内嵌视图。
-
ViewContainerRef对象的insert方法需要一个ViewRef类型的视图
-
viewContainerRef实例.createEmbeddedView(TemplateRef实例);viewContainerRef实例(ViewRef实例)
-
read 参数这种如果不想获取子组件的实例,只想访问Dom元素,可以添加read参数
如果没有设置 {read: ‘’} 查询条件,默认获取的就是 TemplateRef 对象 -
ViewContainerRef: 视图容器,用于创建和管理内嵌视图或组件视图。可添加一个或多个基于TemplateRef实例创建内嵌视图,指定内嵌视图的插入位置。
-
ElementRef 顾名思义是元素参阅。就是获取视图层的dom元素,借助Augular提供的依赖注入机制,轻松的访问到dom元素。
关于ElementRef的知识在官网和书中介绍的太少,部分术语定义在各个博客中总结(摘抄)过来的…感谢各位。
五、相关链接
创建内嵌视图
相关概念引用等
viewchilden1
viewchilden2

