Springboot总结
SpringBoot基础
Springboot是所有基于Spring开发项目的起点,Springboot的设计是为了让你尽可能快的跑起来Spring应用程序并且尽可能减少你的配置文件。
spring的缺点:
- 配置繁琐
- 依赖管理是一件耗时的配置
springboot解决spring的缺点。
约定优于配置
约定大于配置,是一种软件设置范式。本质上就是说,你的系统,框架,类库应该假定合理的默认值,而非要求提供不必要的配置。就是要遵守约定开发。
起步依赖(依赖管理)
假设我们要导入SSM框架。我们通过spring可能要导入几十个jar包,而且还要关注对应的版本。通过springboot的话,我们只需要引用ssm-starter的依赖就好。ssm-starter包含了ssm项目所需要的的所有jar包。
解决spring中配置管理耗时的问题。
自动配置
springboot的自动配置,会在启动的时候自动将一些配置类bean注册到IOC容器 ,我们可以需要的地方使用@Autowired或者@Resource注解使用它就好。
自动 的表现形式就是我们只需要引用我们想用功能的包,但是相关的配置我们完全不用管,springboot会自动动注入这些配置bean,我们直接使用bean即可。
解决spring中配置繁琐的问题。
源码分析
自动配置原理
我们再spring项目是通过用在applicaiton.xml配置文件中对依赖的bean进行配置。那么springoboot通过起步依赖starter帮我们注入功能所需要的依赖jar包,对于其中bean的配置,则是通过基于java代码的bean配置。
@SpringBootApplication注解
SpringBootApplication是一个组合注解。里面有几个核心注解
@SpringBootConfiguration,@EnableAutoConfiguration,@ComponentScan。
@SpringBootConfiguration
@SpringBootConfiguration其实就是注解@Configuration。也就是说被@SpringBootApplication注解标注的类,本身就相当于一个配置类。
@EnableAutoConfiguration
从名字上看,是一个模块装配。自动装配配置类。
这个注解也是个组合注解。核心有两个@AutoConfiguraionPackage,@Import。
@AutoConfiguraionPackage:
@Target(ElementType.TYPE)
@Retention(RetentionPolicy.RUNTIME)
@Documented
@Inherited
@Import(AutoConfigurationPackages.Registrar.class)
public @interface AutoConfigurationPackage {
点进去可以看到,这个注解其实就是一个Import注解。向IOC容器中注入AutoConfigurationPackages.Registrar。
从下面源码可以看出。Registrar 是一个内部类,实现了ImportBeanDefinitionRegistrar接口,也就是说通要注入一个beanDefiniton到IOC中。这个注解就是将主被配置(@SpringBootConfiguration标注的类)的所在包及下面所有子包里面的所有组件扫描到Spring容器中。
/**
 * {@link ImportBeanDefinitionRegistrar} to store the base package from the importing
 * configuration.
 */
static class Registrar implements ImportBeanDefinitionRegistrar, DeterminableImports {

	@Override
	public void registerBeanDefinitions(AnnotationMetadata metadata, BeanDefinitionRegistry registry) {
		register(registry, new PackageImports(metadata).getPackageNames().toArray(new String[0]));
	}

	@Override
	public Set<Object> determineImports(AnnotationMetadata metadata) {
		return Collections.singleton(new PackageImports(metadata));
	}

}
@EnableAutoConfiguration中的@Import注解
@Target(ElementType.TYPE)
@Retention(RetentionPolicy.RUNTIME)
@Documented
@Inherited
@AutoConfigurationPackage
@Import(AutoConfigurationImportSelector.class)
public @interface EnableAutoConfiguration {
从源码中可以看到,Import注解,导入的是AutoConfigurationImportSelector类。进入这个类可以发现,它其实是ImportSelector的实现类。通过重写selectorImports向IOC容器中注入相关组件的全类名数组。这些数组哪里来的呢?

我们可以看到方法中有个方法:getAutoConfigurationEntry()。继续跟下去,我们可以返现这个调用链:getAutoConfigurationEntry() -> getCandidateConfigurations() -> loadFactoryNames()。
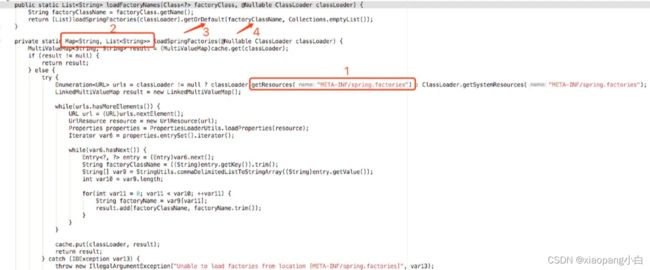
loadFactoryNames方法调用过程:
- 从当前配置项目的类路径中获取所有META-INF/spring.factories这个文件下的信息。
- 将上面获取到的信息封装到一个Map返回。
- 从返回的Map中通过刚才传入的EnableAutoConfiguraion.class参数,获取改key下的所有的值。
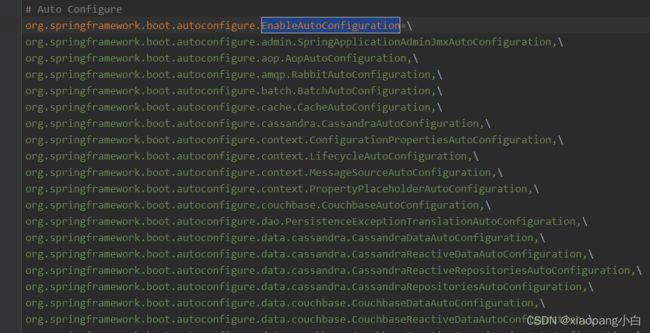
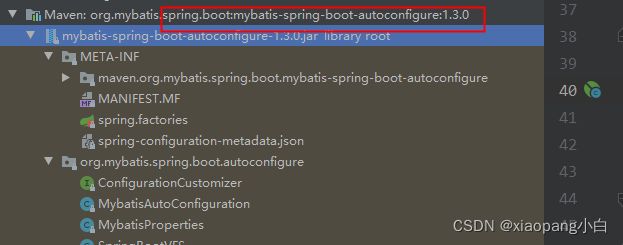
这个里面的内容就是组件对应的@Configuration配置类。当然,很多第三方依赖中都会有这个文件,一般没导入一个第三方的依赖,除了本身的jar包以外,还会有一个xxx-spring-boot-autoConfigure,这个就是第三方依赖自己编写的自动配置类。比如:mybatis-spring-boot-starter。它就有一个mybatis-spring-boot-autoconfigure如下:

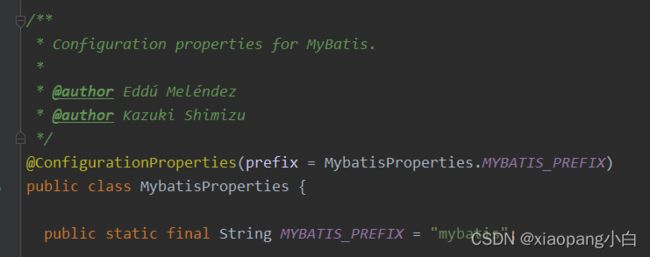
我们可以发现。配置类中基本有这几类注解:
@Condition相关注解,满足指定条件才会装配这个配置类。
@EnableConfigurationProperties,这个注解的作用是使用@ConfigurationProperties注解生效。如果一个配置类只配置了@ConfigurationProperties注解,而没有使用@Component注解,那么在IOC容器中是获取不到properties配置文件转换的bean。@EnableConfiguraionProperties就是将使用@ConfigurationProperties注解的类进行一次注入。
spring.factories里面的配置spring-boot所有默认支持的待自动装配候选类。
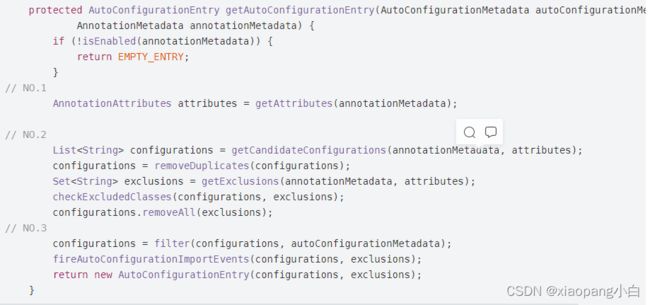
NO.1:获得 @EnableAutoConfiguration注解标签上所有的属性值
NO.2:从spring.factories文件里获得 EnableAutoConfiguration key对应的所有自动装配引导类,并去掉一些重复的(因为有可能用户自定义引入了一些重复的类)
排除需要排除的类,具体操作是通过@SpringBootApplication 注解中的 exclude、excludeName、环境属性中的 spring.autoconfigure.exclude配置
NO.3:根据 spring-autoconfigure-metadata.properties 中配置的规则过虑掉一部分引导类 。
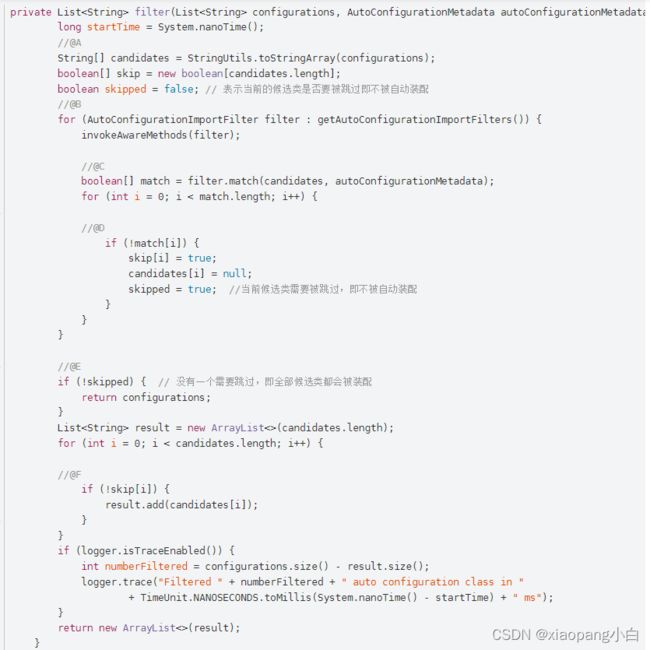
过滤的源码如下:
-
将所有的待处理类(spring.factories里key为org.springframework.boot.autoconfigure.EnableAutoConfiguraiton的配置)从list转换为数组。
-
getAutoConfigurationImportFilters()从spring.factories中获取key为org.springframework.boot.autoconfigure.AutoConfigurImportFIlter的配置类,获取的类都是实现了AutoConfigurationImportFilter接口。
有:OnWebApplicationCondition,OnBeanCondition,OnClassCondition三个类。 -
分别调用三个类的match方法返回boolean[]数组。
调用父类的方法org.springframework.boot.autoconfigure.condition.FilteringSpringBootCondition#match这个方法主要调用子类的 ConditionOutcome[] getOutcomes(String[] autoConfigurationClasses,AutoConfigurationMetadata autoConfigurationMetadata)方法返回一个ConditionOutcome数组,代表每一个候选自动装配类是否应该被忽略。 -
数组中元素为true表示改org.springframework.boot.autoconfigure.EnableAutoConfiguration类合法,为false则表示不合法,需要标记为跳过。
-
如果其中有一个菲利特热处理结果为"所有类不应该跳过"则直接返回候选类全集。
-
组装返回值,不需要跳过的候选键才加入返回值中。
如果想要依赖spring-boot自动配置扩展点动能,我们只需要做以下两部。
(1)新建spring-factories文件在自己的工程下,其结构为:
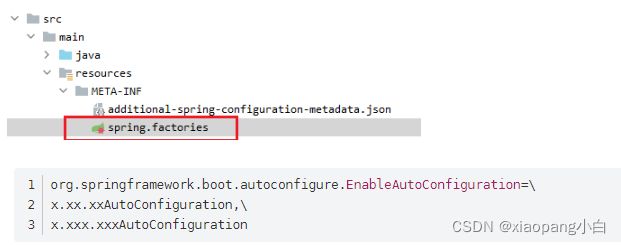
(2) 然后xxAutoConfiguration 这个类里就可以配合@Condition相关注解注入我们的配置类了。

@ComponentScan
@ComponetScan用于Configuration类的组件扫描。可以basePackageClasses或者basePackages来定义要扫描的特定包。如果没有定义特定包,将从声明该类注解的类的包开始扫描。
@ComponentScan与@EnableAutoConfiguration的相似点。都可以将带@Component,@Service等注解的对象注入到IOC容器。它们的不同点为。@EnableAutoConfiguration是被注解标注的类所在包以及自子包进行扫描。@ComponentScan可以指定扫描路径。
run启动流程
项目的启动入口为;
@SpringBootApplication
public class DemoApplication {

    public static void main(String[] args) {
        SpringApplication.run(DemoApplication.class, args);
    }

}
springboot项目,我们再@SpringBootApplication注解标注类中的main方法中,通过SpringApplicaiton.run方法来启动Spring boot项目。
进入run方法:
/**
 * Static helper that can be used to run a {@link SpringApplication} from the
 * specified source using default settings.
 * @param primarySource the primary source to load
 * @param args the application arguments (usually passed from a Java main method)
 * @return the running {@link ApplicationContext}
 */
public static ConfigurableApplicationContext run(Class<?> primarySource, String... args) {
	return run(new Class<?>[] { primarySource }, args);
}
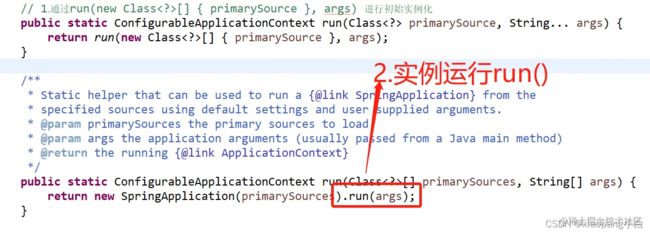
第一个参数primarySource,加载的主要资源类。第二个参数args,传递给应用的应用参数。先用主要资源类来实例化springApplication对象,再调用这个对象的run方法。
SpringApplicaiton 的实例化过程
进入run方法:
/**
 * Static helper that can be used to run a {@link SpringApplication} from the
 * specified sources using default settings and user supplied arguments.
 * @param primarySources the primary sources to load
 * @param args the application arguments (usually passed from a Java main method)
 * @return the running {@link ApplicationContext}
 */
public static ConfigurableApplicationContext run(Class<?>[] primarySources, String[] args) {
	return new SpringApplication(primarySources).run(args);
}
可以看到通过new SpringApplication实例化SpringApplicaiton对象。接着看SpringApplication的实例化过程:
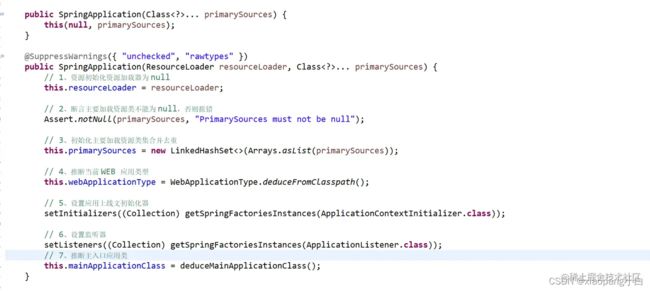
- 资源初始化资源加载器为null
this.resourceLoader = resourceLoader;
- 断言主要
加载资源类不能为null,否则报错
Assert.notNull(primarySources, "PrimarySources must not be null");
- 初始化主要加载资源类集合并去重
this.primarySources = new LinkedHashSet<>(Arrays.asList(primarySources));
- 判断当前WEB应用类型。
this.webApplicationType = WebApplicationType.deduceFromClasspath();
- 设置应用上下文初始化器
在这里插入代码片
setInitializers((Collection) getSpringFactoriesInstances(ApplicationContextInitializer.class));
进入ApplicationContextInitializer:
public interface ApplicationContextInitializer<C extends ConfigurableApplicationContext> {

	/**
	 * Initialize the given application context.
	 * @param applicationContext the application to configure
	 */
	void initialize(C applicationContext);

}
再来看下 setInitializers 方法源码,其实就是初始化一个 ApplicationContextInitializer 应用上下文初始化器实例的集合。
public void setInitializers(Collection<? extends ApplicationContextInitializer<?>> initializers) {
	this.initializers = new ArrayList<>();
	this.initializers.addAll(initializers);
}
最后我们来看一下核心方法getSpringFactoriesInstances 其源码如下:
private <T> Collection<T> getSpringFactoriesInstances(Class<T> type, Class<?>[] parameterTypes, Object... args) {
	ClassLoader classLoader = Thread.currentThread().getContextClassLoader();
	// Use names and ensure unique to protect against duplicates
	Set<String> names = new LinkedHashSet<>(SpringFactoriesLoader.loadFactoryNames(type, classLoader));
	List<T> instances = createSpringFactoriesInstances(type, parameterTypes, classLoader, args, names);
	AnnotationAwareOrderComparator.sort(instances);
	return instances;
}
(1)获取当前线程上下文类加载器
ClassLoader classLoader = Thread.currentThread().getContextClassLoader();
(2)获取 ApplicationContextInitializer 的实例名称集合并去重
Set<String> names = new LinkedHashSet<>(SpringFactoriesLoader.loadFactoryNames(type, classLoader));

public static List<String> loadFactoryNames(Class<?> factoryClass, @Nullable ClassLoader classLoader) {
		String factoryClassName = factoryClass.getName();
		return loadSpringFactories(classLoader).getOrDefault(factoryClassName, Collections.emptyList());
	}

	public static final String FACTORIES_RESOURCE_LOCATION = "META-INF/spring.factories";

	private static Map<String, List<String>> loadSpringFactories(@Nullable ClassLoader classLoader) {
		MultiValueMap<String, String> result = cache.get(classLoader);
		if (result != null) {
			return result;
		}

		try {
			Enumeration<URL> urls = (classLoader != null ?
					classLoader.getResources(FACTORIES_RESOURCE_LOCATION) :
					ClassLoader.getSystemResources(FACTORIES_RESOURCE_LOCATION));
			result = new LinkedMultiValueMap<>();
			while (urls.hasMoreElements()) {
				URL url = urls.nextElement();
				UrlResource resource = new UrlResource(url);
				Properties properties = PropertiesLoaderUtils.loadProperties(resource);
				for (Map.Entry<?, ?> entry : properties.entrySet()) {
					String factoryClassName = ((String) entry.getKey()).trim();
					for (String factoryName : StringUtils.commaDelimitedListToStringArray((String) entry.getValue())) {
						result.add(factoryClassName, factoryName.trim());
					}
				}
			}
			cache.put(classLoader, result);
			return result;
		}
		catch (IOException ex) {
			throw new IllegalArgumentException("Unable to load factories from location [" +
					FACTORIES_RESOURCE_LOCATION + "]", ex);
		}
	}
总的来说就是通过加载spring.factories文件中org.springframwork.context.ApplicationContextInitializer接口的所有配置的类路径名称。
# Initializers
org.springframework.context.ApplicationContextInitializer=\
org.springframework.boot.autoconfigure.SharedMetadataReaderFactoryContextInitializer,\
org.springframework.boot.autoconfigure.logging.ConditionEvaluationReportLoggingListener

# Application Listeners
org.springframework.context.ApplicationListener=\
org.springframework.boot.autoconfigure.BackgroundPreinitializer

# Auto Configuration Import Listeners
org.springframework.boot.autoconfigure.AutoConfigurationImportListener=\
org.springframework.boot.autoconfigure.condition.ConditionEvaluationReportAutoConfigurationImportListener

# Auto Configuration Import Filters
org.springframework.boot.autoconfigure.AutoConfigurationImportFilter=\
org.springframework.boot.autoconfigure.condition.OnClassCondition

# Auto Configure
......
(3)根据以上类路径创建初始化容器实例列表
List<T> instances = createSpringFactoriesInstances(type, parameterTypes, classLoader, args, names);
(4)初始化器实例列表排序
AnnotationAwareOrderComparator.sort(instances);
(5)返回实例化对象
return instances;
(6)设置监听器
setListeners((Collection) getSpringFactoriesInstances(ApplicationListener.class));
(7)判断主入口应用类
private Class<?> deduceMainApplicationClass() {
		try {
			StackTraceElement[] stackTrace = new RuntimeException().getStackTrace();
			for (StackTraceElement stackTraceElement : stackTrace) {
				if ("main".equals(stackTraceElement.getMethodName())) {
					return Class.forName(stackTraceElement.getClassName());
				}
			}
		}
		catch (ClassNotFoundException ex) {
			// Swallow and continue
		}
		return null;
	}
通过构造一个运行时异常,再遍历异常栈中的方法名,获取方法名为 main 的栈帧,从而得到入口类的名字再返回该类。
SpringApplication的run方法
public ConfigurableApplicationContext run(String... args) {
		// 1、创建并启动计时监控类
		StopWatch stopWatch = new StopWatch();
		stopWatch.start();

		// 2、初始化应用上下文和异常报告集合
		ConfigurableApplicationContext context = null;
		Collection<SpringBootExceptionReporter> exceptionReporters = new ArrayList<>();

		// 3、设置系统属性 `java.awt.headless` 的值,默认值为:true
		configureHeadlessProperty();

		// 4、创建所有 Spring 运行监听器并发布应用启动事件
		SpringApplicationRunListeners listeners = getRunListeners(args);
		listeners.starting();
		try {

			// 5、初始化默认应用参数类
			ApplicationArguments applicationArguments = new DefaultApplicationArguments(args);

			// 6、根据运行监听器和应用参数来准备 Spring 环境
			ConfigurableEnvironment environment = prepareEnvironment(listeners, applicationArguments);
			configureIgnoreBeanInfo(environment);

			// 7、创建 Banner 打印类
			Banner printedBanner = printBanner(environment);

			// 8、创建应用上下文
			context = createApplicationContext();

			// 9、准备异常报告器
			exceptionReporters = getSpringFactoriesInstances(SpringBootExceptionReporter.class,
					new Class[] { ConfigurableApplicationContext.class }, context);

			// 10、准备应用上下文
			prepareContext(context, environment, listeners, applicationArguments, printedBanner);

			// 11、刷新应用上下文
			refreshContext(context);

			// 12、应用上下文刷新后置处理
			afterRefresh(context, applicationArguments);

			 // 13、停止计时监控类
			stopWatch.stop();

			// 14、输出日志记录执行主类名、时间信息
			if (this.logStartupInfo) {
				new StartupInfoLogger(this.mainApplicationClass).logStarted(getApplicationLog(), stopWatch);
			}

			// 15、发布应用上下文启动完成事件
			listeners.started(context);

			// 16、执行所有 Runner 运行器
			callRunners(context, applicationArguments);
		}
		catch (Throwable ex) {
			handleRunFailure(context, ex, exceptionReporters, listeners);
			throw new IllegalStateException(ex);
		}

		try {

			// 17、发布应用上下文就绪事件
			listeners.running(context);
		}
		catch (Throwable ex) {
			handleRunFailure(context, ex, exceptionReporters, null);
			throw new IllegalStateException(ex);
		}
		// 18、返回应用上下文
		return context;
	}
- 创建并启动计时监控器
StopWatch stopWatch = new StopWatch();
	stopWatch.start();
首先记录了当前任务的名称,默认为空字符串,然后记录当前 Spring Boot 应用启动的开始时间。
- 初始化应用上下文和异常报告集合
ConfigurableApplicationContext context = null;
Collection<SpringBootExceptionReporter> exceptionReporters = new ArrayList<>();
- 设置系统属性java.awt.healess的值
configureHeadlessProperty();
- 创建所有 Spring 运行监听器并发布应用启动事件
SpringApplicationRunListeners listeners = getRunListeners(args);
listeners.starting();
创建spring运行监听器的相关源码:
	private SpringApplicationRunListeners getRunListeners(String[] args) {
		Class<?>[] types = new Class<?>[] { SpringApplication.class, String[].class };
		return new SpringApplicationRunListeners(logger,
				getSpringFactoriesInstances(SpringApplicationRunListener.class, types, this, args));
	}
SpringApplicationRunListeners {
        ......
		SpringApplicationRunListeners(Log log, Collection<? extends SpringApplicationRunListener> listeners) {
		this.log = log;
		this.listeners = new ArrayList<>(listeners);
	}
        ......
}
SpringApplicationRunListener所有监听器配置在 spring-boot-2.0.4.RELEASE.jar!/META-INF/spring.factories 这个配置文件里面:
# Run Listeners
org.springframework.boot.SpringApplicationRunListener=\
org.springframework.boot.context.event.EventPublishingRunListener
- 初始化默认应用参数类
ApplicationArguments applicationArguments = new DefaultApplicationArguments(args);
- 根据运行监听器和应用参数来准备 Spring 环境
ConfigurableEnvironment environment = prepareEnvironment(listeners, applicationArguments);
configureIgnoreBeanInfo(environment);
看下准备环境的 prepareEnvironment 源码:
private ConfigurableEnvironment prepareEnvironment(SpringApplicationRunListeners listeners,
		ApplicationArguments applicationArguments) {
	// 1.Create the environment
	ConfigurableEnvironment environment = getOrCreateEnvironment();
	// 2.Configure the environment
	configureEnvironment(environment, applicationArguments.getSourceArgs());
	listeners.environmentPrepared(environment);
	bindToSpringApplication(environment);
	if (!this.isCustomEnvironment) {
		environment = new EnvironmentConverter(getClassLoader()).convertEnvironmentIfNecessary(environment,
				deduceEnvironmentClass());
	}
	ConfigurationPropertySources.attach(environment);
	return environment;
}
- 创建 Banner 打印类
Banner printedBanner = printBanner(environment);
- 创建应用上下文
context = createApplicationContext();
- 准备异常报告器
exceptionReporters = getSpringFactoriesInstances(SpringBootExceptionReporter.class,
new Class[] { ConfigurableApplicationContext.class }, context);
该异常报告处理类配置在 spring-boot-2.0.4.RELEASE.jar!/META-INF/spring.factories 这个配置文件里面。
# Error Reporters
org.springframework.boot.SpringBootExceptionReporter=\
org.springframework.boot.diagnostics.FailureAnalyzers
- 准备应用上下文
prepareContext(context, environment, listeners, applicationArguments, printedBanner);
接下来进入prepareContext方法:
private void prepareContext(ConfigurableApplicationContext context, ConfigurableEnvironment environment,
		SpringApplicationRunListeners listeners, ApplicationArguments applicationArguments, Banner printedBanner) {
	context.setEnvironment(environment);
	// 配置上下文的 bean 生成器及资源加载器
	postProcessApplicationContext(context);
	// 为上下文应用所有初始化器
	applyInitializers(context);
	// 触发所有 SpringApplicationRunListener 监听器的 contextPrepared 事件方法
	listeners.contextPrepared(context);
	// 记录日志
	if (this.logStartupInfo) {
		logStartupInfo(context.getParent() == null);
		logStartupProfileInfo(context);
	}

	// Add boot specific singleton beans 启动两个特殊的单例bean
	context.getBeanFactory().registerSingleton("springApplicationArguments", applicationArguments);
	if (printedBanner != null) {
		context.getBeanFactory().registerSingleton("springBootBanner", printedBanner);
	}

	// Load the sources 加载所有资源
	Set<Object> sources = getAllSources();
	Assert.notEmpty(sources, "Sources must not be empty");
	load(context, sources.toArray(new Object[0]));
	// 触发所有 SpringApplicationRunListener 监听器的 contextLoaded 事件方法
	listeners.contextLoaded(context);
}
- 刷新应用上下文
refreshContext(context);
- 应用上下文刷新后,自定义处理
afterRefresh(context, applicationArguments);
protected void afterRefresh(ConfigurableApplicationContext context, ApplicationArguments args) {
}
- 停止计时监控类
stopWatch.stop();
- 输出日志记录执行主类名、时间信息
if (this.logStartupInfo) {
	new StartupInfoLogger(this.mainApplicationClass).logStarted(getApplicationLog(), stopWatch);
}
- 发布应用上下文启动完成事件
listeners.started(context);
- 执行所有 Runner 运行器
callRunners(context, applicationArguments);
- 发布应用上下文就绪事件
listeners.running(context);
- 返回应用上下文
return context;
run流程
- 从spring.factories配置文件中加载EventPublishingRunListener对象,该对象拥有SimpleApplicationEventMulticaster属性,即在SpringBoot启动过程的不同阶段用来发射内置的生命周期事件;
- 准备环境变量,包括系统变量,环境变量,命令行参数,默认变量,servlet相关配置变量,随机值以及配置文件(比如application.properties)等;
- 控制台打印SpringBoot的bannner标志;
- 根据不同类型环境创建不同类型的applicationcontext容器,因为这里是servlet环境,所以创建的是AnnotationConfigServletWebServerApplicationContext容器对象;
- 从spring.factories配置文件中加载FailureAnalyzers对象,用来报告SpringBoot启动过程中的异常;
- 为刚创建的容器对象做一些初始化工作,准备一些容器属性值等,对ApplicationContext应用一些相关的后置处理和调用各个ApplicationContextInitializer的初始化方法来执行一些初始化逻辑等;
- 刷新容器,这一步至关重要。比如调用bean factory的后置处理器,注册BeanPostProcessor后置处理器,初始化事件广播器且广播事件,初始化剩下的单例bean和SpringBoot创建内嵌的Tomcat服务器等等重要且复杂的逻辑都在这里实现,主要步骤可见代码的注释,关于这里的逻辑会在以后的spring源码分析专题详细分析;
- 执行刷新容器后的后置处理逻辑,注意这里为空方法;
- 调用ApplicationRunner和CommandLineRunner的run方法,我们实现这两个接口可以在spring容器启动后需要的一些东西比如加载一些业务数据等;
- 报告启动异常,即若启动过程中抛出异常,此时用FailureAnalyzers来报告异常;
- 最终返回容器对象,这里调用方法没有声明对象来接收。
当然在SpringBoot启动过程中,每个不同的启动阶段会分别发射不同的内置生命周期事件,比如在准备environment前会发射ApplicationStartingEvent事件,在environment准备好后会发射ApplicationEnvironmentPreparedEvent事件,在刷新容器前会发射ApplicationPreparedEvent事件等,总之SpringBoot总共内置了7个生命周期事件,除了标志SpringBoot的不同启动阶段外,同时一些监听器也会监听相应的生命周期事件从而执行一些启动初始化逻辑。
资源文件加载
主要研究分析,springboot中对于资源文件的加载。
核心代码开始位置:
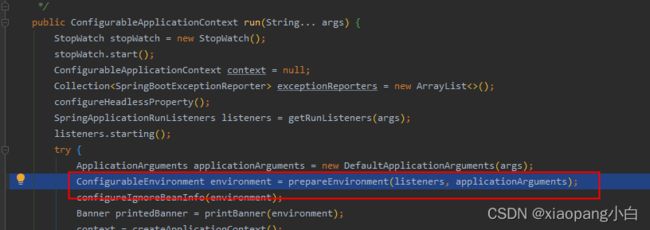
prepareEnvironment方法,根据webApplicationType构建不同的Environment对象。web应用对应的是StandardServletEnvironment对象。
StandardServletEnvironment对象初始化的时候,它的父类AbstractEnvironment的无参构造函数会执行方法:customizePropertySources(this.propertySources);加载定制化propertySource。在StandardServletEnvironment中落地实现,增加name为systemProperties,systemEnvironment,servletConfigInitParams,servletContextInitParams,jndiProperties的propertySource。
配置Environment,根据main函数的请求参数,构建SimpleCommandLinePropertySource。添加到Environment中。
增加ConfigurationPropertySourcesPropertySource,添加到Environment中。
以上都是构建一些propertySource添加到Environment中。资源的加载是有listeners.environmentPrepared((ConfigurableEnvironment)environment);触发。
SpringApplicationRunListener#environmentPrepared
当environment对象创建后,发布ApplicationEnvironmentPreparedEvent事件。
资源的监听类。重点看ConfigFileApplicationListener。
ConfigFileApplicationListener#onApplicationEnvironmentPreparedEvent。
方法进行事件处理。首先通过spring的spi机制,加载spring.factories文件中key为EnvironmentPostProcessor.class的所有实现类。按照order接口顺序排序。执行对应的postProcessorEnvironment方法。每个实现类业务逻辑都是往environment中校验添加对应的propertySource对象。
ConfigFileApplicationListener类本身也实现了EnvironmentPostProcessor接口。它里面有一个load执行步骤。new Loader(environment, resourceLoader).load();排序后的接口如下:
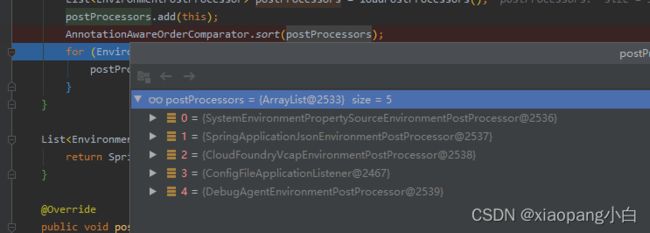
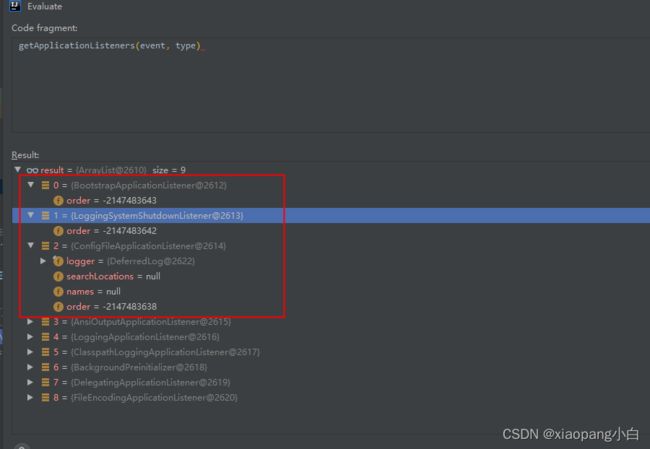
只有springboot,不引入springcloud。environmentPrepared发布事件,监听器的顺序为:
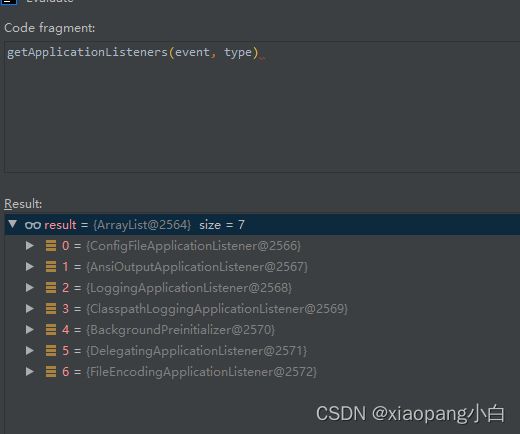
引入springcloud后。environmentPrepared发布事件,监听器的顺序为。可以发现多了这几个监听器。BootstrapApplicationListener,LoggingSystemShutdownListener。
void load() {
          // DEFAULT_PROPERTIES: defaultProperties
          // LOAD_FILTERED_PROPERTY: spring.profiles.active,spring.profiles.include
			FilteredPropertySource.apply(this.environment, DEFAULT_PROPERTIES, LOAD_FILTERED_PROPERTY,
					(defaultProperties) -> {
						this.profiles = new LinkedList<>();
						this.processedProfiles = new LinkedList<>();
						this.activatedProfiles = false;
						this.loaded = new LinkedHashMap<>();
						// 初始化profiles的信息。如果为null,默认为default。这也就是springboot会默认加载applicaiton-default.xx文件的原因。
						initializeProfiles();
						while (!this.profiles.isEmpty()) {
							Profile profile = this.profiles.poll();
							if (isDefaultProfile(profile)) {
								addProfileToEnvironment(profile.getName());
							}
							// 开始加载配置文件信息。方法详情看下面。
							load(profile, this::getPositiveProfileFilter,
									addToLoaded(MutablePropertySources::addLast, false));
							this.processedProfiles.add(profile);
						}
						load(null, this::getNegativeProfileFilter, addToLoaded(MutablePropertySources::addFirst, true));
						addLoadedPropertySources();
						applyActiveProfiles(defaultProperties);
					});
		}

// FilteredPropertySource#apply
static void apply(ConfigurableEnvironment environment, String propertySourceName, Set filteredProperties,
			Consumer> operation) {
		MutablePropertySources propertySources = environment.getPropertySources();
		PropertySource original = propertySources.get(propertySourceName);
		if (original == null) {
			operation.accept(null);
			return;
		}
		propertySources.replace(propertySourceName, new FilteredPropertySource(original, filteredProperties));
		try {
			operation.accept(original);
		}
		finally {
			propertySources.replace(propertySourceName, original);
		}
	}
接下来看看load方法。
private void load(Profile profile, DocumentFilterFactory filterFactory, DocumentConsumer consumer) {
           // getSearchLocations方法返回的内容见下面分析。
			getSearchLocations().forEach((location) -> {
				boolean isDirectory = location.endsWith("/");
				Set names = isDirectory ? getSearchNames() : NO_SEARCH_NAMES;
				names.forEach((name) -> load(location, name, profile, filterFactory, consumer));
			});
		}

		private void load(String location, String name, Profile profile, DocumentFilterFactory filterFactory,
				DocumentConsumer consumer) {
			if (!StringUtils.hasText(name)) {
				for (PropertySourceLoader loader : this.propertySourceLoaders) {
					if (canLoadFileExtension(loader, location)) {
						load(loader, location, profile, filterFactory.getDocumentFilter(profile), consumer);
						return;
					}
				}
				throw new IllegalStateException("File extension of config file location '" + location
						+ "' is not known to any PropertySourceLoader. If the location is meant to reference "
						+ "a directory, it must end in '/'");
			}
			Set processed = new HashSet<>();
			for (PropertySourceLoader loader : this.propertySourceLoaders) {
				for (String fileExtension : loader.getFileExtensions()) {
					if (processed.add(fileExtension)) {
						loadForFileExtension(loader, location + name, "." + fileExtension, profile, filterFactory,
								consumer);
					}
				}
			}
		}
getSearchLocations方法打断点可以看到返回的内容。
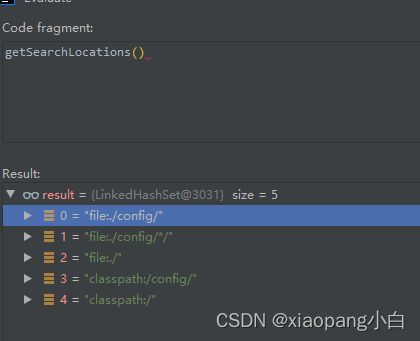
然后遍历每一个location,调用PropertySourceLoader进行资源加载。
PropertySourceLoader也是通过spi机制,在spring.factories中获取key为:PropertySourceLoader.class的实现了。

接着回到资源文件加载的流程。遍历每一个目录,然后通过getSearchNames()方法获取查找的文件名称(spring.config.name)。debug第一次进来发现获取到的name是bootstrap。然后根据目录 + name + 后缀名(每一种PropertySourceLoader都有对应的处理类型)获取到对应的资源对象Resource。继续执行,第二次进来的时候获取到的name是application,后面的流程一样。
针对两次获取的name不一样。是因为我项目是springboot,还引用了springcloud。springcloud里面增加了一个environmentPrepare的监听器:BootstrapApplicationListener。设置了属性spring.config.name为bootstrap。
private Set getSearchNames() {
           // CONFIG_NAME_PROPERTY: spring.config.name。debug进来可以发现获取到的name是bootstrap。
			if (this.environment.containsProperty(CONFIG_NAME_PROPERTY)) {
				String property = this.environment.getProperty(CONFIG_NAME_PROPERTY);
				Set names = asResolvedSet(property, null);
				names.forEach(this::assertValidConfigName);
				return names;
			}
			return asResolvedSet(ConfigFileApplicationListener.this.names, DEFAULT_NAMES);
		}

因为我本地配置了applicaiton.properties,application.yml。这两个配置文件都会加载。
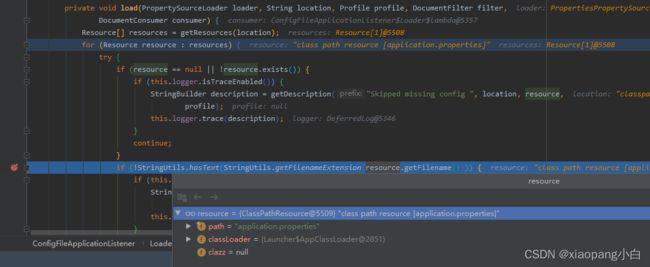
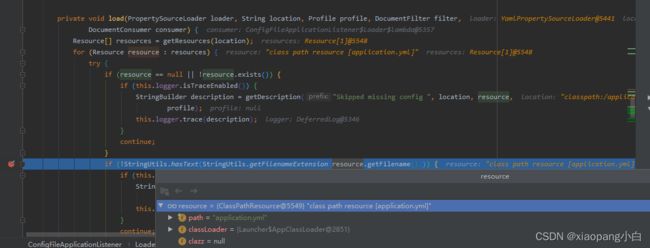
后面会调用consumer.accept(profile, document)。consumer代码如下。document就是我们解析出来的对象。
private DocumentConsumer addToLoaded(BiConsumer> addMethod,
				boolean checkForExisting) {
			return (profile, document) -> {
				if (checkForExisting) {
					for (MutablePropertySources merged : this.loaded.values()) {
						if (merged.contains(document.getPropertySource().getName())) {
							return;
						}
					}
				}
				MutablePropertySources merged = this.loaded.computeIfAbsent(profile,
						(k) -> new MutablePropertySources());
				addMethod.accept(merged, document.getPropertySource());
			};
		}
