6. Redis - 发布博客、博客点赞、好友关注、关注推送、关注查收
文章目录
- Redis - 达人探店与好友关注
- 一、达人探店
-
- 1.1 发布探店笔记
-
- 1.1.1 上传照片
- 1.1.2 blog实体类
- 1.1.3 发布探店图文
- 1.1.4 查看探店笔记
- 1.2 点赞
-
- 1.2.1 点赞相关功能
- 1.2.2 点赞排行榜
-
- 1.2.2.1 改造点赞业务
- 1.2.2.2 改造查询业务
- 1.2.2.3 点赞排行榜
- 1.2.2.4 修改bug
- 1.2.2.5 切换账号测试
- 二、好友关注
-
- 2.1 关注和取关
- 2.2 共同关注
-
- 2.2.1 补充两个接口
- 2.2.2 共同关注
- 2.3 关注推送
-
- 2.3.1 基本介绍
- 2.3.2 基于推模式实现关注推送功能
-
- 2.3.2.1 需求与结构分析
- 2.3.2.2 推送代码分析
- 2.4 关注查收
-
- 2.4.1 滚动分析查询收件箱的思路
- 2.4.2 实现滚动分页查询
Redis - 达人探店与好友关注
一、达人探店
探店笔记类似点评网站的评价,往往是图文结合。
对应的表有两个:
-
tb_blog:
探店笔记表,包含笔记中的标题。文字、图片等
-
tb_blog_comments:
其他用户对探店笔记的评价
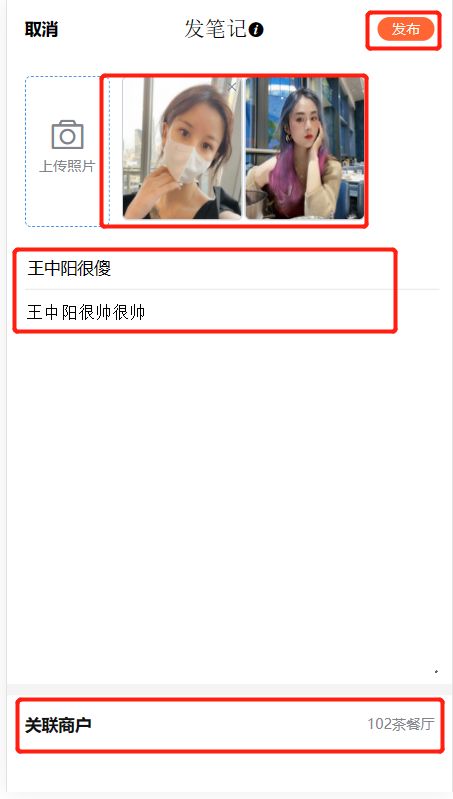
1.1 发布探店笔记
注意!发布照片和发布博客同属于一个功能 - 发布探店笔记功能
但是,他不属于一个接口,上传照片一个接口,发布博客一个接口

1.1.1 上传照片
照片发布应该发布在服务器,而不是本地,我们项目关注Redis,这个地方能够实现即可。
我们把照片放在了Nginx服务器
public static final String IMAGE_UPLOAD_DIR = "E:\\Note\\Note\\Redis\\nginx-1.18.0\\html\\hmdp\\imgs\\";
@Slf4j
@RestController
@RequestMapping("upload")
public class UploadController {

    @PostMapping("blog")
    public Result uploadImage(@RequestParam("file") MultipartFile image) {
        try {
            // 获取原始文件名称
            String originalFilename = image.getOriginalFilename();
            // 生成新文件名
            String fileName = createNewFileName(originalFilename);
            // 保存文件
            image.transferTo(new File(SystemConstants.IMAGE_UPLOAD_DIR, fileName));
            // 返回结果
            log.debug("文件上传成功,{}", fileName);
            return Result.ok(fileName);
        } catch (IOException e) {
            throw new RuntimeException("文件上传失败", e);
        }
    }

    @GetMapping("/blog/delete")
    public Result deleteBlogImg(@RequestParam("name") String filename) {
        File file = new File(SystemConstants.IMAGE_UPLOAD_DIR, filename);
        if (file.isDirectory()) {
            return Result.fail("错误的文件名称");
        }
        FileUtil.del(file);
        return Result.ok();
    }

    private String createNewFileName(String originalFilename) {
        // 获取后缀
        String suffix = StrUtil.subAfter(originalFilename, ".", true);
        // 生成目录
        String name = UUID.randomUUID().toString();
        int hash = name.hashCode();
        int d1 = hash & 0xF;
        int d2 = (hash >> 4) & 0xF;
        // 判断目录是否存在
        File dir = new File(SystemConstants.IMAGE_UPLOAD_DIR, StrUtil.format("/blogs/{}/{}", d1, d2));
        if (!dir.exists()) {
            dir.mkdirs();
        }
        // 生成文件名
        return StrUtil.format("/blogs/{}/{}/{}.{}", d1, d2, name, suffix);
    }
}
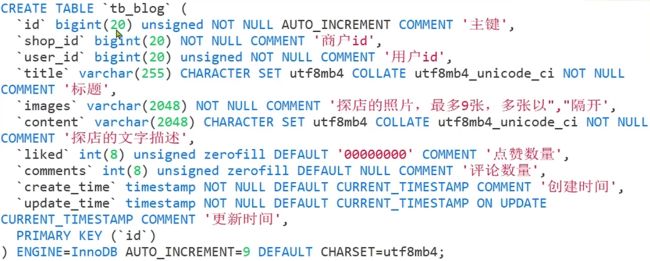
1.1.2 blog实体类
在此实体类中也封装了用户信息
这个地方采取了一个简化的方法,并没有直接封装一个User对象,而是将User对象中的某些重要属性放在了下面这个类中
@Data
@EqualsAndHashCode(callSuper = false)
@Accessors(chain = true)
@TableName("tb_blog")
public class Blog implements Serializable {
    private static final long serialVersionUID = 1L;
    /**
     * 主键
     */
    @TableId(value = "id", type = IdType.AUTO)
    private Long id;
    /**
     * 商户id
     */
    private Long shopId;
    /**
     * 用户id
     */
    private Long userId;
    /**
     * 用户图标
     */
    @TableField(exist = false)
    private String icon;
    /**
     * 用户姓名
     */
    @TableField(exist = false)
    private String name;
    /**
     * 是否点赞过了
     */
    @TableField(exist = false)
    private Boolean isLike;
    /**
     * 标题
     */
    private String title;
    /**
     * 探店的照片,最多9张,多张以","隔开
     */
    private String images;
    /**
     * 探店的文字描述
     */
    private String content;
    /**
     * 点赞数量
     */
    private Integer liked;
    /**
     * 评论数量
     */
    private Integer comments;
    /**
     * 创建时间
     */
    private LocalDateTime createTime;
    /**
     * 更新时间
     */
    private LocalDateTime updateTime;


}
1.1.3 发布探店图文
@RestController
@RequestMapping("/blog")
public class BlogController {

    @Resource
    private IBlogService blogService;
    @Resource
    private IUserService userService;
//  保存博客
    @PostMapping
    public Result saveBlog(@RequestBody Blog blog) {
        // 获取登录用户
//       UserDTO user = UserHolder.getUser();
        UserDTO user = UserHolder.getUser();
        blog.setUserId(user.getId());
        // 保存探店博文
        blogService.save(blog);
        // 返回id
        return Result.ok(blog.getId());
    }
}
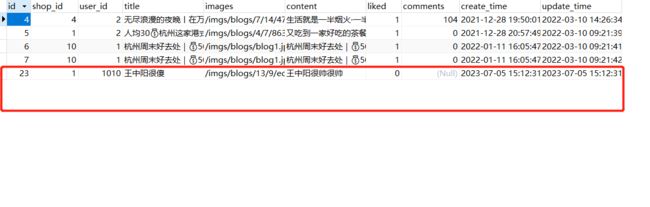
发布成功后跳转到主界面

数据库内容
1.1.4 查看探店笔记
案例:点击首页的探店笔记,会进入详情页面,
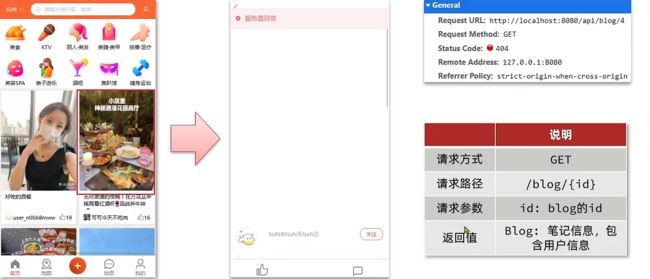
Controller层
@GetMapping("/{id}")
public Result queryBlogById(@PathVariable("id") Long id){
    return blogService.queryBlogById(id);
}
Service层
    @Override
    public Result queryBlogById(Long id) {
//      TODO 1.查询blog
        Blog blog = getById(id);
        if (blog == null){
            return Result.fail("博客不存在");
        }
//      TODO 2.查询blog有关的用户
        Long userId = blog.getUserId();
        User user = userService.getById(userId);

        blog.setName(user.getNickName());
        blog.setIcon(user.getIcon());

        return Result.ok(blog);
    }
效果图

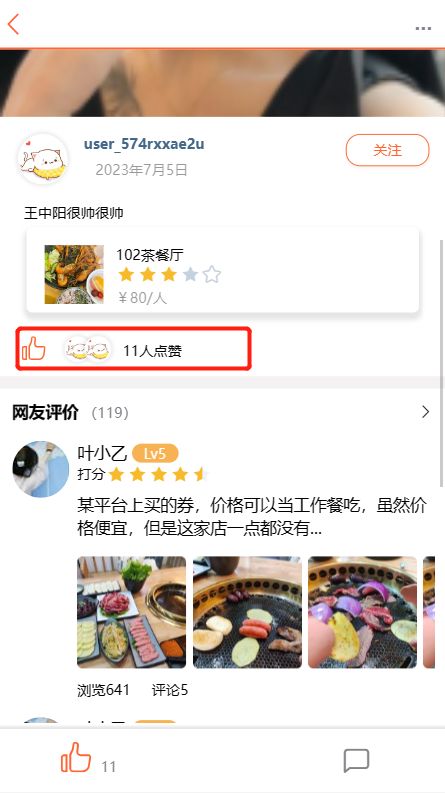
1.2 点赞
1.2.1 点赞相关功能
下图中框起来的地方

需求:
- 同一个用户只能点赞一次,再次点击则取消点赞
- 如果当前用户已经点赞,则点赞按钮高亮显示(前端实现,判断字段Blog类的isLike属性)
实现步骤
①给Blog类中添加一个isLike字段,表示是否被当前用户点赞
实现方案非常的多,除此之外还有在数据库中建一个表,存在blog的id和用户的id,每当用户点赞一次,这张表就记录了一次。但是用数据库实现太笨重,数据库的性能不是很好,除此之外点赞的请求比较多,多数据库的压力很大
我们可以采用Redis,以笔记的id为key,记录一下当前这个笔记被谁点赞过,我们可以采用Set数据结构Redis命令——通用命令、String类型、Key层级结构、Hash类型、List类型、Set类型、SortedSet类型_redis指令查看层级结构
②修改点赞功能,利用Redis的set集合判断是否点赞过,未点赞过则点赞数+1,已点赞则点赞数-1
③修改根据id查询Blog的业务,判断当前登录用户是否点赞过,赋值给isLike字段
点赞Controller层代码
//  点赞功能
    @PutMapping("/like/{id}")
    public Result likeBlog(@PathVariable("id") Long id) {
        return blogService.likeBlog(id);
    }
点赞Service层
    @Override
    public Result likeBlog(Long id) {
//      TODO 1.获取登录用户
        Long userId = UserHolder.getUser().getId();
//      TODO 2.判断当前登录用户是否已经点赞
//      首先判断一下是否是他的成员,key是笔记id,value是用户id
        String key = "blog:liked:" + id;
        Boolean isMember = stringRedisTemplate.opsForSet().isMember(key, userId.toString());

//      TODO 3.如果未点赞,可以点赞
        if (BooleanUtil.isFalse(isMember)) {
//          TODO 3.1 数据库点赞+1
            boolean isSuccess = update().setSql("liked = liked+1").eq("id", id).update();
//          TODO 3.2 保存用户到Redis的set集合
            if (isSuccess){
                stringRedisTemplate.opsForSet().add(key,userId.toString());
            }
        }else {
//          TODO 4.如果已经点赞,取消点赞
//          TODO 4.1 数据库点赞数-1
            boolean isSuccess = update().setSql("liked = liked-1").eq("id", id).update();
//          TODO 4.2 把用户从Redis的set集合移除
            if (isSuccess){
//              移除Redis中集合的哪个元素
                stringRedisTemplate.opsForSet().remove(key,userId.toString());
            }
        }
        return Result.ok();
    }
但是现在还没有完!!
如果这个博客我们已经点赞,则“点赞”标识高亮显示
两个查询的Controller接口
@GetMapping("/hot")
public Result queryHotBlog(@RequestParam(value = "current", defaultValue = "1") Integer current) {
    return  blogService.queryHotBlog(current);
}

@GetMapping("/{id}")
public Result queryBlogById(@PathVariable("id") Long id){
    return blogService.queryBlogById(id);
}
两个查询的Service
 @Service
public class BlogServiceImpl extends ServiceImpl<BlogMapper, Blog> implements IBlogService {
    @Resource
    private IUserService userService;
    @Resource
    private StringRedisTemplate stringRedisTemplate;

    @Override
    public Result queryHotBlog(Integer current) {
        // 根据用户查询
        Page<Blog> page = query()
                .orderByDesc("liked")
                .page(new Page<>(current, SystemConstants.MAX_PAGE_SIZE));
        // 获取当前页数据
        List<Blog> records = page.getRecords();
        // 查询用户
        records.forEach(blog -> {
            Long userId = blog.getUserId();
            User user = userService.getById(userId);
            blog.setName(user.getNickName());
            blog.setIcon(user.getIcon());
//          判断是否被点过赞
            String key = "blog:liked:" + userId;
            Boolean isMember = stringRedisTemplate.opsForSet().isMember(key, UserHolder.getUser().getId().toString());
            blog.setIsLike(BooleanUtil.isTrue(isMember));
        });
        return Result.ok(records);
    }

    @Override
    public Result queryBlogById(Long id) {
//      1.查询blog
        Blog blog = getById(id);
        if (blog == null) {
            return Result.fail("博客不存在");
        }
//      2.查询blog有关的用户
        Long userId = blog.getUserId();
        User user = userService.getById(userId);

        blog.setName(user.getNickName());
        blog.setIcon(user.getIcon());
//      TODO 查询Blog是否被点赞了
        String key = "blog:liked:" + id;
        Boolean isMember = stringRedisTemplate.opsForSet().isMember(key, UserHolder.getUser().getId().toString());
        blog.setIsLike(BooleanUtil.isTrue(isMember));
        return Result.ok(blog);
    }

    @Override
    public Result likeBlog(Long id) {
//      TODO 1.获取登录用户
        Long userId = UserHolder.getUser().getId();
//      TODO 2.判断当前登录用户是否已经点赞
//      首先判断一下是否是他的成员,key是笔记id,value是用户id
        String key = "blog:liked:" + id;
        Boolean isMember = stringRedisTemplate.opsForSet().isMember(key, userId.toString());

//      TODO 3.如果未点赞,可以点赞
        if (BooleanUtil.isFalse(isMember)) {
//          TODO 3.1 数据库点赞+1
            boolean isSuccess = update().setSql("liked = liked+1").eq("id", id).update();
//          TODO 3.2 保存用户到Redis的set集合
            if (isSuccess){
                stringRedisTemplate.opsForSet().add(key,userId.toString());
            }
        }else {
//          TODO 4.如果已经点赞,取消点赞
//          TODO 4.1 数据库点赞数-1
            boolean isSuccess = update().setSql("liked = liked-1").eq("id", id).update();
//          TODO 4.2 把用户从Redis的set集合移除
            if (isSuccess){
//              移除Redis中集合的哪个元素
                stringRedisTemplate.opsForSet().remove(key,userId.toString());
            }
        }
        return Result.ok();
    }
}
效果图

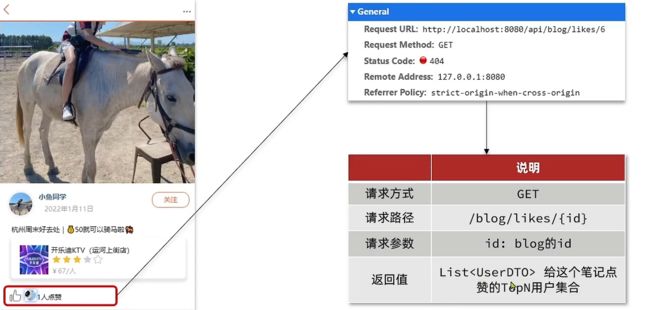
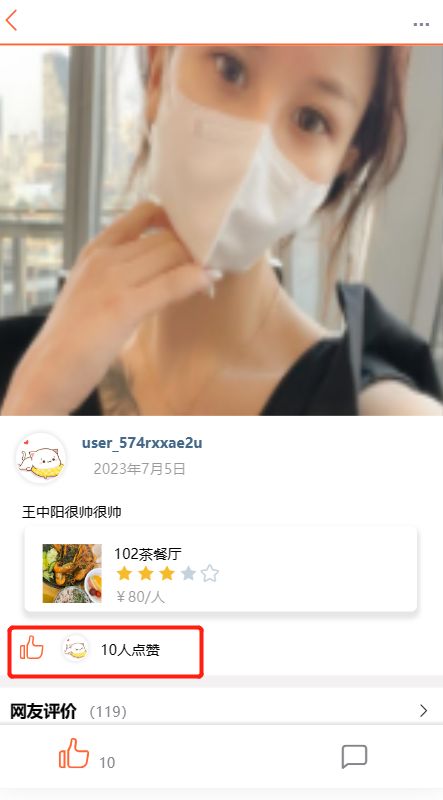
1.2.2 点赞排行榜
在探店笔记详情页面,应该把给该笔记点赞的人显示出来,比如最早点赞的TOP5,形成点赞排行榜:
怎么选取前五名?Set集合能做到么?
按照最早点赞选取前五名,但是Set集合做不到排序,我们之前选择Set集合是因为他有唯一性
我们整理一下我们的需求:能存储多个元素、保证元素唯一、能够排序
所以选择SortedSet
Redis命令——通用命令、String类型、Key层级结构、Hash类型、List类型、Set类型、SortedSet类型_redis指令查看层级结构
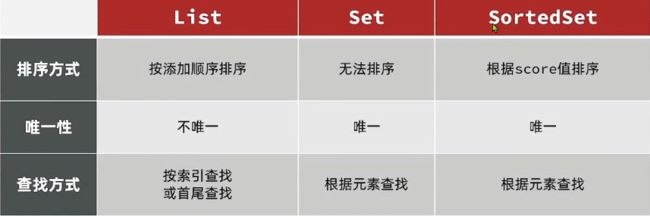
我们在使用set结构,判断值存不存在某一个值 的时候使用命令
SISMEMBER key menber但是在SortedSet没有这个命令
我们只能借助SortedSet的其他命令来弥补
如下所示:获取SortedSet中的指定元素的score值
如果元素存在,自然会返回一个值,如果元素不存在返回的就是空
ZSCORE key member
怎么获取指定范围内的元素呢?
按照score排序后,获取指定排名范围内的元素
ZRANGE key min max

1.2.2.1 改造点赞业务
    @Override
    public Result likeBlog(Long id) {
//      1.获取登录用户
        Long userId = UserHolder.getUser().getId();
//      2.判断当前登录用户是否已经点赞
//      首先判断一下是否是他的成员,key是笔记id,value是用户id
        String key = "blog:liked:" + id;
//      TODO 使用SortedSet判断是否存在
//      Boolean isMember = stringRedisTemplate.opsForSet().isMember(key, userId.toString());
        Double score = stringRedisTemplate.opsForZSet().score(key, userId.toString());

//      TODO 3.如果未点赞,可以点赞,使用SortedSet的score进行判断
        if (score==null) {

//          3.1 数据库点赞+1
            boolean isSuccess = update().setSql("liked = liked+1").eq("id", id).update();
//          3.2 保存用户到Redis的set集合
            if (isSuccess){
//              TODO 改为SortedSet,分数score使用时间戳就行
//              TODO 保存用户到Redis的SortedSet集合 zadd key value score
                stringRedisTemplate.opsForZSet().add(key,userId.toString(),System.currentTimeMillis());
            }
        }else {
//          4.如果已经点赞,取消点赞
//          4.1 数据库点赞数-1
            boolean isSuccess = update().setSql("liked = liked-1").eq("id", id).update();
//          4.2 把用户从Redis的set集合移除
            if (isSuccess){
//               TODO 改为SortedSet,其他不变
                stringRedisTemplate.opsForZSet().remove(key,userId.toString());
            }
        }
        return Result.ok();
    }
1.2.2.2 改造查询业务
一个是根据id查询,一个是分页查询,都需要改造一下
测试的时候把之前的键从redis中删除掉
 @Override
    public Result queryHotBlog(Integer current) {
        // 根据用户查询
        Page<Blog> page = query()
                .orderByDesc("liked")
                .page(new Page<>(current, SystemConstants.MAX_PAGE_SIZE));
        // 获取当前页数据
        List<Blog> records = page.getRecords();
        // 查询用户
        records.forEach(blog -> {
            Long userId = blog.getUserId();
            User user = userService.getById(userId);
            blog.setName(user.getNickName());
            blog.setIcon(user.getIcon());
//          判断是否被点过赞
            String key = "blog:liked:" + userId;
//          TODO 改造为SortedSet
            Double score = stringRedisTemplate.opsForZSet().score(key, UserHolder.getUser().getId().toString());
//          TODO score有值的话,下面就是true
            blog.setIsLike(score != null);
        });
        return Result.ok(records);
    }

    @Override
    public Result queryBlogById(Long id) {
//      1.查询blog
        Blog blog = getById(id);
        if (blog == null) {
            return Result.fail("博客不存在");
        }
//      2.查询blog有关的用户
        Long userId = blog.getUserId();
        User user = userService.getById(userId);

        blog.setName(user.getNickName());
        blog.setIcon(user.getIcon());
//      查询Blog是否被点赞了
        String key = "blog:liked:" + id;
//      TODO 改造为SortedSet
        Double score = stringRedisTemplate.opsForZSet().score(key, UserHolder.getUser().getId().toString());
//      TODO score有值的话,下面就是true
        blog.setIsLike(score != null);
        return Result.ok(blog);
    }
Redis中的内容

1.2.2.3 点赞排行榜
Controller层
//  查询点赞博客的Top5
    @GetMapping("/likes/{id}")
    public Result queryBlogLikes(@PathVariable("id") Long id){
        return blogService.queryBlogLikes(id);
    }
Service层
    //  查询点赞Top5
    @Override
    public Result queryBlogLikes(Long id) {
        String key = "blog:liked:" + id;
//      TODO 1.查询top5的点赞用户 zrang key 0 4
        Set<String> top5Id = stringRedisTemplate.opsForZSet().range(key, 0, 4);
        if (top5Id == null ||top5Id.isEmpty() ){
            return Result.ok(Collections.emptyList());
        }
//      TODO 2.解析出其中的用户id
        List<Long> idList = top5Id.stream().map(Long::valueOf).collect(Collectors.toList());
//      TODO 3.根据用户id查询用户
        List<User> usersList = userService.listByIds(idList);
        List<UserDTO> userDTOList = new ArrayList<>();
        for (User user : usersList) {
                userDTOList.add(BeanUtil.copyProperties(user,UserDTO.class));
        }
//      TODO 4.返回
        return Result.ok(userDTOList);
    }
1.2.2.4 修改bug
- bug1
发现一个事情,如果用户没用登录访问商品页面的时候会有空指针异常
就是下面这个找不到当前用户,导致空指针,我们每次使用之间加一个指针判断即可
Long userId = UserHolder.getUser().getId();
如下所示
UserDTO userDTO = UserHolder.getUser();
if (userDTO == null){
    return ;
}
完整代码
    @Override
    public Result queryHotBlog(Integer current) {

        // 根据用户查询
        Page<Blog> page = query()
                .orderByDesc("liked")
                .page(new Page<>(current, SystemConstants.MAX_PAGE_SIZE));
        // 获取当前页数据
        List<Blog> records = page.getRecords();
        // 查询用户
        records.forEach(blog -> {
            Long userId = blog.getUserId();
            User user = userService.getById(userId);
            blog.setName(user.getNickName());
            blog.setIcon(user.getIcon());
//          判断是否被点过赞
            String key = "blog:liked:" + userId;
//          改造为SortedSet
//          TODO bug改造
            UserDTO userDTO = UserHolder.getUser();
//          未登录,直接返回
            if (userDTO==null){
                return;
            }
            Double score = stringRedisTemplate.opsForZSet().score(key, userDTO.getId().toString());
//          score有值的话,下面就是true
            blog.setIsLike(score != null);
        });
        return Result.ok(records);
    }

    @Override
    public Result queryBlogById(Long id) {
//      1.查询blog
        Blog blog = getById(id);
        if (blog == null) {
            return Result.fail("博客不存在");
        }
//      2.查询blog有关的用户
        Long userId = blog.getUserId();
        User user = userService.getById(userId);

        blog.setName(user.getNickName());
        blog.setIcon(user.getIcon());
//      查询Blog是否被点赞了
        String key = "blog:liked:" + id;
//      改造为SortedSet
//      TODO 解决bug
        UserDTO userDTO = UserHolder.getUser();

        if ( userDTO != null){
            Double score = stringRedisTemplate.opsForZSet().score(key, userDTO.getId().toString());
            blog.setIsLike(score != null);
            return Result.ok(blog);
        }
//      运行到这里的话,说明UserDTO是null,那肯定不用去redis查询是否点赞,因为没有登录,怎么可能点赞,直接给false
        blog.setIsLike( false);
        return Result.ok(blog);
    }
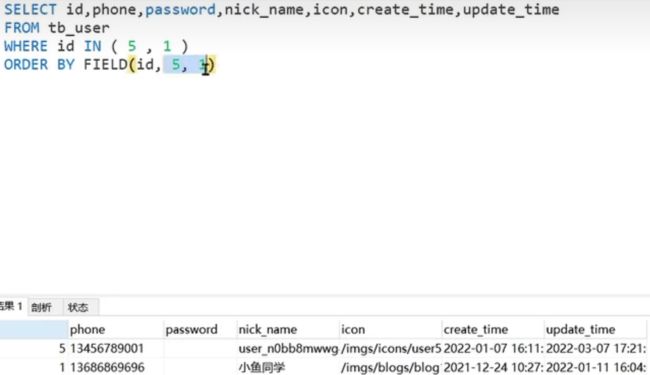
- bug2
我们Redis的SortedSet是按照顺序的,如下所示,先点赞的在前面,后点赞的在后面
但是实际情况不一定是这样的,如下是java查询的代码
List<User> usersList = userService.listByIds(idList);
原因是执行SQL的时候,使用了关键字in,使用其的时候查询的结果不会按照id的顺序
select .....
from tb_user
where id IN (list集合中的东西)
怎么保证用in的时候按照我们给的id顺序出结果?
我们可以再使用order by FIELD关键字,直接告诉他按照哪个字段的什么循序
如下是根据id字段的值的5,1顺序出结果
select .....
from tb_user
where id IN (5,1)
order by FIELD(id,5,1)
业务代码
 //  查询点赞Top5
    @Override
    public Result queryBlogLikes(Long id) {
        String key = "blog:liked:" + id;
//      1.查询top5的点赞用户 zrang key 0 4
        Set<String> top5Id = stringRedisTemplate.opsForZSet().range(key, 0, 4);
        if (top5Id == null ||top5Id.isEmpty() ){
            return Result.ok(Collections.emptyList());
        }
//      2.解析出其中的用户id
        List<Long> idList = top5Id.stream().map(Long::valueOf).collect(Collectors.toList());
//      3.根据用户id查询用户
//      TODO 要有顺序 where id IN (5,1) order by FIELD(id,5,1)
//      将List变成字符串,用“,”拼接
        String idStr = StrUtil.join(",", idList);
//      List usersList = userService.listByIds(idList);
//      query().in("id",idList)相当于 id IN (5,1)
        List<User> usersList = userService.query().in("id",idList)
//              last()表示在原有的sql后面进行拼接
                .last("order by FIELD(id,"+idStr+")").list();
        List<UserDTO> userDTOList = new ArrayList<>();
        for (User user : usersList) {
                userDTOList.add(BeanUtil.copyProperties(user,UserDTO.class));
        }
//      4.返回
        return Result.ok(userDTOList);
    }
1.2.2.5 切换账号测试
二、好友关注
接口1:关注与取消关注
接口2:是否关注此用户,若已关注,则显示"已关注"
相关数据库

为了方便,我们可以将主键设置为自增
如果实现关注的话,就把用户id和关联用户id一一对应起来,取消关注则是把这条信息删除即可
还有一种方案就是不删除,在数据库增加一个boolean字段,来标记是关注还是取关,这种其实不太好的,用户取消关注后还占用着大量的空间
对应实体类
@Data
@EqualsAndHashCode(callSuper = false)
@Accessors(chain = true)
@TableName("tb_follow")
public class Follow implements Serializable {

    private static final long serialVersionUID = 1L;

    /**
     * 主键
     */
    @TableId(value = "id", type = IdType.AUTO)
    private Long id;

    /**
     * 用户id
     */
    private Long userId;

    /**
     * 关联的用户id
     */
    private Long followUserId;

    /**
     * 创建时间
     */
    private LocalDateTime createTime;
}
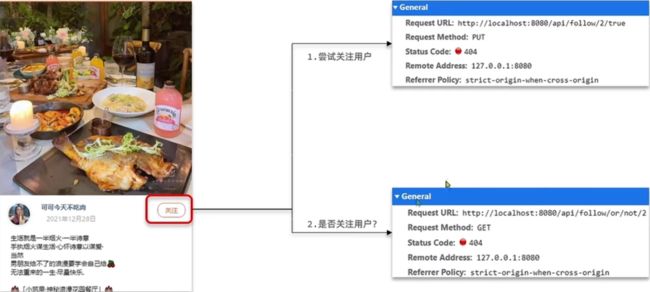
2.1 关注和取关
Controller层代码
@RestController
@RequestMapping("/follow")
public class FollowController {

    @Resource
    private IFollowService followService;

    //关注或者取关功能
    @PutMapping("/{id}/{isFollow}")
    public Result follow(@PathVariable("id") Long followUserId, @PathVariable("isFollow") Boolean isFollow) {
          return followService.follow(followUserId,isFollow);
    }

    //查看关注还是没有关注
    @GetMapping("/or/not/{id}")
    public Result isFollow(@PathVariable("id") Long followUserId) {
        return followService.isFollow(followUserId);
    }
}
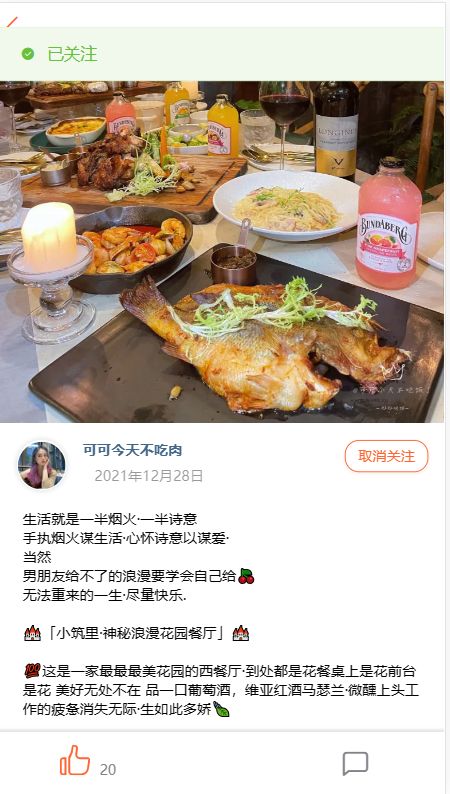
关注功能演示
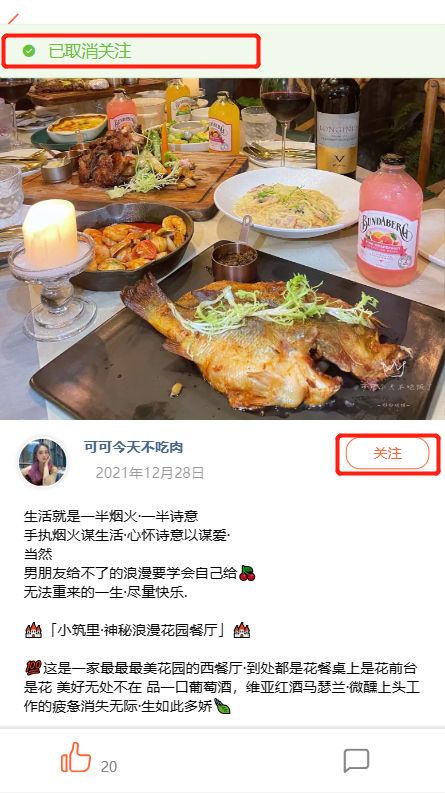
取消关注功能演示
2.2 共同关注
2.2.1 补充两个接口
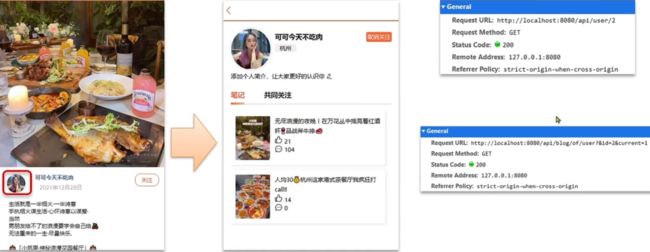
接口1:查询当前主页用户的信息
// UserController 根据id查询用户
@GetMapping("/{id}")
public Result queryUserById(@PathVariable("id") Long userId){
	// 查询详情
	User user = userService.getById(userId);
	if (user == null) {
		return Result.ok();
	}
	UserDTO userDTO = BeanUtil.copyProperties(user, UserDTO.class);
	// 返回
	return Result.ok(userDTO);
}
接口2:分页查询处此用户的笔记
// BlogController
@GetMapping("/of/user")
public Result queryBlogByUserId(
		@RequestParam(value = "current", defaultValue = "1") Integer current,
		@RequestParam("id") Long id) {
	// 根据用户查询
	Page<Blog> page = blogService.query()
			.eq("user_id", id).page(new Page<>(current, SystemConstants.MAX_PAGE_SIZE));
	// 获取当前页数据
	List<Blog> records = page.getRecords();
	return Result.ok(records);
}
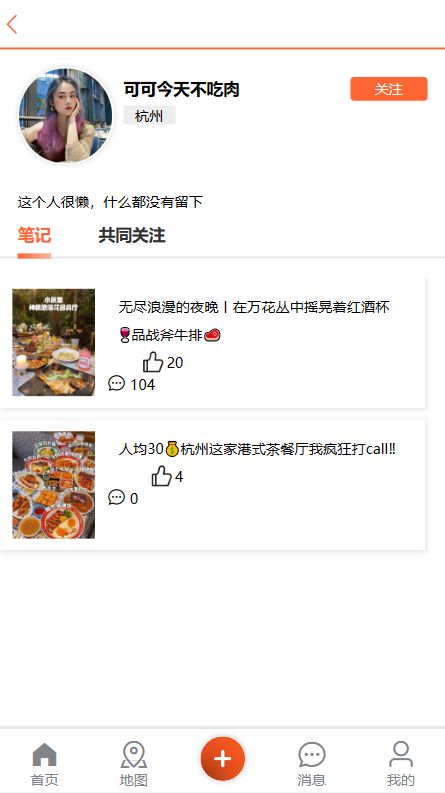
最终效果图
2.2.2 共同关注
需求:利用Redis中恰当的数据结构,实现共同关注功能。
在博客个人页面展示出当前用户与博主共同关注的好友
我们之前的Set集合,有交集功能
Redis命令——通用命令、String类型、Key层级结构、Hash类型、List类型、Set类型、SortedSet类型_redis多个层级命令查询

如果我们借助Redis的Set结构的话,那Redis中需要有内容,所以我们首先改造一个关注/取消关注接口,将关注的对象除了放在MySQL外,也要放在Redis中
//  关注和取消关注
    @Override
    public Result follow(Long followUserId, Boolean isFollow) {
//      1.获取登录用户
        Long userId = UserHolder.getUser().getId();
        String key = "follows:"+userId;
//      2.判断关注还是取关
        if (isFollow) {
//          2.1 关注,新增数据
            Follow follow = new Follow();
            follow.setUserId(userId);
            follow.setFollowUserId(followUserId);
//          TODO 操作数据库之后也要操作Redis,将关注列表放入到Redis
            boolean isSuccess = save(follow);
            if (isSuccess){
//              把关注用户的id,让如redis的set集合 sadd userId followerUserId
                stringRedisTemplate.opsForSet().add(key,followUserId.toString());
            }
        } else {
//          2.2取关,删除 delete from tb_follow where userId=? and follow_user_id=?
            boolean isSuccess = remove(new QueryWrapper<Follow>()
                    .eq("user_id", userId)
                    .eq("follow_user_id", followUserId)
            );
//          TODO 取关的时候也从Redis中移除
            if (isSuccess){
//              把关注用户的id,让如redis的set集合 sadd userId followerUserId
                stringRedisTemplate.opsForSet().remove(key,followUserId.toString());
            }
        }
//      3.返回结果
        return Result.ok();
    }
下面正式实现共同关注的接口
Controller层
//查看共同关注
@GetMapping("/common/{id}")
public Result followCommons(@PathVariable("id") Long id) {
    return followService.followCommons(id);
}
Service层
    //  查看共同关注
    @Override
    public Result followCommons(Long id) {
//      TODO 1.获取当前用户
        Long userId = UserHolder.getUser().getId();
        String thisUserKey = "follows:" + userId;
        String targetUserKey = "follows:" + id;
//      TODO 2.求交集
        Set<String> intersect = stringRedisTemplate.opsForSet().intersect(thisUserKey, targetUserKey);
        if (intersect == null || intersect.isEmpty()) {
            return Result.ok(Collections.emptyList());
        }
//      TODO 3.解析出ID
        List<Long> longList = intersect.stream().map(Long::valueOf).collect(Collectors.toList());
//      TODO 4.查询用户并转换成DTO
        List<UserDTO> userDTOList = userService.listByIds(longList)
                .stream()
                .map(user -> BeanUtil.copyProperties(user, UserDTO.class))
                .collect(Collectors.toList());
//      TODO 5.返回结果
        return Result.ok(userDTOList);
    }
效果图

2.3 关注推送
2.3.1 基本介绍
关注推送也叫做Feed流,直译为投喂。
为用户持续的提供“沉浸式”的体验,通过无限下拉刷新获取新的信息
这个功能大家都很熟悉,看完一个视频,一刷,又出来一个。
而且会看哪个停留时间长,来分析我们使用什么样的,下次再推送同类型的
传统的模式是用户找内容,而现在的Feed模式是根据用户喜欢的内容为用户进行推送
Feed流产品有两种常见模式:
-
Timeline
不做内容筛选,简单的按照内容发布时间顺序,常用于好友或关注。例如朋友圈。
-
优点
信息全面,不会有确实。并且实现也相对简单
-
缺点
信息噪音较多,用户不一定感兴趣,内容获取效率较低
-
-
智能排序
利用智能算法屏蔽掉违规的、用户不感兴趣的内容。推送用户感兴趣的信息来吸引用户
-
优点
投喂用户感兴趣信息,用户粘度很高,容易沉迷
-
缺点
如果算法不精准,可能起到反作用
-
我们下面做的功能是关注推送,如下所示
所以我们选择第一种Timeline即可
Timeline模式有三种方案
-
拉模式
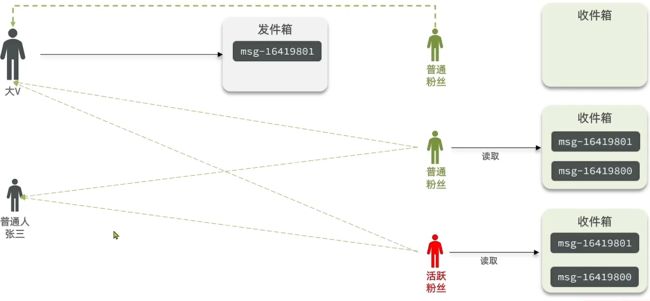
也叫做读扩散。
假设有三个用户,将来会发布一些自己的笔记,我们把发的东西统一称为消息,为每一个人准备一个发件箱,将来发消息的时候就会发到发件箱里面去。
发的除了消息以外,还要带一个时间戳,timeline核心就是按时间排序
此时赵六有一个收件箱,此收件箱平时是空的,只有在他要去读消息的时候,我们才会去给他拉取
我们可以看一下赵六关注的有谁,然后将对应的人的发件箱中的消息一个一个的拉取到他的收件箱里去,拉过来后按照一个时间的排序
-
优点
节省内存空间,收件箱读完之后就不用了,就可以清理掉了,下次使用的时候重新拉。消息只保存了一份,就是发件人的发件箱里
-
缺点
延迟性比较高,每一次读取发件箱的消息都需要重新拉取、排序,这一系列的动作比较久,读取的延迟会比较高

-
-
推模式
也叫做,写扩散。会弥补刚刚模式的缺点
两个up主张三和李四。up主没有了发件箱,所以发送的消息直接发往了所有粉丝的收件箱里去。消息写了好几份,有几个粉丝,就写了多少份。然后对粉丝的收件箱里做一个排序。
粉丝想要读的时候,直接拿到了完整的消息
-
缺点
内存占用比较高,一个消息要写n份
-
优点
延迟低
-

-
推拉结合模式
也叫做读写混合,兼具推和拉两种模式的优点。
对于普通人发布的时候,直接发布到粉丝的收件箱里面
对于大V,我们可以将其粉丝分成两部分,一个是普通粉丝,一个是活跃粉丝。活跃粉丝的数量不多,我们可以利用推模式。而普通粉丝数量较多,我们可以采用拉模式
既节省了内存,又照顾了一些活跃用户的感受
Timeline模式三种方案总结

2.3.2 基于推模式实现关注推送功能
2.3.2.1 需求与结构分析
推模式没有发件箱,只有收件箱。
每当用户发消息的时候,直接推送到所有粉丝的收件箱当中。也就是说每当用户发布一个新的探店笔记时,我们就应该把第几推送到他粉丝的收件箱
①修改新增探店笔记的业务,在保存blog到数据库的同时,推送到粉丝的收件箱
我们数据库中有笔记的完整内容,我们推送到粉丝的收件箱的时候,只用推一个id过去,起到将来排序的作用,那用户再去查询详细信息的时候,可以拿着id再来查询数据库就行,可以进一步的节省内存的空间
②收件箱满足可以根据时间戳排序,必须用Redis的数据结构实现
按时间顺序就是按插入顺序
能排序的只有两个,List、SortedSet。
③查询收件箱数据时,可以实现分页查询
虽然List、SortedSet都能支持排序,但是谁的分页效果更好呢?
List结构是一个链表,底层是有角标的,是可以根据角标实现查询的,因此可以实现分页查询
SortedSet没有角标,但是在排序完成后有一个排名的概念,可以按照排名作为一个查询的条件(排名从0开始,其实和角标是一个效果,也能实现分页)
但是注意!
Feed流中的数据会不断更新(不断的发信息消息,进入到我们的队列里,排名就会不断的变化),所以数据的角标也在变化,因次不能采用传统的分页模式。
如下所示,在分页操作中,数据为6的重复读取了

我们可以采取滚动分页模式
记录每一次查询的最后一条,下一次呢从这个位置开始查
读取第一条的时候,我们设置id成无穷大,那这样就会从最大的id开始查询,查询5条

List不支持这种滚动分页,List中只能按照角标或者首尾
SortedSet会按照score值进行排序,也能按照score值进行范围查询
2.3.2.2 推送代码分析
Controller层
//  保存博客
    @PostMapping
    public Result saveBlog(@RequestBody Blog blog) {
         return blogService.saveBlog(blog);
    }
Service层,实现推送功能
下面是用户和粉丝的关系图。user_id是粉丝的id,follow_user_id是被关注的人的id。
如果我们找某个人的粉丝,那就找follow_user_id等于自己的id的所有信息

// 保存博客
@Override
public Result saveBlog(Blog blog) {
// TODO 1.获取登录用户,也就是执行报错博客功能的用户
UserDTO user = UserHolder.getUser();
blog.setUserId(user.getId());
// TODO 2.保存探店博文
boolean isSuccess = save(blog);
if (!isSuccess) {
return Result.fail("新增笔记失败!");
}
// TODO 3.查询笔记作者的所有粉丝 select * from tb_follow where follow_user_id = ?
List<Follow> followUserList = followService.query()
.eq("follow_user_id", user.getId())
.list();
// TODO 4.推送笔记id给所有粉丝
for (Follow follow:followUserList){
// TODO 4.1 获取粉丝id
Long userId = follow.getUserId();
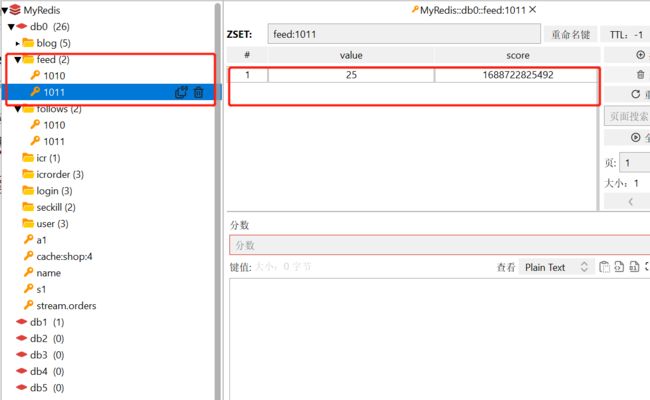
// TODO 4.2 推送(每个粉丝都有自己的收件箱,每一个收件箱都是一个SortedSet)
String key = "feed:"+userId;
stringRedisTemplate.opsForZSet().add(key,blog.getId().toString(),System.currentTimeMillis());
}
// TODO 5.返回id
return Result.ok(blog.getId());
}
运行之后,某一个博主重新发布一个博客,其对应的粉丝就能收到消息
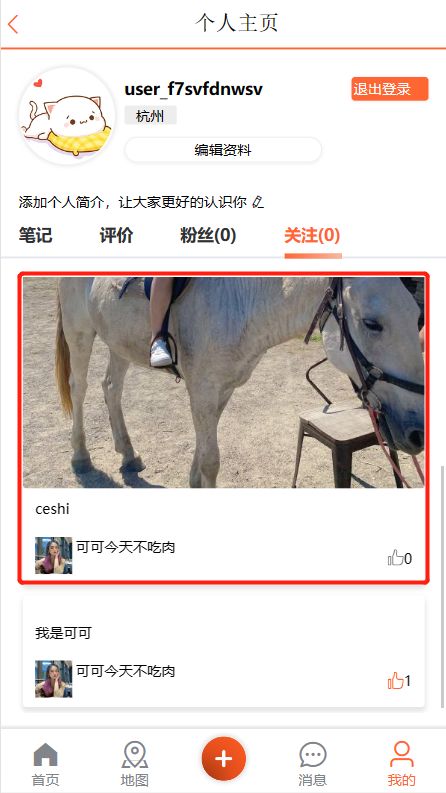
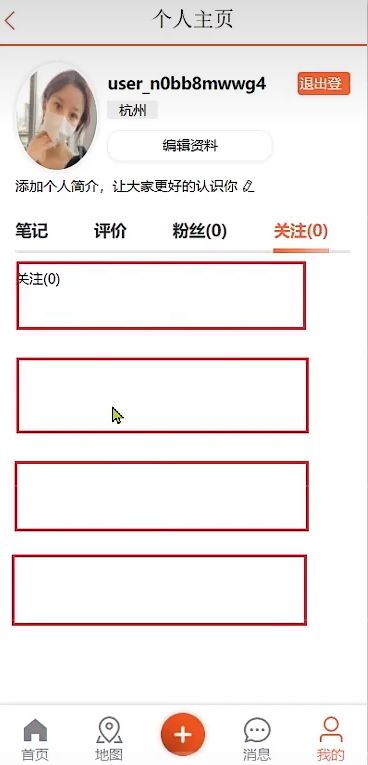
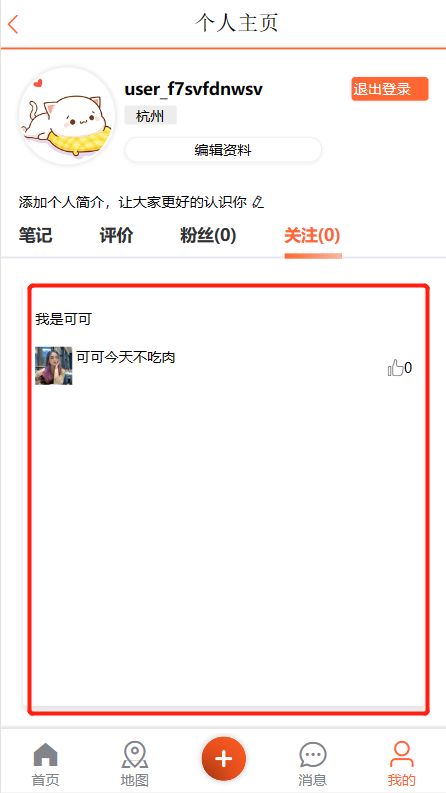
2.4 关注查收
关注推送的业务逻辑已经清晰了,下面我们看一下粉丝接收到数据后改怎么处理
需求:在个人主页的“关注”卡片中,查询并展示推送的Blog信息
2.4.1 滚动分析查询收件箱的思路
回顾一下SortedSet命令:Redis命令——通用命令、String类型、Key层级结构、Hash类型、List类型、Set类型、SortedSet类型_hmset如何批量增加
- 按照角标分页,我们可以使用命令
ZRANGE key min max
但是我们采用倒序排序,所以采用下面的命令。WHTISCORES表示结果中带上分数
ZREVRANGE key start stop WHTISCORES

我们在上面已经说过了,按照角标进行分页会导致数据混乱,这里不解释了
-
按分数分页
ZREVRANGEBYSCORE按照分数的倒数排序,max表示score的最大分数,min表示score的最小分数
ZREVRANGEBYSCORE key max min WHTISCORES LIMIT offset count
我们只关心两个事情:从哪开始,查询几条,所以min给个最小值0就行
如果我们是第一次访问的时候,max就给当前时间戳就行
我们要查询几条呢?使用一个limit offset count
offset 表示偏移量,从最大值开始的第几个元素开始查询(如果给了0,表示从小于等于最大值的第一个元素开始查,如果给了1,则从小于等于最大值的第二个元素开始查)
count 表示总共查询几条
下面进行演示
比如说我们第一次查询
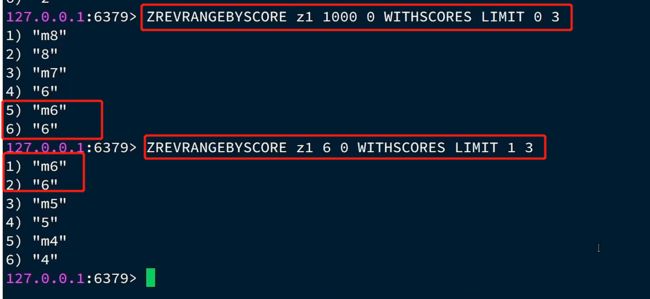
ZREVRANGEBYSCORE z1 100000 0 WHTISCORES LIMIT 0 3

然后再第二次查询.
此时的最大值是第一次查询的最小值,也就是5
从小于等于5的第二个元素开始数三个数据(不能包含5,因为5已经在第一次查询的时候出现过了)
ZREVRANGEBYSCORE z1 5 0 WHTISCORES LIMIT 1 3
所以从第二次查询开始,我们只需要记得前面查询时的最小值是什么即可
而且min与count参数是固定不变的
max的第一次是当前时间戳,之后是前一次查询的最小值,是动态变化的
offset 偏移量,除了第一次是0以外,其他都是1(这么是不对的)
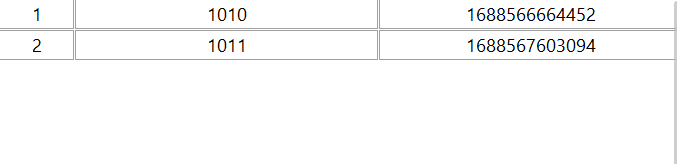
但是上面的规律有问题,还有一个特殊情况,就是SortedSet集合中有score值相同的
如下所示,发现重复了
所以我们offset要跳过的是跟上一次的这个最小值的大小一样的所有的元素的个数
总结滚动分页查询参数
max: 第一次查询时是当前时间戳,之后是上一次查询的最小值
min:0
offset:第一次查询的时候是0,之后是在上一次结果中,与最小值一样的元素的个数
count:固定值,与前端协商即可
2.4.2 实现滚动分页查询

Controller层
//  上一次查询的最后一个id就是下一次查询的最大id
@GetMapping("/of/follow")
public Result queryBlogOfFollow(@RequestParam("lastId") Long max,
                                @RequestParam(value="offset",defaultValue = "0") Integer offset) {
    return blogService.queryBlogOfFollow(max,offset);
}
Service代码
    //  实现滚动分页查询
//  查询的是收件箱里的所有笔记,然后做一个滚动查询
    @Override
    public Result queryBlogOfFollow(Long max, Integer offset) {
//      TODO 1.获取当前用户,找到自己的收件箱
        Long userId = UserHolder.getUser().getId();
//      TODO 2.查询收件箱
        String key = "feed:" + userId;
//      ZREVRANGEBYSCORE key max min WHTISCORES LIMIT offset count
        Set<ZSetOperations.TypedTuple<String>> typedTuples = stringRedisTemplate.opsForZSet()
                .reverseRangeByScoreWithScores(key, 0, max, offset, 3);
//      TODO 做非空判断
        if (typedTuples == null || typedTuples.isEmpty()) {
            return Result.ok();
        }
//      TODO 3.解析收件箱:blog.getId()、时间戳score System.currentTimeMillis()、offset偏移量
//      这个时候id是有序的
        List<Long> ids = new ArrayList<>(typedTuples.size());
        long minTime = 0L;
        int os = 1; //就是下一次查询的offset参数
        for (ZSetOperations.TypedTuple<String> tuple : typedTuples) {
//          TODO 3.1 获取id
            String id = tuple.getValue();
            ids.add(Long.valueOf(id));
//          TODO 3.2 获取分数(时间戳)
//          最后一个肯定就是最小
            long time = tuple.getScore().longValue();
            if (time == minTime) {
                os++;
            } else {
                minTime = time;
                os = 1;
            }
        }
//      TODO 4.根据blog的id查询blog
//      List blogs = listByIds(ids);如果直接这么执行,id就不是有序的了,in(id1,id2,id3...)
        String idStr = StrUtil.join(",", ids);
        List<Blog> blogs = query().in("id", ids)
//              last()表示在原有的sql后面进行拼接
                .last("order by FIELD(id," + idStr + ")")
                .list();
        for (Blog blog : blogs) {
//          查询blog有关的用户
            queryBlogUser(blog);
//          查询blog是否被点赞
            isBlogLiked(blog);
        }

//      TODO 5.封装并返回
        ScrollResult scrollResult = new ScrollResult();
        scrollResult.setList(blogs);
        scrollResult.setOffset(os);
//      这一次的最小时间就是下一次的最大时间
        scrollResult.setMinTime(minTime);
        return Result.ok(scrollResult);
    }

    //  查询blog有关的用户
    private void queryBlogUser(Blog blog) {
        Long userId = blog.getUserId();
        User user = userService.getById(userId);
        blog.setName(user.getNickName());
        blog.setIcon(user.getIcon());
    }

    //  查询blog是否被点赞
    private void isBlogLiked(Blog blog) {
        // 1.获取登录用户
        UserDTO user = UserHolder.getUser();
        if (user == null) {
            // 用户未登录,无需查询是否点赞
            return;
        }
        Long userId = user.getId();
        // 2.判断当前登录用户是否已经点赞
        String key = "blog:liked:" + blog.getId();
        Double score = stringRedisTemplate.opsForZSet().score(key, userId.toString());
        blog.setIsLike(score != null);
    }
然后如果博主再发一条,粉丝也能够看到