【图像处理】Python判断一张图像是否亮度过低,图片模糊判定
文章目录
- 亮度判断
- 模糊判断
亮度判断
代码:
这段代码是一个用于判断图像亮度是否过暗的函数is_dark,并对输入的图像进行可视化直方图展示。
首先,通过import语句导入了cv2和matplotlib.pyplot模块,用于图像处理和可视化。
is_dark函数的作用是判断输入图像的平均亮度是否低于设定的阈值。函数接受两个参数:image_path表示图像文件的路径,threshold表示亮度阈值,默认为100。函数内部的步骤如下:
使用cv2.imread函数读取图像文件,将图像存储在变量img中。
使用cv2.cvtColor函数将图像转换为灰度图像,存储在变量gray中。
使用cv2.mean函数计算灰度图像的平均亮度,存储在变量average_brightness中。
判断average_brightness是否低于设定的阈值threshold,如果是,则返回True表示图像光线过暗;否则返回False表示图像光线正常。
接下来是测试代码部分:
定义了一个图像文件的路径image_path,这里是一个示例路径,请根据实际情况修改。
调用is_dark函数判断图像光线是否过暗,如果返回True,说明图像光线过暗,输出"图片光线过暗";如果返回False,说明图像光线正常,输出"图片光线正常"。
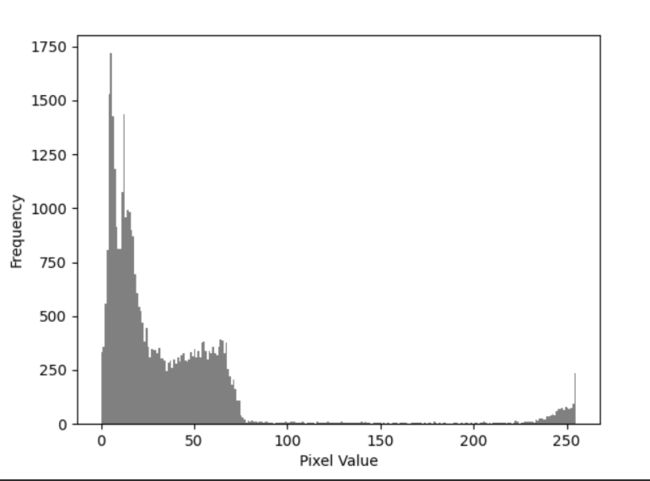
最后,使用cv2.imread函数再次读取图像文件,将图像存储在变量img中。然后使用plt.hist函数绘制灰度图像的直方图,并通过plt.xlabel和plt.ylabel设置横轴和纵轴的标签。最后使用plt.show显示直方图。这样可以直观地查看图像的亮度分布情况。
import cv2
import matplotlib.pyplot as plt


def is_dark(image_path, threshold=100):
    # 读取图像
    img = cv2.imread(image_path)

    # 转换为灰度图像
    gray = cv2.cvtColor(img, cv2.COLOR_BGR2GRAY)

    # 计算灰度图像的平均亮度
    average_brightness = cv2.mean(gray)[0]

    # 判断亮度是否低于阈值
    if average_brightness < threshold:
        return True
    else:
        return False


# 测试代码
image_path = r'E:\facedata\img_data_new\10001normal_face\10001normal_face_0.5893__041430.jpg'
if is_dark(image_path):
    print("图片光线过暗")
else:
    print("图片光线正常")

# 可视化直方图
img = cv2.imread(image_path)
plt.hist(cv2.cvtColor(img, cv2.COLOR_BGR2GRAY).ravel(), bins=256, color='gray')
plt.xlabel('Pixel Value')
plt.ylabel('Frequency')
plt.show()
模糊判断
import os

import cv2
from tqdm import tqdm


def is_blurry(image_path):
    image = cv2.imread(image_path)
    if image is None:
        raise Exception("无法读取图片")

    gray = cv2.cvtColor(image, cv2.COLOR_BGR2GRAY)
    blur_score = cv2.Laplacian(gray, cv2.CV_64F).var()

    return str(round(blur_score * 100)).rjust(10, "0")


def listPathAllfiles(dirname):
    result = []
    for maindir, subdir, file_name_list in os.walk(dirname):
        for filename in file_name_list:
            apath = os.path.join(maindir, filename)
            result.append(apath)
    return result


windowspath = r"E:\facedata\img_data_new"
files = listPathAllfiles(windowspath)
for filename in tqdm(files):
    try:
        num = is_blurry(filename)
    except:
        num = str(round(0 * 100)).rjust(10, "0")

    new_file_name = num + "____" + os.path.basename(filename)
    new_file_name = os.path.join(os.path.dirname(filename), new_file_name)
    os.rename(filename, new_file_name)

