【Ubuntu】使用Zabbix模板轻松实现Docker容器监控
本文前提条件:已经安装好并正常在运行Zabbix服务器,Docker容器环境运行在Ubuntu 22.04上。
目录:
1. 导入Docker模板
2. 安装并配置Zabbix Agent2
3. Zabbix Agent2 的特定插件配置
4. 在Zabbix中添加主机
1. 导入Docker模板
要在Zabbix中使用这个模板[Docker by Zabbix agent 2],需要确保它已经在Zabbix中可用。Zabbix 5.0、5.4和6.0版本都提供了此模板。如果在配置->模板中找不到此模板,则可能是在升级Zabbix版本后未将其导入到环境中。请注意,Zabbix在升级过程中不会自动修改或导入任何模板,因此必须手动导入此模板。您可以从官方的Zabbix Git(或直接单击此处)下载该模板文件,并使用配置->模板页面中的导入按钮将其导入到Zabbix实例中。

2. 安装并配置Zabbix Agent2
现在,我们将从官方Zabbix存储库中安装Zabbix Agent。首先,将Zabbix存储库添加到您的系统中:
wget https://repo.zabbix.com/zabbix/6.2/ubuntu/pool/main/z/zabbix-release/zabbix-release_6.2-4%2Bubuntu22.04_all.deb
sudo dpkg -i zabbix-release_6.2-4+ubuntu22.04_all.deb
sudo apt update
以下为本人测试安装结果,已在SUDO SU模式下:
root@Virtual-Machine:/home/KnightTest# wget https://repo.zabbix.com/zabbix/6.2/ubuntu/pool/main/z/zabbix-release/zabbix-release_6.2-4%2Bubuntu22.04_all.deb
--2023-05-22 09:44:00--  https://repo.zabbix.com/zabbix/6.2/ubuntu/pool/main/z/zabbix-release/zabbix-release_6.2-4%2Bubuntu22.04_all.deb
Resolving repo.zabbix.com (repo.zabbix.com)... 178.128.6.101, 2604:a880:2:d0::2062:d001
Connecting to repo.zabbix.com (repo.zabbix.com)|178.128.6.101|:443... connected.
HTTP request sent, awaiting response... 200 OK
Length: 3780 (3.7K) [application/octet-stream]
Saving to: ‘zabbix-release_6.2-4+ubuntu22.04_all.deb’

zabbix-release_6.2-4+ubuntu22.04_all.deb                             100%[====================================================================================================================================================================>]   3.69K  --.-KB/s    in 0s

2023-05-22 09:44:00 (1.85 GB/s) - ‘zabbix-release_6.2-4+ubuntu22.04_all.deb’ saved [3780/3780]

root@Virtual-Machine:/home/KnightTest# dpkg -i zabbix-release_6.2-4+ubuntu22.04_all.deb
(Reading database ... 209178 files and directories currently installed.)
Preparing to unpack zabbix-release_6.2-4+ubuntu22.04_all.deb ...
Unpacking zabbix-release (1:6.2-4+ubuntu22.04) over (1:6.2-4+ubuntu20.04) ...
Setting up zabbix-release (1:6.2-4+ubuntu22.04) ...
Installing new version of config file /etc/apt/sources.list.d/zabbix-agent2-plugins.list ...
Installing new version of config file /etc/apt/sources.list.d/zabbix.list ...
root@Virtual-Machine:/home/KnightTest# apt update
Hit:1 https://dl.google.com/linux/chrome/deb stable InRelease
Hit:2 http://download.zerotier.com/debian/jammy jammy InRelease
Hit:3 http://cn.archive.ubuntu.com/ubuntu jammy InRelease
Get:4 https://repo.zabbix.com/zabbix-agent2-plugins/1/ubuntu jammy InRelease [4,952 B]
Hit:5 http://cn.archive.ubuntu.com/ubuntu jammy-updates InRelease
Get:6 https://repo.zabbix.com/zabbix/6.2/ubuntu jammy InRelease [4,958 B]
Hit:7 http://cn.archive.ubuntu.com/ubuntu jammy-backports InRelease
Get:8 https://repo.zabbix.com/zabbix-agent2-plugins/1/ubuntu jammy/main Sources [1,002 B]
Get:9 https://repo.zabbix.com/zabbix-agent2-plugins/1/ubuntu jammy/main amd64 Packages [624 B]
Get:10 https://repo.zabbix.com/zabbix/6.2/ubuntu jammy/main Sources [1,952 B]
Get:11 https://repo.zabbix.com/zabbix/6.2/ubuntu jammy/main amd64 Packages [5,491 B]
Get:12 http://security.ubuntu.com/ubuntu jammy-security InRelease [110 kB]
Fetched 129 kB in 4s (35.2 kB/s)
Reading package lists... Done
Building dependency tree... Done
Reading state information... Done
13 packages can be upgraded. Run 'apt list --upgradable' to see them.
N: Skipping acquire of configured file 'main/binary-i386/Packages' as repository 'https://repo.zabbix.com/zabbix/6.2/ubuntu jammy InRelease' doesn't support architecture 'i386'
root@Virtual-Machine:/home/KnightTest#
安装和配置Zabbix Agent2
sudo apt install zabbix-agent2
以下为本人测试安装结果,已在SUDO SU模式下:
root@Virtual-Machine:/home/KnightTest# apt install zabbix-agent2
Reading package lists... Done
Building dependency tree... Done
Reading state information... Done
The following packages were automatically installed and are no longer required:
  libllvm13 zabbix-agent2-plugin-mongodb zabbix-agent2-plugin-postgresql
Use 'sudo apt autoremove' to remove them.
The following packages will be upgraded:
  zabbix-agent2
1 upgraded, 0 newly installed, 0 to remove and 12 not upgraded.
Need to get 4,155 kB of archives.
After this operation, 205 kB disk space will be freed.
Get:1 https://repo.zabbix.com/zabbix/6.2/ubuntu jammy/main amd64 zabbix-agent2 amd64 1:6.2.9-1+ubuntu22.04 [4,155 kB]
Fetched 4,155 kB in 2s (1,945 kB/s)
(Reading database ... 209178 files and directories currently installed.)
Preparing to unpack .../zabbix-agent2_1%3a6.2.9-1+ubuntu22.04_amd64.deb ...
Unpacking zabbix-agent2 (1:6.2.9-1+ubuntu22.04) over (1:6.0.17-1+ubuntu22.04) ...
Setting up zabbix-agent2 (1:6.2.9-1+ubuntu22.04) ...
Installing new version of config file /etc/zabbix/zabbix_agent2.conf ...
Processing triggers for man-db (2.10.2-1) ...
root@Virtual-Machine:/home/KnightTest#
更改/etc/zabbix/zabbix_agent2.conf文件中对应的zabbix服务器的参数。主要以下:
Server=<Zabbix_Server_IP>
ServerActive=<Zabbix_Server_IP>
Hostname=<Hostname_Of_Ubuntu_Client>
3. Zabbix Agent2 的特定插件配置
Zabbix agent2提供了一些特定的插件配置参数,通常情况下,这些特定插件相关的参数都是可选的。您可以在Zabbix文档中找到完整的插件配置参数列表。在新版本的Zabbix agent2中,特定插件的参数被定义在单独的插件配置文件中,位于 /etc/zabbix/zabbix_agent2.d/plugins.d/ 目录下。然而,在旧版本中,这些参数是直接在 zabbix_agent2.conf 文件中定义的。
对于Zabbix agent2 Docker插件(用于监控Docker),我们必须在docker.conf中配置Docker服务的unix-socket文件位置。可以通过以下插件参数实现:
root@Virtual-Machine:/home/KnightTest# cat /etc/zabbix/zabbix_agent2.d/plugins.d/docker.conf
### Option: Plugins.Docker.Endpoint
#       Docker API endpoint.
#
# Mandatory: no
# Default: unix:///var/run/docker.sock
Plugins.Docker.Endpoint=unix:///var/run/docker.sock
以上案例中为Docker服务的unix-socket文件的默认位置,如有修改根据自己的修改设置。
通过执行以下命令将 zabbix 用户添加到 Docker 组:
usermod -aG docker zabbix
全部配置完之后,重启zabbix-agent2服务并检查状态:
sudo systemctl restart zabbix-agent
sudo systemctl enable zabbix-agent
sudo systemctl status zabbix-agent
root@Virtual-Machine:/home/KnightTest# systemctl status zabbix-agent2
● zabbix-agent2.service - Zabbix Agent 2
     Loaded: loaded (/lib/systemd/system/zabbix-agent2.service; enabled; vendor preset: enabled)
     Active: active (running) since Mon 2023-05-22 10:41:48 CST; 3s ago
   Main PID: 3049063 (zabbix_agent2)
      Tasks: 8 (limit: 4614)
     Memory: 6.8M
        CPU: 89ms
     CGroup: /system.slice/zabbix-agent2.service
             └─3049063 /usr/sbin/zabbix_agent2 -c /etc/zabbix/zabbix_agent2.conf

5月 22 10:41:48 knight-Virtual-Machine systemd[1]: Started Zabbix Agent 2.
5月 22 10:41:48 knight-Virtual-Machine zabbix_agent2[3049063]: Starting Zabbix Agent 2 (6.2.9)
5月 22 10:41:48 knight-Virtual-Machine zabbix_agent2[3049063]: Zabbix Agent2 hostname: [KnightTestEnv]
5月 22 10:41:48 knight-Virtual-Machine zabbix_agent2[3049063]: Press Ctrl+C to exit.
4. 在Zabbix中添加主机
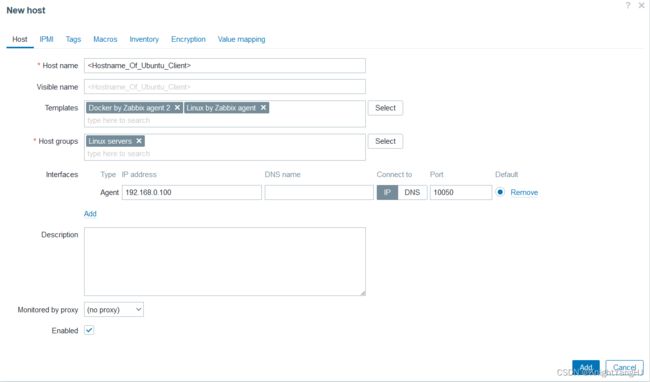
现在需要为Docker实例创建一个主机。设置主机名并分配主机组——我将把它分配给 Linux servers主机组。将 Docker by Zabbix agent 2模板以及Linux by Zabbix Agent关联到该主机。因为要使用Zabbix agent2模板来采集数据,所以需要在这个主机上添加一个代理接口。接口的地址是运行 Docker 容器的机器地址。单击 Add 按钮完成主机配置。

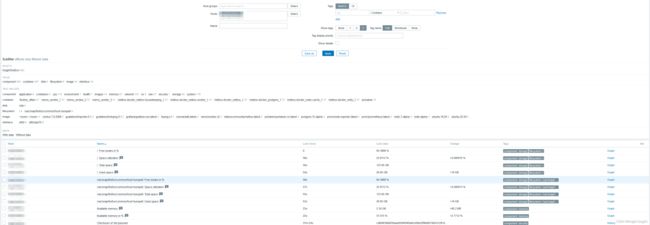
稍后就可以在Zabbix中查看到关于Docker的信息了,以下仅部分截图。


补充:
如何解决N: Skipping acquire of configured file 'main/binary-i386/Packages' as repository 'https://repo.zabbix.com/zabbix/6.2/ubuntu jammy InRelease' doesn't support architecture 'i386'
修改 **/etc/apt/sources.list.d/zabbix.list **在该软件库的URL之前添加“[arch=amd64]”选项,将其限制为amd64架构:
deb [arch=amd64] https://repo.zabbix.com/zabbix/6.2/ubuntu jammy main
保存并关闭文件,然后运行“sudo apt update”命令刷新软件包列表。这样就可以跳过zabbix软件库的i386软件包,并防止出现错误消息。
如果需要安装zabbix软件库中仅适用于i386架构的软件包,则可以尝试手动下载仓库网站上的.deb软件包文件,并使用“dpkg”进行安装。但是,请注意可能会导致依赖项问题并可能无法按预期工作。