Flutter开发之MVC设计模式:新建文件与导入文件(八)
在前面的例子中,所有的代码和路由都是在main.dart 下写的.我们知道不管后台还是前端,不管是Android 还是iOS开发,都是基于MVC设计模式开发的.那么flutter是怎么使用MVC设计模式的尼?
一切皆dart,一起皆widget.
M:数据模型
V:一些视图或者视图组件
C:我们习惯称之为页面或者路由
一般我们把这三种分别建一个对应的类文件来管理.
我们实现传递数组、列表显示、详情内容显示
实现步骤:
- 新建一个模型类文件Todo.dart
- 新建一个列表页面路由TodosScreen.dart
- 新建一个详情内容显示页面路由DetailScreen.dart
新建文件
选中 main.dart 所在的目录文件夹 lib 右键–> 选 New File—>文件名:Todo.dart
记得加上后缀.
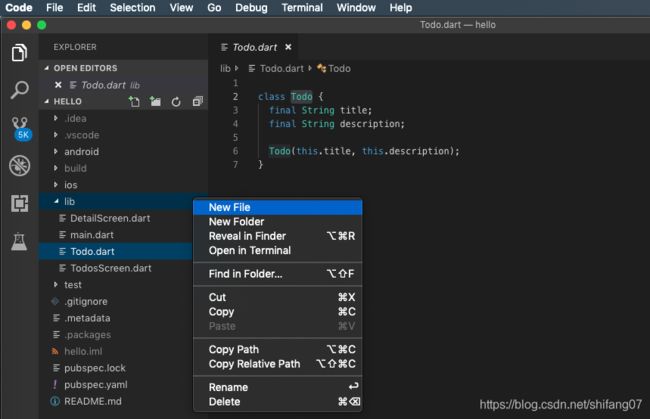
Todo.dart 的代码:
class Todo {
  final String title;
  final String description;

  Todo(this.title, this.description);
}
同理:新建 TodosScreen.dart 和 DetailScreen.dart
TodosScreen.dart 代码
import 'package:flutter/material.dart';
import 'package:hello/DetailScreen.dart';
import 'package:hello/Todo.dart';

class TodosScreen extends StatelessWidget {
  final List todos;

  TodosScreen({Key key, @required this.todos}) : super(key: key);

  @override
  Widget build(BuildContext context) {
    return new Scaffold(
      appBar: new AppBar(
        title: new Text('第一个页面'),
      ),
      body: new ListView.builder(
        itemCount: todos.length,
        itemBuilder: (context, index) {
          return new ListTile(
            title: new Text(todos[index].title),
            subtitle:new Text(todos[index].description) ,
            // When a user taps on the ListTile, navigate to the DetailScreen.
            // Notice that we're not only creating a new DetailScreen, we're
            // also passing the current todo through to it!
            onTap: () {
              Navigator.push(
                context,
                new MaterialPageRoute(
                  builder: (context) => new DetailScreen(todo: todos[index]),
                ),
              );
            },
          );
        },
      ),
    );
  }
}
DetailScreen.dart 代码
import 'package:flutter/material.dart';
import 'package:hello/Todo.dart';


class DetailScreen extends StatelessWidget {
  // Declare a field that holds the Todo
  final Todo todo;

  // In the constructor, require a Todo
  DetailScreen({Key key, @required this.todo}) : super(key: key);

  @override
  Widget build(BuildContext context) {
    // Use the Todo to create our UI
    return new Scaffold(
      appBar: new AppBar(
        title: new Text("${todo.title}"),
      ),
      body: new Padding(
        padding: new EdgeInsets.all(16.0),
        child: new Text('${todo.description}'),
      ),
    );
  }
}
导入文件
最后在main.dart 的控件中添加一个按钮跳转如下:传递一个数组
在顶部导入需要的类文件: (你不导入也会提示让你导入到的)
import 'package:hello/Todo.dart';
import 'package:hello/TodosScreen.dart';
RaisedButton(
              child: Text("Go ListView Page"),
              textColor: Colors.red,
              onPressed: () {
                //导航到新路由
                Navigator.push(context, new MaterialPageRoute(builder: (BuildContext context){

                  return new TodosScreen(todos: new List.generate(
                    20,
                    (i) => new Todo(
                      '我是表第 $i 项',
                      '我是内容 $i',
                      ),
                      ),
                      );

                  })
                  );
              },
          ),
热重载,点击按钮 Go ListView Page 后看效果


一个简单的列表页面完成了.