谷粒商城-商品服务-三级分类
商品服务-三级分类
CategoryController
/**
- 查出所有分类以及子分类,以树形结构组装起来
*/
@RequestMapping("/list/tree")
public R list(){
     log.info("ohhh");
    List<CategoryEntity> entities = categoryService.listWithTree();


    return R.ok().put("data", entities);
}
CategoryServiceImpl
@Service("categoryService")
public class CategoryServiceImpl extends ServiceImpl<CategoryDao, CategoryEntity> implements CategoryService {

@Override
public List<CategoryEntity> listWithTree() {
    //1、查出所有分类
    List<CategoryEntity> entities = baseMapper.selectList(null);//用baseMapper而没有用CategoryDao的原因是因为

    //2、组装成父子的树形结构
List<CategoryEntity> list=entities.stream().filter((categoryEntity) -> {//箭头函数
    return categoryEntity.getParentCid()==0;//不能用equals,只能用==,因为是int型的
}).collect(Collectors.toList());

    //2.1)、找到所有的一级分类
    List<CategoryEntity> level1Menus = entities.stream().filter(categoryEntity ->
         categoryEntity.getParentCid() == 0
    ).map((menu)->{
        menu.setChildren(getChildrens(menu,entities));
        return menu;
    }).sorted((menu1,menu2)->{
        return (menu1.getSort()==null?0:menu1.getSort()) - (menu2.getSort()==null?0:menu2.getSort());
    }).collect(Collectors.toList());


    return level1Menus;
}
}
用baseMapper而没有用CategoryDao是因为不需要,ServiceImpl
public class ServiceImpl
//M继承了BaseMapper,T又是CategoryEntity,所有M继承了BaseMapper
protected Log log = LogFactory.getLog(this.getClass());
@Autowired
protected M baseMapper;
//baseMapper 实例化了M
Stream
stream位于java.util.stream中,是一组支持串行并行聚合操作的元素,也可以理解成集合或者迭代器的增强版
特征:
单次处理,一次处理结束后,当前stream就关闭了
支持并行操作
allMatch和anyMatch
allMatch:检查 Stream 中的所有元素,全部都通过检测则返回 true,否则 false
anyMatch:检查 Stream 中的所有元素,至少有一个通过检测则返回 true,否则 false
max,min和sort
max:返回stream中的最大值
min:返回stream中的最小值
sort:对stream中的元素排序
filter和map
filter:筛选 Stream 元素,符合条件的留下并组成一个新的 Stream 。
map:依次对 Stream 中的元素进行指定的函数操作,并将按顺序将函数操作的返回值组合到一个新的 Stream 中。
distinct和collect
distinct:去重
collect:可以做collectors中的一些操作,如:连接,转list,分组等
改变后的CategoryServiceImpl:
     @Override
    public List<CategoryEntity> listWithTree() {
        //1、查出所有分类
        List<CategoryEntity> entities = baseMapper.selectList(null);
Dolist  dolist=new Dolist();
        //2、组装成父子的树形结构
List<CategoryEntity> list=entities.stream().filter((categoryEntity) -> {
    return categoryEntity.getParentCid()==0;//不能用equals,只能用==,因为是int型的
}).collect(Collectors.toList());
List<CategoryEntity> res =list.stream().map((categoryEntity)->{
    categoryEntity.setChildren(dolist.getChildrenPractice(categoryEntity,entities));
    return categoryEntity;
}).sorted((num1,num2)->{
    return num1.getSort()-num2.getSort();
}).collect(Collectors.toList());

return list;
}
CategoryServiceImpl的内部类:
public class Dolist{
public List getChildrenPractice(CategoryEntity entity,List entities){

  List res =entities.stream().filter((obj)->{
   return   obj.getParentCid()==entity.getCatId();//获得子对象
  })

  .collect(Collectors.toList());
  res.stream().map((obj)->{
      obj.setChildren(getChildrenPractice(obj,entities));//递归调用
  return obj;
  }).collect(Collectors.toList());
  return res;
}
}
前端:
vuedemo项目
首先,遇到了无法跨域的问题,由于cros协议无法跨域,只能在返回的response的header上加入
response.addHeader(“Access-Control-Allow-Origin”,"*");
使用axious接受结果集。
放在了MutiplyList中
首先,axious是异步传输的,这导致了当结果集还没有返回的时候程序就已经往下走了,导致显示结果集为空。解决办法是将axious.get的获取作为一个方法。然后用其他方法来调用这个方法
 showData () {
      var b = this.getData()
      b.then((res) => {
        // console.log(res.data.data)
        // this.$set(this.data,res.data.data)
        this.data=res.data.data
        // console.log(this.mid)
      })
      // console.log(this.data.data)
    },
    getData () {
      this.res = 'first'
      var api = 'http://localhost:10000/product/category/list/tree'
      var a = Axios.get(api)
      return a
    }
然后,在生命周期函数created中调用showData方法。(生命周期函数要写在method外面!!!)
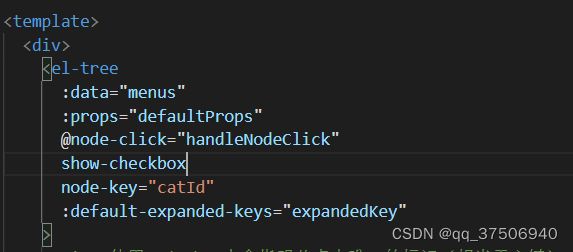
最后,使用elementUI中的tree组件实现三级列表
defaultProps: {
label: ‘name’,//是列表中使用name属性的值来展示在列表中
children: ‘children’ //子列在children中找
}
vue-统一配置地址:
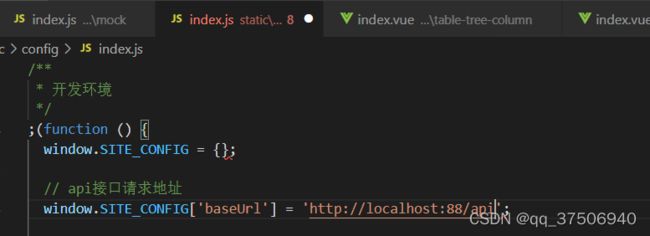
前端项目发送时发向80端口的/api
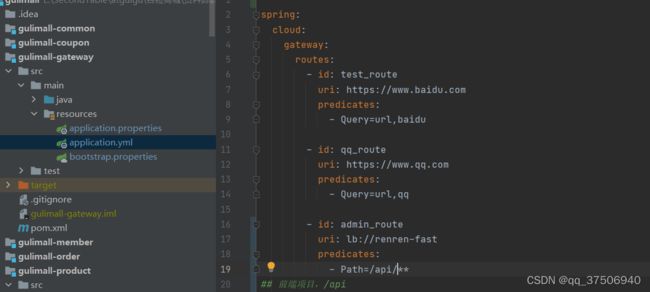
gateway中自动将所有的/api/**的转发到renren-fast之中
但是这样会导致项目发到了http://localhost:8080/api/**无法被renren-fast处理
于是进行路径的重写:

将/api/** 的路径改成/renren-fast/**
Gateway重写product的地址:

并且,位置要放在admin_route的上方‘
跨域配置
在gateway的config包下统一配置过滤器处理跨域请求:
@Configuration
public class GulimallCorsConfiguration {

    @Bean
    public CorsWebFilter corsWebFilter(){
        UrlBasedCorsConfigurationSource source = new UrlBasedCorsConfigurationSource();

        CorsConfiguration corsConfiguration = new CorsConfiguration();

        //1、配置跨域
        corsConfiguration.addAllowedHeader("*");
        corsConfiguration.addAllowedMethod("*");
        corsConfiguration.addAllowedOrigin("*");
        corsConfiguration.setAllowCredentials(true);

        source.registerCorsConfiguration("/**",corsConfiguration);
        return new CorsWebFilter(source);
    }
}
前端第二种实现方式:
/* eslint-disable */
<template>
  <div>
    <el-tree :data="menus" :props="defaultProps" @node-click="handleNodeClick"></el-tree>
  </div>
</template>

<script>
export default {
data() {
      return {
        menus: [],
        defaultProps: {
          children: 'children',  //对象的children作为子树的值
          label: 'name' //对象的name作为标签的值
        }
      };
    },
    methods: {
      handleNodeClick(data) {
        console.log(data);
      },
      getMenus(){
        this.$http({
          url: this.$http.adornUrl('/product/category/list/tree'),
          method: 'get'
        }).then(({data})=>{  // ({data})的目的是解离,因为数据是放在返回的body中的data.data中的,({data})可以使得获取到data中的data
           console.log("成功获取到菜单数据。。。",data.data)
           this.menus=data.data
        })
      }
    },
   created(){
       this.getMenus();
   }
}
</script>

<style>

</style>
增加,删除的页面效果:
导入 《span》标签显示增添和删除功能
<template>
  <div>
    <el-tree
      :data="menus"
      :props="defaultProps"
      @node-click="handleNodeClick"
      show-checkbox
      node-key="catId"
    >
    <!-- 使用node-key来拿指明节点中唯一的标识(相当于主键),show-checkbox表示显示选项框 slot-scope解构 -->
      <span class="custom-tree-node" slot-scope="{ node, data }">
        <span>{{ node.label }}</span>
        <span>
          <!-- 规定只有层级是1,2层的可以进行增添 -->
          <el-button
            v-if="node.level <= 2"
            type="text"
            size="mini"
            @click="() => append(data)"
          >
            Append
          </el-button>
             <!-- 规定只有层级最低的可以进行删除 -->
          <el-button
            v-if="node.childNodes.length == 0"
            type="text"
            size="mini"
            @click="() => remove(node, data)"
          >
            Delete
          </el-button>
        </span>
      </span>
    </el-tree>
  </div>
</template>

<script>
export default {
  data() {
    return {
      menus: [],
      defaultProps: {
        children: "children", //对象的children作为子树的值
        label: "name", //对象的name作为标签的值
      },
    };
  },
  methods: {
    handleNodeClick(data) {
      console.log(data);
    },
    getMenus() {
      this.$http({
        url: this.$http.adornUrl("/product/category/list/tree"),
        method: "get",
      }).then(({ data }) => {
        // ({data})的目的是解离,因为数据是放在返回的body中的data.data中的,({data})可以使得获取到data中的data
        console.log("成功获取到菜单数据。。。", data.data);
        this.menus = data.data;
      });
    },
    append(data) {
      console.log("append", data);
    },

    remove(node, data) {
      console.log("remove", mode, data);
    },
  },
  created() {
    this.getMenus();
  },
};
</script>

<style>
</style>
@RequestBody:获取请求体,必须发送POST请求
SpringMVC自动将请求体的数据(json),转为对应的对象
逻辑删除
CategoryController:
 @RequestMapping("/delete")
    //@RequiresPermissions("product:category:delete")
    public R delete(@RequestBody Long[] catIds){


		//categoryService.removeByIds(Arrays.asList(catIds));

        categoryService.removeMenuByIds(Arrays.asList(catIds));

        return R.ok();
    }
CategoryServiceImpl:
 @Override
    public void removeMenuByIds(List<Long> asList) {
        //TODO  1、检查当前删除的菜单,是否被别的地方引用

        //逻辑删除
        baseMapper.deleteBatchIds(asList);
    }
yml进行配置逻辑删除功能:
mybatis-plus:
  mapper-locations: classpath:/mapper/**/*.xml
  global-config:
    db-config:
      id-type: auto
      logic-delete-value: 1   #1代表逻辑删除
      logic-not-delete-value: 0  #0代表逻辑不删除
并在CategoryEntity中配置指定的属性,这个属性的0或1代表了删除或不删除
@TableLogic(value = "1",delval = "0")//配置了以后就是逻辑删除了,1是显示,0是不显示
	private Integer showStatus;
由于和配置文件中的恰好相反,所以要特意的设置。
删除细节实现:
  remove(node, data) {
      var ids = [data.catId];
      this.$confirm('此操作将永久删除该菜单, 是否继续?', "提示", {
        confirmButtonText: "确定",
        cancelButtonText: "取消",
        type: "warning",
      }).then(() => {
        this.$http({
          url: this.$http.adornUrl("/product/category/delete"),
          method: "post",
          data: this.$http.adornData(ids, false),
        }).then(({ data }) => {
          this.$message({
              message: '菜单删除成功',
              type: 'success'
          });
          //刷新出新的菜单
          this.getMenus();
          //设置需要默认展开的菜单
          this.expandedKey = [node.parent.data.catId]
        });
      }).catch(()=>{

      });
    }
设置expandedKey将被删除的节点的父节点的catId值传给expandedKey,这样就会自动的展开该父节点


