STM32F1—呼吸灯—端口复用,重映射,GPIO,TIM,PWM
目录
一.前言
二.主要知识点
1.端口复用
2.重映射
3.LED灯
(1)led.h
(2)led.c
4.定时器
(1)tim.h
(2)tim.c
5.PWM
(2)pwm.h
(2)pwm.c
6.主函数
main.c
7.部分函数补充
(1)TIM_SetCompare
三.感想
一.前言
本人所用的是STM32F103VET6。
写此文是为作为学习笔记,如有不足还请多指教。
二.主要知识点
1.端口复用
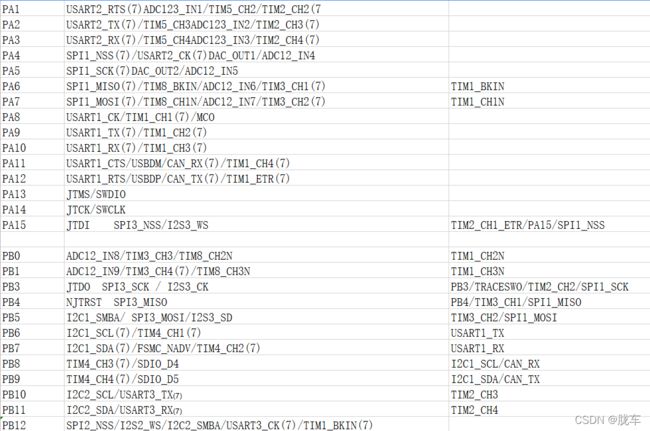
GPIO作为内置外设使用时就叫复用,也叫默认复用功能,不把GPIO口当作单纯的I/O口而是赋予它一个外设的含义。
表1:端口复用和重映射
(第一列:引脚;第二列:默认复用功能;第三列:重映射)
此时需要使能GPIO时钟,同时使能内置外设时钟
RCC_APB2PeriphClockCmd(RCC_APB2Periph_GPIOB, ENABLE);		//使能 GPIO时钟
RCC_APB1PeriphClockCmd(RCC_APB1Periph_TIM3, ENABLE);		//使能 外设时钟
2.重映射
重映射是将某些I/O口上面的功能映射到其他I/O口上面去。
表2:同上
(第一列:引脚;第二列:默认复用功能;第三列:重映射)
同上一样需要使能GPIO时钟,同时使能内置外设时钟,但要注意还需要再使能AFIO时钟
RCC_APB2PeriphClockCmd(RCC_APB2Periph_GPIOB, ENABLE);		//使能 GPIO时钟
RCC_APB1PeriphClockCmd(RCC_APB1Periph_TIM3, ENABLE);		//使能 外设时钟
RCC_APB2PeriphClockCmd(RCC_APB2Periph_AFIO, ENABLE);		//使能 AFIO时钟
GPIO_PinRemapConfig(GPIO_PartialRemap_TIM3, ENABLE);		//部分重映射Timer3 TIM3_CH2->PB5
3.LED灯
(1)led.h
#ifndef __LED_H
#define __LED_H

#include "stm32f10x.h"

#define LED_R_Pin		GPIO_Pin_5
#define LED_G_Pin		GPIO_Pin_0
#define LED_B_Pin		GPIO_Pin_1
#define LED_Port		GPIOB

void Led_R_Config(void);
void Led_B_Config(void);
void Led_G_Config(void);
void Led_Config(void);

#endif /* __LED_H */
(2)led.c
#include "led.h"

void Led_R_Config(void)
{
	static GPIO_InitTypeDef		GPIO_InitStructure;

	//配置GPIO引脚为复用功能
	GPIO_InitStructure.GPIO_Pin=LED_R_Pin;
	GPIO_InitStructure.GPIO_Mode=GPIO_Mode_AF_PP;//选择引脚为复用推挽功能
	GPIO_InitStructure.GPIO_Speed=GPIO_Speed_50MHz;//选择引脚速度
	GPIO_Init(LED_Port,&GPIO_InitStructure); //初始化GPIO

	RCC_APB2PeriphClockCmd(RCC_APB2Periph_GPIOB, ENABLE);
}

void Led_G_Config(void)
{
	static GPIO_InitTypeDef		GPIO_InitStructure;

	GPIO_InitStructure.GPIO_Pin=LED_G_Pin;
	GPIO_InitStructure.GPIO_Mode=GPIO_Mode_AF_PP;
	GPIO_InitStructure.GPIO_Speed=GPIO_Speed_50MHz;
	GPIO_Init(LED_Port,&GPIO_InitStructure);

	RCC_APB2PeriphClockCmd(RCC_APB2Periph_GPIOB, ENABLE);
}

void Led_B_Config(void)
{
	static GPIO_InitTypeDef		GPIO_InitStructure;

	GPIO_InitStructure.GPIO_Pin=LED_B_Pin;
	GPIO_InitStructure.GPIO_Mode=GPIO_Mode_AF_PP;
	GPIO_InitStructure.GPIO_Speed=GPIO_Speed_50MHz;
	GPIO_Init(LED_Port,&GPIO_InitStructure);

	RCC_APB2PeriphClockCmd(RCC_APB2Periph_GPIOB, ENABLE);
}

void Led_Config(void)
{
	static GPIO_InitTypeDef		GPIO_InitStructure;

	GPIO_InitStructure.GPIO_Pin=LED_R_Pin | LED_G_Pin | LED_B_Pin;
	GPIO_InitStructure.GPIO_Mode=GPIO_Mode_AF_PP;
	GPIO_InitStructure.GPIO_Speed=GPIO_Speed_50MHz;
	GPIO_Init(LED_Port,&GPIO_InitStructure);

	RCC_APB2PeriphClockCmd(RCC_APB2Periph_GPIOB, ENABLE);
}
4.定时器
(1)tim.h
#ifndef __TIM_H
#define __TIM_H

#include "stm32f10x.h"

void TIM3_Config(void);

#endif /* __TIM_H */
(2)tim.c
#include "tim.h"

//定时器3配置
void TIM3_Config(void)
{
	static TIM_TimeBaseInitTypeDef		TIM_TimeBaseStructure;

	//使能GPIO时钟、定时器3时钟和AFIO时钟,并部分重映射
	RCC_APB2PeriphClockCmd(RCC_APB2Periph_GPIOB, ENABLE);	//使能 GPIO时钟
	RCC_APB1PeriphClockCmd(RCC_APB1Periph_TIM3, ENABLE);	//使能 外设时钟
	RCC_APB2PeriphClockCmd(RCC_APB2Periph_AFIO, ENABLE);	//使能 AFIO时钟
	GPIO_PinRemapConfig(GPIO_PartialRemap_TIM3, ENABLE);	//部分重映射 TIM3_CH2->PB5

	//配置定时器3
	TIM_TimeBaseStructure.TIM_Prescaler=0;		//预分频器
	TIM_TimeBaseStructure.TIM_CounterMode=TIM_CounterMode_Up;	//计数模式
	TIM_TimeBaseStructure.TIM_Period=99;		//定时器周期
	//TIM_TimeBaseStructure.TIM_ClockDivision=;		//时钟分频
	//TIM_TimeBaseStructure.TIM_RepetitionCounter=;		//重复计算器
	TIM_TimeBaseInit(TIM3,&TIM_TimeBaseStructure);  //初始化定时器
	//计数器计数一次的时间:1 / [APB1Periph / (Prescaler + 1)]
	//中断一次的时间:[(Prescaler + 1) / APB1Periph] * Period

	//开启定时器3
	TIM_Cmd(TIM3,ENABLE);
}
5.PWM
(2)pwm.h
#ifndef __PWM_H
#define __PWM_H

#include "stm32f10x.h"

void PWM_TIM3CH2_Config(void);

#endif /* __PWM_H */
(2)pwm.c
#include "pwm.h"

void PWM_TIM3CH2_Config(void)
{
	static TIM_OCInitTypeDef		TIM_OCInitStructure;

	//配置定时器3的通道2占空比
	TIM_OCInitStructure.TIM_OCMode=TIM_OCMode_PWM2;
	TIM_OCInitStructure.TIM_OutputState=TIM_OutputState_Enable;		//打开或者关闭脉冲输出
	TIM_OCInitStructure.TIM_Pulse = 50;		//比较值
	TIM_OCInitStructure.TIM_OCPolarity=TIM_OCPolarity_High;		//有效电平设置为高状态
	TIM_OC2Init(TIM3,&TIM_OCInitStructure);		//初始化定时器通道2
}
6.主函数
main.c
#include "stm32f10x.h"
#include "pwm.h"
#include "delay.h"
#include "led.h"
#include "tim.h"

int main(void)
{
	int32_t i=0;   //为了使定时器比较值发生变化使用,这样可以实现动态PWM波

	//调用定时器3的配置函数
	Led_R_Config();
	TIM3_Config();
	PWM_TIM3CH2_Config();

	//主函数循环
	while(1)
	{
		//灯渐灭
		for(i=100;i>=0;i--)
		{
			TIM_SetCompare2(TIM3,i);//2通道,定时器3,占空比为i/100
			delay_ms(1);
		}
		//灯渐亮
		for(i=0;i<=100;i++)
		{
			TIM_SetCompare2(TIM3,i);
			delay_ms(1);
		}
	}
}
7.部分函数补充
(1)TIM_SetCompare
这个函数有四个,分别是TIM_SetCompare1,TIM_SetCompare2,TIM_SetCompare3,TIM_SetCompare4。
第一个参数传入相应定时器,第二个参数是输出PWM的高电平的时间。这个值如果大于等于周期的值,将会与周期保持一致。
三.感想
上述内容拼拼凑凑,都是从CSDN大佬那里习得的,非常感谢大佬们的文章。
以此记录我的点滴学习。

