- GitHub上克隆项目
bigbig猩猩
github
从GitHub上克隆项目是一个简单且直接的过程,它允许你将远程仓库中的项目复制到你的本地计算机上,以便进行进一步的开发、测试或学习。以下是一个详细的步骤指南,帮助你从GitHub上克隆项目。一、准备工作1.安装Git在克隆GitHub项目之前,你需要在你的计算机上安装Git工具。Git是一个开源的分布式版本控制系统,用于跟踪和管理代码变更。你可以从Git的官方网站(https://git-scm.
- 01-Git初识
Meereen
Gitgit
01-Git初识概念:一个免费开源,分布式的代码版本控制系统,帮助开发团队维护代码作用:记录代码内容。切换代码版本,多人开发时高效合并代码内容如何学:个人本机使用:Git基础命令和概念多人共享使用:团队开发同一个项目的代码版本管理Git配置用户信息配置:用户名和邮箱,应用在每次提交代码版本时表明自己的身份命令:查看git版本号git-v配置用户名gitconfig--globaluser.name
- SpringBlade dict-biz/list 接口 SQL 注入漏洞
文章永久免费只为良心
oracle数据库
SpringBladedict-biz/list接口SQL注入漏洞POC:构造请求包查看返回包你的网址/api/blade-system/dict-biz/list?updatexml(1,concat(0x7e,md5(1),0x7e),1)=1漏洞概述在SpringBlade框架中,如果dict-biz/list接口的后台处理逻辑没有正确地对用户输入进行过滤或参数化查询(PreparedSta
- spring如何整合druid连接池?
惜.己
springspringjunit数据库javaidea后端xml
目录spring整合druid连接池1.新建maven项目2.新建mavenModule3.导入相关依赖4.配置log4j2.xml5.配置druid.xml1)xml中如何引入properties2)下面是配置文件6.准备jdbc.propertiesJDBC配置项解释7.配置druid8.测试spring整合druid连接池1.新建maven项目打开IDE(比如IntelliJIDEA,Ecl
- Kafka是如何保证数据的安全性、可靠性和分区的
喜欢猪猪
kafka分布式
Kafka作为一个高性能、可扩展的分布式流处理平台,通过多种机制来确保数据的安全性、可靠性和分区的有效管理。以下是关于Kafka如何保证数据安全性、可靠性和分区的详细解析:一、数据安全性SSL/TLS加密:Kafka支持SSL/TLS协议,通过配置SSL证书和密钥来加密数据传输,确保数据在传输过程中不会被窃取或篡改。这一机制有效防止了中间人攻击,保护了数据的安全性。SASL认证:Kafka支持多种
- SpringCloudAlibaba—Sentinel(限流)
菜鸟爪哇
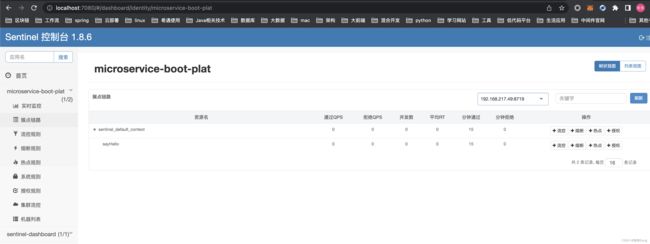
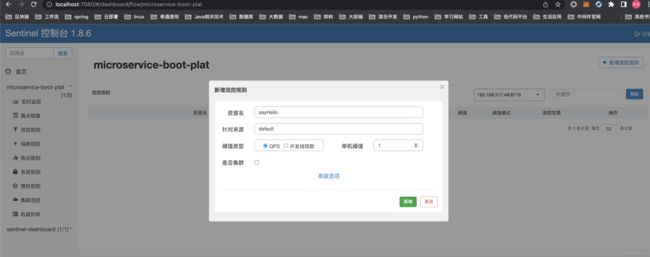
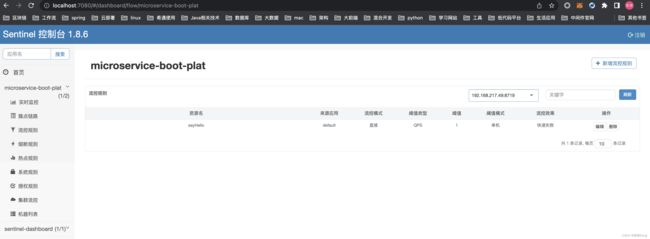
前言:自己在学习过程的记录,借鉴别人文章,记录自己实现的步骤。借鉴文章:https://blog.csdn.net/u014494148/article/details/105484410Sentinel介绍Sentinel诞生于阿里巴巴,其主要目标是流量控制和服务熔断。Sentinel是通过限制并发线程的数量(即信号隔离)来减少不稳定资源的影响,而不是使用线程池,省去了线程切换的性能开销。当资源
- springboot+vue项目实战一-创建SpringBoot简单项目
苹果酱0567
面试题汇总与解析springboot后端java中间件开发语言
这段时间抽空给女朋友搭建一个个人博客,想着记录一下建站的过程,就当做笔记吧。虽然复制zjblog只要一个小时就可以搞定一个网站,或者用cms系统,三四个小时就可以做出一个前后台都有的网站,而且想做成啥样也都行。但是就是要从新做,自己做的意义不一样,更何况,俺就是专门干这个的,嘿嘿嘿要做一个网站,而且从零开始,首先呢就是技术选型了,经过一番思量决定选择-SpringBoot做后端,前端使用Vue做一
- Spring MVC 全面指南:从入门到精通的详细解析
一杯梅子酱
技术栈学习springmvcjava
引言:SpringMVC,作为Spring框架的一个重要模块,为构建Web应用提供了强大的功能和灵活性。无论是初学者还是有一定经验的开发者,掌握SpringMVC都将显著提升你的Web开发技能。本文旨在为初学者提供一个全面且易于理解的学习路径,通过详细的知识点分析和实际案例,帮助你快速上手SpringMVC,让学习过程既深刻又高效。一、SpringMVC简介1.1什么是SpringMVC?Spri
- Spring Boot中实现跨域请求
BABA8891
springboot后端java
在SpringBoot中实现跨域请求(CORS,Cross-OriginResourceSharing)可以通过多种方式,以下是几种常见的方法:1.使用@CrossOrigin注解在SpringBoot中,你可以在控制器或者具体的请求处理方法上使用@CrossOrigin注解来允许跨域请求。在控制器上应用:importorg.springframework.web.bind.annotation.
- WebMagic:强大的Java爬虫框架解析与实战
Aaron_945
Javajava爬虫开发语言
文章目录引言官网链接WebMagic原理概述基础使用1.添加依赖2.编写PageProcessor高级使用1.自定义Pipeline2.分布式抓取优点结论引言在大数据时代,网络爬虫作为数据收集的重要工具,扮演着不可或缺的角色。Java作为一门广泛使用的编程语言,在爬虫开发领域也有其独特的优势。WebMagic是一个开源的Java爬虫框架,它提供了简单灵活的API,支持多线程、分布式抓取,以及丰富的
- 博客网站制作教程
2401_85194651
javamaven
首先就是技术框架:后端:Java+SpringBoot数据库:MySQL前端:Vue.js数据库连接:JPA(JavaPersistenceAPI)1.项目结构blog-app/├──backend/│├──src/main/java/com/example/blogapp/││├──BlogApplication.java││├──config/│││└──DatabaseConfig.java
- RabbitMQ生产者重复机制与确认机制
java炒饭小能手
java-rabbitmqrabbitmqjava
重复机制生产者发送消息时,出现了网络故障,导致与MQ的连接中断。为了解决这个问题,SpringAMQP提供的消息发送时的重试机制。即:当RabbitTemplate与MQ连接超时后,多次重试。需要修该发送端模块的application.yaml文件,添加下面的内容:spring:rabbitmq:connection-timeout:1s#设置MQ的连接超时时间template:retry:ena
- 华为云分布式缓存服务DCS 8月新特性发布
华为云PaaS服务小智
华为云分布式缓存
分布式缓存服务(DistributedCacheService,简称DCS)是华为云提供的一款兼容Redis的高速内存数据处理引擎,为您提供即开即用、安全可靠、弹性扩容、便捷管理的在线分布式缓存能力,满足用户高并发及数据快速访问的业务诉求。此次为大家带来DCS8月的特性更新内容,一起来看看吧!
- 浅谈MapReduce
Android路上的人
Hadoop分布式计算mapreduce分布式框架hadoop
从今天开始,本人将会开始对另一项技术的学习,就是当下炙手可热的Hadoop分布式就算技术。目前国内外的诸多公司因为业务发展的需要,都纷纷用了此平台。国内的比如BAT啦,国外的在这方面走的更加的前面,就不一一列举了。但是Hadoop作为Apache的一个开源项目,在下面有非常多的子项目,比如HDFS,HBase,Hive,Pig,等等,要先彻底学习整个Hadoop,仅仅凭借一个的力量,是远远不够的。
- 【Java】已解决:org.springframework.jdbc.datasource.lookup.DataSourceLookupFailureException
屿小夏
java开发语言
文章目录一、分析问题背景问题背景描述出现问题的场景二、可能出错的原因三、错误代码示例四、正确代码示例五、注意事项已解决:org.springframework.jdbc.datasource.lookup.DataSourceLookupFailureException在使用Spring框架进行开发时,数据源的配置和使用是非常关键的一环。然而,有时候我们可能会遇到org.springframewo
- SpringBoot和SpringMVC是什么关系?SpringBoot替代SpringMVC了吗?
瑞金彭于晏
springboot后端javaMVCspring数据库
SpringBoot和SpringMVC都是SpringFramework生态系统中的一部分,但它们各自扮演着不同的角色和提供不同的功能集。理解它们之间的关系,首先需要了解SpringFramework本身。SpringFrameworkSpringFramework是一个全面的、开源的应用程序开发框架,它提供了广泛的功能来支持企业应用开发的几乎所有方面。SpringFramework的核心特性之
- spring mvc @RequestBody String类型参数
zoyation
spring-mvcspringmvc
通过如下配置:text/html;charset=UTF-8application/json;charset=UTF-8在springmvc的Controller层使用@RequestBody接收Content-Type为application/json的数据时,默认支持Map方式和对象方式参数@RequestMapping(value="/{code}/saveUser",method=Requ
- Java -jar 如何在后台运行项目
vincent_hahaha
撸了今年阿里、头条和美团的面试,我有一个重要发现.......>>>说到运行jar包通常我们都会以下面的方式运行:java-jarspringboot-0.0.1-SNAPSHOT.jar这样运行的话会有一个问题,就是我们一关闭当前窗口就会停止运行项目,要想解决这个问题,就需要在后台运行。nohupjava-jarbabyshark-0.0.1-SNAPSHOT.jar >log.file 2>&
- spring security中几大组件的作用和执行顺序
阿信在这里
javaspring
springsecurity中几大组件的作用和执行顺序在SpringSecurity中,AuthenticationProvider、GroupPermissionEvaluator、PermissionEvaluator、AbstractAuthenticationProcessingFilter、DefaultMethodSecurityExpressionHandler和ManageSecu
- KVM+GFS分布式存储系统构建KVM高可用
henan程序媛
分布式GFS高可用KVM
一、案列分析1.1案列概述本章案例主要使用之前章节所学的KVM及GlusterFs技术,结合起来从而实现KVM高可用。利用GlusterFs分布式复制卷,对KVM虚拟机文件进行分布存储和冗余。分布式复制卷主要用于需要冗余的情况下把一个文件存放在两个或两个以上的节点,当其中一个节点数据丢失或者损坏之后,KVM仍然能够通过卷组找到另一节点上存储的虚拟机文件,以保证虚拟机正常运行。当节点修复之后,Glu
- 探索Zebra4J:构建高效企业级Web应用的微服务框架
叶准鑫Natalie
探索Zebra4J:构建高效企业级Web应用的微服务框架ZebraZebra4J/Zebra4Js基于SpringBoot的JavaWeb/Nodejs框架项目地址:https://gitcode.com/gh_mirrors/zebra/Zebra项目介绍在当今快速发展的技术环境中,构建高效、可扩展的企业级Web应用是每个开发团队的追求。Zebra4J作为一款基于SpringBoot的全新微服务
- Hadoop
傲雪凌霜,松柏长青
后端大数据hadoop大数据分布式
ApacheHadoop是一个开源的分布式计算框架,主要用于处理海量数据集。它具有高度的可扩展性、容错性和高效的分布式存储与计算能力。Hadoop核心由四个主要模块组成,分别是HDFS(分布式文件系统)、MapReduce(分布式计算框架)、YARN(资源管理)和HadoopCommon(公共工具和库)。1.HDFS(HadoopDistributedFileSystem)HDFS是Hadoop生
- 大模型训练数据库Common Crawl
WindyChanChan
数据集语言模型数据库
CommonCrawl介绍CommonCrawl是一个非营利组织,致力于通过大规模分布式爬虫系统定期抓取整个Web并将其存储在一个可公开访问的数据库中。CommonCrawl的数据收集和处理过程包括使用Python开源爬虫工具收集全球范围内的网站数据,并将其上传到CommonCrawl基金会的数据仓库中。该项目从2008年开始,至今已经积累了大量的原始网页数据、元数据和文本提取数据。这些数据
- 基于JavaWeb开发的Java+SpringMvc+vue+element实现上海汽车博物馆平台
网顺技术团队
成品程序项目javavue.js汽车课程设计springboot
基于JavaWeb开发的Java+SpringMvc+vue+element实现上海汽车博物馆平台作者主页网顺技术团队欢迎点赞收藏⭐留言文末获取源码联系方式查看下方微信号获取联系方式承接各种定制系统精彩系列推荐精彩专栏推荐订阅不然下次找不到哟Java毕设项目精品实战案例《1000套》感兴趣的可以先收藏起来,还有大家在毕设选题,项目以及论文编写等相关问题都可以给我留言咨询,希望帮助更多的人文章目录基
- 慢速连接攻击是什么?慢速连接攻击怎么防护?
快快小毛毛
网络ddos服务器
慢速连接攻击(SlowConnectionAttack),又称慢速攻击(SlowlorisAttack),是一种网络攻击技术,旨在通过占用服务器上的所有可用连接资源来使其无法响应正常请求。与传统的拒绝服务(DoS)和分布式拒绝服务(DDoS)攻击不同,慢速攻击并不依赖于发送大量数据包来消耗带宽,而是利用HTTP、TCP或SSL等协议的特性,通过发送大量不完整的请求或缓慢发送数据来占用服务器资源,使
- 分布式锁和spring事务管理
暴躁的鱼
锁及事务分布式springjava
最近开发一个小程序遇到一个需求需要实现分布式事务管理业务需求用户在使用小程序的过程中可以查看景点,对景点地区或者城市标记是否想去,那么需要统计一个地点被标记的人数,以及记录某个用户对某个地点是否标记为想去,用两个表存储数据,一个地点表记录改地点被标记的次数,一个用户意向表记录某个用户对某个地点是否标记为想去。由于可能有多个用户同时标记一个地点,每个用户在前端点击想去按钮之后,后台接收到请求,从数据
- Gobelieve 架构
weixin_34099526
数据库golangjson
Gobelievegithub地址声明:转简书JackieF的文章,为了自己方便copy了一份,加一些自己的东西.链接:https://www.jianshu.com/p/8121d6e85282IMCore主要分三大块:im客户连接服务器(可分布式部署,暂无负载均衡模块)imr路由查询服务器(主要解决im分布式部署的问题)ims存储服务器(主从部署)基础模块1.数据包协议包:header(12)
- 如何重启Linux服务器?
老男孩IT教育
gitlinux运维
在Linux操作系统中,提供了多种方法用于重启服务器,那么Linux服务器如何重启?以下列举了常用的几种方法,希望对大家有所帮助,快来看看吧。重启Linux服务器有以下几种方法:1、使用命令行使用reboot命令reboot使用shutdown命令shutdown-rnow2、使用systemctl使用以下命令:systemctlreboot3、使用web界面大多数现代Linux发行版本都提供一个
- Java面试笔记记录6
今天背八股了吗
java面试笔记
1.Spring是什么?特性?有哪些模块?Spring是一个轻量级、非入侵式的控制反转Ioc和面向切面AOP的框架。特性:1.Ioc和DISpring的核心就是一个大的工厂容器,可以维护所有对象的创建和依赖关系,Spring工厂用于生成Bean,并且管理Bean的生命周期,实现高内聚低耦合的设计理念。2.AOP编程Spring提供面向切面编程,可以方便实现对程序进行权限拦截、运行监控等切面功能。3
- sentinel 不显示项目_Sentinel相关问题记录
weixin_39840606
sentinel不显示项目
SentinelFAQ整理Sentinel承接阿里巴巴近10年双十一大促流量的核心场景,以流量为切入点,从流量控制、熔断降级、系统负载保护等多个维度保护服务的稳定性。其提供丰富的应用场景支持、完备的监控能力、易用的拓展点。Note:中文文档请见此处。热点问题1、Q:dashboard不展示监控问题如何排查?dashboard是一个单独启动的控制台,引入sentinel的应用是一个客户端。它们各自有
- iOS http封装
374016526
ios服务器交互http网络请求
程序开发避免不了与服务器的交互,这里打包了一个自己写的http交互库。希望可以帮到大家。
内置一个basehttp,当我们创建自己的service可以继承实现。
KuroAppBaseHttp *baseHttp = [[KuroAppBaseHttp alloc] init];
[baseHttp setDelegate:self];
[baseHttp
- lolcat :一个在 Linux 终端中输出彩虹特效的命令行工具
brotherlamp
linuxlinux教程linux视频linux自学linux资料
那些相信 Linux 命令行是单调无聊且没有任何乐趣的人们,你们错了,这里有一些有关 Linux 的文章,它们展示着 Linux 是如何的有趣和“淘气” 。
在本文中,我将讨论一个名为“lolcat”的小工具 – 它可以在终端中生成彩虹般的颜色。
何为 lolcat ?
Lolcat 是一个针对 Linux,BSD 和 OSX 平台的工具,它类似于 cat 命令,并为 cat
- MongoDB索引管理(1)——[九]
eksliang
mongodbMongoDB管理索引
转载请出自出处:http://eksliang.iteye.com/blog/2178427 一、概述
数据库的索引与书籍的索引类似,有了索引就不需要翻转整本书。数据库的索引跟这个原理一样,首先在索引中找,在索引中找到条目以后,就可以直接跳转到目标文档的位置,从而使查询速度提高几个数据量级。
不使用索引的查询称
- Informatica参数及变量
18289753290
Informatica参数变量
下面是本人通俗的理解,如有不对之处,希望指正 info参数的设置:在info中用到的参数都在server的专门的配置文件中(最好以parma)结尾 下面的GLOBAl就是全局的,$开头的是系统级变量,$$开头的变量是自定义变量。如果是在session中或者mapping中用到的变量就是局部变量,那就把global换成对应的session或者mapping名字。
[GLOBAL] $Par
- python 解析unicode字符串为utf8编码字符串
酷的飞上天空
unicode
php返回的json字符串如果包含中文,则会被转换成\uxx格式的unicode编码字符串返回。
在浏览器中能正常识别这种编码,但是后台程序却不能识别,直接输出显示的是\uxx的字符,并未进行转码。
转换方式如下
>>> import json
>>> q = '{"text":"\u4
- Hibernate的总结
永夜-极光
Hibernate
1.hibernate的作用,简化对数据库的编码,使开发人员不必再与复杂的sql语句打交道
做项目大部分都需要用JAVA来链接数据库,比如你要做一个会员注册的 页面,那么 获取到用户填写的 基本信后,你要把这些基本信息存入数据库对应的表中,不用hibernate还有mybatis之类的框架,都不用的话就得用JDBC,也就是JAVA自己的,用这个东西你要写很多的代码,比如保存注册信
- SyntaxError: Non-UTF-8 code starting with '\xc4'
随便小屋
python
刚开始看一下Python语言,传说听强大的,但我感觉还是没Java强吧!
写Hello World的时候就遇到一个问题,在Eclipse中写的,代码如下
'''
Created on 2014年10月27日
@author: Logic
'''
print("Hello World!");
运行结果
SyntaxError: Non-UTF-8
- 学会敬酒礼仪 不做酒席菜鸟
aijuans
菜鸟
俗话说,酒是越喝越厚,但在酒桌上也有很多学问讲究,以下总结了一些酒桌上的你不得不注意的小细节。
细节一:领导相互喝完才轮到自己敬酒。敬酒一定要站起来,双手举杯。
细节二:可以多人敬一人,决不可一人敬多人,除非你是领导。
细节三:自己敬别人,如果不碰杯,自己喝多少可视乎情况而定,比如对方酒量,对方喝酒态度,切不可比对方喝得少,要知道是自己敬人。
细节四:自己敬别人,如果碰杯,一
- 《创新者的基因》读书笔记
aoyouzi
读书笔记《创新者的基因》
创新者的基因
创新者的“基因”,即最具创意的企业家具备的五种“发现技能”:联想,观察,实验,发问,建立人脉。
第一部分破坏性创新,从你开始
第一章破坏性创新者的基因
如何获得启示:
发现以下的因素起到了催化剂的作用:(1) -个挑战现状的问题;(2)对某项技术、某个公司或顾客的观察;(3) -次尝试新鲜事物的经验或实验;(4)与某人进行了一次交谈,为他点醒
- 表单验证技术
百合不是茶
JavaScriptDOM对象String对象事件
js最主要的功能就是验证表单,下面是我对表单验证的一些理解,贴出来与大家交流交流 ,数显我们要知道表单验证需要的技术点, String对象,事件,函数
一:String对象;通常是对字符串的操作;
1,String的属性;
字符串.length;表示该字符串的长度;
var str= "java"
- web.xml配置详解之context-param
bijian1013
javaservletweb.xmlcontext-param
一.格式定义:
<context-param>
<param-name>contextConfigLocation</param-name>
<param-value>contextConfigLocationValue></param-value>
</context-param>
作用:该元
- Web系统常见编码漏洞(开发工程师知晓)
Bill_chen
sqlPHPWebfckeditor脚本
1.头号大敌:SQL Injection
原因:程序中对用户输入检查不严格,用户可以提交一段数据库查询代码,根据程序返回的结果,
获得某些他想得知的数据,这就是所谓的SQL Injection,即SQL注入。
本质:
对于输入检查不充分,导致SQL语句将用户提交的非法数据当作语句的一部分来执行。
示例:
String query = "SELECT id FROM users
- 【MongoDB学习笔记六】MongoDB修改器
bit1129
mongodb
本文首先介绍下MongoDB的基本的增删改查操作,然后,详细介绍MongoDB提供的修改器,以完成各种各样的文档更新操作 MongoDB的主要操作
show dbs 显示当前用户能看到哪些数据库
use foobar 将数据库切换到foobar
show collections 显示当前数据库有哪些集合
db.people.update,update不带参数,可
- 提高职业素养,做好人生规划
白糖_
人生
培训讲师是成都著名的企业培训讲师,他在讲课中提出的一些观点很新颖,在此我收录了一些分享一下。注:讲师的观点不代表本人的观点,这些东西大家自己揣摩。
1、什么是职业规划:职业规划并不完全代表你到什么阶段要当什么官要拿多少钱,这些都只是梦想。职业规划是清楚的认识自己现在缺什么,这个阶段该学习什么,下个阶段缺什么,又应该怎么去规划学习,这样才算是规划。
- 国外的网站你都到哪边看?
bozch
技术网站国外
学习软件开发技术,如果没有什么英文基础,最好还是看国内的一些技术网站,例如:开源OSchina,csdn,iteye,51cto等等。
个人感觉如果英语基础能力不错的话,可以浏览国外的网站来进行软件技术基础的学习,例如java开发中常用的到的网站有apache.org 里面有apache的很多Projects,springframework.org是spring相关的项目网站,还有几个感觉不错的
- 编程之美-光影切割问题
bylijinnan
编程之美
package a;
public class DisorderCount {
/**《编程之美》“光影切割问题”
* 主要是两个问题:
* 1.数学公式(设定没有三条以上的直线交于同一点):
* 两条直线最多一个交点,将平面分成了4个区域;
* 三条直线最多三个交点,将平面分成了7个区域;
* 可以推出:N条直线 M个交点,区域数为N+M+1。
- 关于Web跨站执行脚本概念
chenbowen00
Web安全跨站执行脚本
跨站脚本攻击(XSS)是web应用程序中最危险和最常见的安全漏洞之一。安全研究人员发现这个漏洞在最受欢迎的网站,包括谷歌、Facebook、亚马逊、PayPal,和许多其他网站。如果你看看bug赏金计划,大多数报告的问题属于 XSS。为了防止跨站脚本攻击,浏览器也有自己的过滤器,但安全研究人员总是想方设法绕过这些过滤器。这个漏洞是通常用于执行cookie窃取、恶意软件传播,会话劫持,恶意重定向。在
- [开源项目与投资]投资开源项目之前需要统计该项目已有的用户数
comsci
开源项目
现在国内和国外,特别是美国那边,突然出现很多开源项目,但是这些项目的用户有多少,有多少忠诚的粉丝,对于投资者来讲,完全是一个未知数,那么要投资开源项目,我们投资者必须准确无误的知道该项目的全部情况,包括项目发起人的情况,项目的维持时间..项目的技术水平,项目的参与者的势力,项目投入产出的效益.....
- oracle alert log file(告警日志文件)
daizj
oracle告警日志文件alert log file
The alert log is a chronological log of messages and errors, and includes the following items:
All internal errors (ORA-00600), block corruption errors (ORA-01578), and deadlock errors (ORA-00060)
- 关于 CAS SSO 文章声明
denger
SSO
由于几年前写了几篇 CAS 系列的文章,之后陆续有人参照文章去实现,可都遇到了各种问题,同时经常或多或少的收到不少人的求助。现在这时特此说明几点:
1. 那些文章发表于好几年前了,CAS 已经更新几个很多版本了,由于近年已经没有做该领域方面的事情,所有文章也没有持续更新。
2. 文章只是提供思路,尽管 CAS 版本已经发生变化,但原理和流程仍然一致。最重要的是明白原理,然后
- 初二上学期难记单词
dcj3sjt126com
englishword
lesson 课
traffic 交通
matter 要紧;事物
happy 快乐的,幸福的
second 第二的
idea 主意;想法;意见
mean 意味着
important 重要的,重大的
never 从来,决不
afraid 害怕 的
fifth 第五的
hometown 故乡,家乡
discuss 讨论;议论
east 东方的
agree 同意;赞成
bo
- uicollectionview 纯代码布局, 添加头部视图
dcj3sjt126com
Collection
#import <UIKit/UIKit.h>
@interface myHeadView : UICollectionReusableView
{
UILabel *TitleLable;
}
-(void)setTextTitle;
@end
#import "myHeadView.h"
@implementation m
- N 位随机数字串的 JAVA 生成实现
FX夜归人
javaMath随机数Random
/**
* 功能描述 随机数工具类<br />
* @author FengXueYeGuiRen
* 创建时间 2014-7-25<br />
*/
public class RandomUtil {
// 随机数生成器
private static java.util.Random random = new java.util.R
- Ehcache(09)——缓存Web页面
234390216
ehcache页面缓存
页面缓存
目录
1 SimplePageCachingFilter
1.1 calculateKey
1.2 可配置的初始化参数
1.2.1 cach
- spring中少用的注解@primary解析
jackyrong
primary
这次看下spring中少见的注解@primary注解,例子
@Component
public class MetalSinger implements Singer{
@Override
public String sing(String lyrics) {
return "I am singing with DIO voice
- Java几款性能分析工具的对比
lbwahoo
java
Java几款性能分析工具的对比
摘自:http://my.oschina.net/liux/blog/51800
在给客户的应用程序维护的过程中,我注意到在高负载下的一些性能问题。理论上,增加对应用程序的负载会使性能等比率的下降。然而,我认为性能下降的比率远远高于负载的增加。我也发现,性能可以通过改变应用程序的逻辑来提升,甚至达到极限。为了更详细的了解这一点,我们需要做一些性能
- JVM参数配置大全
nickys
jvm应用服务器
JVM参数配置大全
/usr/local/jdk/bin/java -Dresin.home=/usr/local/resin -server -Xms1800M -Xmx1800M -Xmn300M -Xss512K -XX:PermSize=300M -XX:MaxPermSize=300M -XX:SurvivorRatio=8 -XX:MaxTenuringThreshold=5 -
- 搭建 CentOS 6 服务器(14) - squid、Varnish
rensanning
varnish
(一)squid
安装
# yum install httpd-tools -y
# htpasswd -c -b /etc/squid/passwords squiduser 123456
# yum install squid -y
设置
# cp /etc/squid/squid.conf /etc/squid/squid.conf.bak
# vi /etc/
- Spring缓存注解@Cache使用
tom_seed
spring
参考资料
http://www.ibm.com/developerworks/cn/opensource/os-cn-spring-cache/
http://swiftlet.net/archives/774
缓存注解有以下三个:
@Cacheable @CacheEvict @CachePut
- dom4j解析XML时出现"java.lang.noclassdeffounderror: org/jaxen/jaxenexception"错误
xp9802
java.lang.NoClassDefFoundError: org/jaxen/JaxenExc
关键字: java.lang.noclassdeffounderror: org/jaxen/jaxenexception
使用dom4j解析XML时,要快速获取某个节点的数据,使用XPath是个不错的方法,dom4j的快速手册里也建议使用这种方式
执行时却抛出以下异常:
Exceptio


