微信小程序用户登录及头像昵称设置教程(前后端)
目录
1.背景分析
2.具体需求分析
3.前端设计
3.1 用户登录
3.2 头像昵称填写(个人信息界面)
4.后端设计
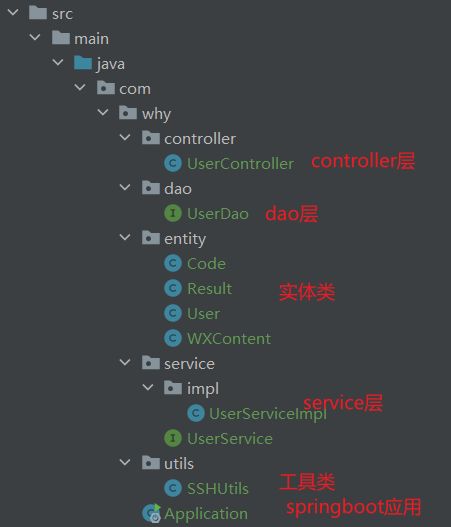
4.1项目架构分析
4.2 代码分析
实体类
dao层
service层
controller层
工具类
5.nginx部署
6.效果演示
1.背景分析
众所周知,微信小程序获取用户信息的接口经过了好几次调整,目前来说【wx.getUserProfile】 和【wx.getUserInfo】 这两个获取用户信息的接口都已经停用了,取而代之的是【头像昵称填写能力】:
详见小程序用户头像昵称获取规则调整公告:小程序用户头像昵称获取规则调整公告 | 微信开放社区
而与此同时,手机号快速验证组件将需要付费使用,及【获取用户手机号码】的功能要收费了....
详见:手机号快速验证组件 | 微信开放文档
这样的调整无疑会对用户身份信息的获取以及用户登录产生一定的影响,因此在本demo中采用【wx.login】进行登录,而不是获取用户手机号码进行登录;
在用户头像和昵称获取方面采用最新的接口来实现;
2.具体需求分析
前端页面:
- 登录页面:登录按钮
- 个人信息页面:展示/设置用户头像及昵称
流程:
- 在登录页面,用户点击按钮进行登录,需要判断用户是否已经登录过
- 如果用户尚未登录,为用户自动进行注册
- 如果用户已经登录过,则需要获取到用户之前已经设置过的用户头像和昵称,并展示在个人信息页面
- 在个人信息页面:
- 需要保证用户此时已经登录
- 用户可以设置头像,将设置的头像发送到服务器进行保存
- 用户可以设置昵称,将设置的昵称发送到服务器进行保存
数据库设计: 共有一张数据表:【user表】
user_id:用户id,用户身份的唯一标识,以微信用户的openid作为用户id
user_avatarurl:用户头像
user_name:用户昵称
技术栈:
- 前端:微信小程序原生开发,基于微信官方案例拓展
- 后端:采用SpringBoot框架开发,接口运行在本地
- 服务器:采用华为云服务器,部署nginx,主要功能是保存图片资源并提供静态资源访问的接口
3.前端设计
3.1 用户登录
用户登录全流程详见:小程序登录 | 微信开放文档
包括前后端对接以及微信接口服务的调用;
在前端开发部分主要使用的是微信提供的【wx.login】API: 接口文档:wx.login(Object object) | 微信开放文档
login页面具体设计如下:
①login.wxml:
一个简单的按钮组件,绑定【login】方法:
②login.wxss:
.container {
display: flex;
justify-content: center;
align-items: center;
width: 100%;
height: 100vh;
}
对按钮的位置进行居中设置,需要注意的是这里的【height】不能设置100%,否则垂直居中不起作用
vh,是css相对视口高度。1vh=1%*视口高度
至此页面绘制完毕,很简单:
③login.js:
Page({

    data: {

    },

    login() {
        wx.login({
            success: (res) => {
                console.log(res)
                var code = res.code //获取code
                wx.request({ //调用后端接口
                    url: 'http://localhost:8080/login',
                    method: 'POST',
                    header: {
                        'content-type': 'application/json'
                    },
                    data: {
                        code: code, //请求体中封装code
                    },
                    success(res)
                    {
                        console.log(res)
                        //页面跳转
                        wx.navigateTo({
                            //携带用户头像信息和用户昵称信息
                          url: '/index/index?userAvatarUrl=' + res.data.data.userAvatarUrl + '&userName=' + res.data.data.userName,
                        })
                    }
                })
            },
        })
    }
})
主要逻辑就是前端通过【wx.login】获取code,然后后端拿到code之后通过调用 微信服务端的【auth.code2Session】接口来换取用户唯一身份标识openId
如果用户不是第一次登录,则可能在之前的登录中设置过头像和昵称,因此后端接口的返回信息中需要有通过openId查询到的用户头像和用户昵称,前端获取到这些信息后通过页面跳转携带这些信息到达个人信息界面;
3.2 头像昵称填写(个人信息界面)
参考微信官方文档的【头像昵称填写功能】:
头像昵称填写 | 微信开放文档
需要注意该功能从基础库 2.21.2 开始支持,因此需要检查开发者工具中【调试基础库的版本】
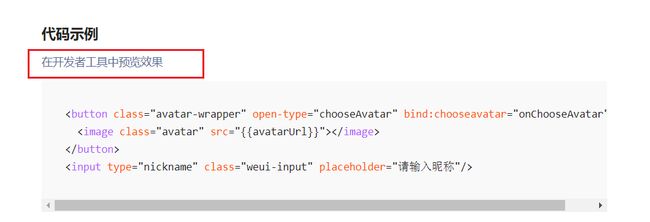
具体的前端代码参考了官方案例:
点击【在开发者工具中预览效果】即可下载代码
①index.wxml:
展示用户头像和昵称:
②index.wxss:页面简单布局
.avatar-wrapper {
  padding: 0;
  width: 56px !important;
  border-radius: 8px;
  margin-top: 40px;
  margin-bottom: 40px;
}

.avatar {
  display: block;
  width: 56px;
  height: 56px;
}

.container {
  display: flex;
}
③index.json:
导入了【weui】这个组件库,是官方案例中采用的组件库
相关信息可以参考:WeUI组件库简介 | 微信开放文档
这个组件库本人没用过,但可以推荐一款比较好用的组件库:Vant Weapp - 轻量、可靠的小程序 UI 组件库
{
    "usingComponents": {
        "mp-form-page": "weui-miniprogram/form-page/form-page",
        "mp-form": "weui-miniprogram/form/form",
        "mp-cells": "weui-miniprogram/cells/cells",
        "mp-cell": "weui-miniprogram/cell/cell"
    },
    "pageOrientation": "auto",
    "navigationBarTitleText": "我的"
}
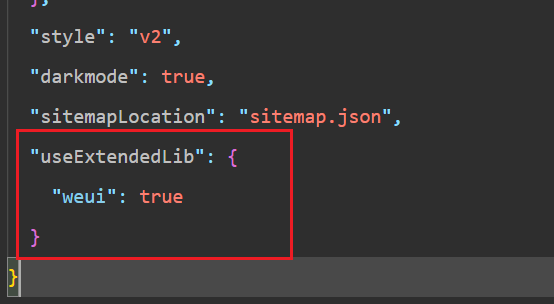
注意,如果不是直接下载的官方案例,而是自己想要用的话,不要忘记在【app.json】中设置:
至此页面绘制完毕:
接下来是js的逻辑:
④index.js:
const app = getApp()

//默认头像
const defaultAvatarUrl = 'https://mmbiz.qpic.cn/mmbiz/icTdbqWNOwNRna42FI242Lcia07jQodd2FJGIYQfG0LAJGFxM4FbnQP6yfMxBgJ0F3YRqJCJ1aPAK2dQagdusBZg/0'


Page({
    data: {
        avatarUrl: defaultAvatarUrl, //用户头像
        theme: wx.getSystemInfoSync().theme,
        nickName: "" //用户昵称
    },

    //onLoad方法
    onLoad(options) {
        //接收到登录页面传过来的头像和昵称
        if (options.userAvatarUrl != "null") { //进行判空处理
            this.setData({
                //这里的地址是华为云服务器的地址,需要进行nginx配置
                avatarUrl: "http://117.78.3.175/" + options.userAvatarUrl
            })
        }
        if (options.userName != "null") {
            this.setData({
                nickName: options.userName
            })
        }
        //监听主题改变事件(与本demo功能无关)
        wx.onThemeChange((result) => {
            this.setData({
                theme: result.theme
            })
        })
    },

    //用户选择头像
    onChooseAvatar(e) {
        var that = this;
        console.log(e.detail)
        const {
            avatarUrl
        } = e.detail

        this.setData({
            avatarUrl
        })

        //对临时图片链接进行base64编码
        var avatarUrl_base64 = 'data:image/jpeg;base64,' + wx.getFileSystemManager().readFileSync(this.data.avatarUrl, 'base64')

        //将编码后的图片发送到服务器进行存储
        wx.request({
            url: 'http://localhost:8080/upLoadImage',
            method: 'POST',
            header: {
                'content-type': 'application/json'
            },
            data: {
                avatarUrl: avatarUrl_base64, //请求体中封装编码后的图片
            },
            success(res) {
                console.log(res)
            }
        })
    },

    //获取用户昵称
    getNickName(e) {
        var that = this;
        var username = e.detail.value
        //将编码后的图片发送到服务器进行存储
        wx.request({
            url: 'http://localhost:8080/setUserName',
            method: 'POST',
            header: {
                'content-type': 'application/json'
            },
            data: {
                username: username, //请求体中封装编码后的图片
            },
            success(res) {
                console.log(res)
                that.setData({
                    nickName: e.detail.value
                })
            }
        })

    }
})
一共需要访问两个接口:设置用户头像和设置用户昵称
简单的流程就是用户在前端设置好头像/昵称之后将设置的内容发送到后端接口,然后进行持久化的存储;
这里需要特别注意的是用户头像的处理,因为通过微信最新提供的【头像昵称获取能力】,我们获取到的头像是一个临时链接,其格式如下:
http://tmp/FQvGKAKmSs4fef9778ae6f68da86726aa6992beae979.jpeg
这个链接在浏览器中也是无法打开的
因此我们无法直接将这个链接存储到数据库中,否则下一次访问的时候这个链接就失效了,起不到持久化存储的作用;
解决方法:
- 对临时图片链接进行base64编码,发送到后端接口,在后端对编码后的数据进行解码,得到字节数组,然后将字节数组通过jsch框架提供的sftp文件上传通道上传到华为云服务器,并将该图片的名称存储到数据库中
- 在华为云服务器上安装nginx来访问静态资源,这样我们获取到云服务器的ip地址以及图片资源的名称(数据库中存储了)后即可访问图片资源
4.后端设计
采用SpringBoot + Maven + Mybatis 进行开发,maven版本是3.6.3
有关环境配置相关内容参考:百度翻译API使用教程(前端+后端)_百度翻译接口_THE WHY的博客-CSDN博客
的后端代码部分,这里不再赘述
由于我创建SpringBoot项目使用的是专业版的IDEA,所以如果不是专业版的IDEA,可以自己配置SpringBoot环境,项目中使用到的pom.xml依赖提供如下:
			org.springframework.boot
			spring-boot-starter-web


			org.springframework.boot
			spring-boot-starter-test
			test


			org.springframework.boot
			spring-boot-configuration-processor
			true


			cn.hutool
			hutool-all
			5.7.16


			org.mybatis.spring.boot
			mybatis-spring-boot-starter
			3.0.2


			com.mysql
			mysql-connector-j
			runtime


			org.mybatis.spring.boot
			mybatis-spring-boot-starter-test
			3.0.2
			test


			com.jcraft
			jsch
			0.1.54
4.1项目架构分析
4.2 代码分析
实体类
①User:用户类
public class User {

    private String userId; //id
    public String userAvatarUrl; //头像
    public String userName; //昵称

    public String getUserId() {
        return userId;
    }

    public void setUserId(String userId) {
        this.userId = userId;
    }

    public String getUserAvatarUrl() {
        return userAvatarUrl;
    }

    public void setUserAvatarUrl(String userAvatarUrl) {
        this.userAvatarUrl = userAvatarUrl;
    }

    public String getUserName() {
        return userName;
    }

    public void setUserName(String userName) {
        this.userName = userName;
    }

    @Override
    public String toString() {
        return "User{" +
                "userId='" + userId + '\'' +
                ", userAvatarUrl='" + userAvatarUrl + '\'' +
                ", userName='" + userName + '\'' +
                '}';
    }
}
②Code:状态码:定义了返回前端的状态码
package com.why.entity;

public class Code {
    public static final Integer LOGIN_ALREADY = 10001; //用户已经登录
    public static final Integer LOGIN_NOT = 10002; //用户尚未登录

    public static final Integer IMAGE_SET_SUCCESS = 10011; //图片上传成功

    public static final Integer IMAGE_SET_FAIL = 10012; //图片上传失败

    public static final Integer NAME_SET_SUCCESS = 10021; //名字设置成功

    public static final Integer NAME_SET_FAIL = 10022; //名字设置失败

    public static final Integer ERROR = 20000; //服务器错误

}
③Result:定义了返回前端的数据的格式:
package com.why.entity;

public class Result {
    private Object data;
    private Integer code;
    private String msg;

    public Result(Object data, Integer code, String msg) {
        this.data = data;
        this.code = code;
        this.msg = msg;
    }

    public Result(Integer code, String msg) {
        this.code = code;
        this.msg = msg;
    }

    public Result(Object data, Integer code) {
        this.data = data;
        this.code = code;
    }

    @Override
    public String toString() {
        return "Result{" +
                "data=" + data +
                ", code=" + code +
                ", msg='" + msg + '\'' +
                '}';
    }

    public Object getData() {
        return data;
    }

    public void setData(Object data) {
        this.data = data;
    }

    public Integer getCode() {
        return code;
    }

    public void setCode(Integer code) {
        this.code = code;
    }

    public String getMsg() {
        return msg;
    }

    public void setMsg(String msg) {
        this.msg = msg;
    }
}
④WXContent:微信小程序相关内容,包括获取openid需要使用的appid和appsecret:
public class WXContent {
    public static final String APPID = "你的APPID";
    public static final String APPSECRET = "你的APPSECRET";

}
dao层
UserDao:
@Mapper
public interface UserDao {

    /**
     * 获取用户所有信息
     * @return
     */
    @Select("select * from user")
    public List getAll();

    /**
     * 用户注册
     * @param userId
     * @return
     */
    @Insert("insert into user(user_id) values(#{userId})")
    public int insertId(String userId);

    /**
     * 用户设置头像
     * @param userId
     * @param image
     * @return
     */
    @Insert("update user set user_avatarurl = #{image} where user_id = #{userId}")
    public int insertImage(String userId, String image);

    /**
     * 用户设置昵称
     * @param userId
     * @param name
     * @return
     */
    @Insert("update user set user_name = #{name} where user_id = #{userId}")
    public int insertName(String userId, String name);

    /**
     * 查看所有用户
     * @param openid
     * @return
     */
    @Select("select user_id as userId, user_avatarurl as userAvatarUrl, user_name as userName from user where user_id = #{openid}")
    public List getById(String openid);

}
采用mybatis的注解形式进行开发;
这里需要注意一下【查看所有用户】的方法:由于数据库中的字段名和User类中的变量名并不统一,因此我们可以通过赋别名的方法来让从数据库中查询出的内容装载到User类的实例中;
也可以采用xml文件的方式来进行配置,可以自行查找方法
service层
①UserService:
public interface UserService {
    public List getAll();

    public int insertId(String userId);

    public int insertImage(String userId, String image);

    public int insertName(String userId, String name);

    public List getById(String openid);

}
②UserServiceImpl:
@Service
public class UserServiceImpl implements UserService {

    @Autowired
    private UserDao userDao;

    @Override
    public List getAll() {
        return userDao.getAll();
    }

    @Override
    public int insertId(String userId) {
        return userDao.insertId(userId);
    }

    @Override
    public int insertImage(String userId, String image) {
        return userDao.insertImage(userId, image);
    }

    @Override
    public int insertName(String userId, String name) {
        return userDao.insertName(userId, name);
    }

    @Override
    public List getById(String openid) {
        return userDao.getById(openid);
    }
}
controller层
UserController:(一共有三个接口:登录/上传图片/设置昵称)
@RestController
public class UserController {
@Autowired
private UserService userService;
private String openid = "";
/**
* 用户登录
* @param data
* @return
*/
@PostMapping("/login")
public Result login(@RequestBody Map data)
{
String code = data.get("code").toString();
String url = "https://api.weixin.qq.com/sns/jscode2session?appid=" + WXContent.APPID + "&secret=" + WXContent.APPSECRET
+ "&js_code=" + code + "&grant_type=authorization_code";
RestTemplate restTemplate = new RestTemplate();
MappingJackson2HttpMessageConverter mappingJackson2HttpMessageConverter = new MappingJackson2HttpMessageConverter();
mappingJackson2HttpMessageConverter.setSupportedMediaTypes(Arrays.asList(
MediaType.TEXT_HTML,
MediaType.TEXT_PLAIN
));
restTemplate.getMessageConverters().add(mappingJackson2HttpMessageConverter);
ResponseEntity - 其中【login】接口的开发可以参考:小程序登录 | 微信开放文档;由于【RestTemplate】默认不支持text_plain格式,所以我们需要通过【MappingJackson2HttpMessageConverter】来添加text_plain格式,否则会报错;
- 【upLoadImage】的开发需要参考下面的工具类SSHUtils,就是解码base64格式的文件,然后通过sftp通道上传到服务器
工具类
SSHUtils:实现文件上传的功能
public class SSHUtils {
    /**
     * \文件上传
     * @param fileBytes 文件字节数组
     * @param fileName 文件名
     * @throws Exception
     */
    public static void sftp(byte[] fileBytes,String fileName) throws Exception{
        String ip = "你的服务器ip地址"; //ip地址
        String username = "用户名"; //用户名
        String password = "密码"; //密码
        int port = 22; //端口号
        String filePath = "文件路径"; //文件路径

        JSch jsch = new JSch();

        //创建session连接
        Session session = jsch.getSession(username, ip ,port);
        if (session == null) {
            throw new Exception("session create error");
        }
        session.setPassword(password);//设置密码
        session.setConfig("StrictHostKeyChecking", "no"); //设置登陆提示为"no"
        session.connect(1000); //设置超时时间

        //创建通信通道
        Channel channel = (Channel) session.openChannel("sftp");
        if (channel == null)
        {
            throw new Exception("channel create error");
        }
        channel.connect(1000); //设置超时时间
        ChannelSftp sftp = (ChannelSftp) channel; //创建sftp通道

        OutputStream outputStream = null;
        //开始文件上传
        try {
            sftp.cd(filePath); //进入指定文件路径
            outputStream =sftp.put(fileName);
            outputStream.write(fileBytes);
        }catch (Exception e) {
            e.printStackTrace();
            throw new Exception("file upload failed");
        } finally {
            if(outputStream != null){ //关闭文件流
                outputStream.flush();
                outputStream.close();
            }
            if(channel != null){ //关闭通道
                channel.disconnect();
            }
            if(session != null){ //关闭链接
                session.disconnect();
            }

        }
    }
}
5.nginx部署
1.安装所需的安装包的编译环境:
yum -y install pcre-devel zlib-devel openssl-devel gcc gcc-c++ make
2.到官网下载并解压:
官网网址:nginx: download
下载完成后解压:tar zxvf nginx-1.20.2.tar.gz -C /opt/
3.安装:
首先进入nginx的解压目录,然后执行指令:
./configure && make && make install
(默认的安装路径是/usr/local/nginx)
4.启动nginx:
/usr/local/nginx/sbin/nginx
通过netstat -anp | grep 80可以检查nginx是否正常启动;
如下所示则正常启动:
![]()
使用指令:/usr/local/nginx/sbin/nginx -s stop 可以关闭nginx服务器;
5.配置静态资源访问路径:
vim /usr/local/nginx/conf/nginx.conf
添加以下内容:
location ~ .*\.(gif|jpg|jpeg|png|bmp|swf|css)$ {
root /usr/local/nginx/html/images;
expires 10d;
}
如下:
含义及对于图片等静态资源的访问都会转到/usr/local/nginx/html/images路径下,因此我们的用户头像资源也需要上传到该路径下
6.效果演示
用户处于登录状态下,可以自动获取之前设置的头像和昵称,并进行填写,如下所示:


