macOS 搭建ESP8266编译环境
前言:在折腾完 Visual Studio Code 与 Win10 64bit Ubuntu bash 的ESP8266 编译开发环境搭建(无需编译toolchain)之后,又想在macOS下折腾一次,于是有了这篇博文。
系统版本:macOS Mojave
参考文章:
1. https://www.esp8266.com/wiki/doku.php?id=setup-osx-compiler-esp8266
2. https://github.com/pfalcon/esp-open-sdk
3. 在Mac OS上设置ESP 8266开发环境
4. ESP8266 MAC(OSX)开发环境搭建
5. Visual Studio Code 与 Win10 64bit Ubuntu bash 的ESP8266 编译开发环境搭建(无需编译toolchain)
我搜到的关于macOS建立开发环境的网文,都已经过时了。
第一,他们提到的 brew tap Homebrew/dupes已经不能用了(因为2018年3月已经合并到 Homebrew/core里面了)。
第二,他们都要求在mac系统上建立一个大小写敏感的镜像重新编译toolchain,太麻烦了。
第三,这些文章都是基于ESP8266 open SDK的,而我目前不在esp open sdk上编译,只需要编译基于non_os SDK的项目。
所以在上一篇博文中我有提到一个参考文章: 快速建立esp8266-linux開發環境 ,里面提到其实各平台的toolchain可以从ESP8266 Core for Arduino提供的package_esp8266com_index.json 文档里面解析出来,里面包含了 win 32/64bit, linux 32/64bit, osx 32/64bit的编译好的toolchain。
toolchain可以在官方github页面下载(注意根据SDK版本选择下载4.8.5或者5.2.0版本的):
下载页面链接
1. 安装Homebrew
如果没有先安装Homebrew
/usr/bin/ruby -e "$(curl -fsSL https://raw.githubusercontent.com/Homebrew/install/master/install)"
2. 安装依赖包
brew install binutils coreutils automake autoconf wget gawk libtool help2man gperf gnu-sed --with-default-names grep
3. 下载toolchain
sudo mkdir /opt/espressif
sudo chmod 777 /opt/espressif
cd /opt/espressif
wget https://dl.espressif.com/dl/xtensa-lx106-elf-osx-1.22.0-88-gde0bdc1-4.8.5.tar.gz
tar xvf xtensa-lx106-elf-osx-1.22.0-88-gde0bdc1-4.8.5.tar.gz
以下内容为旧版:
建立文件夹并授予权限,下载toolchain, 然后解压
sudo mkdir /opt/espressif
sudo chmod 777 /opt/espressif
cd /opt/espressif
wget https://github.com/esp8266/Arduino/releases/download/2.3.0/osx-xtensa-lx106-elf-gb404fb9-2.tar.gz
tar xvf osx-xtensa-lx106-elf-gb404fb9-2.tar.gz
下载库补丁至/opt/espressif/xtensa-lx106-elf/xtensa-lx106-elf/lib,先切换目录,注意是xtensa-lx106-elf下面的xtensa-lx106-elf同名子目录:
cd /opt/espressif/xtensa-lx106-elf/xtensa-lx106-elf
wget -O lib/libc.a https://github.com/esp8266/esp8266-wiki/raw/master/libs/libc.a
wget -O lib/libhal.a https://github.com/esp8266/esp8266-wiki/raw/master/libs/libhal.a
wget -O include.tgz https://github.com/esp8266/esp8266-wiki/raw/master/include.tgz
tar xvf include.tgz
4. 编辑shell profile
编辑~/.zshrc(因为我用oh-my-zsh),如果你用的是默认bash,那么需要编辑 ~/.bashrc,添加两行
export PATH=/usr/local/opt/gnu-sed/libexec/gnubin:$PATH
export PATH=/opt/espressif/xtensa-lx106-elf/bin:$PATH
5. source profile使其生效
source ~/.zshrc
或者
source ~/.bashrc
6. 确认路径已经存在于$PATH中
然后 echo $PATH确认两个路径已经存在于$PATH中
echo $PATH
7. 查看toolchain版本
/opt/espressif/xtensa-lx106-elf/xtensa-lx106-elf >cd ~
➜ /Users/simonliu >xtensa-lx106-elf-gcc -v
看到如下信息即可
Using built-in specs.
COLLECT_GCC=xtensa-lx106-elf-gcc
COLLECT_LTO_WRAPPER=/opt/espressif/xtensa-lx106-elf/bin/../libexec/gcc/xtensa-lx106-elf/4.8.2/lto-wrapper
Target: xtensa-lx106-elf
Configured with: /Users/igrokhotkov/e/ESPTools/crosstool-NG/.build/src/gcc-4.8.2/configure --build=x86_64-build_apple-darwin14.1.0 --host=x86_64-build_apple-darwin14.1.0 --target=xtensa-lx106-elf --prefix=/Users/igrokhotkov/e/ESPTools/crosstool-NG/builds/xtensa-lx106-elf --with-local-prefix=/Users/igrokhotkov/e/ESPTools/crosstool-NG/builds/xtensa-lx106-elf/xtensa-lx106-elf/sysroot --disable-libmudflap --with-sysroot=/Users/igrokhotkov/e/ESPTools/crosstool-NG/builds/xtensa-lx106-elf/xtensa-lx106-elf/sysroot --with-newlib --enable-threads=no --disable-shared --with-pkgversion='crosstool-NG 1.20.0' --disable-__cxa_atexit --with-gmp=/Users/igrokhotkov/e/ESPTools/crosstool-NG/.build/xtensa-lx106-elf/buildtools --with-mpfr=/Users/igrokhotkov/e/ESPTools/crosstool-NG/.build/xtensa-lx106-elf/buildtools --with-mpc=/Users/igrokhotkov/e/ESPTools/crosstool-NG/.build/xtensa-lx106-elf/buildtools --with-isl=/Users/igrokhotkov/e/ESPTools/crosstool-NG/.build/xtensa-lx106-elf/buildtools --with-cloog=/Users/igrokhotkov/e/ESPTools/crosstool-NG/.build/xtensa-lx106-elf/buildtools --with-libelf=/Users/igrokhotkov/e/ESPTools/crosstool-NG/.build/xtensa-lx106-elf/buildtools --enable-lto --enable-target-optspace --disable-libgomp --disable-libmudflap --disable-nls --disable-multilib --enable-languages=c,c++
Thread model: single
gcc version 4.8.2 (crosstool-NG 1.20.0)
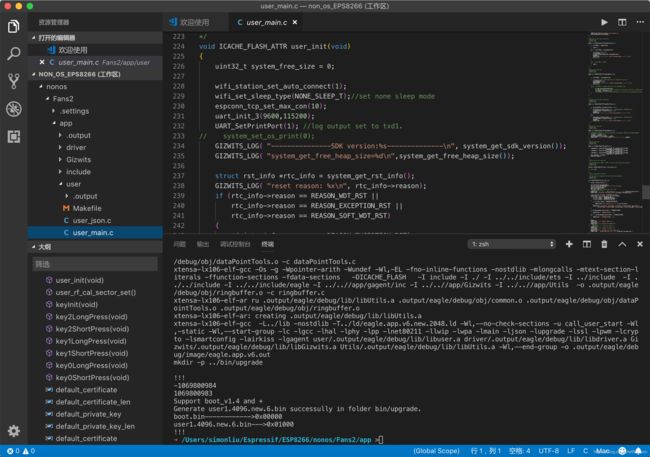
然后在Visual Studio Code导入工作区目录后,在终端窗口里面也可以编译了,我的MacBook Pro (Retina, 13-inch, Late 2013),make clean只需要1秒不到,编译只需要15秒不到,太爽了。

关于烧写
安装esptool和pyserial及其依赖包
pip install esptool
pip install pyserial
如果安装esptool遇到困难,可以尝试
python -m pip install esptool
如果遇到Cannot uninstall ‘pyserial’. It is a distutils installed project and thus we cannot accurately determine which files belong to it which would lead to only a partial uninstall.错误,那么可以使用
pip install --ignore-installed pyserial安装
烧写命令
首先查看一下usb转ttl设备的名称:
>ls /dev/tty.*
>/dev/tty.Bluetooth-Incoming-Port /dev/tty.wchusbserial1410
我的设备名称就是/dev/tty.wchusbserial1410
在app目录下运行如下命令即可烧写基于机智云SOC代码
esptool.py --port /dev/tty.wchusbserial1410 --baud 345600 write_flash -fm dio -fs 4MB-c1 -ff 40m 0x00000 ../bin/boot_v1.6.bin 0x3fc000 ../bin/esp_init_data_default.bin 0x3fe000 ../bin/blank.bin 0x01000 ../bin/upgrade/user1.4096.new.6.bin
所以我最后创建了一个alias,以后直接mkflash就好了
alias mkflash="make clean && ./gen_misc.sh && esptool.py --port /dev/tty.wchusbserial1410 --baud 345600 write_flash -fm dio -fs 4MB-c1 -ff 40m 0x00000 ../bin/boot_v1.6.bin 0x3fc000 ../bin/esp_init_data_default.bin 0x3fe000 ../bin/blank.bin 0x01000 ../bin/upgrade/user1.4096.new.6.bin"
最后我又对alias进行了一些修改:
mk="make clean && make COMPILE=gcc BOOT=new APP=1 SPI_SPEED=40 SPI_MODE=QIO SPI_SIZE_MAP=6"
mk2="make clean && make COMPILE=gcc BOOT=new APP=2 SPI_SPEED=40 SPI_MODE=QIO SPI_SIZE_MAP=6"
flash = ''esptool.py --port /dev/tty.wchusbserial1410 --baud 921600 write_flash -fm qio -fs 4MB-c1 -ff 40m 0x00000 ./bin/boot_v1.6.bin 0x3fc000 ./bin/esp_init_data_default.bin 0x3fe000 ./bin/blank.bin 0x01000 ./bin/upgrade/user1.4096.new.6.bin"
mkflash="mk && flash"