opengauss 在一个机器上搭建主备集群
项目上需要高斯主备集群,试了好几个版本。最后搭建出一个在一个机器上的主备。用做测试,记录一下。
下载安装包
-
从openGauss开源社区下载对应平台的安装包。
a. 通过软件包 | openGauss登录openGauss开源社区,选择3.1.0版本对应平台极简版安装包。

b. 单击“下载”。
2.检查安装包。
解压安装包,检查安装目录及文件是否齐全。在安装包所在目录执行以下命令,并将软件包重命名去掉后面的bz2后缀(不然解压不了)
tar -xvf openGauss-x.x.x-openEuler-64bit.tar查看解压的结果
输入:ls -lb

结果:
total 90296
drwx------ 3 root root     4096 Mar 31 21:18 bin
drwx------ 3 root root     4096 Mar 31 21:18 etc
drwx------ 3 root root     4096 Mar 31 21:18 include
drwx------ 4 root root     4096 Mar 31 21:18 jre
drwx------ 5 root root     4096 Mar 31 21:18 lib
-rw------- 1 root root 92427499 Apr  1 09:43 openGauss-x.x.x-openEuler-64bit.tar.bz2
drwx------ 5 root root     4096 Mar 31 21:18 share
drwx------ 2 root root     4096 Mar 31 21:18 simpleInstall
-rw------- 1 root root       32 Mar 31 21:18 version.cfg
安装高斯需要的软件环境要求(大部分centos7.8都可以满足)

环境变量配置
目前仅支持在防火墙关闭的状态下进行安装。
-
修改/etc/selinux/config文件中的“SELINUX”值为“disabled”。
a. 使用VIM打开config文件。
vim /etc/selinux/configb. 修改“SELINUX”的值“disabled”,执行**:wq**保存并退出修改。
SELINUX=disabled -
重新启动操作系统。
reboot -
检查防火墙是否关闭。
systemctl status firewalld若防火墙状态显示为active (running),则表示防火墙未关闭,请执行4;
若防火墙状态显示为inactive (dead),则无需再关闭防火墙。
-
关闭防火墙。
systemctl disable firewalld.service
systemctl stop firewalld.service
设置字符集参数
将各数据库节点的字符集设置为相同的字符集,可以在/etc/profile文件中添加“export LANG=XXX”(XXX为Unicode编码)。
vim /etc/profile(可选)关闭swap交换内存
关闭swap交换内存是为了保障数据库的访问性能,避免把数据库的缓冲区内存淘汰到磁盘上。 如果服务器内存比较小,内存过载时,可打开swap交换内存保障正常运行。
在各数据库节点上,使用swapoff -a命令将交换内存关闭。
swapoff -a
关闭RemoveIPC
在各数据库节点上,关闭RemoveIPC。CentOS操作系统默认为关闭,可以跳过该步骤。
-
修改/etc/systemd/logind.conf文件中的“RemoveIPC”值为“no”。
a. 使用VIM打开logind.conf文件。
vim /etc/systemd/logind.confb. 修改“RemoveIPC”值为“no”。
RemoveIPC=no -
修改/usr/lib/systemd/system/systemd-logind.service文件中的“RemoveIPC”值为“no”。
a. 使用VIM打开systemd-logind.service文件。
vim /usr/lib/systemd/system/systemd-logind.serviceb. 修改“RemoveIPC”值为“no”。
RemoveIPC=no -
重新加载配置参数。
systemctl daemon-reload systemctl restart systemd-logind -
检查修改是否生效。
loginctl show-session | grep RemoveIPC
systemctl show systemd-logind | grep RemoveIPC
创建用户与组(重要,后续安装和查询都要用这个用户)
1.创建组
groupadd dbGroup
2.创建用户(gauss)并指定组
useradd -m -g dbGroup omm
节点安装
执行命令切换到刚才创建的omm用户
su - omm-
假定解压包的路径为/opt/software/openGauss,进入解压后目录下的simpleInstall。
cd /opt/software/openGauss/simpleInstall -
执行install.sh脚本安装openGauss。
sh install.sh -w xxxx --multinode
![]()
说明:
- -w:初始化数据库密码(gs_initdb指定),安全需要必须设置。
- -p:指定的openGauss主节点端口号,默认5432。备节点端口号会使用主端口号+200,默认5632。
- –multinode:用来区分是单节点还是一主一备安装。
- -h|–help:打印使用说明。
- 安装后,数据库的主节点名称为nodename1,备节点名称为nodename2。
- 安装后,数据库主节点目录安装路径/opt/software/openGauss/data/master,备节点目录安装路径为/opt/software/openGauss/data/slave,其中/opt/software/openGauss为解压包路径,data/master(slave)为新创建的数据库节点目录。
安装执行完成后,使用ps和gs_ctl查看进程是否正常。
ps ux | grep gaussdb
gs_ctl query -D /opt/software/openGauss/data/master
执行ps命令,显示类似如下信息:
omm  4879 11.8 1.1 2082452 373832 pts/0  Sl   14:26   8:29 /opt/software/openGauss/bin/gaussdb -D /opt/software/openGauss/data/master -M primary

omm  5083  1.1  0.9 1819988 327200 pts/0  Sl   14:26   0:49 /opt/software/openGauss/bin/gaussdb -D /opt/software/openGauss/data/slave -M standby

omm      20377  0.0  0.0 119880  1216 pts/0    S+   15:37   0:00 grep --color=auto gaussdb
执行gs_ctl命令,显示类似如下信息:
gs_ctl query ,datadir is /opt/software/openGauss/data/master
HA state:
    local_role                     : Primary
    static_connections             : 1
    db_state                       : Normal
    detail_information             : Normal

Senders info:
    sender_pid                     : 5165
    local_role                     : Primary
    peer_role                      : Standby
    peer_state                     : Normal
    state                          : Streaming
    sender_sent_location           : 0/4005148
    sender_write_location          : 0/4005148
    sender_flush_location          : 0/4005148
    sender_replay_location         : 0/4005148
    receiver_received_location     : 0/4005148
    receiver_write_location        : 0/4005148
    receiver_flush_location        : 0/4005148
    receiver_replay_location       : 0/4005148
    sync_percent                   : 100%
    sync_state                     : Sync
    sync_priority                  : 1
    sync_most_available            : Off
    channel                        : 10.244.44.52:27001-->10.244.44.52:35912

 Receiver info:
No information
修改IP绑定和权限,链接navicat
进入主库配置文件修改IP验证
vim /opt/software/openGauss/data/master/pg_hba.conf修改验证权限,添加下面这行
host all all 0.0.0.0/0 sha256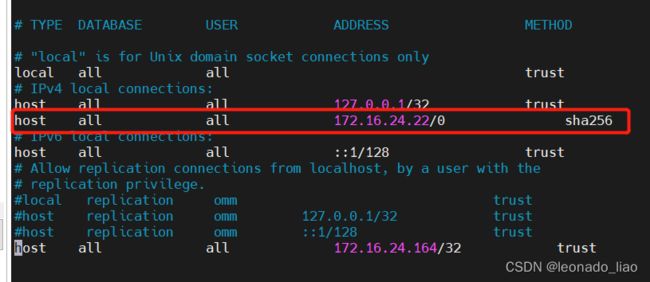
vim /opt/software/openGauss/data/master/postgresql.conf修改ip绑定和验证方式
搜索 #listen_addresses 将注释删除,并将单引号中的值改为 * ,
搜索 max_connections(最大连接数) 将值修改为1200,如图:

搜索password_encryption_type(密码存储类型) 将值修改为 1,如图:

进入bin目录重启服务器主库
gs_ctl restart -D /opt/software/openGauss/data/master -M primary重启成功后提示

执行命令进入主库
gsql -d postgres -p 5432输入\du查询用户
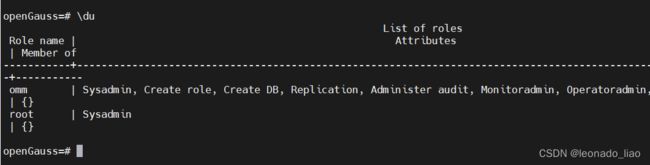
执行命令新增用户
CREATE user root WITH SYSADMIN password "1qaz@WSX";新增成功之后输入\q退出主库。
使用navicat尝试链接
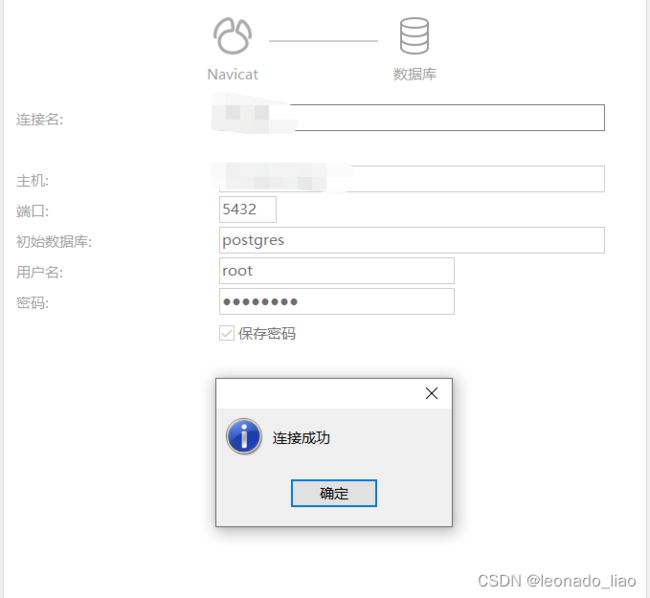
链接成功
主从同步验证
用navicat新建一个模式,在模式中新建一个表。建表结束之后进入从库验证。
cd /opt/software/openGauss/bin
#进入从库,端口5632
gsql -d postgres -p 5632
#切换数据库到同步过来的新库
\c lztest
输入\dn查看同步过来的模式

运行sql查询任意一个数据表:
格式: select * from 模式名.表名


主从库数据相同。验证完毕
至此,opengauss主从的下载、搭建、访问、验证执行完毕 。