【Ceph】Ceph集群应用详解
Ceph集群应用详解
- 1. 资源池Pool管理
-
- 1.1 查看Pool集群信息
- 1.2 删除Pool资源池
- 2. OSD故障模拟与恢复
接上文基于ceph-deploy部署Ceph集群详解
1. 资源池Pool管理
Pool是Ceph中存储Object对象抽象概念。我们可以将其理解为Ceph存储上划分的逻辑分区,Pool由多个PG组成;而PG通过CRUSH算法映射到不同的OSD上;同时Pool可以设置副本size大小,默认副本数量为3。
Ceph客户端向monitor请求集群的状态,并向Pool中写入数据,数据根据PGs的数量,通过CRUSH算法将其映射到不同的OSD节点上,实现数据的存储。 这里我们可以把Pool理解为存储Object数据的逻辑单元;当然,当前集群没有资源池,因此需要进行定义。
创建一个Pool资源池,其名字为mypool,PGs数量设置为64,设置PGs的同时还需要设置PGP(通常PGs和PGP的值是相同的):
PG (Placement Group),pg 是一个虚拟的概念,用于存放object,PGP(Placement Group for Placement purpose),相当于是pg存放的一种osd排列组合.
cd /etc/ceph
ceph osd pool create mypool 64 64
1.1 查看Pool集群信息
ceph osd pool ls
rados lspools
ceph osd lspools
查看资源池副本的数量
ceph osd pool get mypool size
查看PG和PGP数量
ceph osd pool get mypool pg_num
ceph osd pool get mypool pgp_num
修改pg_num和pgp_num的数量为128
ceph osd pool set mypool pg_num 128
ceph osd pool set mypool pgp_num 128

ceph osd pool get mypool pg_num
ceph osd pool get mypool pgp_num
修改Pool副本数量为2
ceph osd pool set mypool size 2

ceph osd pool get mypool size
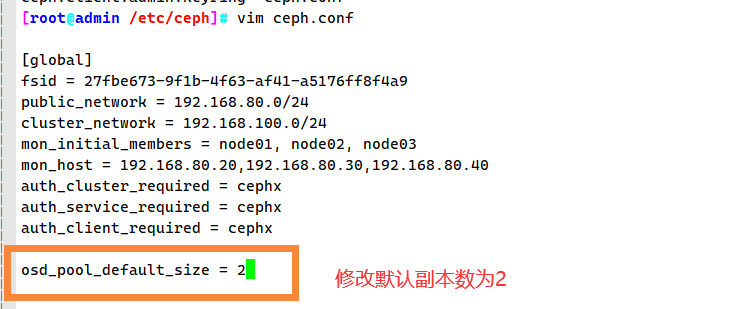
修改默认副本数为 2
vim /etc/ceph/ceph.conf
......
osd_pool_default_size = 2

ceph-deploy --overwrite-conf config push node01 node02 node03
1.2 删除Pool资源池
(1)删除存储池命令存在数据丢失的风险,Ceph默认禁止此类操作,需要管理员先在ceph.conf配置文件中开启支持删除存储池的操作
vim ceph.conf
......
[mon]
mon allow pool delete = true
(2)推送ceph.conf配置文件给所有mon节点
ceph-deploy --overwrite-conf config push node01 node02 node03
(3)所有mon节点重启ceph-mon服务
systemctl restart ceph-mon.target
(4)执行删除Pool命令
ceph osd pool rm mypool mypool --yes-i-really-really-mean-it     #mypool是集群中已有的资源池名称
ceph osd pool ls
2. OSD故障模拟与恢复
(1)模拟OSD故障
如果ceph集群有上千个osd,每天坏2~3个太正常了,我们可以模拟down掉一个osd。
###如果osd守护进程正常运行,down的osd会很快自恢复正常,所以需要先关闭守护进程
ssh root@node01 systemctl stop ceph-osd@0

#down掉osd
ceph osd down 0
ceph osd tree
(2)将坏掉的osd踢出集群
方法一:
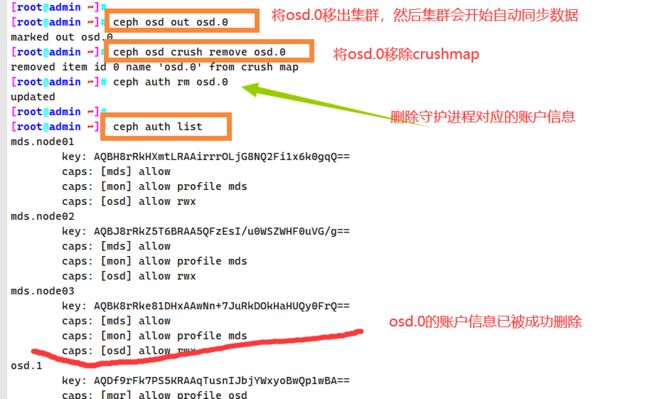
#将 osd.0 移出集群,集群会开始自动同步数据
ceph osd out osd.0

#将 osd.0 移除 crushmap
ceph osd crush remove osd.0

#删除守护进程对应的账户信息
ceph auth rm osd.0
ceph auth list

#删掉 osd.0
ceph osd rm osd.0

ceph osd stat
ceph -s
方法二:
ceph osd out osd.2

#使用综合步骤,删除配置文件中针对坏掉的 osd 的配置
ceph osd purge osd.2 --yes-i-really-mean-it
(3)把原来坏掉的osd修复后重新加入集群
#在osd节点中创建osd,无需指定名,会按序号自动生成
cd /etc/ceph
ceph osd create
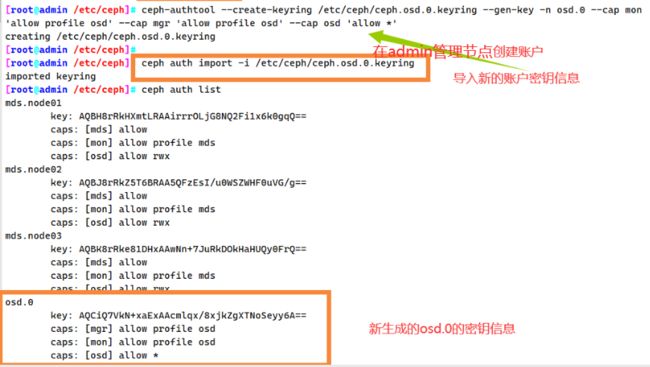
创建账户
ceph-authtool --create-keyring /etc/ceph/ceph.osd.0.keyring --gen-key -n osd.0 --cap mon 'allow profile osd' --cap mgr 'allow profile osd' --cap osd 'allow *'
导入新的账户秘钥信息
ceph auth import -i /etc/ceph/ceph.osd.0.keyring
ceph auth list
在osd节点中,更新osd文件夹中对应的密钥环文件
ceph auth get-or-create osd.0 -o /var/lib/ceph/osd/ceph-0/keyring
![]()
在admin管理节点中,加入crushmap
ceph osd crush add osd.0 1.000 host=node01 #1.000 代表权重
在admin管理节点中,将新修复的osd节点加入集群
ceph osd in osd.0
ceph osd tree
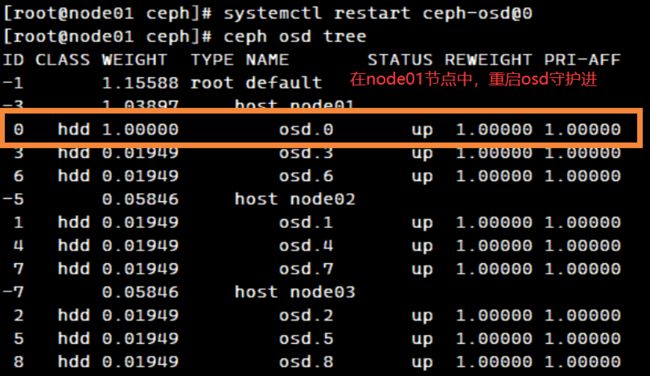
在osd节点中重启osd守护进程
systemctl restart ceph-osd@0
ceph osd tree		#稍等片刻后osd状态为up
如果重启失败
报错如下:
Job for [email protected] failed because start of the service was attempted too often. See "systemctl  status [email protected]" and "journalctl -xe" for details.
To force a start use "systemctl reset-failed [email protected]" followed by "systemctl start [email protected]" again.
在osd节点中运行以下命令,重启osd守护进程
systemctl reset-failed [email protected] && systemctl restart [email protected]


