怎么在Windows WSL上利用GPU运行tensorflow 2.12
背景
1. 在window上安装WSL
2. 再WSL上安装miniconda。
3. 创建conda环境
4. 设置GPU
5. 安装tensorflow 2.12
6. 在Pycharm里运行你的GPU Tensorflow 2.12代码
背景
从tensorflow 2.10开始,已经没有tensorflow-gpu相应的版本在Window GPU运行了,只能通过在window上安装WSL2,在wsl2里运行tensorflow的方式调用GPU.当然你也可以回退到老的tensorflow-gpu的版本,不过你如果要用新的tensorflow只能通过WSL2。本文是给你展示怎么在window上调用GPU来运行tensorflow2.12。
如果tensorflow的版本是2.10之前的,可以参考博客.
1. 在window上安装WSL
开发人员可以在 Windows 计算机上同时访问 Windows 和 Linux 的强大功能。 Windows Subsystem for Linux (WSL) 允许开发人员安装 Linux 发行版(例如 Ubuntu、OpenSUSE、Kali、Debian、Arch Linux 等)并直接在 Windows 上使用 Linux 应用程序、实用程序和 Bash 命令行工具,无需修改,无需任何修改。 传统虚拟机或双引导设置的开销。
前提条件
您必须运行 Windows 10 版本 2004 及更高版本(Build 19041 及更高版本)或 Windows 11 才能使用这些命令
安装 WSL 命令
现在,您可以使用单个命令安装运行 WSL 所需的所有内容。 右键单击并选择“以管理员身份运行”,以管理员模式打开 PowerShell 或 Windows 命令提示符,输入 wsl --install 命令,然后重新启动计算机。
wsl --install
如果不能执行可以用wsl.exe --install
好了,重启完我们继续。
提示:上述命令默认安装ubuntu,不想用的可以按照下面图片里的进行更改
如果有下面问题,可以进入BIOS, 改一下就可以了。

之后运行下面命令

完了之后你在菜单栏里就会发现Ubuntu。点击打开。

创建用户名和密码

参考资料: https://learn.microsoft.com/en-us/windows/wsl/install
2. 再WSL上安装miniconda。
curl https://repo.anaconda.com/miniconda/Miniconda3-latest-Linux-x86_64.sh -o Miniconda3-latest-Linux-x86_64.sh
bash Miniconda3-latest-Linux-x86_64.sh
3. 创建conda环境
创建一个虚拟环境,我的名字是tf2.12
conda create --name tf2.12 python=3.9 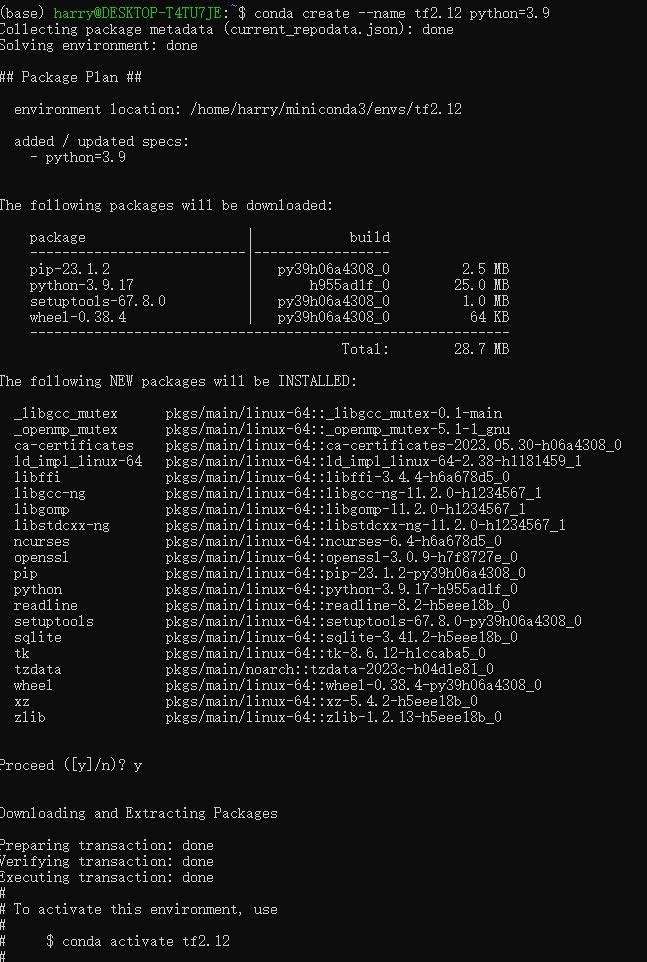
执行 conda activate tf2.12 进入虚拟环境。
4. 设置GPU
安装nvidia gpu driver
运行下面命令验证你有没有装nvidia gpu driver, 如果没有,你可以download并安装。https://www.nvidia.com/download/index.aspx?lang=en-us
-
nvidia-smi
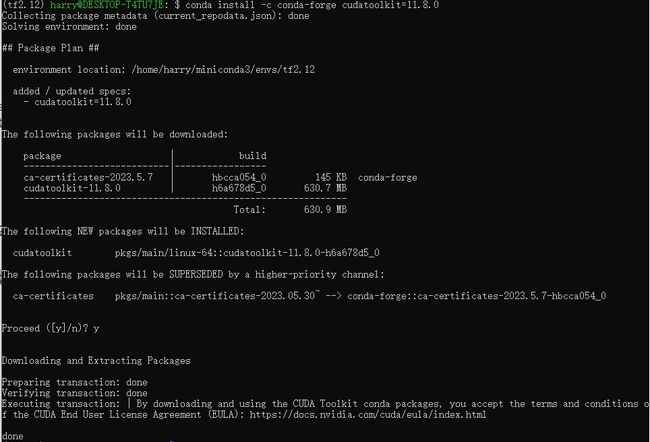
安装cuda toolkit
conda install -c conda-forge cudatoolkit=11.8.0
安装cuDNN cull
pip install nvidia-cudnn-cu11==8.6.0.163如果比较慢,可以用下面命令
pip install nvidia-cudnn-cu11==8.6.0.163 -i https://pypi.tuna.tsinghua.edu.cn/simple

配置系统路径。 激活 conda 环境后,每次启动新终端时,都可以使用以下命令来执行此操作。
CUDNN_PATH=$(dirname $(python -c "import nvidia.cudnn;print(nvidia.cudnn.__file__)"))
export LD_LIBRARY_PATH=$CONDA_PREFIX/lib/:$CUDNN_PATH/lib:$LD_LIBRARY_PATH
5. 安装tensorflow 2.12
安装tensorflow 2.12版本
pip install tensorflow==2.12执行下面代码验证tesnroflow可以跑在GPU上。
python3 -c "import tensorflow as tf; print(tf.config.list_physical_devices('GPU'))"如果返回 GPU 设备列表,则表明您已成功安装 TensorFlow。
如果你想要运行window目录下的某个python文件,可以在目录的地址前加/mnt/
例如你要的目录地址是/c/apps/PycharmProjects/
你可以运行下面命令到你这个目录
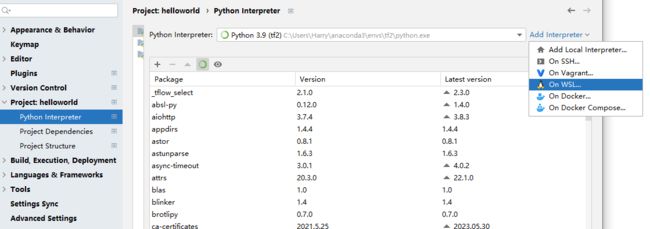
cd /mnt/c/apps/PycharmProjects/6. 在Pycharm里运行你的GPU Tensorflow 2.12代码
Pycharm加一下新的nterceptor, 找On WSL。
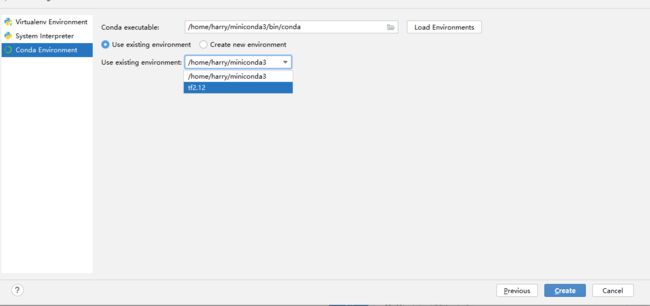
点击Next

选你之前创建的虚拟环境,我的是tf2.12。点击Create
然后运行的测试代码。
import tensorflow as tf
print("Num GPUs Available: ", len(tf.config.list_physical_devices('GPU')))
运行结果
2023-07-18 21:57:44.195176: I tensorflow/compiler/xla/stream_executor/cuda/cuda_gpu_executor.cc:982] could not open file to read NUMA node: /sys/bus/pci/devices/0000:2d:00.0/numa_node
Your kernel may have been built without NUMA support.
2023-07-18 21:57:44.195233: I tensorflow/compiler/xla/stream_executor/cuda/cuda_gpu_executor.cc:982] could not open file to read NUMA node: /sys/bus/pci/devices/0000:2d:00.0/numa_node
Your kernel may have been built without NUMA support.
Num GPUs Available:  1
参考资料:https://www.tensorflow.org/install/pip